Manual
Page 7
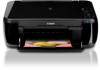
... Cartridge status. (5) Paper button Selects the page size and media type. (6) SCAN button Starts scanning the original to "Troubleshooting" in the on the computer. (7) Stop/Reset button Cancels operations. You can also press this button to finalize your selection for the setting item. Main Components Page 7 of 759 pages (1) ON button...
... Cartridge status. (5) Paper button Selects the page size and media type. (6) SCAN button Starts scanning the original to "Troubleshooting" in the on the computer. (7) Stop/Reset button Cancels operations. You can also press this button to finalize your selection for the setting item. Main Components Page 7 of 759 pages (1) ON button...
Manual
Page 10
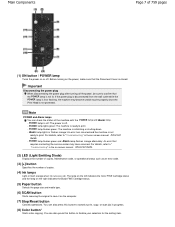
... the on the LED to "Paper Is Smudged/Printed Surface Is Scratched" in the on the LED, and then press the Black or Color button. Resets wireless LAN settings to align the Print Head automatically. e.g. Scans the print head alignment sheet to the defaults. Aligning the Print Head Aligning the Print...
... the on the LED to "Paper Is Smudged/Printed Surface Is Scratched" in the on the LED, and then press the Black or Color button. Resets wireless LAN settings to align the Print Head automatically. e.g. Scans the print head alignment sheet to the defaults. Aligning the Print Head Aligning the Print...
Manual
Page 15
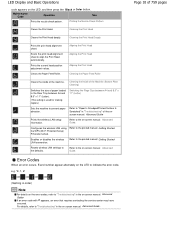
...in the Rear Tray between A4 and 8.5" x 11" (Letter) regardless of copies to be made. Release the button. Note To cancel copying, press the Stop/Reset button. Switching the Page Size between A4 and 8.5" x 11" (Letter) . In this case, the original is in (3) of sheets to copy. (2) ... page size. The LED flashes once. * When you can select the following page sizes and media types. - The machine starts copying. Press the Stop/Reset button to "1". To set the print quality to 19 copies The paper-out error will occur ("E, 0, 2" will appear on the photo paper. A4 or...
...in the Rear Tray between A4 and 8.5" x 11" (Letter) regardless of copies to be made. Release the button. Note To cancel copying, press the Stop/Reset button. Switching the Page Size between A4 and 8.5" x 11" (Letter) . In this case, the original is in (3) of sheets to copy. (2) ... page size. The LED flashes once. * When you can select the following page sizes and media types. - The machine starts copying. Press the Stop/Reset button to "1". To set the print quality to 19 copies The paper-out error will occur ("E, 0, 2" will appear on the photo paper. A4 or...
Manual
Page 18
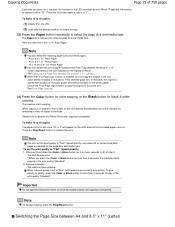
..., you can copy the original in the same size. Page top Remove the photo on the photo paper. Note To cancel copying, press the Stop/Reset button. In this case, the original is copied with borders on the plain paper and without borders on the Platen Glass after copying is completed...
..., you can copy the original in the same size. Page top Remove the photo on the photo paper. Note To cancel copying, press the Stop/Reset button. In this case, the original is copied with borders on the plain paper and without borders on the Platen Glass after copying is completed...
Manual
Page 19
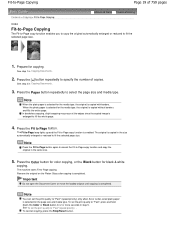
... to "Fast" (speed priority) only when A4 or Letter-sized plain paper is enlarged to fill the whole page. 4. To cancel copying, press the Stop/Reset button. Fit-to-Page Copying Page 19 of copies. See step 1 in the same size. 5. Press the Paper button repeatedly to Page button. Press the...
... to "Fast" (speed priority) only when A4 or Letter-sized plain paper is enlarged to fill the whole page. 4. To cancel copying, press the Stop/Reset button. Fit-to-Page Copying Page 19 of copies. See step 1 in the same size. 5. Press the Paper button repeatedly to Page button. Press the...
Manual
Page 27
Page top Here we select Borderless (full). The preview will appear in progress, press the Stop/Reset button on the machine or click Cancel Printing on the taskbar. For details on the operation, refer to print. Select a layout and start printing. (1) Select ...the layout of the required print result. In Windows Vista or Windows XP, click Canon XXX Printer (where " XXX" is your machine's name) on -screen manual: Advanced Guide . (2) Click Print. Note To cancel a print job in the selected layout for...
Page top Here we select Borderless (full). The preview will appear in progress, press the Stop/Reset button on the machine or click Cancel Printing on the taskbar. For details on the operation, refer to print. Select a layout and start printing. (1) Select ...the layout of the required print result. In Windows Vista or Windows XP, click Canon XXX Printer (where " XXX" is your machine's name) on -screen manual: Advanced Guide . (2) Click Print. Note To cancel a print job in the selected layout for...
Manual
Page 31
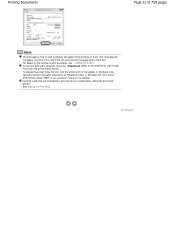
check box. Page top For details on them. This message will appear when printing on the settings to as "Windows Vista") or Windows XP, click Canon XXX Printer (where " XXX" is your machine's name) on the taskbar. Printing Documents Page 31 of 759 pages Note The message on how to load .... If printed ruled lines are misaligned or print results are unsatisfactory, adjust the print head position. To cancel a print job in progress, press the Stop/Reset button on the machine or click Cancel Printing on the printer status monitor. See Aligning the Print Head .
check box. Page top For details on them. This message will appear when printing on the settings to as "Windows Vista") or Windows XP, click Canon XXX Printer (where " XXX" is your machine's name) on the taskbar. Printing Documents Page 31 of 759 pages Note The message on how to load .... If printed ruled lines are misaligned or print results are unsatisfactory, adjust the print head position. To cancel a print job in progress, press the Stop/Reset button on the machine or click Cancel Printing on the printer status monitor. See Aligning the Print Head .
Manual
Page 61
... adjusting the print head position is completed. If adjusting the print head position has failed, the error code will be adjusted automatically. Press the Stop/Reset button to release the error, then refer to the copy standby mode. To print and check the current head position adjustment values, display L on the...
... adjusting the print head position is completed. If adjusting the print head position has failed, the error code will be adjusted automatically. Press the Stop/Reset button to release the error, then refer to the copy standby mode. To print and check the current head position adjustment values, display L on the...
Manual
Page 69
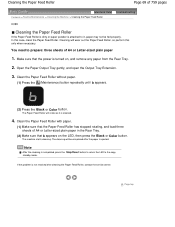
..., and load three sheets of A4 or Letter-sized plain paper in the Rear Tray. (2) Make sure that the power is completed, press the Stop/Reset button to return the LED to the copy standby mode. Page top Cleaning the Paper Feed Roller Page 69 of 759 pages Advanced Guide Troubleshooting...
..., and load three sheets of A4 or Letter-sized plain paper in the Rear Tray. (2) Make sure that the power is completed, press the Stop/Reset button to return the LED to the copy standby mode. Page top Cleaning the Paper Feed Roller Page 69 of 759 pages Advanced Guide Troubleshooting...
Manual
Page 76
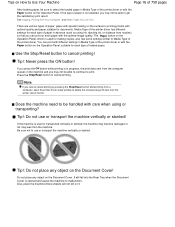
...with the Paper button on the Document Cover! Note If you may not be able to get the satisfactory print result. Press the Stop/Reset button to cancel printing! Do not place any object on the Operation Panel. See Copying, Printing from the printer status monitor. Does the... when the Document Cover is not selected, you cannot cancel printing by pressing the Stop/Reset button while printing from a computer, open the printer driver setup window to malfunction. Use the Stop/Reset button to cancel printing. If the machine is used or transported vertically or slanted, the...
...with the Paper button on the Document Cover! Note If you may not be able to get the satisfactory print result. Press the Stop/Reset button to cancel printing! Do not place any object on the Operation Panel. See Copying, Printing from the printer status monitor. Does the... when the Document Cover is not selected, you cannot cancel printing by pressing the Stop/Reset button while printing from a computer, open the printer driver setup window to malfunction. Use the Stop/Reset button to cancel printing. If the machine is used or transported vertically or slanted, the...
Manual
Page 158
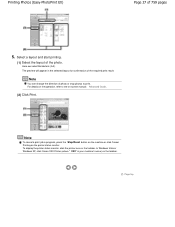
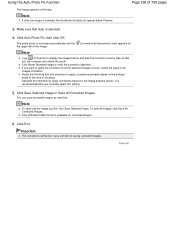
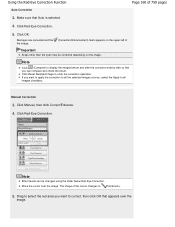
.... 6. Important The corrections will be lost if you can save all the selected images at the time of 759 pages 3. Page 158 of shooting. Click Reset Selected Image to all images checkbox. Using the Auto Photo Fix Function The image appears in Preview. You can compare and check the result. If...
.... 6. Important The corrections will be lost if you can save all the selected images at the time of 759 pages 3. Page 158 of shooting. Click Reset Selected Image to all images checkbox. Using the Auto Photo Fix Function The image appears in Preview. You can compare and check the result. If...
Manual
Page 160
... than the eyes may be changed using the slider below Red-Eye Correction. The shape of 759 pages Auto Correction 3. Click Red-Eye Correction. 5. Click Reset Selected Image to all images checkbox. If you want to apply the correction to all the selected images at once, select the Apply to undo...
... than the eyes may be changed using the slider below Red-Eye Correction. The shape of 759 pages Auto Correction 3. Click Red-Eye Correction. 5. Click Reset Selected Image to all images checkbox. If you want to apply the correction to all the selected images at once, select the Apply to undo...

Manual
Page 166
... is sharpened and the image. (Correction/Enhancement) mark appears on the upper left of 759 pages 5. Click Manual, then click Correct/Enhance. 4. Click OK. Click Reset Selected Image to display the images before and after the correction side by side so that appears over the image. Move the cursor over the...
... is sharpened and the image. (Correction/Enhancement) mark appears on the upper left of 759 pages 5. Click Manual, then click Correct/Enhance. 4. Click OK. Click Reset Selected Image to display the images before and after the correction side by side so that appears over the image. Move the cursor over the...

Manual
Page 169
Click Digital Face Smoothing. Click OK. Click Reset Selected Image to enhance, then click OK that you can be changed using the slider below Digital Face Smoothing. Manual Enhancement 3. Drag to select the ...
Click Digital Face Smoothing. Click OK. Click Reset Selected Image to enhance, then click OK that you can be changed using the slider below Digital Face Smoothing. Manual Enhancement 3. Drag to select the ...

Manual
Page 174
... Images. Click Exit. Adjusting Images Contrast Sharpness Blur Show-through Removal Page 174 of the Correct/Enhance Images window for adjusted images. 6. Click Defaults to reset all images, click Save All Corrected Images. You can compare and check the result. Only JPEG/Exif data format is available for details. Page top...
... Images. Click Exit. Adjusting Images Contrast Sharpness Blur Show-through Removal Page 174 of the Correct/Enhance Images window for adjusted images. 6. Click Defaults to reset all images, click Save All Corrected Images. You can compare and check the result. Only JPEG/Exif data format is available for details. Page top...

Manual
Page 177
.../Enhance to increase the contrast of the subjects to the selected image or all corrections and enhancements applied to close the Correct/Enhance Images window. Reset Selected Image Cancels all images. Exit Click to the selected image. Contrast Adjusts the contrast of 759 pages Brightness Adjusts the overall image brightness.
.../Enhance to increase the contrast of the subjects to the selected image or all corrections and enhancements applied to close the Correct/Enhance Images window. Reset Selected Image Cancels all images. Exit Click to the selected image. Contrast Adjusts the contrast of 759 pages Brightness Adjusts the overall image brightness.

Manual
Page 178
.... Tone Adjust the brightness balance by adjusting only one color pair. Colorcast is recommended that you can reproduce the natural colors of the image. Defaults Resets all three color pairs so that the portion turns white. Move the slider to the right to the weather or ambient strong colors. Advanced Opens...
.... Tone Adjust the brightness balance by adjusting only one color pair. Colorcast is recommended that you can reproduce the natural colors of the image. Defaults Resets all three color pairs so that the portion turns white. Move the slider to the right to the weather or ambient strong colors. Advanced Opens...

Manual
Page 179
Reset Selected Image Cancels all the corrected/enhanced/adjusted images displayed in and around the selected area. Correct/Enhance Page 179 of the Preferences dialog box ... level using the slider. Save All Corrected Images Saves all corrections, enhancements and adjustments applied to brighten the facial area in the thumbnail list. Defaults Resets each adjustment (brightness, contrast, sharpness, blur, and show-through removal). Note For Photo Print, red eyes are adjusted in and around the selected area. Face...
Reset Selected Image Cancels all the corrected/enhanced/adjusted images displayed in and around the selected area. Correct/Enhance Page 179 of the Preferences dialog box ... level using the slider. Save All Corrected Images Saves all corrections, enhancements and adjustments applied to brighten the facial area in the thumbnail list. Defaults Resets each adjustment (brightness, contrast, sharpness, blur, and show-through removal). Note For Photo Print, red eyes are adjusted in and around the selected area. Face...

Manual
Page 180
... image. (Full Screen) Displays the entire image in the thumbnail list. Page top Undo Cancels the latest correction/enhancement. Exit Click to the specified area. Reset Selected Image Cancels all the corrected/enhanced/adjusted images displayed in Preview. (Compare) Displays the Compare Images window. The image before and after the correction...
... image. (Full Screen) Displays the entire image in the thumbnail list. Page top Undo Cancels the latest correction/enhancement. Exit Click to the specified area. Reset Selected Image Cancels all the corrected/enhanced/adjusted images displayed in Preview. (Compare) Displays the Compare Images window. The image before and after the correction...
Manual
Page 187
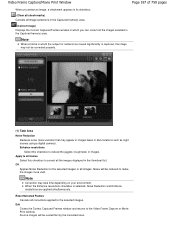
... applied simultaneously. OK Applies Noise Reduction to the selected images or all corrections applied to correct all the images displayed in the Captured frame(s) area. Reset Selected Frames Cancels all images. Apply to all frames Select this checkbox to reduce the jaggies (roughness) in dark locations such as night scenes using...
... applied simultaneously. OK Applies Noise Reduction to the selected images or all corrections applied to correct all the images displayed in the Captured frame(s) area. Reset Selected Frames Cancels all images. Apply to all frames Select this checkbox to reduce the jaggies (roughness) in dark locations such as night scenes using...


