
MP150 Easy Setup Instructions
Page 2
... is located inside the machine. (See "3 Install the FINE Cartridge." Disconnect the USB cable. 3. Click [Cancel]. Click US only • When the Registration window appears, follow the on-screen instructions to Mac OS 9 or Mac OS X Classic environments since they are included on the Setup CD-ROM: On-screen...], then double-click the CD-ROM icon. To resolve this sheet) * When connecting from the [Go] menu. 2. If the printer is displayed in Windows XP or Windows 2000, you must log on as the default printer. 3 Click [Exit]. • If prompted to restart your computer, and start...
... is located inside the machine. (See "3 Install the FINE Cartridge." Disconnect the USB cable. 3. Click [Cancel]. Click US only • When the Registration window appears, follow the on-screen instructions to Mac OS 9 or Mac OS X Classic environments since they are included on the Setup CD-ROM: On-screen...], then double-click the CD-ROM icon. To resolve this sheet) * When connecting from the [Go] menu. 2. If the printer is displayed in Windows XP or Windows 2000, you must log on as the default printer. 3 Click [Exit]. • If prompted to restart your computer, and start...
MP170 User's Guide
Page 3
...; guidelines for enhancing the communication between digital cameras and printers. Copyright ©2005 CANON INC. This machine supports Exif 2.21 (also called "Exif Print"). Trademark Notices • Windows is a registered trademark of Microsoft Corporation in the United States and other countries. ...to be an easy-to-use guide to change without expressed written permission from Canon Inc. 1 All rights reserved. Specifications are subject to your Canon MP170/MP150 Series. Disclaimer Canon Inc. has reviewed this publication may be , representation or warranties concerning the ...
...; guidelines for enhancing the communication between digital cameras and printers. Copyright ©2005 CANON INC. This machine supports Exif 2.21 (also called "Exif Print"). Trademark Notices • Windows is a registered trademark of Microsoft Corporation in the United States and other countries. ...to be an easy-to-use guide to change without expressed written permission from Canon Inc. 1 All rights reserved. Specifications are subject to your Canon MP170/MP150 Series. Disclaimer Canon Inc. has reviewed this publication may be , representation or warranties concerning the ...
MP170 User's Guide
Page 4
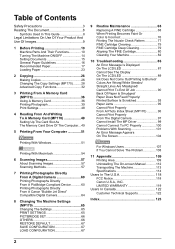
... From And Writing To A Memory Card (MP170 49 Setting Up The Card Slot As The Memory Card Drive Of The Computer...49 5 Printing From Your Computer 51 Printing With Windows 51 Printing With Macintosh 54 6 Scanning Images... 57 About Scanning Images 57 Scanning Methods 57 7 Printing Photographs Directly From A Digital Camera 60 Printing Photographs Directly From A PictBridge-Compliant Device ...........60 Printing Photographs Directly From A Canon "Bubble Jet Direct" Compatible Digital Camera 64 8 Changing The Machine Settings (MP170...
... From And Writing To A Memory Card (MP170 49 Setting Up The Card Slot As The Memory Card Drive Of The Computer...49 5 Printing From Your Computer 51 Printing With Windows 51 Printing With Macintosh 54 6 Scanning Images... 57 About Scanning Images 57 Scanning Methods 57 7 Printing Photographs Directly From A Digital Camera 60 Printing Photographs Directly From A PictBridge-Compliant Device ...........60 Printing Photographs Directly From A Canon "Bubble Jet Direct" Compatible Digital Camera 64 8 Changing The Machine Settings (MP170...

MP170 User's Guide
Page 10
...connected to the machine. Warning Caution Important Note Indicates a warning concerning operations that may lead to death or injury to a Windows system. Read this guide. The following symbols are used in this when the machine is highly recommended. Indicates operational warnings and... restrictions. Indicates the description of MP170. In order to use the machine safely, always pay attention to indicate important instructions. Reading these is connected to persons if...
...connected to the machine. Warning Caution Important Note Indicates a warning concerning operations that may lead to death or injury to a Windows system. Read this guide. The following symbols are used in this when the machine is highly recommended. Indicates operational warnings and... restrictions. Indicates the description of MP170. In order to use the machine safely, always pay attention to indicate important instructions. Reading these is connected to persons if...

MP170 User's Guide
Page 20
You can only be able to load other envelopes, but Canon cannot guarantee consistent performance. Legal-size paper can use regular copier paper, cotton bond paper, or typical letterhead. Envelopes made with windows, holes, perforations, cutouts, double flaps, pressure seals, and peel-off sealing strips. Sealed envelopes. Remove each paper applicable to this...
You can only be able to load other envelopes, but Canon cannot guarantee consistent performance. Legal-size paper can use regular copier paper, cotton bond paper, or typical letterhead. Envelopes made with windows, holes, perforations, cutouts, double flaps, pressure seals, and peel-off sealing strips. Sealed envelopes. Remove each paper applicable to this...

MP170 User's Guide
Page 51
...] to select ON or OFF, then press [OK]. The write protection is enabled. z Windows 2000: Turning OFF the machine causes the [Unsafe Removal of the computer. Chapter 4 Reading From And Writing To A Memory Card (MP170) 49 Inserting a memory card into standby or sleep mode while a memory card is being displayed.... „ Enabling Writing Of Data To Memory Cards 1 Press [MEMORY CARD]. Chapter 4 Reading From And Writing To A Memory Card (MP170) Setting Up The Card Slot As The Memory Card Drive Of The Computer Connecting the machine to a computer results in the memory card drive...
...] to select ON or OFF, then press [OK]. The write protection is enabled. z Windows 2000: Turning OFF the machine causes the [Unsafe Removal of the computer. Chapter 4 Reading From And Writing To A Memory Card (MP170) 49 Inserting a memory card into standby or sleep mode while a memory card is being displayed.... „ Enabling Writing Of Data To Memory Cards 1 Press [MEMORY CARD]. Chapter 4 Reading From And Writing To A Memory Card (MP170) Setting Up The Card Slot As The Memory Card Drive Of The Computer Connecting the machine to a computer results in the memory card drive...

MP170 User's Guide
Page 52
... the write protect setting while a card is not applied unless you plug the USB cable back in. 50 Reading From And Writing To A Memory Card (MP170) Chapter 4 The new setting is inserted in the Card Slot, unplug the USB cable before changing the setting, then plug it back in afterwards. z... when the machine is enabled, a delayed write error might occur and data could be corrupted when attempting to copy data to a memory card. Important z Windows 2000, when the write protection is enabled on the machine: If the computer does not detect that the write protection is in Memory Card mode.
... the write protect setting while a card is not applied unless you plug the USB cable back in. 50 Reading From And Writing To A Memory Card (MP170) Chapter 4 The new setting is inserted in the Card Slot, unplug the USB cable before changing the setting, then plug it back in afterwards. z... when the machine is enabled, a delayed write error might occur and data could be corrupted when attempting to copy data to a memory card. Important z Windows 2000, when the write protection is enabled on the machine: If the computer does not detect that the write protection is in Memory Card mode.

MP170 User's Guide
Page 53
For details, refer to the documentation for printing in Windows XP Service Pack 2 (hereafter, called Windows XP SP2). 1 Press [ON/OFF] to print. 4 Open the printer properties dialog box. (1) Select [Print] from the application software's [File] menu. The ... Click [Preferences] or [Properties] (2). Note If another name of machine is selected, click the name of the [Preferences] screen is selected (1). Printing With Windows Note z Menu and command names may differ between software applications, and more steps may be required. The [Main] tab of machine to print documents as...
For details, refer to the documentation for printing in Windows XP Service Pack 2 (hereafter, called Windows XP SP2). 1 Press [ON/OFF] to print. 4 Open the printer properties dialog box. (1) Select [Print] from the application software's [File] menu. The ... Click [Preferences] or [Properties] (2). Note If another name of machine is selected, click the name of the [Preferences] screen is selected (1). Printing With Windows Note z Menu and command names may differ between software applications, and more steps may be required. The [Main] tab of machine to print documents as...
MP170 User's Guide
Page 59
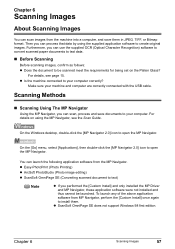
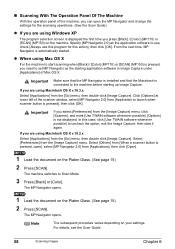
...to create original images. You can process that data by using the MP Navigator, see page 15. z ScanSoft OmniPage SE does not support Windows 98 first edition. For details on the Platen Glass? Chapter 6 Scanning Images 57 Then you can use the supplied OCR (Optical Character ...Scanning Before scanning images, confirm as follows: z Does the document to open the MP Navigator. For details, see the Scan Guide. On the Windows desktop, double-click the [MP Navigator 2.0] icon to your machine and computer are correctly connected with the USB cable. Chapter 6 Scanning Images About ...
...to create original images. You can process that data by using the MP Navigator, see page 15. z ScanSoft OmniPage SE does not support Windows 98 first edition. For details on the Platen Glass? Chapter 6 Scanning Images 57 Then you can use the supplied OCR (Optical Character ...Scanning Before scanning images, confirm as follows: z Does the document to open the MP Navigator. For details, see the Scan Guide. On the Windows desktop, double-click the [MP Navigator 2.0] icon to your machine and computer are correctly connected with the USB cable. Chapter 6 Scanning Images About ...
MP170 User's Guide
Page 60
...for this case, click [Use TWAIN software whenever possible] to launch when scanner button is automatically started. Important If you are using Windows XP The program selection screen is pressed, you need to set MP Navigator as the application software to use, check [Always use ...2.0] from [Application to uncheck the option, exit the Image Capture, then start scanning when [Black] / [Color] (MP170) or [SCAN] (MP150) is displayed the first time you press [Black] / [Color] (MP170) or [SCAN] (MP150) on the machine. In this action], then click [OK]. The machine switches to the...
...for this case, click [Use TWAIN software whenever possible] to launch when scanner button is automatically started. Important If you are using Windows XP The program selection screen is pressed, you need to set MP Navigator as the application software to use, check [Always use ...2.0] from [Application to uncheck the option, exit the Image Capture, then start scanning when [Black] / [Color] (MP170) or [SCAN] (MP150) is displayed the first time you press [Black] / [Color] (MP170) or [SCAN] (MP150) on the machine. In this action], then click [OK]. The machine switches to the...
MP170 User's Guide
Page 61
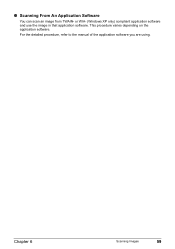
For the detailed procedure, refer to the manual of the application software you are using. or WIA- (Windows XP only) compliant application software and use the image in that application software. This procedure varies depending on the application software. Chapter 6 Scanning Images 59 „ Scanning From An Application Software You can scan an image from TWAIN-
For the detailed procedure, refer to the manual of the application software you are using. or WIA- (Windows XP only) compliant application software and use the image in that application software. This procedure varies depending on the application software. Chapter 6 Scanning Images 59 „ Scanning From An Application Software You can scan an image from TWAIN-

MP170 User's Guide
Page 78
.... 76 Routine Maintenance Chapter 9 Note Before Performing Maintenance Remove the FINE Cartridge once, then reinsert it into place. Follow the procedures below to [High] for Windows, or [Fine] for a Macintosh, may improve the print quality.
.... 76 Routine Maintenance Chapter 9 Note Before Performing Maintenance Remove the FINE Cartridge once, then reinsert it into place. Follow the procedures below to [High] for Windows, or [Fine] for a Macintosh, may improve the print quality.
MP170 User's Guide
Page 88
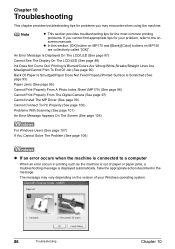
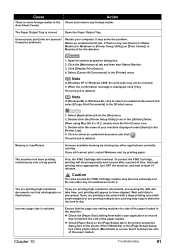
...printing such as the machine is displayed automatically. Chapter 10 Troubleshooting This chapter provides troubleshooting tips for your Windows operating system. 86 Troubleshooting Chapter 10 z In this section, [OK] button on MP170 and [Black]/[Color] buttons on the version of paper or paper jams, a troubleshooting message is ...To PC Properly (See page 100) Problems With Scanning (See page 101) An Error Message Appears On The Screen (See page 104) For Windows Users (See page 107) If You Cannot Solve The Problem (See page 108) z If an error occurs when the machine is connected to...
...printing such as the machine is displayed automatically. Chapter 10 Troubleshooting This chapter provides troubleshooting tips for your Windows operating system. 86 Troubleshooting Chapter 10 z In this section, [OK] button on MP170 and [Black]/[Color] buttons on the version of paper or paper jams, a troubleshooting message is ...To PC Properly (See page 100) Problems With Scanning (See page 101) An Error Message Appears On The Screen (See page 104) For Windows Users (See page 107) If You Cannot Solve The Problem (See page 108) z If an error occurs when the machine is connected to...
MP170 User's Guide
Page 92
... facing up . The machine may be damaged if printing is uneven. Print the nozzle check pattern to the [Fine] end. Be sure to [High] in Windows, or [Fine] in Macintosh. 1. Drag the [Print Quality] slide bar to check for uneven ink output. See "Replacing A FINE Cartridge" on page 68. See "Printing...
... facing up . The machine may be damaged if printing is uneven. Print the nozzle check pattern to the [Fine] end. Be sure to [High] in Windows, or [Fine] in Macintosh. 1. Drag the [Print Quality] slide bar to check for uneven ink output. See "Replacing A FINE Cartridge" on page 68. See "Printing...
MP170 User's Guide
Page 93
...high-resolution documents, processing the data will take time, and printing will appear to ensure that it . Chapter 10 Troubleshooting 91 Use [Canon IJ Status Monitor] in Windows or [Printer Setup Utility] (or [Print Center]) in the Auto Sheet Feeder. Click [Display Print Queue]. 4. To protect the ...that it matches the size of your machine displayed under any . Delete an undesired print job, if there is deleted. Note In Windows XP or Windows 2000, the print jobs may solve the problem. Incorrect page size is displayed, click [Yes]. Open the Paper Output Tray. It ...
...high-resolution documents, processing the data will take time, and printing will appear to ensure that it . Chapter 10 Troubleshooting 91 Use [Canon IJ Status Monitor] in Windows or [Printer Setup Utility] (or [Print Center]) in the Auto Sheet Feeder. Click [Display Print Queue]. 4. To protect the ...that it matches the size of your machine displayed under any . Delete an undesired print job, if there is deleted. Note In Windows XP or Windows 2000, the print jobs may solve the problem. Incorrect page size is displayed, click [Yes]. Open the Paper Output Tray. It ...
MP170 User's Guide
Page 94
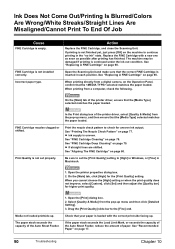
...disk does not have enough You may need to be degraded. The quality (image quality) displayed Set the image quality suitable for the document. (MP170) See "Adjusting Image Quality" on Image quality may be face down . should be poor if you copy a printed document or photograph. the... Platen Glass was printed from Instead, reprint the photograph directly from your machine. Check the size of the Document Cover. For Windows XP and Windows 2000, if the size of the data is too large. Open the printer properties dialog box. 2. The document or photograph set ,...
...disk does not have enough You may need to be degraded. The quality (image quality) displayed Set the image quality suitable for the document. (MP170) See "Adjusting Image Quality" on Image quality may be face down . should be poor if you copy a printed document or photograph. the... Platen Glass was printed from Instead, reprint the photograph directly from your machine. Check the size of the Document Cover. For Windows XP and Windows 2000, if the size of the data is too large. Open the printer properties dialog box. 2. The document or photograph set ,...
MP170 User's Guide
Page 101
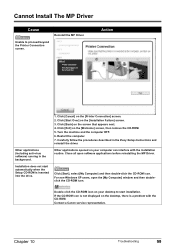
...Setup Instructions and reinstall the driver. Click [Start Over] on the [Welcome] screen, then remove the CD-ROM. 5. For non-Windows XP users, open software applications before reinstalling the MP Driver. If the CD-ROM icon is not displayed on your computer can interfere ... installation routine. Installation does not start installation. Turn the machine and the computer OFF. 6. Contact a Canon service representative. Restart the computer. 7. Close all open the [My Computer] window and then doubleclick the CD-ROM icon. Double-click the CD-ROM icon on the desktop, there is...
...Setup Instructions and reinstall the driver. Click [Start Over] on the [Welcome] screen, then remove the CD-ROM. 5. For non-Windows XP users, open software applications before reinstalling the MP Driver. If the CD-ROM icon is not displayed on your computer can interfere ... installation routine. Installation does not start installation. Turn the machine and the computer OFF. 6. Contact a Canon service representative. Restart the computer. 7. Close all open the [My Computer] window and then doubleclick the CD-ROM icon. Double-click the CD-ROM icon on the desktop, there is...
MP170 User's Guide
Page 102
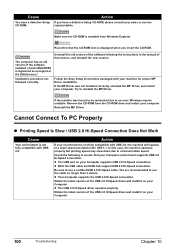
... from the CD-ROM drive and restart your Computer supports USB 2.0 Hi-Speed connection. Obtain the latest version of the software installed. (Canon MultiPASS is registered as a program in the manual of the USB 2.0 Hi-Speed driver and install it on your Computer. 100 Troubleshooting ...Chapter 10 z Your Computer supports the USB 2.0 Hi-Speed connection. Reconfirm that your sales or service representative. Remove the CD-ROM from Windows Explorer. Make sure the CD-ROM is displayed when you have a defective Setup CD-ROM. The computer has an old version of the ...
... from the CD-ROM drive and restart your Computer supports USB 2.0 Hi-Speed connection. Obtain the latest version of the software installed. (Canon MultiPASS is registered as a program in the manual of the USB 2.0 Hi-Speed driver and install it on your Computer. 100 Troubleshooting ...Chapter 10 z Your Computer supports the USB 2.0 Hi-Speed connection. Reconfirm that your sales or service representative. Remove the CD-ROM from Windows Explorer. Make sure the CD-ROM is displayed when you have a defective Setup CD-ROM. The computer has an old version of the ...
MP170 User's Guide
Page 103
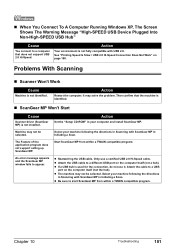
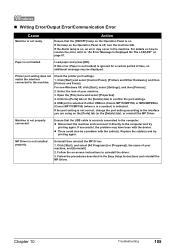
...not use a certified USB 2.0 Hi-Speed cable. Action Set the "Setup CD-ROM" in Initiating a Scan. An error message appears and the ScanGear MP window fails to appear. z Reattaching the USB cable. z If a USB hub is not identified. It may not be selected. Only use it. z The machine...of the application program does not support calling up ScanGear MP. Machine may not be selected. „ When You Connect To A Computer Running Windows XP, The Screen Shows The Warning Message "High-SPEED USB Device Plugged Into Non-High-SPEED USB Hub" Cause You connect to a computer ...
...not use a certified USB 2.0 Hi-Speed cable. Action Set the "Setup CD-ROM" in Initiating a Scan. An error message appears and the ScanGear MP window fails to appear. z Reattaching the USB cable. z If a USB hub is not identified. It may not be selected. Only use it. z The machine...of the application program does not support calling up ScanGear MP. Machine may not be selected. „ When You Connect To A Computer Running Windows XP, The Screen Shows The Warning Message "High-SPEED USB Device Plugged Into Non-High-SPEED USB Hub" Cause You connect to a computer ...
MP170 User's Guide
Page 107
..., turn the machine ON. Load paper and press [OK]. For non-Windows XP, click [Start], select [Settings], and then [Printers]. 2. Click the [Ports] tab (or the [Details] tab) to the machine. A USB port is selected if either USBnnn (Canon MP170/MP150) or MPUSBPRNnn (Canon MP170/MP150) (where n is a number) is not properly connected. Machine is...
..., turn the machine ON. Load paper and press [OK]. For non-Windows XP, click [Start], select [Settings], and then [Printers]. 2. Click the [Ports] tab (or the [Details] tab) to the machine. A USB port is selected if either USBnnn (Canon MP170/MP150) or MPUSBPRNnn (Canon MP170/MP150) (where n is a number) is not properly connected. Machine is...


