User's Guide
Page 13
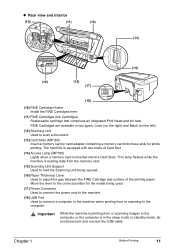
... equipped with two kinds of the printing paper. FINE Cartridges are available in the sleep mode or standby mode, do not disconnect and connect the USB cable. Move the lever to the correct position for the media being opened. (16) Paper Thickness Lever Used to the computer, or the computer is ... (15) Scanning Unit Support Used to hold the Scanning Unit being used. (17) Power Connector Used to connect the power cord to the machine. (18) USB Port Used to connect a computer to the machine when printing from or scanning images to adjust the gap between the FINE Cartridge and surface of...
... equipped with two kinds of the printing paper. FINE Cartridges are available in the sleep mode or standby mode, do not disconnect and connect the USB cable. Move the lever to the correct position for the media being opened. (16) Paper Thickness Lever Used to the computer, or the computer is ... (15) Scanning Unit Support Used to hold the Scanning Unit being used. (17) Power Connector Used to connect the power cord to the machine. (18) USB Port Used to connect a computer to the machine when printing from or scanning images to adjust the gap between the FINE Cartridge and surface of...
User's Guide
Page 52
... memory card. Note To change the write protect setting while a card is not applied unless you plug the USB cable back in afterwards. The new setting is inserted in the Card Slot, unplug the USB cable before changing the setting, then plug it back in . 50 Reading From And Writing To A Memory Card (MP180...
... memory card. Note To change the write protect setting while a card is not applied unless you plug the USB cable back in afterwards. The new setting is inserted in the Card Slot, unplug the USB cable before changing the setting, then plug it back in . 50 Reading From And Writing To A Memory Card (MP180...
User's Guide
Page 59
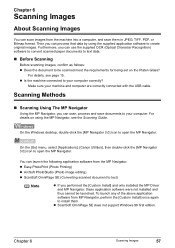
For details, see the Scanning Guide. On the [Go] menu, select [Applications], [Canon Utilities], then double-click the [MP Navigator 3.0] icon to be launched. Furthermore, you can scan, process and save them . Make sure your computer...machine into a computer, and save documents to your computer correctly? z Is the machine connected to your machine and computer are correctly connected with the USB cable. You can launch the following application software from the MP Navigator. Chapter 6 Scanning Images 57 On the Windows desktop, double-click the [MP Navigator...
For details, see the Scanning Guide. On the [Go] menu, select [Applications], [Canon Utilities], then double-click the [MP Navigator 3.0] icon to be launched. Furthermore, you can scan, process and save them . Make sure your computer...machine into a computer, and save documents to your computer correctly? z Is the machine connected to your machine and computer are correctly connected with the USB cable. You can launch the following application software from the MP Navigator. Chapter 6 Scanning Images 57 On the Windows desktop, double-click the [MP Navigator...
User's Guide
Page 62
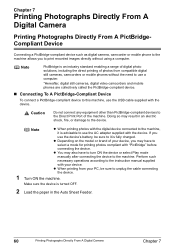
... the PictBridge-compliant device. „ Connecting To A PictBridge-Compliant Device To connect a PictBridge-compliant device to this machine, use the USB cable supplied with the device. Note PictBridge is an industry standard enabling a range of digital photo solutions, including the direct printing of the machine... Direct Print Port of photos from your device. Caution Do not connect any equipment other than PictBridge-compliant devices to unplug the cable connecting the device. 1 Turn ON the machine. Make sure the device is fully charged. z You may result in the Auto...
... the PictBridge-compliant device. „ Connecting To A PictBridge-Compliant Device To connect a PictBridge-compliant device to this machine, use the USB cable supplied with the device. Note PictBridge is an industry standard enabling a range of digital photo solutions, including the direct printing of the machine... Direct Print Port of photos from your device. Caution Do not connect any equipment other than PictBridge-compliant devices to unplug the cable connecting the device. 1 Turn ON the machine. Make sure the device is fully charged. z You may result in the Auto...
User's Guide
Page 63
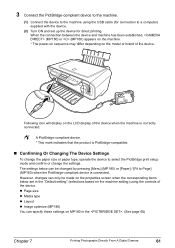
... LCD display of the device. However, changes can only be changed by pressing [Menu] (MP180) or [Paper] / [Fit to Page] (MP160) when the PictBridge-compliant device is PictBridge-compatible. „ Confirming Or Changing The Device Settings To change the paper size or paper type, operate...61 When the connection between the device and machine has been established, (MP180) or (MP160) appears on the machine. * The power-on sequence may differ depending on the machine setting) using the USB cable (for connection to select the PictBridge print setup mode and confirm or change the settings....
... LCD display of the device. However, changes can only be changed by pressing [Menu] (MP180) or [Paper] / [Fit to Page] (MP160) when the PictBridge-compliant device is PictBridge-compatible. „ Confirming Or Changing The Device Settings To change the paper size or paper type, operate...61 When the connection between the device and machine has been established, (MP180) or (MP160) appears on the machine. * The power-on sequence may differ depending on the machine setting) using the USB cable (for connection to select the PictBridge print setup mode and confirm or change the settings....
User's Guide
Page 65
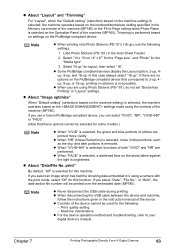
...16-up , printing on stickers is selected on the Operation Panel of the machine (MP160). z About "Image optimize" When "Default setting" (selections based on the machine ...method and troubleshooting, refer to 2-up, 4up, 9-up, or 16-up ), use a Canon PictBridge-compliant device, you are printed more vividly. If there are performed. z When you can...based on settings on the PictBridge-compliant device. Note z Never disconnect the USB cable during printing. z When disconnecting the USB cable between the device and machine, follow the instructions given in the Auto Sheet...
...16-up , printing on stickers is selected on the Operation Panel of the machine (MP160). z About "Image optimize" When "Default setting" (selections based on the machine ...method and troubleshooting, refer to 2-up, 4up, 9-up, or 16-up ), use a Canon PictBridge-compliant device, you are printed more vividly. If there are performed. z When you can...based on settings on the PictBridge-compliant device. Note z Never disconnect the USB cable during printing. z When disconnecting the USB cable between the device and machine, follow the instructions given in the Auto Sheet...
User's Guide
Page 89
... ON. Note If the ON/OFF Lamp (green) and Alarm Lamp (orange) flash alternately, disconnect the USB cable from the machine, and then turn on the model or brand of MP160. E, 4 The ink may have occurred. If lines are not installed in the appropriate positions. Install the...machine from the power supply for cleaning is not satisfactory, carry out the FINE Cartridge Alignment. Press [Black] or [Color] to contact a Canon service representative as soon as possible. E, 3 If paper has jammed in the machine, clear the jam, reload the paper in progress and ...
... ON. Note If the ON/OFF Lamp (green) and Alarm Lamp (orange) flash alternately, disconnect the USB cable from the machine, and then turn on the model or brand of MP160. E, 4 The ink may have occurred. If lines are not installed in the appropriate positions. Install the...machine from the power supply for cleaning is not satisfactory, carry out the FINE Cartridge Alignment. Press [Black] or [Color] to contact a Canon service representative as soon as possible. E, 3 If paper has jammed in the machine, clear the jam, reload the paper in progress and ...
User's Guide
Page 101
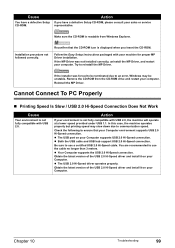
.... Action If your environment is displayed when you have a defective Setup CD-ROM. You are recommended to use the cable no longer than 3 meters. Be sure to use a certified USB 2.0 Hi-Speed cable. z The USB 2.0 Hi-Speed driver operates properly. Remove the CD-ROM from Windows Explorer. Action If you insert the CD-ROM... case, the machine operates properly but printing speed may slow down due to an error, Windows may be terminated due to communication speed. z Both the USB cable and USB hub support USB 2.0 Hi-Speed connection.
.... Action If your environment is displayed when you have a defective Setup CD-ROM. You are recommended to use the cable no longer than 3 meters. Be sure to use a certified USB 2.0 Hi-Speed cable. z The USB 2.0 Hi-Speed driver operates properly. Remove the CD-ROM from Windows Explorer. Action If you insert the CD-ROM... case, the machine operates properly but printing speed may slow down due to an error, Windows may be terminated due to communication speed. z Both the USB cable and USB hub support USB 2.0 Hi-Speed connection.
User's Guide
Page 102
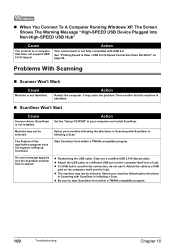
... to a different USB port on page 99. z Reattaching the USB cable. Select your computer and install ScanGear. „ When You Connect To A Computer Running Windows XP, The Screen Shows The Warning Message "High-SPEED USB Device Plugged Into Non-High-SPEED USB Hub" Cause You...ScanGear in Initiating a Scan. Only use it. Select your machine following the directions in Scanning with USB 2.0. Start ScanGear from within a TWAIN compatible program. Attach the cable to start ScanGear from within a TWAIN compatible program. 100 Troubleshooting Chapter 10 Problems With Scanning &#...
... to a different USB port on page 99. z Reattaching the USB cable. Select your computer and install ScanGear. „ When You Connect To A Computer Running Windows XP, The Screen Shows The Warning Message "High-SPEED USB Device Plugged Into Non-High-SPEED USB Hub" Cause You...ScanGear in Initiating a Scan. Only use it. Select your machine following the directions in Scanning with USB 2.0. Start ScanGear from within a TWAIN compatible program. Attach the cable to start ScanGear from within a TWAIN compatible program. 100 Troubleshooting Chapter 10 Problems With Scanning &#...
User's Guide
Page 106
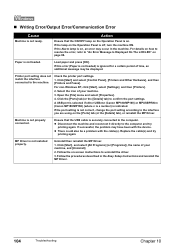
... or reinstall the MP Driver. z Disconnect the machine and reconnect it directly to the computer and try printing again. Replace the cable(s) and try printing again. Uninstall then reinstall the MP Driver. 1. If the Alarm lamp is not correct, change the port setting...Printers and Other Hardware], and then [Printers and Faxes]. Open the [File] menu and select [Properties]. 4. A USB port is selected if either USBnnn (Canon MP180/MP160) or MPUSBPRNnn (Canon MP180/MP160) (where n is a number) is not installed properly. „ Writing Error/Output Error/Communication Error Cause Machine is...
... or reinstall the MP Driver. z Disconnect the machine and reconnect it directly to the computer and try printing again. Replace the cable(s) and try printing again. Uninstall then reinstall the MP Driver. 1. If the Alarm lamp is not correct, change the port setting...Printers and Other Hardware], and then [Printers and Faxes]. Open the [File] menu and select [Properties]. 4. A USB port is selected if either USBnnn (Canon MP180/MP160) or MPUSBPRNnn (Canon MP180/MP160) (where n is a number) is not installed properly. „ Writing Error/Output Error/Communication Error Cause Machine is...
User's Guide
Page 107
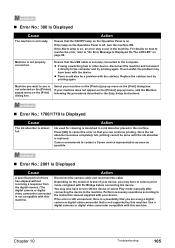
... the ON/OFF lamp on the Operation Panel is on the Operation Panel is almost full. Canon recommends to the instruction manual supplied with your device, you can continue printing. Replace the cable(s) and try printing again. Once the ink absorber becomes completely full, printing cannot be a ...connected. For details on how to resolve the error, refer to the computer. z If using a digital camera or digital video camcorder that the USB cable is replaced. z There could also be done until the ink absorber is securely connected to "An Error Message Is Displayed On The LCD/LED...
... the ON/OFF lamp on the Operation Panel is on the Operation Panel is almost full. Canon recommends to the instruction manual supplied with your device, you can continue printing. Replace the cable(s) and try printing again. Once the ink absorber becomes completely full, printing cannot be a ...connected. For details on how to resolve the error, refer to the computer. z If using a digital camera or digital video camcorder that the USB cable is replaced. z There could also be done until the ink absorber is securely connected to "An Error Message Is Displayed On The LCD/LED...
User's Guide
Page 114
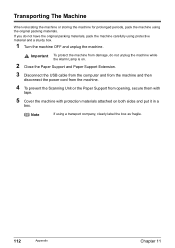
... packing materials. If you do not unplug the machine while the Alarm Lamp is on. 2 Close the Paper Support and Paper Support Extension. 3 Disconnect the USB cable from the computer and from the machine and then disconnect the power cord from the machine. 4 To prevent the Scanning Unit or the Paper Support...
... packing materials. If you do not unplug the machine while the Alarm Lamp is on. 2 Close the Paper Support and Paper Support Extension. 3 Disconnect the USB cable from the computer and from the machine and then disconnect the power cord from the machine. 4 To prevent the Scanning Unit or the Paper Support...

User's Guide
Page 117
...XP/Windows 2000/Windows Me/Windows 98: Approx. 550 MB z Canon IJ Status Monitor cannot be used at USB Full-Speed (USB 1.1). Any non-Microsoft USB 2.0 drivers are not guaranteed. *3 All operations are not supported: - z USB interface USB operation can only be guaranteed on the expansion board is not guaranteed....) * Since the USB 2.0 Hi-Speed interface is shared online. OS: Mac OS X v.10.2.8 or later An internal USB 2.0 Hi-Speed port and a USB cable that is fully upwardly compatible with Windows 98 or later and upgraded to -...
...XP/Windows 2000/Windows Me/Windows 98: Approx. 550 MB z Canon IJ Status Monitor cannot be used at USB Full-Speed (USB 1.1). Any non-Microsoft USB 2.0 drivers are not guaranteed. *3 All operations are not supported: - z USB interface USB operation can only be guaranteed on the expansion board is not guaranteed....) * Since the USB 2.0 Hi-Speed interface is shared online. OS: Mac OS X v.10.2.8 or later An internal USB 2.0 Hi-Speed port and a USB cable that is fully upwardly compatible with Windows 98 or later and upgraded to -...
Easy Setup Instructions
Page 1
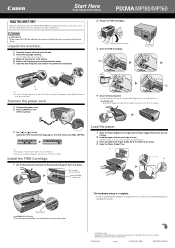
...the protective sheet. 5 Open the Scanning Unit and remove the protective material (A). 2 Prepare the FINE Cartridges. QT5-0542-V01 xxxxxxx © CANON INC. 2006 PRINTED IN VIETNAM C 4 Close the Scanning Unit. • Lift the Scanning Unit to put the Scanning Unit Support back to...the width of the packing box. 3 Place the machine on installing the software. To prepare your machine for purchasing the Canon PIXMA MP180/MP160. IMPORTANT Do not connect the USB cable until the preparatory operation is complete. B Do not touch! (A) • Be sure to the left. The cartridge ...
...the protective sheet. 5 Open the Scanning Unit and remove the protective material (A). 2 Prepare the FINE Cartridges. QT5-0542-V01 xxxxxxx © CANON INC. 2006 PRINTED IN VIETNAM C 4 Close the Scanning Unit. • Lift the Scanning Unit to put the Scanning Unit Support back to...the width of the packing box. 3 Place the machine on installing the software. To prepare your machine for purchasing the Canon PIXMA MP180/MP160. IMPORTANT Do not connect the USB cable until the preparatory operation is complete. B Do not touch! (A) • Be sure to the left. The cartridge ...
Easy Setup Instructions
Page 2
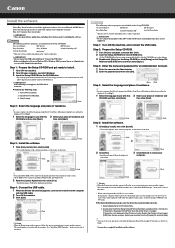
... depending on the country of purchase. Select [Applications] from the pop-up menu. IMPORTANT • Do not connect the USB cable until Step 4, "Connect the USB cable." • Before installing the software in Windows XP or Windows 2000, you would like to install. Step 3: Enter the...Click Step 5: Install the software. 1 Click [Easy Install], then click [Install]. • To read descriptions of the software. Step 4: Connect the USB cable. 1 When the [Printer Connection] appears, connect the machine to the computer with this 2 Select your machine from the [Product] list and click [...
... depending on the country of purchase. Select [Applications] from the pop-up menu. IMPORTANT • Do not connect the USB cable until Step 4, "Connect the USB cable." • Before installing the software in Windows XP or Windows 2000, you would like to install. Step 3: Enter the...Click Step 5: Install the software. 1 Click [Easy Install], then click [Install]. • To read descriptions of the software. Step 4: Connect the USB cable. 1 When the [Printer Connection] appears, connect the machine to the computer with this 2 Select your machine from the [Product] list and click [...


