
User Guide
Page 17
...files are available when ZoomBrowser EX is used . In addition, ZoomBrowser EX Ver.6.5 or later or ImageBrowser EX Ver.1.0 or later supplied with Canon digital cameras or digital camcorders are supported. File Formats Available for Printing • JPEG (.jpg, .jpeg) • TIFF (.tif, ....8226; TIFF (.tif, .tiff) • PNG (.png) • PDF (.pdf) Note The following TIFF file formats are supported. Uncompressed, black and white binary Uncompressed, RGB (8 bits per channel) Uncompressed, YCC (8 bits per component) Uncompressed, RGB (16 bits per channel) Uncompressed, YCC (16 bits per...
...files are available when ZoomBrowser EX is used . In addition, ZoomBrowser EX Ver.6.5 or later or ImageBrowser EX Ver.1.0 or later supplied with Canon digital cameras or digital camcorders are supported. File Formats Available for Printing • JPEG (.jpg, .jpeg) • TIFF (.tif, ....8226; TIFF (.tif, .tiff) • PNG (.png) • PDF (.pdf) Note The following TIFF file formats are supported. Uncompressed, black and white binary Uncompressed, RGB (8 bits per channel) Uncompressed, YCC (8 bits per component) Uncompressed, RGB (16 bits per channel) Uncompressed, YCC (16 bits per...

User Guide
Page 19
... Selecting files by registered event (Event view) Selecting files by clicking the thumbnails displayed in the screens. To select multiple files in white. You cannot select images in other applications are not supported. Capturing and Printing Still Images from Videos You can also select images downloaded...time. Note Click a date and select Select All from Photo Sharing Sites For videos, only MOV or MP4 format videos recorded with Canon digital cameras or digital camcorders appear. PDF files created or edited in different folders or views at the same time. Calendar View (...
... Selecting files by registered event (Event view) Selecting files by clicking the thumbnails displayed in the screens. To select multiple files in white. You cannot select images in other applications are not supported. Capturing and Printing Still Images from Videos You can also select images downloaded...time. Note Click a date and select Select All from Photo Sharing Sites For videos, only MOV or MP4 format videos recorded with Canon digital cameras or digital camcorders appear. PDF files created or edited in different folders or views at the same time. Calendar View (...

User Guide
Page 31
... Identified as those of unregistered people in the Unregistered People view. To register as the same person as a different person, click an area outside the white frame to the People view. To delete a registered person, right-click the person in the pull-down menu. People can also register by One Select...
... Identified as those of unregistered people in the Unregistered People view. To register as the same person as a different person, click an area outside the white frame to the People view. To delete a registered person, right-click the person in the pull-down menu. People can also register by One Select...

User Guide
Page 32
.... To register as a different person, click an area outside the white frame. A white frame to specify the area to register. 5. Click Register name below the white frame, then enter the name of the person you want to remove the white frame. 4. The area specified here appears as the registered person, ...select the name in the People view. Note Click (Close) to register. Click an area outside the white frame to complete the name entry. To register as the same person as the thumbnail in the pull-down menu. Note When a registered name...
.... To register as a different person, click an area outside the white frame. A white frame to specify the area to register. 5. Click Register name below the white frame, then enter the name of the person you want to remove the white frame. 4. The area specified here appears as the registered person, ...select the name in the People view. Note Click (Close) to register. Click an area outside the white frame to complete the name entry. To register as the same person as the thumbnail in the pull-down menu. Note When a registered name...
User Guide
Page 100
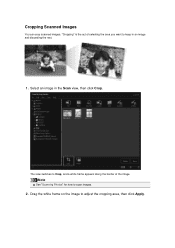
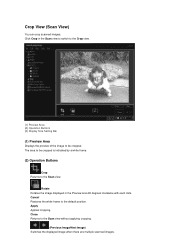
Drag the white frame on the image to Crop, and a white frame appears along the border of selecting the area you want to scan images. 2. The view switches to adjust the cropping area, then click Apply. "Cropping" is the act of the image. Note See "Scanning Photos" for how to keep in the Scan view, then click Crop. Select an image in an image and discarding the rest. 1. Cropping Scanned Images You can crop scanned images.
Drag the white frame on the image to Crop, and a white frame appears along the border of selecting the area you want to scan images. 2. The view switches to adjust the cropping area, then click Apply. "Cropping" is the act of the image. Note See "Scanning Photos" for how to keep in the Scan view, then click Crop. Select an image in an image and discarding the rest. 1. Cropping Scanned Images You can crop scanned images.
User Guide
Page 101
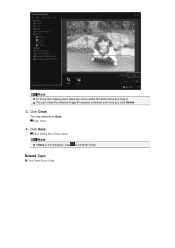
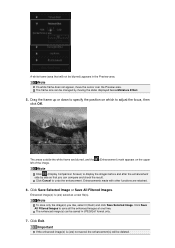
Click Save. Note To move the cropping area, place the cursor within the white frame and drag it. You can rotate the selected image 90 degrees clockwise each time you click Rotate. 3. Scan View 4. Save Dialog Box (Scan View) Note If Save is not displayed, click (Thumbnail View). Related Topic Crop View (Scan View) Click Close. The view switches to Scan.
Click Save. Note To move the cropping area, place the cursor within the white frame and drag it. You can rotate the selected image 90 degrees clockwise each time you click Rotate. 3. Scan View 4. Save Dialog Box (Scan View) Note If Save is not displayed, click (Thumbnail View). Related Topic Crop View (Scan View) Click Close. The view switches to Scan.
User Guide
Page 106
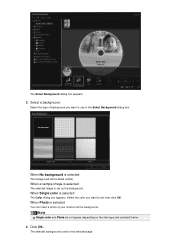
Select a background. When Photo is selected The background will be blank (white). Note Single color and Photo do not appear depending on the item type and selected theme. 4. When a sample image is selected The selected image is ...
Select a background. When Photo is selected The background will be blank (white). Note Single color and Photo do not appear depending on the item type and selected theme. 4. When a sample image is selected The selected image is ...
User Guide
Page 143
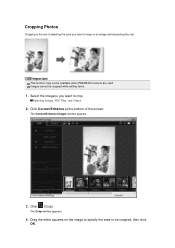
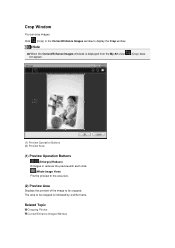
The Correct/Enhance Images window appears. 3. Click (Crop). Images cannot be available when PREMIUM Contents are used. Drag the white squares on the image to specify the area to crop. Selecting Images, PDF Files, and Videos 2. The Crop window appears. 4. Select the image(s) you want to be cropped, then click OK. Cropping Photos Cropping is the act of the screen. Important This function may not be cropped while editing items. 1. Click Correct/Enhance at the bottom of selecting the area you want to keep in an image and discarding the rest.
The Correct/Enhance Images window appears. 3. Click (Crop). Images cannot be available when PREMIUM Contents are used. Drag the white squares on the image to specify the area to crop. Selecting Images, PDF Files, and Videos 2. The Crop window appears. 4. Select the image(s) you want to be cropped, then click OK. Cropping Photos Cropping is the act of the screen. Important This function may not be cropped while editing items. 1. Click Correct/Enhance at the bottom of selecting the area you want to keep in an image and discarding the rest.
User Guide
Page 151
... image(s) you can be saved in the Preview area. Click Save All Filtered Images to adjust the focus, then click OK. The areas outside the white frame are ) saved as a new file(s). Enhancements made with other functions are ) not saved, the enhancement(s) will not be blurred) appears in ...JPEG/Exif format only. 7. Note To save all the enhanced images at one time. A white frame (area that you like, select it (them) and click Save Selected Image. Drag the frame up or down to specify the position on the...
... image(s) you can be saved in the Preview area. Click Save All Filtered Images to adjust the focus, then click OK. The areas outside the white frame are ) saved as a new file(s). Enhancements made with other functions are ) not saved, the enhancement(s) will not be blurred) appears in ...JPEG/Exif format only. 7. Note To save all the enhanced images at one time. A white frame (area that you like, select it (them) and click Save Selected Image. Drag the frame up or down to specify the position on the...
User Guide
Page 189
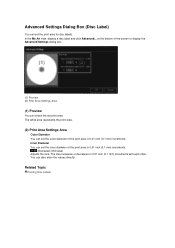
... in 0.01 inch (0.1 mm) increments with each click. In the My Art view, display a disc label and click Advanced... Related Topic Printing Disc Labels The white area represents the print area. (2) Print Area Settings Area Outer Diameter You can set print area. at the bottom of the screen to display the...
... in 0.01 inch (0.1 mm) increments with each click. In the My Art view, display a disc label and click Advanced... Related Topic Printing Disc Labels The white area represents the print area. (2) Print Area Settings Area Outer Diameter You can set print area. at the bottom of the screen to display the...

User Guide
Page 192
... in the details view, the video playback panel appears and you can specify the face area of a person and register the name. Specify Person Displays a white frame in preview with which you can use (Stop), (Playback) / (Pause), (Frame Backward), (Frame Advance), and (Mute) / (Unmute). Note See "Registering Events" for how to...
... in the details view, the video playback panel appears and you can specify the face area of a person and register the name. Specify Person Displays a white frame in preview with which you can use (Stop), (Playback) / (Pause), (Frame Backward), (Frame Advance), and (Mute) / (Unmute). Note See "Registering Events" for how to...
User Guide
Page 197
... to the Video Frame Capture view in which you can crop still images from which you can print images and PDF files. Specify Person Displays a white frame in preview with which you can enhance images with Document Open Password set the theme and main people of a person and register the name...
... to the Video Frame Capture view in which you can crop still images from which you can print images and PDF files. Specify Person Displays a white frame in preview with which you can enhance images with Document Open Password set the theme and main people of a person and register the name...

User Guide
Page 203
Create/Edit PDF File View Specify Person Displays a white frame in preview with special filters. Print Displays the print settings dialog box from the Details View Select an item to create to My Art ...
Create/Edit PDF File View Specify Person Displays a white frame in preview with special filters. Print Displays the print settings dialog box from the Details View Select an item to create to My Art ...
User Guide
Page 205
... (Enlarge) to display the Select Theme and Main People dialog box in which you can print images. Create/Edit PDF File View Specify Person Displays a white frame in which you can enhance images with which you can set the theme and main people of a person and register the name. Correct/Enhance...
... (Enlarge) to display the Select Theme and Main People dialog box in which you can print images. Create/Edit PDF File View Specify Person Displays a white frame in which you can enhance images with which you can set the theme and main people of a person and register the name. Correct/Enhance...
User Guide
Page 207
... details view, fits the preview to the area size. (Reduce/Enlarge) Click (Reduce) or (Enlarge) to reduce or enlarge the display size. Specify Person Displays a white frame in which you can crop still images from the Details View" for the details view of a person and register the name. Print Settings Dialog...
... details view, fits the preview to the area size. (Reduce/Enlarge) Click (Reduce) or (Enlarge) to reduce or enlarge the display size. Specify Person Displays a white frame in which you can crop still images from the Details View" for the details view of a person and register the name. Print Settings Dialog...
User Guide
Page 212
... Area (2) Operation Buttons (3) Display Size Setting Bar (1) Preview Area Displays the preview of the image to be cropped is indicated by a white frame. (2) Operation Buttons Crop Returns to be cropped. Click Crop in the Preview area 90 degrees clockwise with each click. Cancel Restores the... white frame to the Scan view without applying cropping. (Previous Image/Next Image) Switches the displayed image when there are multiple scanned images....
... Area (2) Operation Buttons (3) Display Size Setting Bar (1) Preview Area Displays the preview of the image to be cropped is indicated by a white frame. (2) Operation Buttons Crop Returns to be cropped. Click Crop in the Preview area 90 degrees clockwise with each click. Cancel Restores the... white frame to the Scan view without applying cropping. (Previous Image/Next Image) Switches the displayed image when there are multiple scanned images....
User Guide
Page 242
The area to be cropped is indicated by a white frame. Note When the Correct/Enhance Images windows is displayed from the My Art view, not appear. (Crop) does (1) Preview Operation Buttons (2) Preview Area (1) Preview ...
The area to be cropped is indicated by a white frame. Note When the Correct/Enhance Images windows is displayed from the My Art view, not appear. (Crop) does (1) Preview Operation Buttons (2) Preview Area (1) Preview ...
User Guide
Page 244
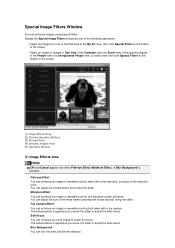
... Image Filters Window You can blur the area outside the selection. Fish-eye Effect You can enhance an entire image to resemble a photo of the white frame (area that will not be blurred) using the slider.
... Image Filters Window You can blur the area outside the selection. Fish-eye Effect You can enhance an entire image to resemble a photo of the white frame (area that will not be blurred) using the slider.


