
DV NETWORK SOLUTION DISK Ver.2 Software Instruction Manual
Page 50
... NETWORK mode is set to .) Moves the focus point closer. (Cannot be used with autofocus.) When you click this button while the camcorder is set to manual focus in to zoom out (the subject becomes smaller). „ The [CAMERA] Operating Buttons 1 Zoom to wide-angle 2 Zoom to...panel in (the subject becomes bigger). This button appears only on the memory card. (Only camcorders with NETWORK mode.) Select the capture mode of still images (single, continuous, interval recording). 50 Operating Camcorders with autofocus). Click here to zoom in View & Record mode. Click here to zoom ...
... NETWORK mode is set to .) Moves the focus point closer. (Cannot be used with autofocus.) When you click this button while the camcorder is set to manual focus in to zoom out (the subject becomes smaller). „ The [CAMERA] Operating Buttons 1 Zoom to wide-angle 2 Zoom to...panel in (the subject becomes bigger). This button appears only on the memory card. (Only camcorders with NETWORK mode.) Select the capture mode of still images (single, continuous, interval recording). 50 Operating Camcorders with autofocus). Click here to zoom in View & Record mode. Click here to zoom ...
OPTURA40 OPTURA30 Instruction Manual
Page 6
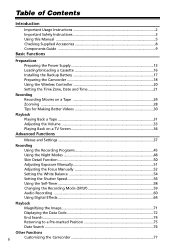
... Important Safety Instructions 3 Using this Manual ...5 Checking Supplied Accessories 8 Components Guide ...9 Basic Functions Preparations Preparing the Power Supply 13 Loading/Unloading a Cassette 16 Installing the Backup Battery 17 Preparing the Camcorder 18 Using the Wireless Controller 20 ...30 Playback Playing Back a Tape ...31 Adjusting the Volume 33 Playing Back on a TV Screen 34 Advanced Functions Menus and Settings ...37 Recording Using the Recording Programs 45 Using the Night Modes 48 Skin Detail Function...50 Adjusting Exposure Manually 51 Adjusting the Focus Manually...
... Important Safety Instructions 3 Using this Manual ...5 Checking Supplied Accessories 8 Components Guide ...9 Basic Functions Preparations Preparing the Power Supply 13 Loading/Unloading a Cassette 16 Installing the Backup Battery 17 Preparing the Camcorder 18 Using the Wireless Controller 20 ...30 Playback Playing Back a Tape ...31 Adjusting the Volume 33 Playing Back on a TV Screen 34 Advanced Functions Menus and Settings ...37 Recording Using the Recording Programs 45 Using the Night Modes 48 Skin Detail Function...50 Adjusting Exposure Manually 51 Adjusting the Focus Manually...
OPTURA40 OPTURA30 Instruction Manual
Page 38
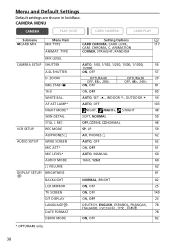
..., OFF 80 AUTO, SET W, INDOOR T, OUTDOOR U 54 AUTO, OFF 103 NIGHT, NIGHT+, S.NIGHT 48 SOFT, NORMAL 50 OFF, FINE, NORMAL 98 SP, LP 59 AV, PHONES H 62 AUTO, OFF 62 ON, OFF 61 AUTO, MANUAL 60 16bit, 12bit 60 62 81 NORMAL, BRIGHT 82 ON, OFF 25 ON, OFF 140 ON, OFF...
..., OFF 80 AUTO, SET W, INDOOR T, OUTDOOR U 54 AUTO, OFF 103 NIGHT, NIGHT+, S.NIGHT 48 SOFT, NORMAL 50 OFF, FINE, NORMAL 98 SP, LP 59 AV, PHONES H 62 AUTO, OFF 62 ON, OFF 61 AUTO, MANUAL 60 16bit, 12bit 60 62 81 NORMAL, BRIGHT 82 ON, OFF 25 ON, OFF 140 ON, OFF...

OPTURA40 OPTURA30 Instruction Manual
Page 63
E Refer also to the instruction manual of the camcorder. The audio level may differ from that of 0.14 in microphone may appear on the screen. Use a microphone with built-in microphone. - Almost all stereo ..., connect it to the MIC terminal. ❍ When recording in silent places, the built-in . (3.5 mm) can attach a commercially available microphone or the optional DM-50 Directional Stereo Microphone to the accessory shoe. 2. When using a commercially available microphone: - Advanced Functions Recording 63
E Refer also to the instruction manual of the camcorder. The audio level may differ from that of 0.14 in microphone may appear on the screen. Use a microphone with built-in microphone. - Almost all stereo ..., connect it to the MIC terminal. ❍ When recording in silent places, the built-in . (3.5 mm) can attach a commercially available microphone or the optional DM-50 Directional Stereo Microphone to the accessory shoe. 2. When using a commercially available microphone: - Advanced Functions Recording 63
OPTURA40 OPTURA30 Instruction Manual
Page 111
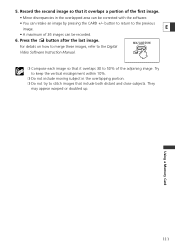
...26 images can retake an image by pressing the CARD +/- Record the second image so that it overlaps 30 to the previous image. Using a Memory Card 111 button to return to 50% of the adjoining image. For details on how to merge these images, refer to the Digital Video ...Software Instruction Manual. ❍ Compose each image so that include both distant and close subjects. Try to keep the vertical...
...26 images can retake an image by pressing the CARD +/- Record the second image so that it overlaps 30 to the previous image. Using a Memory Card 111 button to return to 50% of the adjoining image. For details on how to merge these images, refer to the Digital Video ...Software Instruction Manual. ❍ Compose each image so that include both distant and close subjects. Try to keep the vertical...
OPTURA40 OPTURA30 Instruction Manual
Page 141
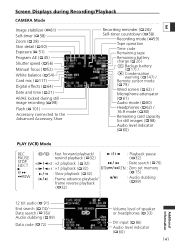
Screen Displays during Recording/Playback CAMERA Mode Image stabilizer ( 81) Self-timer ( 58) Zoom ( 28) Skin detail ( 50) Exposure ( 51) Program AE ( 45) Shutter speed ( 56) Manual focus ( 52) White balance ( 54) Card mix ( 117) Digital effects ( 64) Date and time ( 21) AF/AE locked during still image recording ( 98) Flash ( 101) ...
Screen Displays during Recording/Playback CAMERA Mode Image stabilizer ( 81) Self-timer ( 58) Zoom ( 28) Skin detail ( 50) Exposure ( 51) Program AE ( 45) Shutter speed ( 56) Manual focus ( 52) White balance ( 54) Card mix ( 117) Digital effects ( 64) Date and time ( 21) AF/AE locked during still image recording ( 98) Flash ( 101) ...

OPTURA40 OPTURA30 Instruction Manual
Page 164
Manual focus 52 Memory card 93 Menus 37-44 MIC terminal 63 Microphone 63 Microphone attenuator 61...Snow mode 45 Screen displays 140 SD Memory Card 93 Self-timer 58 Shoulder strap 19 Shutter speed 56 Skin detail 50 Slide show 113 SP mode 59 Speaker 33 Sports mode 45 Spotlight mode 45 Still image quality 94 Still image size... 94 Stitch Assist mode 110 Super Night mode 48 T Tape protection 150 Time code 26 Time zone 21 Transfer order 138 Tripod 30 Troubleshooting 152 TV Screen 34, 140 U USB terminal 123, 134 V Video heads 147 Video light 103, 158, 159 Videocassettes ...
Manual focus 52 Memory card 93 Menus 37-44 MIC terminal 63 Microphone 63 Microphone attenuator 61...Snow mode 45 Screen displays 140 SD Memory Card 93 Self-timer 58 Shoulder strap 19 Shutter speed 56 Skin detail 50 Slide show 113 SP mode 59 Speaker 33 Sports mode 45 Spotlight mode 45 Still image quality 94 Still image size... 94 Stitch Assist mode 110 Super Night mode 48 T Tape protection 150 Time code 26 Time zone 21 Transfer order 138 Tripod 30 Troubleshooting 152 TV Screen 34, 140 U USB terminal 123, 134 V Video heads 147 Video light 103, 158, 159 Videocassettes ...

Digital Video Software (Windows) Ver.12 Instruction Manual
Page 50
Click [Internet] in the Main Window. 2. To use this function, the e-mail software must be enabled as MAPI client. Click [Email Images]. 50 For details, refer to an E-mail message. Attaching Still Images to E-mail Messages You can attach selected still images to the instruction manual of the e-mail software. 1.
Click [Internet] in the Main Window. 2. To use this function, the e-mail software must be enabled as MAPI client. Click [Email Images]. 50 For details, refer to an E-mail message. Attaching Still Images to E-mail Messages You can attach selected still images to the instruction manual of the e-mail software. 1.

