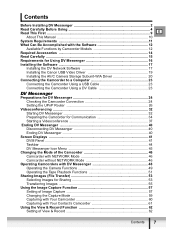
ZoomBrowser EX 6.5 for Windows Instruction Manual
Page 5
...Images to Email...38 Slide Shows...39 Viewing Images in Slide Shows...39 Image Management...40 Changing File Names in Batches 40 Sorting Images into Folders by Shooting Date 40 Configuring Image Information Settings 41 Setting Star Ratings...41 Inserting Comments...41 Assigning Keywords...42...Settings...46 Changing the Shutter Sound and Start-Up Image 46 Transferring Images...48 Transferring Images to a Camera 48 CANON iMAGE GATEWAY...49 About CANON iMAGE GATEWAY (for U.S.A. customers only 49 Registering...49 Available Services...50 Preference Settings...51 Customizing ZoomBrowser EX...51 ...
ZoomBrowser EX 6.5 for Windows Instruction Manual
Page 40
... xxx_02 xxx_03 xxx_04 xxx_05 Sorting Images into Folders by Shooting Date You can sort images into folders by clicking on the disk. Table of Contents 40 Procedures 1 Select a task from the left side of the window: [View & Classify] and [Rename Multiple Files]. • You can change the file names of multiple...
DV Messenger Ver 1.0 Instruction Manual
Page 4
Contents Read Carefully Before Using 2 CANON SOFTWARE LICENCE AGREEMENT 2 Read This First ...5 Required Accessories ...6 Requirements for Using the DV Messenger 6 System Requirements ...7 What Can Be Accomplished With the ...Preparations for the DV Messenger 29 Checking the Camcorder Connection 29 Disabling the Firewall 30 Videoconferencing ...33 Starting the DV Messenger 33 Preparing the Camcorder for Communication 34 Starting a Videoconference 37 Screen Displays ...40 DVM Panel ...40 Taskbar ...41 DV Messenger Icon Menu 42 Operating Camcorders with DV Messenger 43 In [CAMERA] Mode...
DV Messenger Ver 1.0 Instruction Manual
Page 40
... camcorder is highlighted (only if a Canon camcorder is using DV Messenger or Canon camcorder). 5 [Allow Remote Control] This selects whether you allow remote control. 6 [Always On Top] Button This selects whether to operate your camcorder. Use the buttons on the taskbar, or click the DV Messenger icon and select [Control Panel Open] from the displayed menu. 40...
DV NETWORK SOLUTION DISK Ver.2 Software Instruction Manual
Page 7
...Installing the DV Network Software 17 Installing the Canon USB Video Driver 19 Installing the AV/C Camera Storage Subunit-WIA Driver 20 Connecting the Camcorder to a Computer 23 Connecting the Camcorder Using a USB Cable 23 Connecting the Camcorder Using a DV Cable 23 DV Messenger ... Ending DV Messenger 40 Disconnecting DV Messenger 40 Ending DV Messenger 40 Screen Displays ...41 DVM Panel ...41 Taskbar ...44 DV Messenger Icon Menu 45 Changing the Mode of the Camcorder 46 Camcorder with NETWORK Mode 46 Camcorder without NETWORK Mode 46 Operating Camcorders with DV Messenger ...
DV NETWORK SOLUTION DISK Ver.2 Software Instruction Manual
Page 40
DV Messenger closes. 40 Ending DV Messenger Ending DV Messenger Disconnecting DV Messenger 1 Click . 2 When the confirmation window appears, click [YES]. The communication with another contact, click and select a contact from the displayed menu. If you wish to communicate with your contact ends. Ending DV Messenger 1 Click the DV Messenger icon on the taskbar and select [Exit] from the list.
DV NETWORK SOLUTION DISK Ver.2 Software Instruction Manual
Page 42
... NETWORK mode, remote control allowed. Here you find the buttons for operating the camcorder. This does not end DV Messenger ( 40). 42 Screen Displays Camcorder without NETWORK mode, remote control allowed. Displays the camcorder model names ([Canon MiniDV] appears with camcorder models released before 2001). Camcorder without NETWORK mode, remote control prohibited. Click here to allow/prohibit remote...
DV NETWORK SOLUTION DISK Ver.2 Software Instruction Manual
Page 43
... your contact. Clicking the button displays a window asking you to confirm disconnection ( 40). 2 Allow Remote Control Click here to select whether you are connected, appears. Clicking the button displays the [Select a contact] window ( 37). When you are disconnected, appears. The camcorder is set View & Record ( 62). 6 DVM panel always on top, and... image of other windows. Screen Displays 43 Function Buttons (8 above) 1 2 3 4 5 6 E DV Messenger 1 Connect/Disconnect Click here to connect or disconnect the communication to your camcorder.
DV NETWORK SOLUTION DISK Ver.2 Software Instruction Manual
Page 45
... function ( 62). Displays the DV Messenger panel on the screen. Displays the [Select a contact] window and starts the communication of DV Messenger. Exits DV Messenger ( 40). Disconnects the communication between you click the DV Messenger icon in the taskbar, a list of menus appears. 1 E 2 3 4 5 6 7 8 DV Messenger 1 About DV Messenger 2 Help Topics 3 Start...
DV NETWORK SOLUTION DISK Ver.2 Software Instruction Manual
Page 58
... entering a number. 58 Using the Image Capture Function Displays the file name. You can select between 2, 5, 10, 15, 20, 25, 30, 35, 40, 45, 50 and unlimited. Select the number of the camcorder. Select the size of Image Capture Window 1 2 3 4 5 6 1 Store 2 File name 3 Image size 4 Shutter sound 5 Continuous mode 6 Interval mode Displays the...
OPTURA40 OPTURA30 Instruction Manual
Page 14
... to OFF. 2. q 3. Connect the power adapter to the power adapter. ❍ You may cause picture interference. NB-2L 110 min. 70 min. 55 min. 40 min. 30 min. 85 min. Actual time may also not be shorter. 14 Move the adapter away from the TV or the antenna cable. ❍ Do not... Time LCD Typical Recording Viewfinder Time* LCD Playback Time NB-2LH 115 min. 90 min. 75 min. 50 min. 40 min. 105 min. The battery pack may stop , zooming, power on/off the camcorder before connecting or disconnecting the power adapter. ❍ If the adapter is used close to a TV, it back...
OPTURA40 OPTURA30 Instruction Manual
Page 15
... need. ❍ To conserve battery charge, turn off the camcorder instead of 32 ˚F to 104 ˚F (0 ˚C to 3 times longer than you think you prepare battery packs 2 to 40 ˚C), the CHARGE indicator flashes rapidly and charging stops. ...10061; A lithium ion battery pack can be charged at any charge state. Basic Functions Preparations 15 Unlike E conventional battery packs, you do not need to completely use or discharge it in temperatures between 50 ˚F and 86 ˚F (10 ˚C and 30...
OPTURA40 OPTURA30 Instruction Manual
Page 40
... SIZE FILE NOS. REMOTE A1, A2, OFF B 79 BEEP ON, OFF 80 T.ZONE/DST See list of time zones. 21 D/TIME SET 21 * OPTURA40 only. 40 DISPLAY SETUP/ BRIGHTNESS BACKLIGHT TV SCREEN DISPLAYS 6SEC. DATE DATA CODE D/TIME SEL. WIND SCREEN MIC ATT* MIC LEVEL* 12bit AUDIO MIX BALANCE Setting Options...
OPTURA40 OPTURA30 Instruction Manual
Page 149
... range is from 32 ˚F to 104 ˚F (0 ˚C to 40 ˚C), the optimal range is from time to time if they may become ...been jammed as video heads may become dirty with a memory function, metal plated terminals may damage the camcorder. ❍ Do not use . Additional Information 149 At cold temperatures, performance will temporarily decline. ...]-shaped hole. Clean the terminals with care. The memory function is useful when you wish to 30 ˚C). Back side of the battery pack Terminal cover attached Charged Uncharged Cassette Handling Precautions ❍...
OPTURA40 OPTURA30 Instruction Manual
Page 152
... until the battery pack - The battery pack is exhausted. The camcorder Consult a Canon Service - battery pack. Use a different battery pack. - 152 Cassette compartment Battery pack is damaged. Replace or charge the 13 will not turn Battery pack is below 104 ˚F (40 ˚C) and retry charging. Replace or charge the 13 on the...
OPTURA40 OPTURA30 Instruction Manual
Page 161
... (rated) 7.4 V DC Power consumption (AF on) 3.4W (using viewfinder), 4.2W (using LCD screen) Operating temperature 32 - 104 ˚F (0 - 40 ˚C) Dimensions (W × H × D) 3.0 × 3.2 × 5.3 in. (77 × 82 × 134 mm) Weight (camcorder body only) 1.3 lb. (585 g) CA-570 Compact Power Adapter Power supply Power consumption Rated output Operating temperature Dimensions...
Digital Video Software (Windows) Ver.12 Instruction Manual
Page 9
... or on a user-built PC. ❍ Proper operation is not guaranteed on a computer meeting the following minimum requirements. PhotoStitch: 40 MB or more • Canon DV TWAIN Driver: 25 MB or more • Canon DV WIA Driver: 25 MB or more For all of the above OS preinstalled and have built-in USB... the requirements outlined above. ❍ A CD-ROM drive is recommended (for those computers that come with built-in USB ports Free Hard Disk Space: • Canon Utilities -
Digital Video Software (Windows) Ver.12 Instruction Manual
Page 40
Exporting Movies (MovieExport Task) 3. Select a file format and click [Set the save format]. You can select multiple images or a folder to be saved]. 40 Specify the export settings and click [Specify name of file to include all images in that folder. 4. Select a movie and click [Select the save format]. 5.
Digital Video Software (Macintosh) Ver.12 Instruction Manual
Page 40
Select this option to automatically correct images shot with Exif 2.2 compliant camcorders. 40 In the [Preferences] window, select [Print], set the image quality settings and click [OK]. See Printing Still Images for the next steps ( 36). Click the [ImageBrowser] menu in ImageBrowser and select [Preferences]. 2. Select this option to automatically correct the image quality. A check mark must be placed here to automatically correct only images shot with Exif 2.2 compliant camcorders and other images. Printing Still Images (ImageBrowser) Mac OS X (version 10.1/10.2/10.3) 1.