Getting Started
Page 19
... (closed network) function − Confirm MAC address − Disable the access point's IP address • The configuration, router functions, setup procedures and security functions of your network administrator. • If a screen not specified in the procedure or an error message appears during ... and that the computer can connect to the network. • For information on Wireless LAN Connection • Ad-hoc mode is not supported. • If you connect to a network that Canon software is attempting to restart your access point's instruction manual or contact its manufacturer...
... (closed network) function − Confirm MAC address − Disable the access point's IP address • The configuration, router functions, setup procedures and security functions of your network administrator. • If a screen not specified in the procedure or an error message appears during ... and that the computer can connect to the network. • For information on Wireless LAN Connection • Ad-hoc mode is not supported. • If you connect to a network that Canon software is attempting to restart your access point's instruction manual or contact its manufacturer...

Getting Started
Page 21
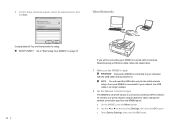
... Network Red Is this your first time onnecting Yes the machine to use the machine on other computers Para utilizar el equipo en otros ordenadores Setup Flow (Reading Order) Flujo de la instalación (orden de lectura) P.29 P.34 P.50 P.53 P.60 P.20 P.29 P.35 P.20 P.53 P.61 P.21 P.29 P.47... P.70 A B P.50 C P.70 D P.50 E P.70 F P.50 G P.50 H P.70 I J K 19 Sí ¿Es la primera vez que conecta el equipo a la red? No No USB USB Wireless LAN LAN inalámbrica Wired LAN LAN por cable WPS WPS WCN WCN To use ? ¿Qué método de conexión tiene...
... Network Red Is this your first time onnecting Yes the machine to use the machine on other computers Para utilizar el equipo en otros ordenadores Setup Flow (Reading Order) Flujo de la instalación (orden de lectura) P.29 P.34 P.50 P.53 P.60 P.20 P.29 P.35 P.20 P.53 P.61 P.21 P.29 P.47... P.70 A B P.50 C P.70 D P.50 E P.70 F P.50 G P.50 H P.70 I J K 19 Sí ¿Es la primera vez que conecta el equipo a la red? No No USB USB Wireless LAN LAN inalámbrica Wired LAN LAN por cable WPS WPS WCN WCN To use ? ¿Qué método de conexión tiene...
Obtaining the Password For Your Existing Wireless Network (Mac OS X)
Page 1
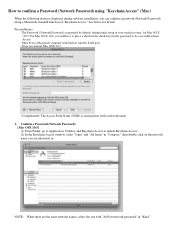
... is registered by default, during software installation, you are the same network names, select the one with "AirPort network password" in wireless LAN port. - Does not support Mac OSX 10.3. The Access Point Name (SSID) is synonymous with built-in "Kind." NOTE...with a network name. 1. How to confirm a Password (Network Password) using "Keychain Access" (Mac) When the following dialog is displayed during initial setup of "Keychain Access." Confirm a Password (Network Password). [Mac OSX 10.5] (1) From Finder, go to Application, Utilities, and Keychain Access to launch ...
... is registered by default, during software installation, you are the same network names, select the one with "AirPort network password" in wireless LAN port. - Does not support Mac OSX 10.3. The Access Point Name (SSID) is synonymous with built-in "Kind." NOTE...with a network name. 1. How to confirm a Password (Network Password) using "Keychain Access" (Mac) When the following dialog is displayed during initial setup of "Keychain Access." Confirm a Password (Network Password). [Mac OSX 10.5] (1) From Finder, go to Application, Utilities, and Keychain Access to launch ...
MX860 Getting Started For Mac Users
Page 4
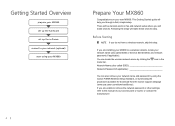
...the procedures available for download from the Canon support webpage (www.usa.canon.com/downloadlibrary). Following the steps will make these choices easy. Before Starting If you through a fast, simple setup. If you are installing your MX860 to a wireless network, locate your access point or... 4 Getting Started Overview prepare your MX860 set up the hardware set up the software connect to your network (optional) start using your MX860 Prepare Your MX860 Congratulations on your network name and password by using the Canon PIXMA Wireless Setup Assistant, or by clicking the menu...
...the procedures available for download from the Canon support webpage (www.usa.canon.com/downloadlibrary). Following the steps will make these choices easy. Before Starting If you through a fast, simple setup. If you are installing your MX860 to a wireless network, locate your access point or... 4 Getting Started Overview prepare your MX860 set up the hardware set up the software connect to your network (optional) start using your MX860 Prepare Your MX860 Congratulations on your network name and password by using the Canon PIXMA Wireless Setup Assistant, or by clicking the menu...
MX860 Getting Started For Mac Users
Page 19
... your computer with an Ethernet cable On the Canon IJ Network Tool dialog, select LAN connection, then click OK. Wi-Fi router router Wi-Fi router 4 Select printer to use a Select Setup in the Printers pane, then click OK. Once your MX860 is connected to a wireless (Wi-Fi) network. You will need the USB...
... your computer with an Ethernet cable On the Canon IJ Network Tool dialog, select LAN connection, then click OK. Wi-Fi router router Wi-Fi router 4 Select printer to use a Select Setup in the Printers pane, then click OK. Once your MX860 is connected to a wireless (Wi-Fi) network. You will need the USB...
MX860 Getting Started For Mac Users
Page 20
5 Select your computer, click Next. 6 Complete the network setup When the Setup Completion dialog appears: a Disconnect the USB cable and place the MX860 where it . If the MX860 does not connect, see section 5.6 of the printed manual "Network Setup Troubleshooting." The connection measurement results will be used. The network password is case sensitive. Measuring Wireless Connection Performance 1 Click Next. b If your network requires a password, enter it will display. 20 b On your wireless network a Select the network name you wrote down in step 1. c Click Connect.
5 Select your computer, click Next. 6 Complete the network setup When the Setup Completion dialog appears: a Disconnect the USB cable and place the MX860 where it . If the MX860 does not connect, see section 5.6 of the printed manual "Network Setup Troubleshooting." The connection measurement results will be used. The network password is case sensitive. Measuring Wireless Connection Performance 1 Click Next. b If your network requires a password, enter it will display. 20 b On your wireless network a Select the network name you wrote down in step 1. c Click Connect.
MX860 Getting Started For Mac Users
Page 23
...MX860 is connected to your MX860 has been previously set for a wired network, ensure the connection type is set at the factory to connect to your computer with the USB cable and is powered on page 28 for details. 3 Select LAN connection On the Canon... password (if applicable) of your wireless network Click the icon in the menu bar .... 2 Make sure the MX860 is ready Ensure the MX860 is connected to a wireless (Wi-Fi) network. ... wireless network. b Select MX860 series in the pop-up menu. c Click OK. work with ess point Wireless ...
...MX860 is connected to your MX860 has been previously set for a wired network, ensure the connection type is set at the factory to connect to your computer with the USB cable and is powered on page 28 for details. 3 Select LAN connection On the Canon... password (if applicable) of your wireless network Click the icon in the menu bar .... 2 Make sure the MX860 is ready Ensure the MX860 is connected to a wireless (Wi-Fi) network. ... wireless network. b Select MX860 series in the pop-up menu. c Click OK. work with ess point Wireless ...
MX860 Getting Started For Mac Users
Page 25
... see section 5.6 of the printed manual "Network Setup Troubleshooting." b On your computer, click Next. 10 Click Connect Measuring Wireless Connection Performance 1 Click Next 11 Complete the network setup When the Setup Completion dialog appears: a Disconnect the USB cable and place the MX860 where it will be used. If the MX860 does not connect, see a green check...
... see section 5.6 of the printed manual "Network Setup Troubleshooting." b On your computer, click Next. 10 Click Connect Measuring Wireless Connection Performance 1 Click Next 11 Complete the network setup When the Setup Completion dialog appears: a Disconnect the USB cable and place the MX860 where it will be used. If the MX860 does not connect, see a green check...
MX860 Getting Started For Mac Users
Page 28
... Ethernet cable, follow the steps below. 1 Make sure the MX860 is ready Ensure the MX860 is connected to a wireless (Wi-Fi) network. To connect to "Start Using Your MX860!" Wi-Fi router Wi-Fi router Congratulations! a On the MX860, press the Menu button. Wi-Fi router router If you ...or ► button to the selected device, then Wired Networks click Exit. on You will need the USB cable only for the initial network setup. You are finished with an Ethernet cable (example: Airport Extreme and Airport Express) d Confirm that a checkmark appears next to select Settings, ...
... Ethernet cable, follow the steps below. 1 Make sure the MX860 is ready Ensure the MX860 is connected to a wireless (Wi-Fi) network. To connect to "Start Using Your MX860!" Wi-Fi router Wi-Fi router Congratulations! a On the MX860, press the Menu button. Wi-Fi router router If you ...or ► button to the selected device, then Wired Networks click Exit. on You will need the USB cable only for the initial network setup. You are finished with an Ethernet cable (example: Airport Extreme and Airport Express) d Confirm that a checkmark appears next to select Settings, ...
MX860 Getting Started For Mac Users
Page 33
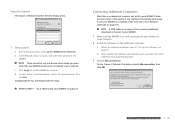
...the MAC address of the MX860. You are finished with the setup. b After installing the software and restarting your MX860. Select the Scanner The Canon IJ Network Scanner Selector dialog opens. 1 Select scanner a From the pop-up menu, select Canon MX860 series Network. prepare hardware ... MX860 series device connected to your computer, the Canon IJ Network Tool automatically starts. 3 Select LAN connection On the Canon IJ Network Tool dialog, select LAN connection, then click OK. Connecting Additional Computers More than one networked computer can print to your wireless ...
...the MAC address of the MX860. You are finished with the setup. b After installing the software and restarting your MX860. Select the Scanner The Canon IJ Network Scanner Selector dialog opens. 1 Select scanner a From the pop-up menu, select Canon MX860 series Network. prepare hardware ... MX860 series device connected to your computer, the Canon IJ Network Tool automatically starts. 3 Select LAN connection On the Canon IJ Network Tool dialog, select LAN connection, then click OK. Connecting Additional Computers More than one networked computer can print to your wireless ...
Solución de problemas de configuración de red [Spanish Version]
Page 2
...9632; Troubles in Setup/Connections 1 Connection checklist...the machine in a multiple access point setup P.2 3 How to set a network...setup P.4 5.1 The Access Points screen is displayed during setup P.4 5.2 The An access point could not be detected is displayed during setup...setup P.5 5.7 The Enter Password screen is displayed during setup P.6 5.8 The You have connected the printer to an unsecured wireless network is displayed during setup P.6 5.9 The Communication with the Card Slot failed is displayed during setup...setup P.7 5.12 The Timeout error screen is displayed during WPS setup...
...9632; Troubles in Setup/Connections 1 Connection checklist...the machine in a multiple access point setup P.2 3 How to set a network...setup P.4 5.1 The Access Points screen is displayed during setup P.4 5.2 The An access point could not be detected is displayed during setup...setup P.5 5.7 The Enter Password screen is displayed during setup P.6 5.8 The You have connected the printer to an unsecured wireless network is displayed during setup P.6 5.9 The Communication with the Card Slot failed is displayed during setup...setup P.7 5.12 The Timeout error screen is displayed during WPS setup...
Router Guide
Page 5
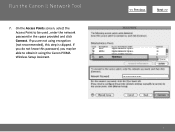
If you are not using the Canon PIXMA Wireless Setup Assistant. > 5 On the Access Points screen, select the Access Point to be able to obtain it using encryption (not recommended), this password, you do not know this step is skipped. Run the Canon IJ Network Tool 7. If you may be used , enter the network password in the space provided and click Connect.
If you are not using the Canon PIXMA Wireless Setup Assistant. > 5 On the Access Points screen, select the Access Point to be able to obtain it using encryption (not recommended), this password, you do not know this step is skipped. Run the Canon IJ Network Tool 7. If you may be used , enter the network password in the space provided and click Connect.
Network Key Guide
Page 2
> Obtaining Your Network Key PIXMA MP980 / PIXMA MX860 / PIXMA MP620 Windows OS Introduction 3 Download the Canon PIXMA Wireless Setup Assistant 4 Using the Canon PIXMA Wireless Setup Assistant 6 Trouble Shooting 10 2
> Obtaining Your Network Key PIXMA MP980 / PIXMA MX860 / PIXMA MP620 Windows OS Introduction 3 Download the Canon PIXMA Wireless Setup Assistant 4 Using the Canon PIXMA Wireless Setup Assistant 6 Trouble Shooting 10 2

Network Key Guide
Page 3
NOTE: The Wireless Setup Assistant is not known, you may be able to retrieve the information using the Canon PIXMA Wireless Setup Assistant. Introduction > Introduction If you are unable to proceed past the Access Points screen during wireless setup because the required Network Key is supported on the following operating systems only: • Windows XP SP3 or later • Windows XP x64 Edition SP3 or later • Vista (32 & 64 bit) • Windows 7 (32 & 64 bit) 3
NOTE: The Wireless Setup Assistant is not known, you may be able to retrieve the information using the Canon PIXMA Wireless Setup Assistant. Introduction > Introduction If you are unable to proceed past the Access Points screen during wireless setup because the required Network Key is supported on the following operating systems only: • Windows XP SP3 or later • Windows XP x64 Edition SP3 or later • Vista (32 & 64 bit) • Windows 7 (32 & 64 bit) 3
Network Key Guide
Page 4
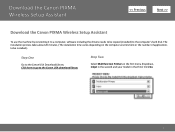
... or the number of applications to be copied (installed) to the Canon USA download library Step Two Select Multifunction Printers in the first menu dropdown, Inkjet in the second and your model in the third. Click Go. 4 Download the Canon PIXMA Wireless Setup Assistant > Download the Canon PIXMA Wireless Setup Assistant To use the machine by connecting it to a computer...
... or the number of applications to be copied (installed) to the Canon USA download library Step Two Select Multifunction Printers in the first menu dropdown, Inkjet in the second and your model in the third. Click Go. 4 Download the Canon PIXMA Wireless Setup Assistant > Download the Canon PIXMA Wireless Setup Assistant To use the machine by connecting it to a computer...
Network Key Guide
Page 5
Download the Canon PIXMA Wireless Setup Assistant > Step Three In the Drivers / Software Selection section, select your operating system in the Select OS dropdown menu. Begin Download Choose to download the file CanonAPChkTool. Step Four In the Software section, click the link to "Save" the file. Write down the file name and the location to where the file is being saved. 5 Step Five On the next screen, read the information and instructions and click I Agree -
Download the Canon PIXMA Wireless Setup Assistant > Step Three In the Drivers / Software Selection section, select your operating system in the Select OS dropdown menu. Begin Download Choose to download the file CanonAPChkTool. Step Four In the Software section, click the link to "Save" the file. Write down the file name and the location to where the file is being saved. 5 Step Five On the next screen, read the information and instructions and click I Agree -
Network Key Guide
Page 6
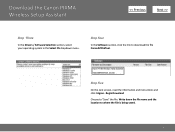
If you downloaded previously. 2. If you are installing the latest driver from download, re-run the the driver/network installation by double-clicking the driver file you are installing from the CD-ROM, select Custom Install, printer driver / MP Drivers, and then perform the installation. Using the Canon PIXMA Wireless Setup Assistant Using the Canon PIXMA Wireless Setup Assistant Step One Open the Access Points window. Note: Leave this window open on your desktop and proceed to step two. > 6 If the Access Points window is closed: 1.
If you downloaded previously. 2. If you are installing the latest driver from download, re-run the the driver/network installation by double-clicking the driver file you are installing from the CD-ROM, select Custom Install, printer driver / MP Drivers, and then perform the installation. Using the Canon PIXMA Wireless Setup Assistant Using the Canon PIXMA Wireless Setup Assistant Step One Open the Access Points window. Note: Leave this window open on your desktop and proceed to step two. > 6 If the Access Points window is closed: 1.
Network Key Guide
Page 7
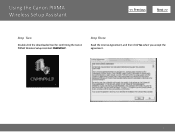
Step Three Read the License Agreement, and then click Yes when you accept the agreement. 7 Using the Canon PIXMA Wireless Setup Assistant > Step Two Double-click the downloaded tool for confirming the Canon PIXMA Wireless Setup Assistant CNMNPHLP.
Step Three Read the License Agreement, and then click Yes when you accept the agreement. 7 Using the Canon PIXMA Wireless Setup Assistant > Step Two Double-click the downloaded tool for confirming the Canon PIXMA Wireless Setup Assistant CNMNPHLP.

Network Key Guide
Page 8
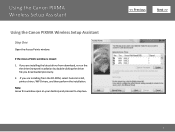
The "Canon PIXMA Wireless Setup Assistant" tool is launched. 2. Select the access point name that the access points listed in the window are connecting to, and then click the "Copy Network Key." > 8 Confirm that you are the same as the ones in the Access Points window (Step One). 3. Using the Canon PIXMA Wireless Setup Assistant Step Four 1.
The "Canon PIXMA Wireless Setup Assistant" tool is launched. 2. Select the access point name that the access points listed in the window are connecting to, and then click the "Copy Network Key." > 8 Confirm that you are the same as the ones in the Access Points window (Step One). 3. Using the Canon PIXMA Wireless Setup Assistant Step Four 1.

Network Key Guide
Page 9
... the mouse and select "Paste" from the drop down menu. Click the access point name(s) in "Detected Access Points" there.) 2. Using the Canon PIXMA Wireless Setup Assistant Step Five 1. Click Connect. The tool "Canon PIXMA Wireless Setup Assistant" is displayed. > 9 b. When access point names are the same, you will find the name(s) in the Access Point window (you...
... the mouse and select "Paste" from the drop down menu. Click the access point name(s) in "Detected Access Points" there.) 2. Using the Canon PIXMA Wireless Setup Assistant Step Five 1. Click Connect. The tool "Canon PIXMA Wireless Setup Assistant" is displayed. > 9 b. When access point names are the same, you will find the name(s) in the Access Point window (you...


