Network Setup Guide
Page 12
... reinstall the software. If it is not ejected automatically, remove it manually. When using the Canon IJ Network Tool after software installation is selected, then click Restart. Note Keep the CD-ROM in a safe place in the User's Guide on -screen instructions to complete the installation. (1) Click Exit. For details, refer to "Using...
... reinstall the software. If it is not ejected automatically, remove it manually. When using the Canon IJ Network Tool after software installation is selected, then click Restart. Note Keep the CD-ROM in a safe place in the User's Guide on -screen instructions to complete the installation. (1) Click Exit. For details, refer to "Using...
Network Setup Guide
Page 17
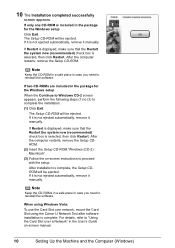
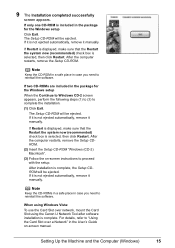
... that the Restart the system now (recommended) check box is selected, then click Restart. If two CD-ROMs are included in the User's Guide on -screen instructions to proceed with the setup. 9 The Installation completed successfully screen appears. The Setup CD-ROM will be ejected. ...Restart is displayed, make sure that the Restart the system now (recommended) check box is selected, then click Restart. When using the Canon IJ Network Tool after software installation is not ejected automatically, remove it is complete. If it manually. After installation is included in ...
... that the Restart the system now (recommended) check box is selected, then click Restart. If two CD-ROMs are included in the User's Guide on -screen instructions to proceed with the setup. 9 The Installation completed successfully screen appears. The Setup CD-ROM will be ejected. ...Restart is displayed, make sure that the Restart the system now (recommended) check box is selected, then click Restart. When using the Canon IJ Network Tool after software installation is not ejected automatically, remove it is complete. If it manually. After installation is included in ...
Network Setup Guide
Page 21
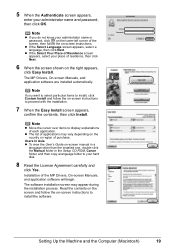
... application. The MP Drivers, On-screen Manuals, and application software are installed automatically. Users in Asia z To view the User's Guide on-screen manual in a language other than the installed one, double-click the Manual folder in the Setup CD-ROM, Canon folder, and then copy a language folder to display explanations of purchase. z The...
... application. The MP Drivers, On-screen Manuals, and application software are installed automatically. Users in Asia z To view the User's Guide on-screen manual in a language other than the installed one, double-click the Manual folder in the Setup CD-ROM, Canon folder, and then copy a language folder to display explanations of purchase. z The...
Network Setup Guide
Page 23
... the machine may cause the machine not to reinstall the software. Note Keep the CD-ROM in a safe place in the User's Guide on-screen manual. When the computer restarts, the Canon IJ Network Tool will start up automatically. After the computer restarts, remove the Setup CDROM. To resolve this, either unplug the...
... the machine may cause the machine not to reinstall the software. Note Keep the CD-ROM in a safe place in the User's Guide on-screen manual. When the computer restarts, the Canon IJ Network Tool will start up automatically. After the computer restarts, remove the Setup CDROM. To resolve this, either unplug the...
Network Setup Guide
Page 28
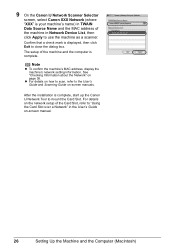
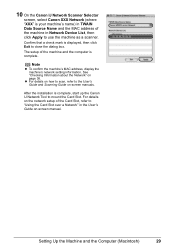
... installation is complete. The setup of the machine and the computer is complete, start up the Canon IJ Network Tool to mount the Card Slot. For details on the network setup of the machine in the User's Guide on-screen manual. 26 Setting Up the Machine and the Computer (Macintosh) z For details on... how to scan, refer to the User's Guide and Scanning Guide on page 38. Confirm that a check mark is your machine's name) in TWAIN Data Source Name and the MAC address of the Card Slot, refer ...
... installation is complete. The setup of the machine and the computer is complete, start up the Canon IJ Network Tool to mount the Card Slot. For details on the network setup of the machine in the User's Guide on-screen manual. 26 Setting Up the Machine and the Computer (Macintosh) z For details on... how to scan, refer to the User's Guide and Scanning Guide on page 38. Confirm that a check mark is your machine's name) in TWAIN Data Source Name and the MAC address of the Card Slot, refer ...
Network Setup Guide
Page 31
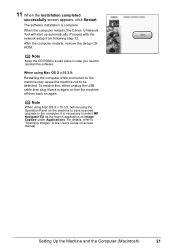
... To confirm the machine's MAC address, display the machine's network setting information. z For details on how to scan, refer to the User's Guide and Scanning Guide on page 38. Setting Up the Machine and the Computer (Macintosh) 29 See "Checking Information about the Network" on -screen manuals. ...use the machine as a scanner. For details on the network setup of the machine in the User's Guide on-screen manual. 10 On the Canon IJ Network Scanner Selector screen, select Canon XXX Network (where "XXX" is complete, start up the Canon IJ Network Tool to mount the Card Slot.
... To confirm the machine's MAC address, display the machine's network setting information. z For details on how to scan, refer to the User's Guide and Scanning Guide on page 38. Setting Up the Machine and the Computer (Macintosh) 29 See "Checking Information about the Network" on -screen manuals. ...use the machine as a scanner. For details on the network setup of the machine in the User's Guide on-screen manual. 10 On the Canon IJ Network Scanner Selector screen, select Canon XXX Network (where "XXX" is complete, start up the Canon IJ Network Tool to mount the Card Slot.
Network Setup Guide
Page 32
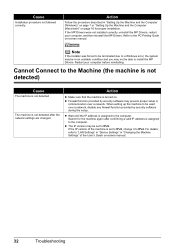
...to "Troubleshooting" in setup/connections z "Cannot Install the MP Drivers" on page 31 z "Cannot Connect to this computer." Troubles in the User's Guide onscreen manual. Other useful information z "Setting Up the Machine Again for problems you do not find a description for your trouble here, refer ...to "Troubleshooting" in the User's Guide on page 36 • ""Cannot map any more drives, because all the drive letters are assigned." is displayed" on page 35 •...
...to "Troubleshooting" in setup/connections z "Cannot Install the MP Drivers" on page 31 z "Cannot Connect to this computer." Troubles in the User's Guide onscreen manual. Other useful information z "Setting Up the Machine Again for problems you do not find a description for your trouble here, refer ...to "Troubleshooting" in the User's Guide on page 36 • ""Cannot map any more drives, because all the drive letters are assigned." is displayed" on page 35 •...
Network Setup Guide
Page 34
...uninstall the MP Drivers, restart your computer before reinstalling. Restart your computer, and then reinstall the MP Drivers. If the IP version of the User's Guide on . Note If the installer was forced to be terminated due to a Windows error, the system may not be able to the computer....prevent proper setup or communication over a network, disable any firewall function provided by security software during the setup. Refer to the PC Printing Guide on page 16 for the machine again after the network settings are changed Action z Make sure that the machine is assigned to IPv6....
...uninstall the MP Drivers, restart your computer before reinstalling. Restart your computer, and then reinstall the MP Drivers. If the IP version of the User's Guide on . Note If the installer was forced to be terminated due to a Windows error, the system may not be able to the computer....prevent proper setup or communication over a network, disable any firewall function provided by security software during the setup. Refer to the PC Printing Guide on page 16 for the machine again after the network settings are changed Action z Make sure that the machine is assigned to IPv6....
Network Setup Guide
Page 38
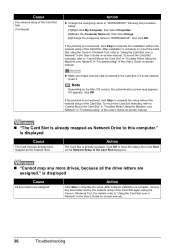
...click Skip to "Using the Card Slot over a Network" in the User's Guide on the Network Setup of the Card Slot dialog box. „ "Cannot map any drive letter and try the network setup of the Card Slot again using the Canon IJ Network Tool, refer to complete the setup without the network... using the Canon IJ Network Tool. If the problem is complete, remove any more drives, because all the drive letters are assigned. To mount the Card Slot manually, refer to "Cannot Mount the Card Slot" in "Troubles When Using the Machine over Network" in "Troubleshooting" of the User's Guide on the ...
...click Skip to "Using the Card Slot over a Network" in the User's Guide on the Network Setup of the Card Slot dialog box. „ "Cannot map any drive letter and try the network setup of the Card Slot again using the Canon IJ Network Tool, refer to complete the setup without the network... using the Canon IJ Network Tool. If the problem is complete, remove any more drives, because all the drive letters are assigned. To mount the Card Slot manually, refer to "Cannot Mount the Card Slot" in "Troubles When Using the Machine over Network" in "Troubleshooting" of the User's Guide on the ...
Network Setup Guide
Page 39
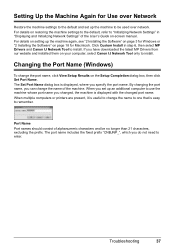
... fixed prefix "CNBJNP_", which you can change the name to one that is easy to "Initializing Network Settings" in step 6, then select MP Drivers and Canon IJ Network Tool to install. Changing the Port Name (Windows) To change the port name, click View Setup Results on page 18 for Macintosh. For... from our website and installed them on -screen manual. When multiple computers or printers are present, it is useful to change the name of the User's Guide on your computer, select Canon IJ Network Tool only to install.
... fixed prefix "CNBJNP_", which you can change the name to one that is easy to "Initializing Network Settings" in step 6, then select MP Drivers and Canon IJ Network Tool to install. Changing the Port Name (Windows) To change the port name, click View Setup Results on page 18 for Macintosh. For... from our website and installed them on -screen manual. When multiple computers or printers are present, it is useful to change the name of the User's Guide on your computer, select Canon IJ Network Tool only to install.
Network Setup Guide
Page 40
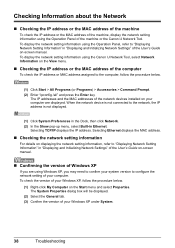
...computer To check the IP address or MAC address assigned to "Displaying Network Setting Information" in "Displaying and Initializing Network Settings" of the User's Guide on your computer. The IP addresses and the MAC addresses of the network devices installed on -screen manual. „ Confirming the version...the version of the machine or the Canon IJ Network Tool. To display the network setting information using the Canon IJ Network Tool, select Network Information on the View menu. „ Checking the IP address or the MAC address of the User's Guide on the Start menu and select ...
...computer To check the IP address or MAC address assigned to "Displaying Network Setting Information" in "Displaying and Initializing Network Settings" of the User's Guide on your computer. The IP addresses and the MAC addresses of the network devices installed on -screen manual. „ Confirming the version...the version of the machine or the Canon IJ Network Tool. To display the network setting information using the Canon IJ Network Tool, select Network Information on the View menu. „ Checking the IP address or the MAC address of the User's Guide on the Start menu and select ...
Quick Start Guide
Page 13
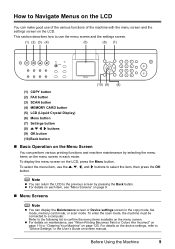
... Operation on the Menu Screen You can return the LCD to the previous screen by selecting the menu items on the menu screen in the User's Guide on the menu screen. z For details on each mode. How to Navigate Menus on the LCD You can make good use of the various ... confirm the menu items available on -screen manual. Refer to the following list to "Device Settings" in each item, see "When Printing Becomes Faint or Colors Are Incorrect" on page 114 or "Cleaning Your Machine" on the LCD. This section describes how to use the {, }, [, and ] buttons to a computer. Before ...
... Operation on the Menu Screen You can return the LCD to the previous screen by selecting the menu items on the menu screen in the User's Guide on the menu screen. z For details on each mode. How to Navigate Menus on the LCD You can make good use of the various ... confirm the menu items available on -screen manual. Refer to the following list to "Device Settings" in each item, see "When Printing Becomes Faint or Colors Are Incorrect" on page 114 or "Cleaning Your Machine" on the LCD. This section describes how to use the {, }, [, and ] buttons to a computer. Before ...
Quick Start Guide
Page 15
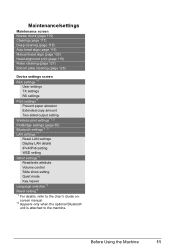
...(page 120) Head alignment print (page 119) Roller cleaning (page 127) Bottom plate cleaning (page 128) Device settings screen FAX settings *1 User settings TX settings RX settings Print settings*1 Prevent paper abrasion Extended copy amount Two-sided output setting Wireless print settings*1, 2 PictBridge settings (page 55...write attribute Volume control Slide show setting Quiet mode Key repeat Language selection*1 Reset setting*1 *1 For details, refer to the User's Guide onscreen manual. *2 Appears only when the optional Bluetooth unit is attached to the machine. Before Using the Machine 11
...(page 120) Head alignment print (page 119) Roller cleaning (page 127) Bottom plate cleaning (page 128) Device settings screen FAX settings *1 User settings TX settings RX settings Print settings*1 Prevent paper abrasion Extended copy amount Two-sided output setting Wireless print settings*1, 2 PictBridge settings (page 55...write attribute Volume control Slide show setting Quiet mode Key repeat Language selection*1 Reset setting*1 *1 For details, refer to the User's Guide onscreen manual. *2 Appears only when the optional Bluetooth unit is attached to the machine. Before Using the Machine 11
Quick Start Guide
Page 16
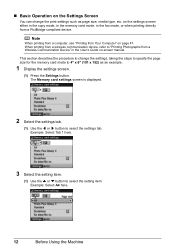
... settings screen. (1) Press the Settings button. „ Basic Operation on the settings screen either in the copy mode, in the memory card mode, in the User's Guide on page 47. on the Settings Screen You can change the settings, taking the steps to specify the page size for the memory card mode...
... settings screen. (1) Press the Settings button. „ Basic Operation on the settings screen either in the copy mode, in the memory card mode, in the User's Guide on page 47. on the Settings Screen You can change the settings, taking the steps to specify the page size for the memory card mode...
Quick Start Guide
Page 26
In such cases, reduce the sheets of paper you remove the previously printed sheet from your mobile phone to sticker paper, select Stickers for Canon genuine paper, weighing more than a postcard, including plain paper or notepad paper cut to a small size. Refer to "Printing on ...photos saved on mobile phones, refer to "Setting the Page Size, Media Type, and Layout When Printing from a Wireless Communication Device" of the User's Guide on-screen manual. Refer to "Copying on Stickers (Sticker copy)" in Wireless print settings. When printing photos saved on your computer. *4 We...
In such cases, reduce the sheets of paper you remove the previously printed sheet from your mobile phone to sticker paper, select Stickers for Canon genuine paper, weighing more than a postcard, including plain paper or notepad paper cut to a small size. Refer to "Printing on ...photos saved on mobile phones, refer to "Setting the Page Size, Media Type, and Layout When Printing from a Wireless Communication Device" of the User's Guide on-screen manual. Refer to "Copying on Stickers (Sticker copy)" in Wireless print settings. When printing photos saved on your computer. *4 We...
Quick Start Guide
Page 39
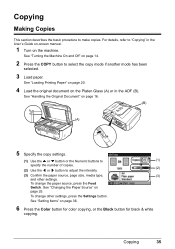
... 20. 4 Load the original document on the Platen Glass (A) or in the User's Guide on-screen manual. 1 Turn on the machine. To change other settings. Copying 35 See "Handling the Original Document" on page 36. 6 Press the Color button for color copying, or the Black button for black & white copying. Copying Making Copies This...
... 20. 4 Load the original document on the Platen Glass (A) or in the User's Guide on-screen manual. 1 Turn on the machine. To change other settings. Copying 35 See "Handling the Original Document" on page 36. 6 Press the Color button for color copying, or the Black button for black & white copying. Copying Making Copies This...
Quick Start Guide
Page 40
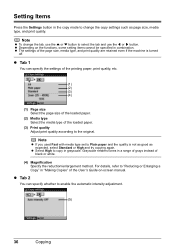
... of the printing paper, print quality, etc. (1) (2) (3) (4) (1) Page size Select the page size of the loaded paper. (2) Media type Select the media type of the User's Guide on the functions, some setting items cannot be specified in combination. z Tab 1 You can specify whether to enable the automatic intensity adjustment. (5) 36 Copying Note...
... of the printing paper, print quality, etc. (1) (2) (3) (4) (1) Page size Select the page size of the loaded paper. (2) Media type Select the media type of the User's Guide on the functions, some setting items cannot be specified in combination. z Tab 1 You can specify whether to enable the automatic intensity adjustment. (5) 36 Copying Note...
Quick Start Guide
Page 42
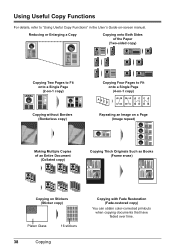
... onto a Single Page (2-on-1 copy) Copying without Borders (Borderless copy) Copying Four Pages to "Using Useful Copy Functions" in the User's Guide on Stickers (Sticker copy) Platen Glass 16 stickers 38 Copying Copying with Fade Restoration (Fade-restored copy) You can obtain color-corrected printouts when copying documents that have faded over time.
... onto a Single Page (2-on-1 copy) Copying without Borders (Borderless copy) Copying Four Pages to "Using Useful Copy Functions" in the User's Guide on Stickers (Sticker copy) Platen Glass 16 stickers 38 Copying Copying with Fade Restoration (Fade-restored copy) You can obtain color-corrected printouts when copying documents that have faded over time.
Quick Start Guide
Page 47
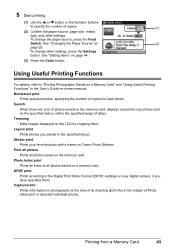
...by cropping them . Trimming Edits images displayed on page 44. (3) Press the Color button. Sticker print Prints your digital camera, if you pasted in the specified ..."Changing the Paper Source" on photographs at the time of its shooting (Exif info) in the User's Guide on the specified date or within the specified range of dates. To change other settings. Layout print...change the paper source, press the Feed Switch. Photo Index print Prints an index of all photos saved on Canon Photo Stickers. 5 Start printing. (1) Use the { or } button or the Numeric buttons to specify the ...
...by cropping them . Trimming Edits images displayed on page 44. (3) Press the Color button. Sticker print Prints your digital camera, if you pasted in the specified ..."Changing the Paper Source" on photographs at the time of its shooting (Exif info) in the User's Guide on the specified date or within the specified range of dates. To change other settings. Layout print...change the paper source, press the Feed Switch. Photo Index print Prints an index of all photos saved on Canon Photo Stickers. 5 Start printing. (1) Use the { or } button or the Numeric buttons to specify the ...
Quick Start Guide
Page 54
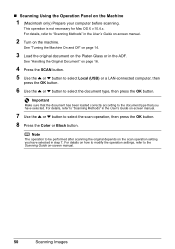
For details, refer to "Scanning Methods" in the User's Guide on-screen manual. 2 Turn on page 16. 4 Press the SCAN button. 5 Use the { ... press the OK button. See "Handling the Original Document" on the machine. Note The operation to the Scanning Guide on the Platen Glass or in the ADF. „ Scanning Using the Operation Panel on the scan operation setting... the Machine 1 (Macintosh only) Prepare your computer before scanning. For details, refer to "Scanning Methods" in the User's Guide on-screen manual. 7 Use the { or } button to the document type that you have selected. Important Make ...
For details, refer to "Scanning Methods" in the User's Guide on-screen manual. 2 Turn on page 16. 4 Press the SCAN button. 5 Use the { ... press the OK button. See "Handling the Original Document" on the machine. Note The operation to the Scanning Guide on the Platen Glass or in the ADF. „ Scanning Using the Operation Panel on the scan operation setting... the Machine 1 (Macintosh only) Prepare your computer before scanning. For details, refer to "Scanning Methods" in the User's Guide on-screen manual. 7 Use the { or } button to the document type that you have selected. Important Make ...


