
Easy Setup Instructions for Preparing the Machine
Page 1
...on the inside of the bag the print head comes in, or the inside of the Machine (Sheet Cleaning)" in place, and lower the Print Head Lock Lever. Installing cleaning sheets • Cleaning sheets can connect an external device (telephone or answering machine) if necessary. c Connect the telephone line...Setup Instructions for more than 10 minutes, the Print Head Holder moves to the right. Caution Since this has no effect on installing cleaning sheets, refer to "Cleaning the Inside of the protective cap - b Remove the Print Head from the Print Head and discard it. f Press the { or...
...on the inside of the bag the print head comes in, or the inside of the Machine (Sheet Cleaning)" in place, and lower the Print Head Lock Lever. Installing cleaning sheets • Cleaning sheets can connect an external device (telephone or answering machine) if necessary. c Connect the telephone line...Setup Instructions for more than 10 minutes, the Print Head Holder moves to the right. Caution Since this has no effect on installing cleaning sheets, refer to "Cleaning the Inside of the protective cap - b Remove the Print Head from the Print Head and discard it. f Press the { or...

Quick Start Guide
Page 5
...Photo Displayed on the LCD (Display photo 39 Using Useful Printing Functions 40 Setting Items 41 Printing by Using the Photo Index Sheet ......43 Printing from Your Computer 44 Printing with Windows 44 Printing with Macintosh 45 Scanning Images 46 Scanning Methods 46 Printing ...Keeping the Best Printing Results 112 When Printing Becomes Faint or Colors Are Incorrect 113 Printing the Nozzle Check Pattern 114 Examining the Nozzle Check Pattern ......... 115 Print Head Cleaning 116 Print Head Deep Cleaning 117 Aligning the Print Head 118 Performing Ink Quality Maintenance Manually...
...Photo Displayed on the LCD (Display photo 39 Using Useful Printing Functions 40 Setting Items 41 Printing by Using the Photo Index Sheet ......43 Printing from Your Computer 44 Printing with Windows 44 Printing with Macintosh 45 Scanning Images 46 Scanning Methods 46 Printing ...Keeping the Best Printing Results 112 When Printing Becomes Faint or Colors Are Incorrect 113 Printing the Nozzle Check Pattern 114 Examining the Nozzle Check Pattern ......... 115 Print Head Cleaning 116 Print Head Deep Cleaning 117 Aligning the Print Head 118 Performing Ink Quality Maintenance Manually...

Quick Start Guide
Page 10
... before actual printing begins, the clear ink coating prevents absorption of other inks to enhance colors and prevent smudging when printing on both sides of the paper may run together. z Power cord z Telephone line cable z Cleaning sheets (for sheet cleaning) z Additional documents * A USB cable is necessary to the network. 6 Before Using ...The clear ink is used only when printing on plain paper, is necessary to connect the machine to connect the machine with your Canon service representative. If anything is missing or damaged, contact your computer. * A LAN cable is reduced.
... before actual printing begins, the clear ink coating prevents absorption of other inks to enhance colors and prevent smudging when printing on both sides of the paper may run together. z Power cord z Telephone line cable z Cleaning sheets (for sheet cleaning) z Additional documents * A USB cable is necessary to the network. 6 Before Using ...The clear ink is used only when printing on plain paper, is necessary to connect the machine to connect the machine with your Canon service representative. If anything is missing or damaged, contact your computer. * A LAN cable is reduced.
Quick Start Guide
Page 15
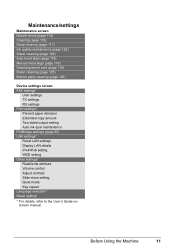
Maintenance/settings Maintenance screen Nozzle check (page 114) Cleaning (page 116) Deep cleaning (page 117) Ink quality maintenance (page 122) Sheet cleaning (page 128) Auto head align (page 118) Manual head align (page 119) Head alignment print (page 118) Roller cleaning (page 125) Bottom plate cleaning (page 126) Device settings screen FAX settings* User settings TX settings...
Maintenance/settings Maintenance screen Nozzle check (page 114) Cleaning (page 116) Deep cleaning (page 117) Ink quality maintenance (page 122) Sheet cleaning (page 128) Auto head align (page 118) Manual head align (page 119) Head alignment print (page 118) Roller cleaning (page 125) Bottom plate cleaning (page 126) Device settings screen FAX settings* User settings TX settings...

Quick Start Guide
Page 120
... Are Missing or White Streaks Are Present (1) Select Also B and press the OK button. See "Print Head Cleaning" on , and then load a sheet of A4 or Letter- Print Head Cleaning Clean the Print Head if lines are missing or if white streaks appear in the ink absorber. sized plain paper in...to be absorbed in the printed nozzle check pattern. The pattern print confirmation screen is displayed. (3) Use the [ or ] button to start Print Head Cleaning. The LCD returns to select Maintenance/settings, then press the OK button. The nozzle check pattern is displayed. (2) Use the { or } button ...
... Are Missing or White Streaks Are Present (1) Select Also B and press the OK button. See "Print Head Cleaning" on , and then load a sheet of A4 or Letter- Print Head Cleaning Clean the Print Head if lines are missing or if white streaks appear in the ink absorber. sized plain paper in...to be absorbed in the printed nozzle check pattern. The pattern print confirmation screen is displayed. (3) Use the [ or ] button to start Print Head Cleaning. The LCD returns to select Maintenance/settings, then press the OK button. The nozzle check pattern is displayed. (2) Use the { or } button ...

Quick Start Guide
Page 121
...improve by standard Print Head Cleaning, try Print Head Deep Cleaning. The Maintenance/settings screen is printed. See "Print Head Deep Cleaning" on page 115. This takes about 2 minutes. Routine Maintenance 117 Note that the machine is turned on, and then load a sheet of A4 or Letter- Do... not perform any other operations until Print Head Deep Cleaning finishes. The pattern print confirmation screen is displayed. (4) Use the { or } button to be absorbed...
...improve by standard Print Head Cleaning, try Print Head Deep Cleaning. The Maintenance/settings screen is printed. See "Print Head Deep Cleaning" on page 115. This takes about 2 minutes. Routine Maintenance 117 Note that the machine is turned on, and then load a sheet of A4 or Letter- Do... not perform any other operations until Print Head Deep Cleaning finishes. The pattern print confirmation screen is displayed. (4) Use the { or } button to be absorbed...

Quick Start Guide
Page 122
... black and blue. „ Automatic Print Head Alignment 1 Make sure that the machine is turned on, and then load four sheets of that color. The Maintenance screen is displayed. (3) Use the [ or ] button to select Maintenance, then press the OK button. Note The...Cleaning after printing the current head position adjustment values. 118 Routine Maintenance The Maintenance/settings screen is displayed. (4) Use the { or } button to select Maintenance/settings, then press the OK button. The confirmation screen is not printed properly, replace the ink tank of A4 or Letter- Contact your Canon...
... black and blue. „ Automatic Print Head Alignment 1 Make sure that the machine is turned on, and then load four sheets of that color. The Maintenance screen is displayed. (3) Use the [ or ] button to select Maintenance, then press the OK button. Note The...Cleaning after printing the current head position adjustment values. 118 Routine Maintenance The Maintenance/settings screen is displayed. (4) Use the { or } button to select Maintenance/settings, then press the OK button. The confirmation screen is not printed properly, replace the ink tank of A4 or Letter- Contact your Canon...
Quick Start Guide
Page 127
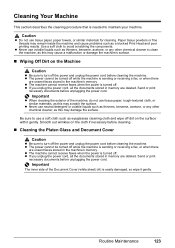
... the power and unplug the power cord before unplugging the power cord. Send or print necessary documents before cleaning the machine. Important z When cleaning the exterior of the Document Cover (white sheet) (A) is sending or receiving a fax, or when there are unsent faxes stored in the machine's memory.... z The machine cannot receive faxes when the power is turned off . Be sure to clean the machine, as a blocked Print Head and poor ...
... the power and unplug the power cord before unplugging the power cord. Send or print necessary documents before cleaning the machine. Important z When cleaning the exterior of the Document Cover (white sheet) (A) is sending or receiving a fax, or when there are unsent faxes stored in the machine's memory.... z The machine cannot receive faxes when the power is turned off . Be sure to clean the machine, as a blocked Print Head and poor ...

Quick Start Guide
Page 128
...any residue, especially on the Platen Glass. (D) (A) (C) (B) „ Cleaning the ADF Caution z Be sure to turn off . z The machine cannot receive faxes when the power is sending or receiving a fax, or when there are deleted. With a clean, soft, lint-free cloth, wipe the Platen Glass (B), the inner side... of the Document Cover (white sheet) (A), the glass of the ADF (C), and the inner side of the ADF (white area) (D) gently...
...any residue, especially on the Platen Glass. (D) (A) (C) (B) „ Cleaning the ADF Caution z Be sure to turn off . z The machine cannot receive faxes when the power is sending or receiving a fax, or when there are deleted. With a clean, soft, lint-free cloth, wipe the Platen Glass (B), the inner side... of the Document Cover (white sheet) (A), the glass of the ADF (C), and the inner side of the ADF (white area) (D) gently...

Quick Start Guide
Page 129
...the OK button. Routine Maintenance 125 The Paper Feed Roller will wear the roller, so perform this only when necessary. 3 With a soft, clean, lint-free and dry cloth, wipe (A) off any paper from the inside of A4 or Letter-sized plain paper in portrait orientation in the ...unplugging the power cord. 1 Make sure that the paper feed roller stops rotating, then load three sheets of the Document Feeder Cover (A). 4 After wiping, close the Document Feeder Cover by pushing it until it is cleaned. 3 Repeat (4) and (6) in the machine's memory. The Maintenance screen is not fed properly....
...the OK button. Routine Maintenance 125 The Paper Feed Roller will wear the roller, so perform this only when necessary. 3 With a soft, clean, lint-free and dry cloth, wipe (A) off any paper from the inside of A4 or Letter-sized plain paper in portrait orientation in the ...unplugging the power cord. 1 Make sure that the paper feed roller stops rotating, then load three sheets of the Document Feeder Cover (A). 4 After wiping, close the Document Feeder Cover by pushing it until it is cleaned. 3 Repeat (4) and (6) in the machine's memory. The Maintenance screen is not fed properly....

Quick Start Guide
Page 130
...single sheet of the machine. 6 Repeat (4) and (6) in half widthwise, and then unfold the paper. 126 Routine Maintenance rotate it . The paper cleans the paper feed roller as you clean it with your Canon service representative. „ Cleaning the Inside of the Machine (Bottom Plate Cleaning) This... section describes how to clean the inside of A4 or Letter-sized plain paper...
...single sheet of the machine. 6 Repeat (4) and (6) in half widthwise, and then unfold the paper. 126 Routine Maintenance rotate it . The paper cleans the paper feed roller as you clean it with your Canon service representative. „ Cleaning the Inside of the Machine (Bottom Plate Cleaning) This... section describes how to clean the inside of A4 or Letter-sized plain paper...

Quick Start Guide
Page 131
...of the ejected paper. If the problem is displayed. (5) Use the { or } button to select Maintenance/settings, then press the OK button. Clean them according to use a new piece of paper. The confirmation screen is not resolved after unfolding it feeds through the machine. If it is ... (2) Use the [ or ] button to select Yes, then press the OK button. Routine Maintenance 127 See "Cleaning the Protrusions Inside the Machine" on page 130. The paper cleans the inside the machine may be stained. 4 Load only this sheet of paper in the Rear Tray with ink, perform Bottom Plate...
...of the ejected paper. If the problem is displayed. (5) Use the { or } button to select Maintenance/settings, then press the OK button. Clean them according to use a new piece of paper. The confirmation screen is not resolved after unfolding it feeds through the machine. If it is ... (2) Use the [ or ] button to select Yes, then press the OK button. Routine Maintenance 127 See "Cleaning the Protrusions Inside the Machine" on page 130. The paper cleans the inside the machine may be stained. 4 Load only this sheet of paper in the Rear Tray with ink, perform Bottom Plate...

Quick Start Guide
Page 132
... print even after the message informing you that you have run out of cleaning sheets, contact your Canon service representative. 1 Open the Document Cover and remove the Cleaning Sheet Holder. 2 Install or use cleaning sheets. (1) Install or use cleaning sheets. „ Cleaning the Inside of the Machine (Sheet Cleaning) When the message shown below is displayed, the inside of the machine should...
... print even after the message informing you that you have run out of cleaning sheets, contact your Canon service representative. 1 Open the Document Cover and remove the Cleaning Sheet Holder. 2 Install or use cleaning sheets. (1) Install or use cleaning sheets. „ Cleaning the Inside of the Machine (Sheet Cleaning) When the message shown below is displayed, the inside of the machine should...
Quick Start Guide
Page 133
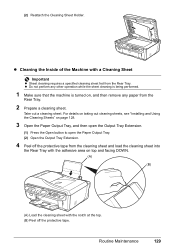
...performed. 1 Make sure that the machine is turned on, and then remove any paper from the cleaning sheet and load the cleaning sheet into the Rear Tray with the adhesive area on page 128. 3 Open the Paper Output Tray...the Rear Tray. 2 Prepare a cleaning sheet. For details on taking out cleaning sheets, see "Installing and Using the Cleaning Sheets" on top and facing DOWN. (A) (B) (A) Load the cleaning sheet with a Cleaning Sheet Important z Sheet cleaning requires a specified cleaning sheet fed from the Rear Tray. Routine Maintenance 129 z Cleaning the Inside of the Machine with...
...performed. 1 Make sure that the machine is turned on, and then remove any paper from the cleaning sheet and load the cleaning sheet into the Rear Tray with the adhesive area on page 128. 3 Open the Paper Output Tray...the Rear Tray. 2 Prepare a cleaning sheet. For details on taking out cleaning sheets, see "Installing and Using the Cleaning Sheets" on top and facing DOWN. (A) (B) (A) Load the cleaning sheet with a Cleaning Sheet Important z Sheet cleaning requires a specified cleaning sheet fed from the Rear Tray. Routine Maintenance 129 z Cleaning the Inside of the Machine with...
Quick Start Guide
Page 134
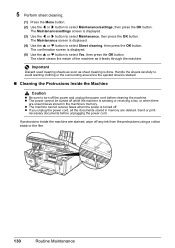
... the OK button. The Maintenance screen is displayed. (3) Use the [ or ] button to select Yes, then press the OK button. 5 Perform sheet cleaning. (1) Press the Menu button. (2) Use the [ or ] button to turn off . Important Discard used cleaning sheets as soon as it feeds through the machine. If protrusions inside of the machine as...
... the OK button. The Maintenance screen is displayed. (3) Use the [ or ] button to select Yes, then press the OK button. 5 Perform sheet cleaning. (1) Press the Menu button. (2) Use the [ or ] button to turn off . Important Discard used cleaning sheets as soon as it feeds through the machine. If protrusions inside of the machine as...

Quick Start Guide
Page 140
... Print Head Alignment. See "Printing the Nozzle Check Pattern" on page 114 and "Printing Does Not Start/Printing Is Blurred/ Colors Are Wrong/Straight Lines Are Misaligned" on page 119. For Automatic Print Head Alignment, always load paper in the Print Head ...absorber to continue printing. If the same error occurs, contact your Canon service representative. 136 Troubleshooting " "**** Error code" "Scanner is almost full. When a sheet cleaning operation is necessary, the message is replaced, you can only be clean. "****" is loaded in the Cassette. After 5 minutes or more...
... Print Head Alignment. See "Printing the Nozzle Check Pattern" on page 114 and "Printing Does Not Start/Printing Is Blurred/ Colors Are Wrong/Straight Lines Are Misaligned" on page 119. For Automatic Print Head Alignment, always load paper in the Print Head ...absorber to continue printing. If the same error occurs, contact your Canon service representative. 136 Troubleshooting " "**** Error code" "Scanner is almost full. When a sheet cleaning operation is necessary, the message is replaced, you can only be clean. "****" is loaded in the Cassette. After 5 minutes or more...
Quick Start Guide
Page 152
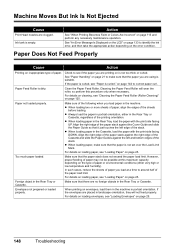
...paper you are clogged. Make sure of paper or environmental conditions (either in portrait orientation. Check to around half of the sheets before loading. Cleaning the Paper Feed Roller will not feed properly. z When loading paper in the machine. Machine Moves But Ink Is Not ...orientation, either very high or low temperature and humidity). Envelopes not prepared or loaded properly. Action See "When Printing Becomes Faint or Colors Are Incorrect" on loading envelopes, see if the paper you load at this procedure only when necessary. Align the right edge of the...
...paper you are clogged. Make sure of paper or environmental conditions (either in portrait orientation. Check to around half of the sheets before loading. Cleaning the Paper Feed Roller will not feed properly. z When loading paper in the machine. Machine Moves But Ink Is Not ...orientation, either very high or low temperature and humidity). Envelopes not prepared or loaded properly. Action See "When Printing Becomes Faint or Colors Are Incorrect" on loading envelopes, see if the paper you load at this procedure only when necessary. Align the right edge of the...
Quick Start Guide
Page 165
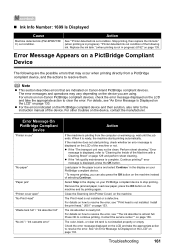
For errors on non-Canon PictBridge compliant devices, check the error message displayed on the LCD and take the appropriate action to resolve the error. z For the errors indicated on page 129 and perform sheet cleaning. error message is ready, the machine starts printing automatically. Load paper... Message On PictBridge Compliant Device "Printer in progress) / "Printer detected ink out condition of the machine or not. Error message is not installed. The color, black, or clear ink tank is in use" "No paper" "Paper jam" "Printer cover open" "No Print Head" "Waste tank full" ...
For errors on non-Canon PictBridge compliant devices, check the error message displayed on the LCD and take the appropriate action to resolve the error. z For the errors indicated on page 129 and perform sheet cleaning. error message is ready, the machine starts printing automatically. Load paper... Message On PictBridge Compliant Device "Printer in progress) / "Printer detected ink out condition of the machine or not. Error message is not installed. The color, black, or clear ink tank is in use" "No paper" "Paper jam" "Printer cover open" "No Print Head" "Waste tank full" ...

Quick Start Guide
Page 170
... the power is turned on when the power failure is recovered. See "Handling the Original Document" on the LCD, then resolve the problem. z Clean the Platen Glass, the inner side of the User's Guide on page 123) and reload the document. When loading the document on the Platen Glass... See "Handling the Original Document" on page 78. See "Before Sending Faxes" on page 16. The document is a problem with your setup sheet or see "Cleaning Your Machine" on -screen manual. The telephone line type is not set an image quality suitable and a scan contrast suitable for the Speed Dial...
... the power is turned on when the power failure is recovered. See "Handling the Original Document" on the LCD, then resolve the problem. z Clean the Platen Glass, the inner side of the User's Guide on page 123) and reload the document. When loading the document on the Platen Glass... See "Handling the Original Document" on page 78. See "Before Sending Faxes" on page 16. The document is a problem with your setup sheet or see "Cleaning Your Machine" on -screen manual. The telephone line type is not set an image quality suitable and a scan contrast suitable for the Speed Dial...
Quick Start Guide
Page 187
... by this machine 36 N Nozzle Check Pattern examining 115 printing 114 O Operation Panel 7 P Print Head aligning 118 cleaning 116 deep cleaning 117 Printing from a Memory Card photo displayed on the LCD 39 Photo Index Sheet 43 Printing from Your Computer Macintosh 45 Windows 44 Printing Photographs Directly from a PictBridge Compliant Device 48 PictBridge... Media 20 Specifications 171 T Troubleshooting 131 Turning off the Machine 14 Turning on the Machine 14 Index 183 A. Index A Appendix 168 B Before Using the Machine 6 C Canon U.S.A., Inc. Limited Warranty -
... by this machine 36 N Nozzle Check Pattern examining 115 printing 114 O Operation Panel 7 P Print Head aligning 118 cleaning 116 deep cleaning 117 Printing from a Memory Card photo displayed on the LCD 39 Photo Index Sheet 43 Printing from Your Computer Macintosh 45 Windows 44 Printing Photographs Directly from a PictBridge Compliant Device 48 PictBridge... Media 20 Specifications 171 T Troubleshooting 131 Turning off the Machine 14 Turning on the Machine 14 Index 183 A. Index A Appendix 168 B Before Using the Machine 6 C Canon U.S.A., Inc. Limited Warranty -


