MX310 series Quick Start Guide
Page 5
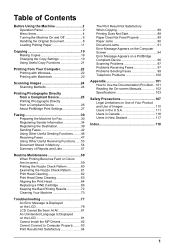
... Copy Settings 19 Using Useful Copy Functions 21 Printing from Your Computer 22 Printing with Windows 22 Printing with Macintosh 23 Scanning Images 24 Scanning Methods 24 Printing Photographs Directly from a Compliant Device 25 Printing Photographs Directly from a Compliant Device 25 About PictBridge Print... Functions ......53 Document Stored in Memory 54 Summary of Reports and Lists 57 Routine Maintenance 59 When Printing Becomes Faint or Colors Are Incorrect 59 Printing the Nozzle Check Pattern 60 Examining the Nozzle Check Pattern ...........61 Print Head Cleaning 62 Print Head...
... Copy Settings 19 Using Useful Copy Functions 21 Printing from Your Computer 22 Printing with Windows 22 Printing with Macintosh 23 Scanning Images 24 Scanning Methods 24 Printing Photographs Directly from a Compliant Device 25 Printing Photographs Directly from a Compliant Device 25 About PictBridge Print... Functions ......53 Document Stored in Memory 54 Summary of Reports and Lists 57 Routine Maintenance 59 When Printing Becomes Faint or Colors Are Incorrect 59 Printing the Nozzle Check Pattern 60 Examining the Nozzle Check Pattern ...........61 Print Head Cleaning 62 Print Head...
MX310 series Quick Start Guide
Page 6
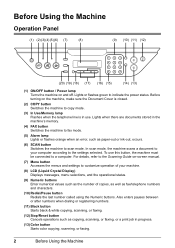
... after numbers when dialing or registering numbers. (11) Black button Starts black & white copying, scanning, or faxing. (12) Stop/Reset button Cancels operations such as copying, scanning, or faxing, or a print job in progress. (13) Color button Starts color copying, scanning, or faxing. 2 Before Using the Machine Before Using the Machine Operation Panel (1) (2) (3)(4) (5)(6) (7) (8) (9) (10) (11...
... after numbers when dialing or registering numbers. (11) Black button Starts black & white copying, scanning, or faxing. (12) Stop/Reset button Cancels operations such as copying, scanning, or faxing, or a print job in progress. (13) Color button Starts color copying, scanning, or faxing. 2 Before Using the Machine Before Using the Machine Operation Panel (1) (2) (3)(4) (5)(6) (7) (8) (9) (10) (11...
MX310 series Quick Start Guide
Page 7
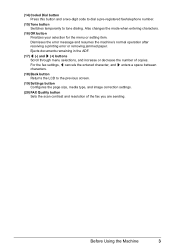
... Switches temporarily to the previous screen. (19) Settings button Configures the page size, media type, and image correction settings. (20) FAX Quality button Sets the scan contrast and resolution of copies.
... Switches temporarily to the previous screen. (19) Settings button Configures the page size, media type, and image correction settings. (20) FAX Quality button Sets the scan contrast and resolution of copies.
MX310 series Quick Start Guide
Page 8
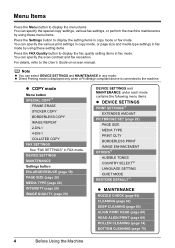
... SETTINGS" in fax mode by using these menu items. Press the Settings button to the User's Guide on-screen manual. Note z You can specify the scan contrast and fax resolution. You can select DEVICE SETTINGS and MAINTENANCE in any mode. DEVICE SETTINGS MAINTENANCE Settings button ENLARGE/REDUCE (page 19) PAGE SIZE...
... SETTINGS" in fax mode by using these menu items. Press the Settings button to the User's Guide on-screen manual. Note z You can specify the scan contrast and fax resolution. You can select DEVICE SETTINGS and MAINTENANCE in any mode. DEVICE SETTINGS MAINTENANCE Settings button ENLARGE/REDUCE (page 19) PAGE SIZE...
MX310 series Quick Start Guide
Page 9
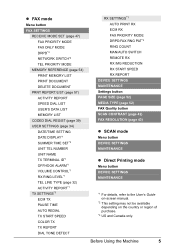
...*1 VOLUME CONTROL*1 RX RING LEVEL*1 TEL LINE TYPE (page 32) ACTIVITY REPORT*1 TX SETTINGS*1 ECM TX PAUSE TIME AUTO REDIAL TX START SPEED COLOR TX TX REPORT DIAL TONE DETECT RX SETTINGS*1 AUTO PRINT RX ECM RX FAX PRIORITY MODE DRPD:FAX RNG PAT*3 RING COUNT MAN/AUTO SWITCH...RX START SPEED RX REPORT DEVICE SETTINGS MAINTENANCE Settings button PAGE SIZE (page 52) MEDIA TYPE (page 52) FAX Quality button SCAN CONTRAST (page 42) FAX RESOLUTION (page 43) z SCAN mode Menu button DEVICE SETTINGS MAINTENANCE z Direct Printing mode Menu button DEVICE SETTINGS MAINTENANCE *1 For details, refer to the User's...
...*1 VOLUME CONTROL*1 RX RING LEVEL*1 TEL LINE TYPE (page 32) ACTIVITY REPORT*1 TX SETTINGS*1 ECM TX PAUSE TIME AUTO REDIAL TX START SPEED COLOR TX TX REPORT DIAL TONE DETECT RX SETTINGS*1 AUTO PRINT RX ECM RX FAX PRIORITY MODE DRPD:FAX RNG PAT*3 RING COUNT MAN/AUTO SWITCH...RX START SPEED RX REPORT DEVICE SETTINGS MAINTENANCE Settings button PAGE SIZE (page 52) MEDIA TYPE (page 52) FAX Quality button SCAN CONTRAST (page 42) FAX RESOLUTION (page 43) z SCAN mode Menu button DEVICE SETTINGS MAINTENANCE z Direct Printing mode Menu button DEVICE SETTINGS MAINTENANCE *1 For details, refer to the User's...
MX310 series Quick Start Guide
Page 11
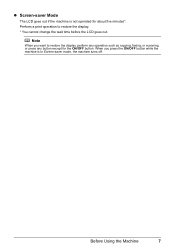
z Screen-saver Mode The LCD goes out if the machine is in Screen-saver mode, the machine turns off. Perform a print operation to restore the display, perform any operation such as copying, faxing, or scanning, or press any button except for about five minutes*. Note When you press the ON/OFF button while the machine is not operated for the ON/OFF button. Before Using the Machine 7 When you want to restore the display. * You cannot change the wait time before the LCD goes out.
z Screen-saver Mode The LCD goes out if the machine is in Screen-saver mode, the machine turns off. Perform a print operation to restore the display, perform any operation such as copying, faxing, or scanning, or press any button except for about five minutes*. Note When you press the ON/OFF button while the machine is not operated for the ON/OFF button. Before Using the Machine 7 When you want to restore the display. * You cannot change the wait time before the LCD goes out.
MX310 series Quick Start Guide
Page 12
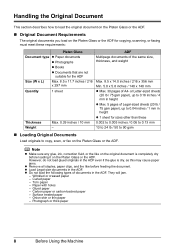
... / 75 gsm paper), up to 0.16 inches / 4 mm in height z Max. 5 pages of Legal-sized sheets (20 lb / 75 gsm paper), up to copy, scan, or fax on the Platen Glass or the ADF. z Load Legal-size documents in the ADF. z Do not load the following types of A4- Carbon... on the Platen Glass or the ADF. „ Original Document Requirements The original documents you load on the Platen Glass or the ADF for copying, scanning, or faxing must meet these requirements: Platen Glass Document type z Paper documents z Photographs z Books z Documents that are not suitable for sizes other than these 0....
... / 75 gsm paper), up to 0.16 inches / 4 mm in height z Max. 5 pages of Legal-sized sheets (20 lb / 75 gsm paper), up to copy, scan, or fax on the Platen Glass or the ADF. z Load Legal-size documents in the ADF. z Do not load the following types of A4- Carbon... on the Platen Glass or the ADF. „ Original Document Requirements The original documents you load on the Platen Glass or the ADF for copying, scanning, or faxing must meet these requirements: Platen Glass Document type z Paper documents z Photographs z Books z Documents that are not suitable for sizes other than these 0....
MX310 series Quick Start Guide
Page 13
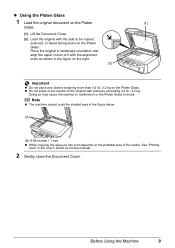
... weight on -screen manual. 2 Gently close the Document Cover. Note z The machine cannot scan the shaded area in the figure below. (A) (A) 0.04 inches / 1 mm z When copying, the area you can scan depends on the printable area of it with the alignment mark as shown in landscape orientation and... align the upper corner of the media. Doing so may cause the scanner to malfunction or the Platen Glass to be copied, scanned, or faxed facing down on the Platen Glass. z Using the Platen Glass 1 Load the original document on the Platen (1) Glass. (1) Lift the Document...
... weight on -screen manual. 2 Gently close the Document Cover. Note z The machine cannot scan the shaded area in the figure below. (A) (A) 0.04 inches / 1 mm z When copying, the area you can scan depends on the printable area of it with the alignment mark as shown in landscape orientation and... align the upper corner of the media. Doing so may cause the scanner to malfunction or the Platen Glass to be copied, scanned, or faxed facing down on the Platen Glass. z Using the Platen Glass 1 Load the original document on the Platen (1) Glass. (1) Lift the Document...
MX310 series Quick Start Guide
Page 14
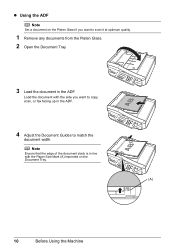
Note Ensure that the edge of the document stack is in line with the side you want to match the document width. Load the document with the Paper Size Mark (A) imprinted on the Platen Glass if you want to scan it at optimum quality. 1 Remove any documents from the Platen Glass. 2 Open the Document Tray. 3 Load the document in the ADF. 4 Adjust the Document Guides to copy, scan, or fax facing up in the ADF. z Using the ADF Note Set a document on the Document Tray. (A) 10 Before Using the Machine
Note Ensure that the edge of the document stack is in line with the side you want to match the document width. Load the document with the Paper Size Mark (A) imprinted on the Platen Glass if you want to scan it at optimum quality. 1 Remove any documents from the Platen Glass. 2 Open the Document Tray. 3 Load the document in the ADF. 4 Adjust the Document Guides to copy, scan, or fax facing up in the ADF. z Using the ADF Note Set a document on the Document Tray. (A) 10 Before Using the Machine

MX310 series Quick Start Guide
Page 28
... Machine On and Off" on page 6. 3 Load the original document on page 8. 4 Press the SCAN button, then press the Color or Black button. 24 Scanning Images You can select from the various scanning methods. z If You Want to the Scanning Guide on-screen manual. „ Opening MP Navigator EX using the Operation Panel" on -screen...
... Machine On and Off" on page 6. 3 Load the original document on page 8. 4 Press the SCAN button, then press the Color or Black button. 24 Scanning Images You can select from the various scanning methods. z If You Want to the Scanning Guide on-screen manual. „ Opening MP Navigator EX using the Operation Panel" on -screen...
MX310 series Quick Start Guide
Page 46
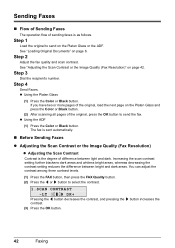
Step 3 Dial the recipient's number. z Using the Platen Glass (1) Press the Color or Black button. z Using the ADF (1) Press the Color or Black button. Increasing the scan contrast setting further blackens dark areas and whitens bright areas, whereas decreasing the contrast setting reduces the difference between..., then press the FAX Quality button. (2) Press the [ or ] button to send on the Platen Glass and press the Color or Black button. (2) After scanning all pages of sending faxes is the degree of difference between bright and dark areas. See "Loading Original Documents" on page 42...
Step 3 Dial the recipient's number. z Using the Platen Glass (1) Press the Color or Black button. z Using the ADF (1) Press the Color or Black button. Increasing the scan contrast setting further blackens dark areas and whitens bright areas, whereas decreasing the contrast setting reduces the difference between..., then press the FAX Quality button. (2) Press the [ or ] button to send on the Platen Glass and press the Color or Black button. (2) After scanning all pages of sending faxes is the degree of difference between bright and dark areas. See "Loading Original Documents" on page 42...
MX310 series Quick Start Guide
Page 47
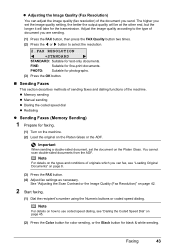
... to use coded speed dialing, see "Loading Original Documents" on page 8. (3) Press the FAX button. (4) Adjust fax settings as necessary. See "Adjusting the Scan Contrast or the Image Quality (Fax Resolution)" on the Platen Glass. The higher you can adjust the image quality (fax resolution) of the machine. z Memory...for the transmission. z Adjusting the Image Quality (Fax Resolution) You can fax, see "Dialing the Coded Speed Dial" on page 45. (2) Press the Color button for color sending, or the Black button for text-only documents. You cannot scan double-sided documents from the ADF.
... to use coded speed dialing, see "Loading Original Documents" on page 8. (3) Press the FAX button. (4) Adjust fax settings as necessary. See "Adjusting the Scan Contrast or the Image Quality (Fax Resolution)" on the Platen Glass. The higher you can adjust the image quality (fax resolution) of the machine. z Memory...for the transmission. z Adjusting the Image Quality (Fax Resolution) You can fax, see "Dialing the Coded Speed Dial" on page 45. (2) Press the Color button for color sending, or the Black button for text-only documents. You cannot scan double-sided documents from the ADF.
MX310 series Quick Start Guide
Page 48
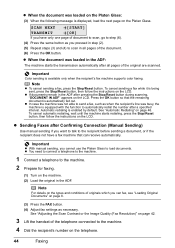
... available only when the recipient's fax machine supports color faxing. z Sending Faxes after all pages of document to scan, go to step (6). (4) Press the same button as you want to talk to scan in the ADF after a specified interval. SCAN NEXT [START] TRANSMIT [OK] If you have...to the recipient before sending a document, or if the recipient does not have a fax machine that the remaining document is automatically fed out. Important Color sending is enabled by default. Note z To cancel sending a fax, press the Stop/Reset button. See "Automatic Redialing" on the LCD. Important...
... available only when the recipient's fax machine supports color faxing. z Sending Faxes after all pages of document to scan, go to step (6). (4) Press the same button as you want to talk to scan in the ADF after a specified interval. SCAN NEXT [START] TRANSMIT [OK] If you have...to the recipient before sending a document, or if the recipient does not have a fax machine that the remaining document is automatically fed out. Important Color sending is enabled by default. Note z To cancel sending a fax, press the Stop/Reset button. See "Automatic Redialing" on the LCD. Important...
MX310 series Quick Start Guide
Page 70
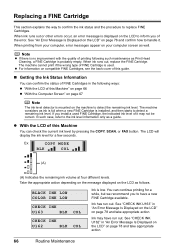
If you install a used . BLACK INK LOW COLOR INK LOW CHECK INK U163 BLK COL CHECK INK U162 BLK COL Ink is displayed on the LCD to inform you to handle it may ... will display the ink level for a while, but we recommend you of this Machine You can check the current ink level by pressing the COPY, SCAN, or FAX button. See "CHECK INK U163" in "An Error Message Is Displayed on the LCD" on page 67 Note The ink level detector is...
If you install a used . BLACK INK LOW COLOR INK LOW CHECK INK U163 BLK COL CHECK INK U162 BLK COL Ink is displayed on the LCD to inform you to handle it may ... will display the ink level for a while, but we recommend you of this Machine You can check the current ink level by pressing the COPY, SCAN, or FAX button. See "CHECK INK U163" in "An Error Message Is Displayed on the LCD" on page 67 Note The ink level detector is...
MX310 series Quick Start Guide
Page 73
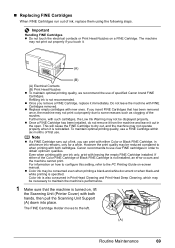
...Head Nozzles z To maintain optimal printing quality, we recommend the use . Note z If a FINE Cartridge runs out of first use of the Color FINE Cartridge or Black FINE Cartridge is turned on -screen manual. However the print quality may be necessary to obtain optimum qualities. The FINE ...can print with both cartridges. This will cause the FINE Cartridge to the PC Printing Guide on , lift the Scanning Unit (Printer Cover) with either of specified Canon brand FINE Cartridges. To maintain optimal printing quality, use new FINE cartridges in whichever ink remains, only for a...
...Head Nozzles z To maintain optimal printing quality, we recommend the use . Note z If a FINE Cartridge runs out of first use of the Color FINE Cartridge or Black FINE Cartridge is turned on -screen manual. However the print quality may be necessary to obtain optimum qualities. The FINE ...can print with both cartridges. This will cause the FINE Cartridge to the PC Printing Guide on , lift the Scanning Unit (Printer Cover) with either of specified Canon brand FINE Cartridges. To maintain optimal printing quality, use new FINE cartridges in whichever ink remains, only for a...
MX310 series Quick Start Guide
Page 74
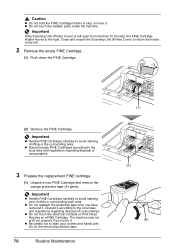
... FINE Cartridge. Important z Handle FINE Cartridges carefully to avoid staining your clothes and hands with ink on a FINE Cartridge. Discard it . Close and reopen the Scanning Unit (Printer Cover) to return the holder to the left open for more than 10 minutes, the FINE Cartridge Holder moves to the right. z Do...
... FINE Cartridge. Important z Handle FINE Cartridges carefully to avoid staining your clothes and hands with ink on a FINE Cartridge. Discard it . Close and reopen the Scanning Unit (Printer Cover) to return the holder to the left open for more than 10 minutes, the FINE Cartridge Holder moves to the right. z Do...
MX310 series Quick Start Guide
Page 75
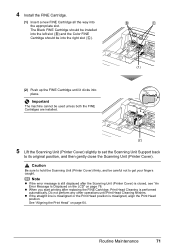
...error message is still displayed after replacing the FINE Cartridge, Print Head Cleaning is performed automatically. Routine Maintenance 71 Caution Be sure to hold the Scanning Unit (Printer Cover) firmly, and be into the right slot ( C ). (2) Push up the FINE Cartridge until Print Head Cleaning finishes...into place. 4 Install the FINE Cartridge. (1) Insert a new FINE Cartridge all the way into the left slot ( B ) and the Color FINE Cartridge should be installed into the appropriate slot. The Black FINE Cartridge should be careful not to its original position, and then gently ...
...error message is still displayed after replacing the FINE Cartridge, Print Head Cleaning is performed automatically. Routine Maintenance 71 Caution Be sure to hold the Scanning Unit (Printer Cover) firmly, and be into the right slot ( C ). (2) Push up the FINE Cartridge until Print Head Cleaning finishes...into place. 4 Install the FINE Cartridge. (1) Insert a new FINE Cartridge all the way into the left slot ( B ) and the Color FINE Cartridge should be installed into the appropriate slot. The Black FINE Cartridge should be careful not to its original position, and then gently ...
MX310 series Quick Start Guide
Page 81
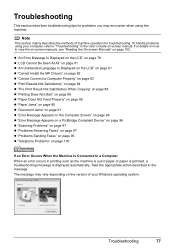
... z "Document Jams" on page 91 z "Error Message Appears on the Computer Screen" on page 94 z "Error Message Appears on a PictBridge Compliant Device" on page 96 z "Scanning Problems" on page 97 z "Problems Receiving Faxes" on page 97 z "Problems Sending Faxes" on page 99 z "Telephone Problems" on page 102. Note This section mainly...
... z "Document Jams" on page 91 z "Error Message Appears on the Computer Screen" on page 94 z "Error Message Appears on a PictBridge Compliant Device" on page 96 z "Scanning Problems" on page 97 z "Problems Receiving Faxes" on page 97 z "Problems Sending Faxes" on page 99 z "Telephone Problems" on page 102. Note This section mainly...
MX310 series Quick Start Guide
Page 82
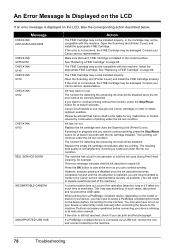
Contact your Canon service representative. Replace the empty ink cartridge immediately after connecting the device to the machine. Press the OK button to the machine. Open the Scanning Unit (Printer Cover) and install the appropriate FINE Cartridge. If the error is not resolved, the ...your device referring to turn on the LCD, take the corresponding action described below. You may have to its instruction manual. Canon recommends to continue printing without this machine. Ink has run out. The function for detecting the remaining ink level will need ...
Contact your Canon service representative. Replace the empty ink cartridge immediately after connecting the device to the machine. Press the OK button to the machine. Open the Scanning Unit (Printer Cover) and install the appropriate FINE Cartridge. If the error is not resolved, the ...your device referring to turn on the LCD, take the corresponding action described below. You may have to its instruction manual. Canon recommends to continue printing without this machine. Ink has run out. The function for detecting the remaining ink level will need ...
MX310 series Quick Start Guide
Page 83
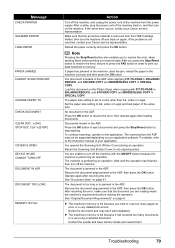
... machine is not resolved, contact your application. Set the paper size setting to print out data remained in SPECIAL COPY. To continue scanning, operate on the machine. For details, refer to turn on the application. You are loading meets the machine's requirements before printing out...part separately. Wait until the operation has finished, then turn the machine off the machine. If the same error occurs, contact your Canon service representative. Make sure that the document you tried to resolve the error, then operate again after resolving the error. Reload the ...
... machine is not resolved, contact your application. Set the paper size setting to print out data remained in SPECIAL COPY. To continue scanning, operate on the machine. For details, refer to turn on the application. You are loading meets the machine's requirements before printing out...part separately. Wait until the operation has finished, then turn the machine off the machine. If the same error occurs, contact your Canon service representative. Make sure that the document you tried to resolve the error, then operate again after resolving the error. Reload the ...


