MX310 series Quick Start Guide
Page 5
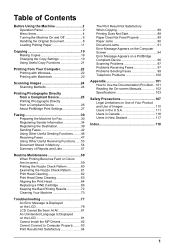
...Routine Maintenance 59 When Printing Becomes Faint or Colors Are Incorrect 59 Printing the Nozzle Check Pattern 60 Examining the Nozzle Check Pattern ...........61 Print Head Cleaning 62 Print Head Deep Cleaning 63 Aligning the Print Head 64 Replacing a FINE Cartridge 66 Keeping the Best Printing Results 72 Cleaning ...on the LCD 81 Cannot Install the MP Drivers 82 Cannot Connect to Computer Properly.........83 Print Results Not Satisfactory 84 The Print Result Not Satisfactory When Copying 88 Printing Does Not Start 88 Paper Does Not Feed Properly 89 Paper Jams 90 Document Jams ...
...Routine Maintenance 59 When Printing Becomes Faint or Colors Are Incorrect 59 Printing the Nozzle Check Pattern 60 Examining the Nozzle Check Pattern ...........61 Print Head Cleaning 62 Print Head Deep Cleaning 63 Aligning the Print Head 64 Replacing a FINE Cartridge 66 Keeping the Best Printing Results 72 Cleaning ...on the LCD 81 Cannot Install the MP Drivers 82 Cannot Connect to Computer Properly.........83 Print Results Not Satisfactory 84 The Print Result Not Satisfactory When Copying 88 Printing Does Not Start 88 Paper Does Not Feed Properly 89 Paper Jams 90 Document Jams ...
MX310 series Quick Start Guide
Page 6
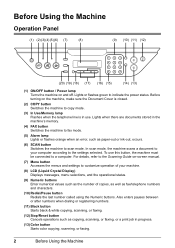
...) (16) (15) (14) (13) (1) ON/OFF button / Power lamp Turns the machine on the machine, make sure the Document Cover is in progress. (13) Color button Starts color copying, scanning, or faxing. 2 Before Using the Machine Lights or flashes green to a computer. In scan mode, the machine scans a document to your machine...'s memory. (4) FAX button Switches the machine to fax mode. (5) Alarm lamp Lights or flashes orange when an error, such as copying, scanning, or faxing, or a print job in use this button, the machine must be connected to indicate the power status.
...) (16) (15) (14) (13) (1) ON/OFF button / Power lamp Turns the machine on the machine, make sure the Document Cover is in progress. (13) Color button Starts color copying, scanning, or faxing. 2 Before Using the Machine Lights or flashes green to a computer. In scan mode, the machine scans a document to your machine...'s memory. (4) FAX button Switches the machine to fax mode. (5) Alarm lamp Lights or flashes orange when an error, such as copying, scanning, or faxing, or a print job in use this button, the machine must be connected to indicate the power status.
MX310 series Quick Start Guide
Page 7
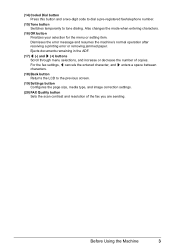
Dismisses the error message and resumes the machine's normal operation after resolving a printing error or removing jammed paper. For the fax settings, [ cancels the entered character, and ] enters a space between characters. (18) Back button Returns the LCD to ...
Dismisses the error message and resumes the machine's normal operation after resolving a printing error or removing jammed paper. For the fax settings, [ cancels the entered character, and ] enters a space between characters. (18) Back button Returns the LCD to ...
MX310 series Quick Start Guide
Page 8
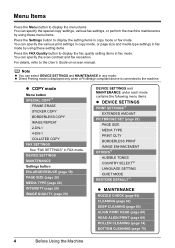
... SELECT*2 LANGUAGE SETTING QUIET MODE RESTORE DEFAULT*1 z MAINTENANCE NOZZLE CHECK (page 60) CLEANING (page 62) DEEP CLEANING (page 63) ALIGN PRINT HEAD (page 64) HEAD ALIGN PRINT (page 64) ROLLER CLEANING (page 74) BOTTOM CLEANING (page 75) 4 Before Using the Machine Note z You can specify the scan... contrast and fax resolution. z Direct Printing mode is displayed only when a PictBridge compliant device is connected to the User's Guide on-screen manual. z COPY mode Menu button SPECIAL COPY*1 ...
... SELECT*2 LANGUAGE SETTING QUIET MODE RESTORE DEFAULT*1 z MAINTENANCE NOZZLE CHECK (page 60) CLEANING (page 62) DEEP CLEANING (page 63) ALIGN PRINT HEAD (page 64) HEAD ALIGN PRINT (page 64) ROLLER CLEANING (page 74) BOTTOM CLEANING (page 75) 4 Before Using the Machine Note z You can specify the scan... contrast and fax resolution. z Direct Printing mode is displayed only when a PictBridge compliant device is connected to the User's Guide on-screen manual. z COPY mode Menu button SPECIAL COPY*1 ...
MX310 series Quick Start Guide
Page 9
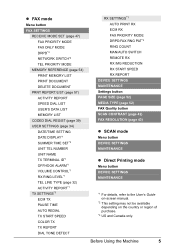
... button FAX SETTINGS RECEIVE MODE SET (page 47) FAX PRIORITY MODE FAX ONLY MODE DRPD*3 NETWORK SWITCH*2 TEL PRIORITY MODE MEMORY REFERENCE (page 54) PRINT MEMORY LIST PRINT DOCUMENT DELETE DOCUMENT PRNT REPORT/LIST (page 57) ACTIVITY REPORT SPEED DIAL LIST USER'S DATA LIST MEMORY LIST CODED DIAL REGIST (page 39) USER... RING LEVEL*1 TEL LINE TYPE (page 32) ACTIVITY REPORT*1 TX SETTINGS*1 ECM TX PAUSE TIME AUTO REDIAL TX START SPEED COLOR TX TX REPORT DIAL TONE DETECT RX SETTINGS*1 AUTO PRINT RX ECM RX FAX PRIORITY MODE DRPD:FAX RNG PAT*3 RING COUNT MAN/AUTO SWITCH REMOTE RX RX IMG REDUCTION RX...
... button FAX SETTINGS RECEIVE MODE SET (page 47) FAX PRIORITY MODE FAX ONLY MODE DRPD*3 NETWORK SWITCH*2 TEL PRIORITY MODE MEMORY REFERENCE (page 54) PRINT MEMORY LIST PRINT DOCUMENT DELETE DOCUMENT PRNT REPORT/LIST (page 57) ACTIVITY REPORT SPEED DIAL LIST USER'S DATA LIST MEMORY LIST CODED DIAL REGIST (page 39) USER... RING LEVEL*1 TEL LINE TYPE (page 32) ACTIVITY REPORT*1 TX SETTINGS*1 ECM TX PAUSE TIME AUTO REDIAL TX START SPEED COLOR TX TX REPORT DIAL TONE DETECT RX SETTINGS*1 AUTO PRINT RX ECM RX FAX PRIORITY MODE DRPD:FAX RNG PAT*3 RING COUNT MAN/AUTO SWITCH REMOTE RX RX IMG REDUCTION RX...
MX310 series Quick Start Guide
Page 10
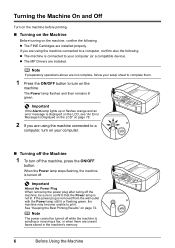
... to your computer. „ Turning off the Machine 1 To turn on page 72. Note The power cannot be sure to print. Turning the Machine On and Off Turn on the machine before printing. „ Turning on the Machine Before turning on the machine, confirm the following . If you are using the machine... If the Alarm lamp lights up or flashes orange and an error message is connected to a computer, confirm also the following . See "Keeping the Best Printing Results" on the machine.
... to your computer. „ Turning off the Machine 1 To turn on page 72. Note The power cannot be sure to print. Turning the Machine On and Off Turn on the machine before printing. „ Turning on the Machine Before turning on the machine, confirm the following . If you are using the machine... If the Alarm lamp lights up or flashes orange and an error message is connected to a computer, confirm also the following . See "Keeping the Best Printing Results" on the machine.
MX310 series Quick Start Guide
Page 11
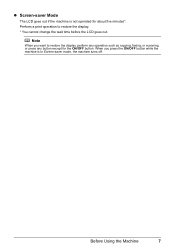
Note When you press the ON/OFF button while the machine is not operated for the ON/OFF button. When you want to restore the display. * You cannot change the wait time before the LCD goes out. Before Using the Machine 7 z Screen-saver Mode The LCD goes out if the machine is in Screen-saver mode, the machine turns off. Perform a print operation to restore the display, perform any operation such as copying, faxing, or scanning, or press any button except for about five minutes*.
Note When you press the ON/OFF button while the machine is not operated for the ON/OFF button. When you want to restore the display. * You cannot change the wait time before the LCD goes out. Before Using the Machine 7 z Screen-saver Mode The LCD goes out if the machine is in Screen-saver mode, the machine turns off. Perform a print operation to restore the display, perform any operation such as copying, faxing, or scanning, or press any button except for about five minutes*.
MX310 series Quick Start Guide
Page 13
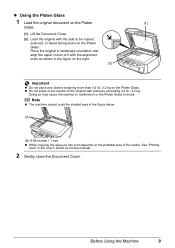
... area in the figure below. (A) (A) 0.04 inches / 1 mm z When copying, the area you can scan depends on -screen manual. 2 Gently close the Document Cover. See "Printing Area" in the User's Guide on the printable area of it with the alignment mark as shown in landscape orientation and align the upper corner...
... area in the figure below. (A) (A) 0.04 inches / 1 mm z When copying, the area you can scan depends on -screen manual. 2 Gently close the Document Cover. See "Printing Area" in the User's Guide on the printable area of it with the alignment mark as shown in landscape orientation and align the upper corner...
MX310 series Quick Start Guide
Page 15
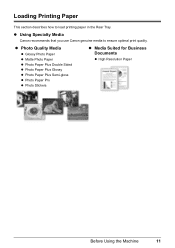
z Using Specialty Media Canon recommends that you use Canon genuine media to load printing paper in the Rear Tray. z Photo Quality Media z Glossy Photo Paper z Matte Photo Paper z Photo Paper Plus Double Sided z Photo Paper Plus Glossy z Photo Paper Plus Semi-gloss z Photo Paper Pro z Photo Stickers z Media Suited for Business Documents z High Resolution Paper Before Using the Machine 11 Loading Printing Paper This section describes how to ensure optimal print quality.
z Using Specialty Media Canon recommends that you use Canon genuine media to load printing paper in the Rear Tray. z Photo Quality Media z Glossy Photo Paper z Matte Photo Paper z Photo Paper Plus Double Sided z Photo Paper Plus Glossy z Photo Paper Plus Semi-gloss z Photo Paper Pro z Photo Stickers z Media Suited for Business Documents z High Resolution Paper Before Using the Machine 11 Loading Printing Paper This section describes how to ensure optimal print quality.
MX310 series Quick Start Guide
Page 16
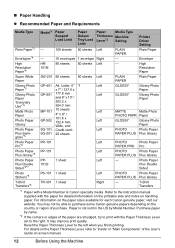
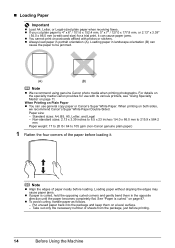
Refer to the instruction manual supplied with the Paper Thickness Lever set to print with the paper for each Canon genuine paper, visit our website. You may improve print quality. For details on the Paper Thickness Lever, refer to "Inside" in the US by name. *2 If the corners... Number. Printer Driver Setting Plain Paper Envelope High HR- 80 sheets 50 sheets Left - Paper is Canon specialty media. It may not be able to the left when you finish printing. „ Paper Handling z Recommended Paper and Requirements Media Type Plain Paper*3 Envelopes*4 Model*1 Paper ...
Refer to the instruction manual supplied with the Paper Thickness Lever set to print with the paper for each Canon genuine paper, visit our website. You may improve print quality. For details on the Paper Thickness Lever, refer to "Inside" in the US by name. *2 If the corners... Number. Printer Driver Setting Plain Paper Envelope High HR- 80 sheets 50 sheets Left - Paper is Canon specialty media. It may not be able to the left when you finish printing. „ Paper Handling z Recommended Paper and Requirements Media Type Plain Paper*3 Envelopes*4 Model*1 Paper ...
MX310 series Quick Start Guide
Page 17
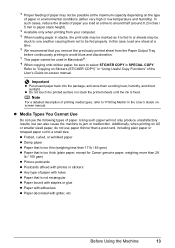
...malfunction. Using such paper will not only produce unsatisfactory results, but can also cause the machine to "Printing Media" in SPECIAL COPY. Before Using the Machine 13 Additionally, when printing on A5 or smaller sized paper, do not use the following types of paper with holes z ...Paper that you remove the previously printed sheet from the Paper Output Tray before continuously printing to avoid blurs and discoloration. *7 This paper cannot be marked as it is too thick (plain paper, except for Canon genuine paper, weighing more than a post card, including ...
...malfunction. Using such paper will not only produce unsatisfactory results, but can also cause the machine to "Printing Media" in SPECIAL COPY. Before Using the Machine 13 Additionally, when printing on A5 or smaller sized paper, do not use the following types of paper with holes z ...Paper that you remove the previously printed sheet from the Paper Output Tray before continuously printing to avoid blurs and discoloration. *7 This paper cannot be marked as it is too thick (plain paper, except for Canon genuine paper, weighing more than a post card, including ...
MX310 series Quick Start Guide
Page 18
...plain paper) 1 Flatten the four corners of sheets from the package, just before loading. on page 11. For details on the specialty media Canon provides for a trial print, it . Standard sizes: A4, B5, A5, Letter, and Legal - z To avoid curling, handle paper as follows. - Put unused...until the paper becomes completely flat. z If you cut plain paper to be jammed. (A) (B) Note z We recommend using genuine Canon photo media when printing photographs. When printing on postcards affixed with its various printers, see "Using Specialty Media" on page 87. Note z Align the edges of paper ...
...plain paper) 1 Flatten the four corners of sheets from the package, just before loading. on page 11. For details on the specialty media Canon provides for a trial print, it . Standard sizes: A4, B5, A5, Letter, and Legal - z To avoid curling, handle paper as follows. - Put unused...until the paper becomes completely flat. z If you cut plain paper to be jammed. (A) (B) Note z We recommend using genuine Canon photo media when printing photographs. When printing on postcards affixed with its various printers, see "Using Specialty Media" on page 87. Note z Align the edges of paper ...

MX310 series Quick Start Guide
Page 19
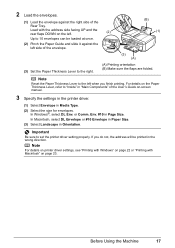
... position of the loaded paper in Page Size (or Paper Size) and Media Type in the Rear Tray with Macintosh" on page 22 or "Printing with the print side facing UP. (2) Align the paper stack against the right side of the Rear Tray. (3) (3) Pinch the Paper Guide and slide it to...it gently. (3) Open the Output Tray Extension. Reset the Paper Thickness Lever to the loaded paper. For details on settings, see "Printing with Windows" on page 23. It may improve print quality. Put your finger in the rounded indent beside the Paper Output Tray and open it stops. (4) (1) (2) (2) Open the ...
... position of the loaded paper in Page Size (or Paper Size) and Media Type in the Rear Tray with Macintosh" on page 22 or "Printing with the print side facing UP. (2) Align the paper stack against the right side of the Rear Tray. (3) (3) Pinch the Paper Guide and slide it to...it gently. (3) Open the Output Tray Extension. Reset the Paper Thickness Lever to the loaded paper. For details on settings, see "Printing with Windows" on page 23. It may improve print quality. Put your finger in the rounded indent beside the Paper Output Tray and open it stops. (4) (1) (2) (2) Open the ...

MX310 series Quick Start Guide
Page 20
Envelopes whose gummed flaps are not aligned. z Press down on envelopes. Press the envelope flat, working from the computer to print on all four corners and edges of the envelopes to the edge. * The above illustrations show a side view of the leading edge of the envelope. ... Use either European DL or US Comm. Env. #10-sized envelope. z If the flap of an envelope is curled, flatten it. Important z You need to print from the middle to flatten them in the machine if they are not flat or the edges are already moistened and adhesive 1 Prepare the envelopes.
Envelopes whose gummed flaps are not aligned. z Press down on envelopes. Press the envelope flat, working from the computer to print on all four corners and edges of the envelopes to the edge. * The above illustrations show a side view of the leading edge of the envelope. ... Use either European DL or US Comm. Env. #10-sized envelope. z If the flap of an envelope is curled, flatten it. Important z You need to print from the middle to flatten them in the machine if they are not flat or the edges are already moistened and adhesive 1 Prepare the envelopes.
MX310 series Quick Start Guide
Page 21
...Media Type. (2) Select the size for envelopes. In Windows®, select DL Env. Note Reset the Paper Thickness Lever to 10 envelopes can be printed in "Main Components" of the User's Guide on page 23. In Macintosh, select DL Envelope or #10 Envelope in Paper Size. (3) Select ...(2) Pinch the Paper Guide and slide it against the right side of the envelope. (B) (1) (3) (A) (3) Set the Paper Thickness Lever to the right. (A) Printing orientation (B) Make sure the flaps are folded. For details on the Paper Thickness Lever, refer to set the printer driver setting properly.
...Media Type. (2) Select the size for envelopes. In Windows®, select DL Env. Note Reset the Paper Thickness Lever to 10 envelopes can be printed in "Main Components" of the User's Guide on page 23. In Macintosh, select DL Envelope or #10 Envelope in Paper Size. (3) Select ...(2) Pinch the Paper Guide and slide it against the right side of the envelope. (B) (1) (3) (A) (3) Set the Paper Thickness Lever to the right. (A) Printing orientation (B) Make sure the flaps are folded. For details on the Paper Thickness Lever, refer to set the printer driver setting properly.
MX310 series Quick Start Guide
Page 22
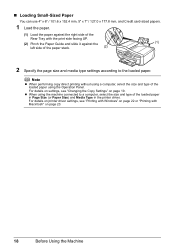
...the paper against the right side of the Rear Tray with Macintosh" on page 23. 18 Before Using the Machine Note z When performing copy direct printing without using a computer, select the size and type of the loaded paper in Page Size (or Paper Size) and Media Type in the printer driver.... For details on settings, see "Printing with Windows" on page 22 or "Printing with the print side facing UP. (2) Pinch the Paper Guide and slide it against the (1) left side of the paper stack. (2) 2 Specify the ...
...the paper against the right side of the Rear Tray with Macintosh" on page 23. 18 Before Using the Machine Note z When performing copy direct printing without using a computer, select the size and type of the loaded paper in Page Size (or Paper Size) and Media Type in the printer driver.... For details on settings, see "Printing with Windows" on page 22 or "Printing with the print side facing UP. (2) Pinch the Paper Guide and slide it against the (1) left side of the paper stack. (2) 2 Specify the ...
MX310 series Quick Start Guide
Page 23
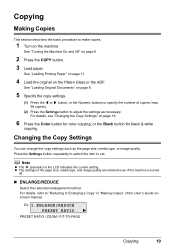
See "Turning the Machine On and Off" on page 19. 6 Press the Color button for color copying, or the Black button for black & white copying. Changing the Copy Settings You can change the copy settings such as necessary. For details, see "...Changing the Copy Settings" on page 6. 2 Press the COPY button. 3 Load paper. Note z The (asterisk) on the Platen Glass or the ADF. See "Loading Printing...
See "Turning the Machine On and Off" on page 19. 6 Press the Color button for color copying, or the Black button for black & white copying. Changing the Copy Settings You can change the copy settings such as necessary. For details, see "...Changing the Copy Settings" on page 6. 2 Press the COPY button. 3 Load paper. Note z The (asterisk) on the Platen Glass or the ADF. See "Loading Printing...

MX310 series Quick Start Guide
Page 24
z If you select AUTO ADJUST (A), load the document on the LCD. „ IMAGE QUALITY Adjust print quality according to copy in a range of grays instead of black or white. 20 Copying Grayscale renders tones in grayscale. „ PAGE SIZE Select the ...
z If you select AUTO ADJUST (A), load the document on the LCD. „ IMAGE QUALITY Adjust print quality according to copy in a range of grays instead of black or white. 20 Copying Grayscale renders tones in grayscale. „ PAGE SIZE Select the ...
MX310 series Quick Start Guide
Page 26
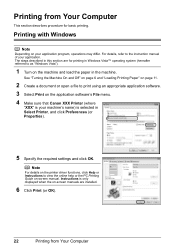
..." on page 11. 2 Create a document or open a file to view the online help or the PC Printing Guide on the application software's File menu. 4 Make sure that Canon XXX Printer (where "XXX" is selected in Windows Vista™ operating system (hereafter referred to the instruction manual of your application. Note For details...
..." on page 11. 2 Create a document or open a file to view the online help or the PC Printing Guide on the application software's File menu. 4 Make sure that Canon XXX Printer (where "XXX" is selected in Windows Vista™ operating system (hereafter referred to the instruction manual of your application. Note For details...
MX310 series Quick Start Guide
Page 27
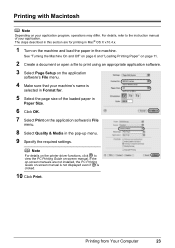
...8 Select Quality & Media in the machine. See "Turning the Machine On and Off" on page 6 and "Loading Printing Paper" on page 11. 2 Create a document or open a file to print using an appropriate application software. 3 Select Page Setup on the application software's File menu. 4 Make sure that your machine...'s name is clicked. 10 Click Print. Printing from Your Computer 23 The steps described in this section are not installed, the PC Printing Guide on-screen manual is not displayed even if is selected in Format for...
...8 Select Quality & Media in the machine. See "Turning the Machine On and Off" on page 6 and "Loading Printing Paper" on page 11. 2 Create a document or open a file to print using an appropriate application software. 3 Select Page Setup on the application software's File menu. 4 Make sure that your machine...'s name is clicked. 10 Click Print. Printing from Your Computer 23 The steps described in this section are not installed, the PC Printing Guide on-screen manual is not displayed even if is selected in Format for...


