Network Setup Troubleshooting
Page 2
Find a description related to the access point. is Displayed P.3 WPS Settings Cannot connect. Description for Windows users. P.6 P.6 P.6 P.7 P.7 P.9 P.10 P.11 P.13 Multiple access points are used in this manual depending on the Machine Specifying the Machine's IP Address (IPv4 only) Restoring the Machine's Default ...
Find a description related to the access point. is Displayed P.3 WPS Settings Cannot connect. Description for Windows users. P.6 P.6 P.6 P.7 P.7 P.9 P.10 P.11 P.13 Multiple access points are used in this manual depending on the Machine Specifying the Machine's IP Address (IPv4 only) Restoring the Machine's Default ...
Network Setup Troubleshooting
Page 15
...be placed with the Canon inkjet printer. • Some functions may not be displayed properly depending on the installation environment and location. Supported Standards: IEEE802.3u (100BASE-TX)/ IEEE802.3 (10BASE-T) Transfer speed: 10 M/100 Mbps (auto switching) Minimum System Requirements Conform to Windows Vista, first uninstall ... and Windows XP only) A4/Letter, 8.5'' x 11.7''/216 x 297 mm Optical resolution (horizontal x vertical) max: 4800 dpi x 9600 dpi Interpolated resolution max: 19200 dpi x 19200 dpi Gray: 48 bit/8 bit (Film Scan: 48 bit/16 bit or 8 bit) Color: 48 bit/24 bit (...
...be placed with the Canon inkjet printer. • Some functions may not be displayed properly depending on the installation environment and location. Supported Standards: IEEE802.3u (100BASE-TX)/ IEEE802.3 (10BASE-T) Transfer speed: 10 M/100 Mbps (auto switching) Minimum System Requirements Conform to Windows Vista, first uninstall ... and Windows XP only) A4/Letter, 8.5'' x 11.7''/216 x 297 mm Optical resolution (horizontal x vertical) max: 4800 dpi x 9600 dpi Interpolated resolution max: 19200 dpi x 19200 dpi Gray: 48 bit/8 bit (Film Scan: 48 bit/16 bit or 8 bit) Color: 48 bit/24 bit (...
Getting Started
Page 17
...screen appears. 1 Remove the USB cable connected to your computer has restarted. • Mac OS 9, Mac OS X Classic environments, or Mac OS X v.10.3.8 or earlier are based on the computer environment or the number of the drivers, this case, proceed from . 2 Click Cancel to quit the dialog box.... 3 Proceed from . Follow the on as "Windows Vista") and Mac OS X v.10.5.x. For a USB connection, a USB cable is required. □ If the Found New Hardware or Found New Hardware Wizard dialog box appears: ...
...screen appears. 1 Remove the USB cable connected to your computer has restarted. • Mac OS 9, Mac OS X Classic environments, or Mac OS X v.10.3.8 or earlier are based on the computer environment or the number of the drivers, this case, proceed from . 2 Click Cancel to quit the dialog box.... 3 Proceed from . Follow the on as "Windows Vista") and Mac OS X v.10.5.x. For a USB connection, a USB cable is required. □ If the Found New Hardware or Found New Hardware Wizard dialog box appears: ...
Getting Started
Page 37
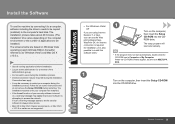
...program does not start automatically, double-click the CD-ROM icon in Computer or My Computer. Connection fees apply. • It may appear that Canon software is also possible to install this software later.) 1 Turn on as the administrator (or a member of applications to be installed.) The ... Internet Explorer 7 or later, you can use the machine by connecting it to a computer, software including the drivers needs to as "Windows Vista") and Mac OS X v.10.5.x. • Quit all running applications before installation. • Log on the computer, then insert the Setup CD-ROM into the CD-...
...program does not start automatically, double-click the CD-ROM icon in Computer or My Computer. Connection fees apply. • It may appear that Canon software is also possible to install this software later.) 1 Turn on as the administrator (or a member of applications to be installed.) The ... Internet Explorer 7 or later, you can use the machine by connecting it to a computer, software including the drivers needs to as "Windows Vista") and Mac OS X v.10.5.x. • Quit all running applications before installation. • Log on the computer, then insert the Setup CD-ROM into the CD-...
Getting Started
Page 44
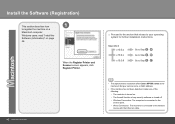
Mac OS X v.10.5.x v.10.4.x v.10.3.9 Go to your operating system for further installation instructions. When the Register Printer and Scanner screen appears, click Register Printer. □ Proceed to the section .... Install the Software (Registration) This section describes how 1 to register the machine on page 46. Windows users: read "Install the Software (Information)" on a Macintosh computer. Go to Step - . 42 Network Connection • The alphanumeric characters after Canon MP990 series is the machine's Bonjour service name or MAC address. • If the machine has...
Mac OS X v.10.5.x v.10.4.x v.10.3.9 Go to your operating system for further installation instructions. When the Register Printer and Scanner screen appears, click Register Printer. □ Proceed to the section .... Install the Software (Registration) This section describes how 1 to register the machine on page 46. Windows users: read "Install the Software (Information)" on a Macintosh computer. Go to Step - . 42 Network Connection • The alphanumeric characters after Canon MP990 series is the machine's Bonjour service name or MAC address. • If the machine has...

Getting Started
Page 45
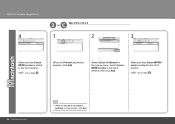
Click More Printers in the list of printers, then click Add. • When the You have no printers available. When the Printer List window appears, click Add. Network Connection 43 Select Canon IJ Network in the pop-up menu, select Canon MP990 series in the Printer Browser screen. Go to Step . screen appears, click Add. B Mac OS X v.10.4.x Mac OS X v.10.3.9 - 1 1 2 Install the Software (Registration) Mac OS X v.10.3.9 - 3 Select Canon MP990 series and click Add. 2 - A Mac OS X v.10.5.x Mac OS X v.10.4.x - 2 -
Click More Printers in the list of printers, then click Add. • When the You have no printers available. When the Printer List window appears, click Add. Network Connection 43 Select Canon IJ Network in the pop-up menu, select Canon MP990 series in the Printer Browser screen. Go to Step . screen appears, click Add. B Mac OS X v.10.4.x Mac OS X v.10.3.9 - 1 1 2 Install the Software (Registration) Mac OS X v.10.3.9 - 3 Select Canon MP990 series and click Add. 2 - A Mac OS X v.10.5.x Mac OS X v.10.4.x - 2 -
Getting Started
Page 46
Make sure that Canon MP990 series is added to the list of printers, then click Add. Go to Step . 44 Network Connection • When the You have no printers available. screen appears, click Add. C Mac OS X v.10.3.9 4 1 2 3 Make sure that Canon MP990 series is added to the list of printers. Select Canon IJ Network in the pop-up menu, select Canon MP990 series in the list of printers. When the Printer List window appears, click Add. Go to Step . Install the Software (Registration) 2 -
Make sure that Canon MP990 series is added to the list of printers, then click Add. Go to Step . 44 Network Connection • When the You have no printers available. screen appears, click Add. C Mac OS X v.10.3.9 4 1 2 3 Make sure that Canon MP990 series is added to the list of printers. Select Canon IJ Network in the pop-up menu, select Canon MP990 series in the list of printers. When the Printer List window appears, click Add. Go to Step . Install the Software (Registration) 2 -
Getting Started
Page 63
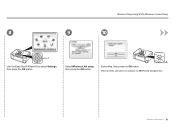
When wireless connection is enabled, the Wi-Fi lamp (B) lights blue. Reference Information 61 B Select Yes, then press the OK button. Select Wireless LAN setup, then press the OK button. Wireless Setup Using WCN (Windows Connect Now) 8 9 10 A Use the Easy-Scroll Wheel (A) to select Settings, then press the OK button.
When wireless connection is enabled, the Wi-Fi lamp (B) lights blue. Reference Information 61 B Select Yes, then press the OK button. Select Wireless LAN setup, then press the OK button. Wireless Setup Using WCN (Windows Connect Now) 8 9 10 A Use the Easy-Scroll Wheel (A) to select Settings, then press the OK button.
Network Installation Guide
Page 10
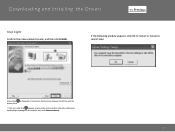
If the following window appears, click OK to restart or Cancel to restart later Ensure that is displayed in Connection Performance between the Printer and the Access Point. • If an icon other than appears, improve the communication status by referring to the displayed message or the help file, then click Remeasurement. 10 Downloading and Installing the Drivers > Step Eight Confirm the measurement results, and then click Finish.
If the following window appears, click OK to restart or Cancel to restart later Ensure that is displayed in Connection Performance between the Printer and the Access Point. • If an icon other than appears, improve the communication status by referring to the displayed message or the help file, then click Remeasurement. 10 Downloading and Installing the Drivers > Step Eight Confirm the measurement results, and then click Finish.
Obtaining Network Key
Page 2
> Obtaining Your Network Key PIXMA MP990 / PIXMA MX640 / PIXMA MP560 Windows OS Introduction 3 Download the Canon PIXMA Wireless Setup Assistant 4 Using the Canon PIXMA Wireless Setup Assistant 6 Troubleshooting 10 2
> Obtaining Your Network Key PIXMA MP990 / PIXMA MX640 / PIXMA MP560 Windows OS Introduction 3 Download the Canon PIXMA Wireless Setup Assistant 4 Using the Canon PIXMA Wireless Setup Assistant 6 Troubleshooting 10 2
Obtaining Network Key (MAC)
Page 10
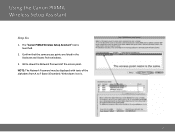
Write down it as-is launched. 2. The "Canon PIXMA Wireless Setup Assistant" tool is . 10 NOTE: The Network Password may be displayed with texts of the access point. Write down the Network Password of the alphabets from A to F (base 16number). Using the Canon PIXMA Wireless Setup Assistant Step Six 1. Confirm that the same access points are listed in the Assistant and Access Point windows. 3.
Write down it as-is launched. 2. The "Canon PIXMA Wireless Setup Assistant" tool is . 10 NOTE: The Network Password may be displayed with texts of the access point. Write down the Network Password of the alphabets from A to F (base 16number). Using the Canon PIXMA Wireless Setup Assistant Step Six 1. Confirm that the same access points are listed in the Assistant and Access Point windows. 3.


