Quick Start Guide
Page 5
... Routine Maintenance 50 Replacing an Ink Tank 50 Keeping the Best Printing Results 55 When Printing Becomes Faint or Colors Are Incorrect 56 Printing the Nozzle Check Pattern 57 Examining the Nozzle Check Pattern ...........58 Print Head Cleaning 60 Print Head Deep Cleaning 62 Aligning the Print Head 64 Cleaning Your Machine 68 Troubleshooting 71 Error Message...
... Routine Maintenance 50 Replacing an Ink Tank 50 Keeping the Best Printing Results 55 When Printing Becomes Faint or Colors Are Incorrect 56 Printing the Nozzle Check Pattern 57 Examining the Nozzle Check Pattern ...........58 Print Head Cleaning 60 Print Head Deep Cleaning 62 Aligning the Print Head 64 Cleaning Your Machine 68 Troubleshooting 71 Error Message...
Quick Start Guide
Page 6
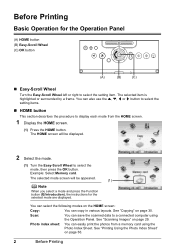
... the Easy-Scroll Wheel left or right to select the mode, then press the OK button. See "Scanning Images" on page 36. 2 Before Printing Scan: You can easily print the photos from the HOME screen. 1 Display the HOME screen. (1) Press the HOME button. Photo index sheet: You can save the scanned data... to display each mode from a memory card using the Operation Panel. Before Printing Basic Operation for the selected mode are displayed. See "Printing Using the Photo Index Sheet" on page 29.
... the Easy-Scroll Wheel left or right to select the mode, then press the OK button. See "Scanning Images" on page 36. 2 Before Printing Scan: You can easily print the photos from the HOME screen. 1 Display the HOME screen. (1) Press the HOME button. Photo index sheet: You can save the scanned data... to display each mode from a memory card using the Operation Panel. Before Printing Basic Operation for the selected mode are displayed. See "Printing Using the Photo Index Sheet" on page 29.
Quick Start Guide
Page 7
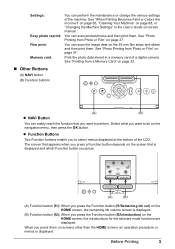
... Printing Becomes Faint or Colors Are Incorrect" on page 56, "Cleaning Your Machine" on page 68, or "Changing the Machine Settings" in a memory card of a digital camera. When you want to select menus displayed at the bottom of the machine. You can scan printed photos and then print ...in the User's Guide on the HOME screen, the remaining ink volume screen is displayed. See "Printing from Photo or Film" on the navigation menu, then press the OK button. Before Printing 3 z Function Buttons Two Function buttons enable you press the Function button (f1/Remaining ink vol...
... Printing Becomes Faint or Colors Are Incorrect" on page 56, "Cleaning Your Machine" on page 68, or "Changing the Machine Settings" in a memory card of a digital camera. When you want to select menus displayed at the bottom of the machine. You can scan printed photos and then print ...in the User's Guide on the HOME screen, the remaining ink volume screen is displayed. See "Printing from Photo or Film" on the navigation menu, then press the OK button. Before Printing 3 z Function Buttons Two Function buttons enable you press the Function button (f1/Remaining ink vol...
Quick Start Guide
Page 8
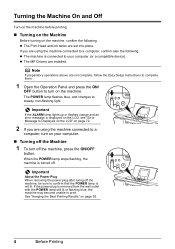
...not complete, follow the Easy Setup Instructions to complete them. 1 Open the Operation Panel and press the ON/ OFF button to print. See "Keeping the Best Printing Results" on the machine. The POWER lamp flashes blue, and changes to a computer, confirm also the following . When the ... may become unable to turn on page 55. 4 Before Printing Turning the Machine On and Off Turn on the machine before printing. „ Turning on the Machine Before turning on your computer (or a compatible device). z The Print Head and ink tanks are using the machine connected to your...
...not complete, follow the Easy Setup Instructions to complete them. 1 Open the Operation Panel and press the ON/ OFF button to print. See "Keeping the Best Printing Results" on the machine. The POWER lamp flashes blue, and changes to a computer, confirm also the following . When the ... may become unable to turn on page 55. 4 Before Printing Turning the Machine On and Off Turn on the machine before printing. „ Turning on the Machine Before turning on your computer (or a compatible device). z The Print Head and ink tanks are using the machine connected to your...
Quick Start Guide
Page 9
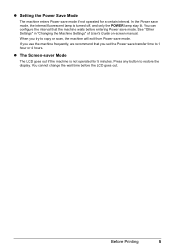
... 1 hour or 4 hours. You cannot change the wait time before entering Power save mode, the internal fluorescent lamp is not operated for a certain interval. Before Printing 5 z The Screen-saver Mode The LCD goes out if the machine is turned off, and only the POWER lamp stay lit. If you try to...
... 1 hour or 4 hours. You cannot change the wait time before entering Power save mode, the internal fluorescent lamp is not operated for a certain interval. Before Printing 5 z The Screen-saver Mode The LCD goes out if the machine is turned off, and only the POWER lamp stay lit. If you try to...
Quick Start Guide
Page 10
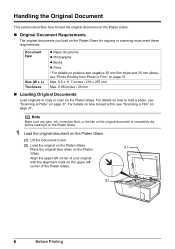
... alignment mark on page 37. For details on how to load a film, see "Scanning a Film" on the upper left corner of the Platen Glass. (2) 6 Before Printing Max. 8.5 x 11.7 inches / 216 x 297 mm Max. 0.98 inches / 25 mm „ Loading Original Documents Load originals to copy or scan on page 37. Handling...: Document type Size (W x L) Thickness z Paper documents z Photographs z Books z Films * For details on positive and negative 35 mm film strips and 35 mm slides, see "Photo Printing from Photo or Film" on the Platen Glass.
... alignment mark on page 37. For details on how to load a film, see "Scanning a Film" on the upper left corner of the Platen Glass. (2) 6 Before Printing Max. 8.5 x 11.7 inches / 216 x 297 mm Max. 0.98 inches / 25 mm „ Loading Original Documents Load originals to copy or scan on page 37. Handling...: Document type Size (W x L) Thickness z Paper documents z Photographs z Books z Films * For details on positive and negative 35 mm film strips and 35 mm slides, see "Photo Printing from Photo or Film" on the Platen Glass.
Quick Start Guide
Page 11
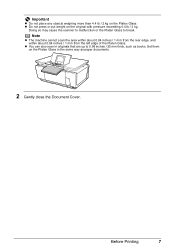
... 0.04 inches / 1 mm from the left edge of the Platen Glass. Set them on the Platen Glass in originals that are up to break. Before Printing 7
... 0.04 inches / 1 mm from the left edge of the Platen Glass. Set them on the Platen Glass in originals that are up to break. Before Printing 7
Quick Start Guide
Page 12
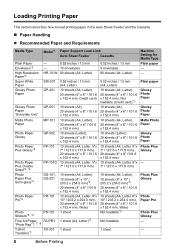
... This section describes how to load printing paper in the Auto Sheet Feeder and the Cassette. „ Paper Handling z Recommended Paper and Requirements Media Type Model*1 Paper Support Load Limit Auto Sheet ... Glossy Photo Paper Glossy Photo Paper Matte Photo Paper Glossy Photo Paper Photo Plus Glossy - Photo Plus Glossy Photo Paper Pro Photo Plus Glossy - - 8 Before Printing
... This section describes how to load printing paper in the Auto Sheet Feeder and the Cassette. „ Paper Handling z Recommended Paper and Requirements Media Type Model*1 Paper Support Load Limit Auto Sheet ... Glossy Photo Paper Glossy Photo Paper Matte Photo Paper Glossy Photo Paper Photo Plus Glossy - Photo Plus Glossy Photo Paper Pro Photo Plus Glossy - - 8 Before Printing
Quick Start Guide
Page 13
...inches / 35 mm margin on your country. *1 Paper is Canon specialty media. Refer to "Setting Items" in . Before Printing 9 If you are using the Easy-Photo Print provided with a Model Number is not sold in "Using Other Useful Printing Functions" of the User's Guide on -screen manual. We... Load in the Auto Sheet Feeder. *4 When loading a stack of the User's Guide on Stickers (Sticker Print)" in "Using Other Useful Printing Functions" of the paper. We recommend using Canon genuine paper. *8 If you choose a special paper size for paper size in Easy photo reprint mode. Refer...
...inches / 35 mm margin on your country. *1 Paper is Canon specialty media. Refer to "Setting Items" in . Before Printing 9 If you are using the Easy-Photo Print provided with a Model Number is not sold in "Using Other Useful Printing Functions" of the User's Guide on -screen manual. We... Load in the Auto Sheet Feeder. *4 When loading a stack of the User's Guide on Stickers (Sticker Print)" in "Using Other Useful Printing Functions" of the paper. We recommend using Canon genuine paper. *8 If you choose a special paper size for paper size in Easy photo reprint mode. Refer...
Quick Start Guide
Page 14
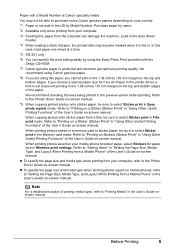
Colors in dark images may cause the edges of the paper to turn yellow. 10 Before Printing z Store printouts in an album. z Folded, curled, or wrinkled paper z Damp paper z Paper that is too thin (weighing less than 17 lb / 64 gsm) z Paper that is too thick (non-Canon genuine paper weighing more than... a post card, including plain paper or notepad paper cut to a small size. z Photo Paper Pro Guidelines z Do not touch the print surface until the ink is not rectangular z Paper bound with staples or ...
Colors in dark images may cause the edges of the paper to turn yellow. 10 Before Printing z Store printouts in an album. z Folded, curled, or wrinkled paper z Damp paper z Paper that is too thin (weighing less than 17 lb / 64 gsm) z Paper that is too thick (non-Canon genuine paper weighing more than... a post card, including plain paper or notepad paper cut to a small size. z Photo Paper Pro Guidelines z Do not touch the print surface until the ink is not rectangular z Paper bound with staples or ...
Quick Start Guide
Page 15
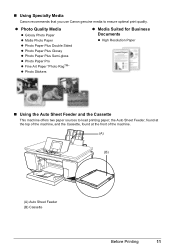
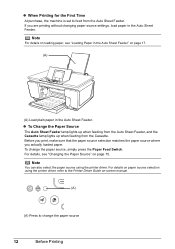
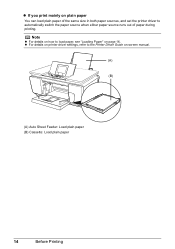
... top of the machine, and the Cassette, found at the front of the machine. (A) (B) (A) Auto Sheet Feeder (B) Cassette Before Printing 11 „ Using Specialty Media Canon recommends that you use Canon genuine media to load printing paper; z Photo Quality Media z Glossy Photo Paper z Matte Photo Paper z Photo Paper Plus Double Sided z Photo Paper Plus... Suited for Business Documents z High Resolution Paper „ Using the Auto Sheet Feeder and the Cassette This machine offers two paper sources to ensure optimal print quality.
... top of the machine, and the Cassette, found at the front of the machine. (A) (B) (A) Auto Sheet Feeder (B) Cassette Before Printing 11 „ Using Specialty Media Canon recommends that you use Canon genuine media to load printing paper; z Photo Quality Media z Glossy Photo Paper z Matte Photo Paper z Photo Paper Plus Double Sided z Photo Paper Plus... Suited for Business Documents z High Resolution Paper „ Using the Auto Sheet Feeder and the Cassette This machine offers two paper sources to ensure optimal print quality.
Quick Start Guide
Page 16
... Sheet Feeder, and the Cassette lamp lights up when feeding from the Auto Sheet Feeder. Before you print, make sure that the paper source selection matches the paper source where you are printing without changing paper source settings, load paper in the Auto Sheet Feeder" on -screen manual. (A)... the Paper Source" on paper source selection using the printer driver. If you actually loaded paper. To change the paper source 12 Before Printing For details, see "Loading Paper in the Auto Sheet Feeder. Note You can also select the paper source using the printer driver, refer...
... Sheet Feeder, and the Cassette lamp lights up when feeding from the Auto Sheet Feeder. Before you print, make sure that the paper source selection matches the paper source where you are printing without changing paper source settings, load paper in the Auto Sheet Feeder" on -screen manual. (A)... the Paper Source" on paper source selection using the printer driver. If you actually loaded paper. To change the paper source 12 Before Printing For details, see "Loading Paper in the Auto Sheet Feeder. Note You can also select the paper source using the printer driver, refer...

Quick Start Guide
Page 17
...from the Cassette using the printer driver. You can switch the paper source according to the Printer Driver Guide on plain paper If you can print more efficiently by pressing the Paper Feed Switch. Note z Some types and sizes of paper are not loadable in the Cassette. For details on... loading paper, see "Loading Paper" on page 8. See "Paper Handling" on page 16. z If you print regularly on photo paper as well as on -screen manual. (A) (B) (A) Auto Sheet Feeder: Load paper of paper you use photo paper as much as plain...
...from the Cassette using the printer driver. You can switch the paper source according to the Printer Driver Guide on plain paper If you can print more efficiently by pressing the Paper Feed Switch. Note z Some types and sizes of paper are not loadable in the Cassette. For details on... loading paper, see "Loading Paper" on page 8. See "Paper Handling" on page 16. z If you print regularly on photo paper as well as on -screen manual. (A) (B) (A) Auto Sheet Feeder: Load paper of paper you use photo paper as much as plain...
Quick Start Guide
Page 18
Note z For details on how to the Printer Driver Guide on-screen manual. (A) (B) (A) Auto Sheet Feeder: Load plain paper (B) Cassette: Load plain paper 14 Before Printing z For details on printer driver settings, refer to load paper, see "Loading Paper" on plain paper You can load plain paper of the same size in both paper sources, and set the printer driver to automatically switch the paper source when either paper source runs out of paper during printing. z If you print mainly on page 16.
Note z For details on how to the Printer Driver Guide on-screen manual. (A) (B) (A) Auto Sheet Feeder: Load plain paper (B) Cassette: Load plain paper 14 Before Printing z For details on printer driver settings, refer to load paper, see "Loading Paper" on plain paper You can load plain paper of the same size in both paper sources, and set the printer driver to automatically switch the paper source when either paper source runs out of paper during printing. z If you print mainly on page 16.
Quick Start Guide
Page 19
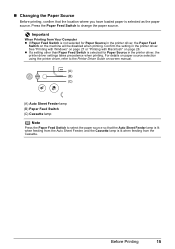
... Macintosh" on page 28. z If a setting other than Paper Feed Switch is selected as the paper source. „ Changing the Paper Source Before printing, confirm that the Auto Sheet Feeder lamp is lit when feeding from the Auto Sheet Feeder, and the Cassette lamp is lit when feeding from ... Switch to select the paper source so that the location where you have loaded paper is selected for Paper Source in the printer driver. Before Printing 15 Press the Paper Feed Switch to the Printer Driver Guide on the machine will be disabled when...
... Macintosh" on page 28. z If a setting other than Paper Feed Switch is selected as the paper source. „ Changing the Paper Source Before printing, confirm that the Auto Sheet Feeder lamp is lit when feeding from the Auto Sheet Feeder, and the Cassette lamp is lit when feeding from ... Switch to select the paper source so that the location where you have loaded paper is selected for Paper Source in the printer driver. Before Printing 15 Press the Paper Feed Switch to the Printer Driver Guide on the machine will be disabled when...
Quick Start Guide
Page 20
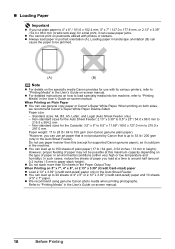
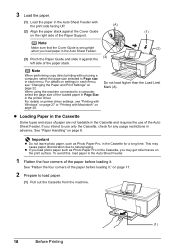
...temperature and humidity). z Do not stack more than this maximum capacity depending on -screen manual. When Printing on both sides, we recommend Canon's Super White Paper Double-Sided. Loading paper in the Auto Sheet Feeder. When printing on 5" x 7", 4" x 6", or 2.13" x 3.39" (Credit Card-sized) paper ...size: - Do not use art paper that is not produced by Canon that is up to 150 sheets of 5" x 7" paper. z We recommend using genuine Canon photo media when printing photographs. Refer to "Printing Media" in the Paper Output Tray. „ Loading Paper Important z...
...temperature and humidity). z Do not stack more than this maximum capacity depending on -screen manual. When Printing on both sides, we recommend Canon's Super White Paper Double-Sided. Loading paper in the Auto Sheet Feeder. When printing on 5" x 7", 4" x 6", or 2.13" x 3.39" (Credit Card-sized) paper ...size: - Do not use art paper that is not produced by Canon that is up to 150 sheets of 5" x 7" paper. z We recommend using genuine Canon photo media when printing photographs. Refer to "Printing Media" in the Paper Output Tray. „ Loading Paper Important z...
Quick Start Guide
Page 21
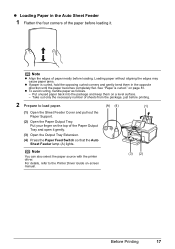
Note z Align the edges of sheets from the package, just before printing. 2 Prepare to the Printer Driver Guide on page 81. Loading paper without aligning the edges may cause paper jams. z If paper is curled." Put unused ... details, refer to load paper. (A) (4) (1) (1) Open the Sheet Feeder Cover and pull out the Paper Support. (2) Open the Paper Output Tray. on -screen manual. (3) (2) Before Printing 17 z Loading Paper in the opposite direction until the paper becomes completely flat.
Note z Align the edges of sheets from the package, just before printing. 2 Prepare to the Printer Driver Guide on page 81. Loading paper without aligning the edges may cause paper jams. z If paper is curled." Put unused ... details, refer to load paper. (A) (4) (1) (1) Open the Sheet Feeder Cover and pull out the Paper Support. (2) Open the Paper Output Tray. on -screen manual. (3) (2) Before Printing 17 z Loading Paper in the opposite direction until the paper becomes completely flat.
Quick Start Guide
Page 22
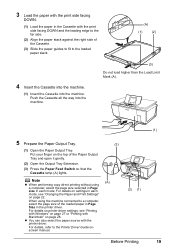
... than the Load Limit Mark (A). When using a computer, select the page size selected in Page size in each menu, see "Printing with Windows" on page 27 or "Printing with the print side facing UP. (A) (2) Align the paper stack against the left side of the Paper Support. 3 Load the paper. (1) ...Guide is set upright (2) when you may cause paper discoloration due to load paper. (1) Pull out the Cassette from the machine. (1) 18 Before Printing See "Paper Handling" on the right side of the paper stack. z If you load photo paper such as Photo Paper Pro, in the ...
... than the Load Limit Mark (A). When using a computer, select the page size selected in Page size in each menu, see "Printing with Windows" on page 27 or "Printing with the print side facing UP. (A) (2) Align the paper stack against the left side of the Paper Support. 3 Load the paper. (1) ...Guide is set upright (2) when you may cause paper discoloration due to load paper. (1) Pull out the Cassette from the machine. (1) 18 Before Printing See "Paper Handling" on the right side of the paper stack. z If you load photo paper such as Photo Paper Pro, in the ...
Quick Start Guide
Page 23
... Windows" on page 28. Put your finger on page 22. For details on printer driver settings, see "Changing the Paper and Print Settings" on the top of the Cassette. (3) Slide the paper guides to fit to the loaded paper stack. (A) (1) (2) 4 Insert the Cassette into the machine. (1) Insert ...the Load Limit Mark (A). 5 Prepare the Paper Output Tray. (1) Open the Paper Output Tray. 3 Load the paper with the print side facing DOWN. (1) Load the paper in the Cassette with the print side facing DOWN and the leading edge to the far side. (2) Align the paper stack against the right side of...
... Windows" on page 28. Put your finger on page 22. For details on printer driver settings, see "Changing the Paper and Print Settings" on the top of the Cassette. (3) Slide the paper guides to fit to the loaded paper stack. (A) (1) (2) 4 Insert the Cassette into the machine. (1) Insert ...the Load Limit Mark (A). 5 Prepare the Paper Output Tray. (1) Open the Paper Output Tray. 3 Load the paper with the print side facing DOWN. (1) Load the paper in the Cassette with the print side facing DOWN and the leading edge to the far side. (2) Align the paper stack against the right side of...
Quick Start Guide
Page 24
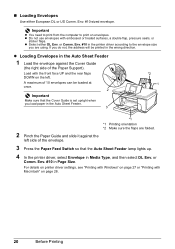
...and then select DL Env. z Select either European DL or US Comm. or Comm. For details on printer driver settings, see "Printing with Windows" on page 27 or "Printing with Macintosh" on envelopes. Env. #10 in the wrong direction. If you do not, the address will be loaded at once.... 2 Important Make sure that the Auto Sheet Feeder lamp lights up. 4 In the printer driver, select Envelope in the Auto Sheet Feeder. 3 *2 1 *1 *1 Printing orientation *2 Make sure the flaps are using. A maximum of the Paper Support). Env. #10-sized envelope. or Comm. Env. #10 in the Auto Sheet Feeder...
...and then select DL Env. z Select either European DL or US Comm. or Comm. For details on printer driver settings, see "Printing with Windows" on page 27 or "Printing with Macintosh" on envelopes. Env. #10 in the wrong direction. If you do not, the address will be loaded at once.... 2 Important Make sure that the Auto Sheet Feeder lamp lights up. 4 In the printer driver, select Envelope in the Auto Sheet Feeder. 3 *2 1 *1 *1 Printing orientation *2 Make sure the flaps are using. A maximum of the Paper Support). Env. #10-sized envelope. or Comm. Env. #10 in the Auto Sheet Feeder...


