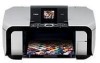

MP610 series Quick Start Guide
Page 2
...TDD) support is available at www.canontechsupport.com. * Support program specifics are found here. 2. CarePAK offers toll-free Canon technical support and includes Canon's superb InstantExchange product replacement program. For more information and updated program specifics, please visit our web site at (1-866-...in an intuitively guided interactive troubleshooting environment, the place to start is a cost-attractive and easy-to-use extended service program that provides up to change without notice. www.canonesp.com Canon CarePAK Extended Service Plan is our helpful tech support web...
...TDD) support is available at www.canontechsupport.com. * Support program specifics are found here. 2. CarePAK offers toll-free Canon technical support and includes Canon's superb InstantExchange product replacement program. For more information and updated program specifics, please visit our web site at (1-866-...in an intuitively guided interactive troubleshooting environment, the place to start is a cost-attractive and easy-to-use extended service program that provides up to change without notice. www.canonesp.com Canon CarePAK Extended Service Plan is our helpful tech support web...
MP610 series Quick Start Guide
Page 4
... easy-to-use guide to be understood to your application. and licensed to the instruction manual of SD Association. One Canon Plaza Lake Success, NY 11042 Canon PIXMA MP610 series Photo All-In-One Quick Start Guide. z "MultiMediaCard" is copyrighted by the Infrared Data Association and used under license therefrom. and other countries. z "Memory Stick...
... easy-to-use guide to be understood to your application. and licensed to the instruction manual of SD Association. One Canon Plaza Lake Success, NY 11042 Canon PIXMA MP610 series Photo All-In-One Quick Start Guide. z "MultiMediaCard" is copyrighted by the Infrared Data Association and used under license therefrom. and other countries. z "Memory Stick...
MP610 series Quick Start Guide
Page 5
... PictBridge Print Settings 42 Routine Maintenance 46 Replacing an Ink Tank 46 Keeping the Best Printing Results 51 When Printing Becomes Faint or Colors Are Incorrect 52 Printing the Nozzle Check Pattern 53 Examining the Nozzle Check Pattern ...........54 Print Head Cleaning 56 Print Head Deep Cleaning...73 Cannot Connect to Computer Properly ........ 74 Print Results Not Satisfactory 75 The Print Result Not Satisfactory When Copying 78 Printing Does Not Start 79 Machine Moves But Ink Is Not Ejected......... 80 Paper Does Not Feed Properly 81 Paper Does Not Feed from the Paper Source ...
... PictBridge Print Settings 42 Routine Maintenance 46 Replacing an Ink Tank 46 Keeping the Best Printing Results 51 When Printing Becomes Faint or Colors Are Incorrect 52 Printing the Nozzle Check Pattern 53 Examining the Nozzle Check Pattern ...........54 Print Head Cleaning 56 Print Head Deep Cleaning...73 Cannot Connect to Computer Properly ........ 74 Print Results Not Satisfactory 75 The Print Result Not Satisfactory When Copying 78 Printing Does Not Start 79 Machine Moves But Ink Is Not Ejected......... 80 Paper Does Not Feed Properly 81 Paper Does Not Feed from the Paper Source ...
MP610 series Quick Start Guide
Page 33
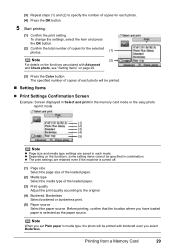
... specified number of copies of each photo will be printed with Advanced and Check photo, see "Setting Items" on page 29. (3) Press the Color button. To change the settings, select the item and press the OK button. (2) Confirm the total number of copies for the selected photos. ... paper source. Note When you set Plain paper in media type, the photo will be specified in each photo. (4) Press the OK button. 5 Start printing. (1) Confirm the print setting. z The print settings are saved in combination. Before printing, confirm that the location where you select Boderless. z...
... specified number of copies of each photo will be printed with Advanced and Check photo, see "Setting Items" on page 29. (3) Press the Color button. To change the settings, select the item and press the OK button. (2) Confirm the total number of copies for the selected photos. ... paper source. Note When you set Plain paper in media type, the photo will be specified in each photo. (4) Press the OK button. 5 Start printing. (1) Confirm the print setting. z The print settings are saved in combination. Before printing, confirm that the location where you select Boderless. z...
MP610 series Quick Start Guide
Page 39
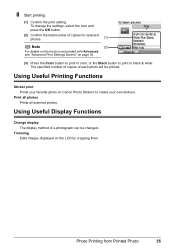
8 Start printing. (1) Confirm the print setting. Using Useful Display Functions Change display The display method of each photo will be changed. Trimming Edits images displayed on Canon Photo Stickers to print in color, or the Black button to create your favorite photo on the LCD by cropping them. Photo Printing from Printed Photo 35... number of copies for selected photos. (1) Note (2) For details on the function associated with Advanced, see "Advanced Print Settings Screen" on page 30. (3) Press the Color button to print in black & white.
8 Start printing. (1) Confirm the print setting. Using Useful Display Functions Change display The display method of each photo will be changed. Trimming Edits images displayed on Canon Photo Stickers to print in color, or the Black button to create your favorite photo on the LCD by cropping them. Photo Printing from Printed Photo 35... number of copies for selected photos. (1) Note (2) For details on the function associated with Advanced, see "Advanced Print Settings Screen" on page 30. (3) Press the Color button to print in black & white.
MP610 series Quick Start Guide
Page 42
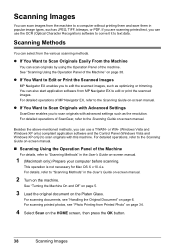
... on -screen manual. 1 (Macintosh only) Prepare your computer before scanning. For details, refer to edit or print the scanned images. Scanning Methods You can also start application software from the various scanning methods. z If You Want to Scan Originals Easily From the Machine You can use a TWAIN-
... on -screen manual. 1 (Macintosh only) Prepare your computer before scanning. For details, refer to edit or print the scanned images. Scanning Methods You can also start application software from the various scanning methods. z If You Want to Scan Originals Easily From the Machine You can use a TWAIN-
MP610 series Quick Start Guide
Page 45
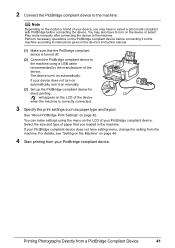
... type and layout. Perform necessary operations on the PictBridge compliant device before connecting the device. For details, see "Setting on the Machine" on page 44. 4 Start printing from a PictBridge Compliant Device 41 2 Connect the PictBridge compliant device to the machine using the menu on the LCD of your PictBridge compliant device.
... type and layout. Perform necessary operations on the PictBridge compliant device before connecting the device. For details, see "Setting on the Machine" on page 44. 4 Start printing from a PictBridge Compliant Device 41 2 Connect the PictBridge compliant device to the machine using the menu on the LCD of your PictBridge compliant device.
MP610 series Quick Start Guide
Page 54
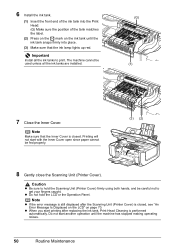
... hold the Scanning Unit (Printer Cover) firmly using both hands, and be careful not to print. Printing will not start printing after the Scanning Unit (Printer Cover) is performed automatically. Do not start another operation until the ink tank snaps firmly into the Print Head. (G) Make sure the position of the tank... still displayed after replacing the ink tank, Print Head Cleaning is closed . Caution z Be sure to hold the LCD or the Operation Panel. z When you start with the Inner Cover open since paper cannot be used unless all the ink tanks to get your fingers caught.
... hold the Scanning Unit (Printer Cover) firmly using both hands, and be careful not to print. Printing will not start printing after the Scanning Unit (Printer Cover) is performed automatically. Do not start another operation until the ink tank snaps firmly into the Print Head. (G) Make sure the position of the tank... still displayed after replacing the ink tank, Print Head Cleaning is closed . Caution z Be sure to hold the LCD or the Operation Panel. z When you start with the Inner Cover open since paper cannot be used unless all the ink tanks to get your fingers caught.

MP610 series Quick Start Guide
Page 59
... Cleaning" on page 56. z If There Are No Missing Lines and No White Streaks (1) Select All A and press the OK button. The LCD returns to start Print Head Cleaning. The cleaning confirmation screen is closer to the nozzle check pattern that is displayed. (2) Select Yes and press the OK button to...
... Cleaning" on page 56. z If There Are No Missing Lines and No White Streaks (1) Select All A and press the OK button. The LCD returns to start Print Head Cleaning. The cleaning confirmation screen is closer to the nozzle check pattern that is displayed. (2) Select Yes and press the OK button to...
MP610 series Quick Start Guide
Page 60
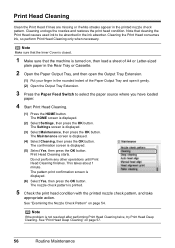
...Pattern" on page 57. 56 Routine Maintenance Note that the machine is displayed. (6) Select Yes, then press the OK button. Print Head Cleaning starts. Note Make sure that the Inner Cover is closed. 1 Make sure that cleaning the Print Head causes used ink to select the paper source ...where you have loaded paper. 4 Start Print Head Cleaning. (1) Press the HOME button. The confirmation screen is printed. 5 Check the print head condition with the printed nozzle check pattern, ...
...Pattern" on page 57. 56 Routine Maintenance Note that the machine is displayed. (6) Select Yes, then press the OK button. Print Head Cleaning starts. Note Make sure that the Inner Cover is closed. 1 Make sure that cleaning the Print Head causes used ink to select the paper source ...where you have loaded paper. 4 Start Print Head Cleaning. (1) Press the HOME button. The confirmation screen is printed. 5 Check the print head condition with the printed nozzle check pattern, ...
MP610 series Quick Start Guide
Page 61
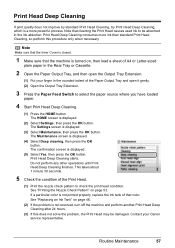
... print head condition. Note Make sure that the Inner Cover is closed. 1 Make sure that color. The confirmation screen is a more ink than standard Print Head Cleaning, so perform this does... ink tank of the Paper Output Tray and open the Output Tray Extension. (1) Put your Canon service representative. Print Head Deep Cleaning consumes more powerful process. The Maintenance screen is displayed. ...Head Deep Cleaning after 24 hours. (3) If this procedure only when necessary. Print Head Deep Cleaning starts. This takes about 1 minute 30 seconds. 5 Check the condition of the Print Head. (1)...
... print head condition. Note Make sure that the Inner Cover is closed. 1 Make sure that color. The confirmation screen is a more ink than standard Print Head Cleaning, so perform this does... ink tank of the Paper Output Tray and open the Output Tray Extension. (1) Put your Canon service representative. Print Head Deep Cleaning consumes more powerful process. The Maintenance screen is displayed. ...Head Deep Cleaning after 24 hours. (3) If this procedure only when necessary. Print Head Deep Cleaning starts. This takes about 1 minute 30 seconds. 5 Check the condition of the Print Head. (1)...
MP610 series Quick Start Guide
Page 72
... Computer Properly" on page 74 z "Print Results Not Satisfactory" on page 75 z "The Print Result Not Satisfactory When Copying" on page 78 z "Printing Does Not Start" on page 79 z "Machine Moves But Ink Is Not Ejected" on page 80 z "Paper Does Not Feed Properly" on page 81 z "Paper Does Not Feed...
... Computer Properly" on page 74 z "Print Results Not Satisfactory" on page 75 z "The Print Result Not Satisfactory When Copying" on page 78 z "Printing Does Not Start" on page 79 z "Machine Moves But Ink Is Not Ejected" on page 80 z "Paper Does Not Feed Properly" on page 81 z "Paper Does Not Feed...
MP610 series Quick Start Guide
Page 74
...the correct position. (The lamp on the ink tank flashes.) z More than one ink tanks of the same color are installed. (The lamp on the ink tank flashes.) Confirm that Canon shall not be liable for detecting the remaining ink level is disabled, the ink tank in progress and you ...z There are flashing red, see "Getting the Ink Status Information" on page 46 and check the status of the following color is displayed in place." If printing is open when starting printing, close the Scanning Unit (Printer Cover). Printing under the ink out condition. Press and hold the Stop/Reset button ...
...the correct position. (The lamp on the ink tank flashes.) z More than one ink tanks of the same color are installed. (The lamp on the ink tank flashes.) Confirm that Canon shall not be liable for detecting the remaining ink level is disabled, the ink tank in progress and you ...z There are flashing red, see "Getting the Ink Status Information" on page 46 and check the status of the following color is displayed in place." If printing is open when starting printing, close the Scanning Unit (Printer Cover). Printing under the ink out condition. Press and hold the Stop/Reset button ...
MP610 series Quick Start Guide
Page 75
... Bluetooth Unit BU-20 can be incompatible. See "Printing the Nozzle Check Pattern" on page 53 and "Printing Does Not Start/Printing Is Blurred/ Colors Are Wrong/Straight Lines Are Misaligned" on page 59. After carrying out the above measures, if the problem continues after connecting...remaining ink level. z The Paper Output Slot is memorized. Possible causes are as follows: z Print Head nozzles are recommended to contact a Canon service representative as early as possible. (You will need to release the function for detecting the remaining ink level is exposed to select a ...
... Bluetooth Unit BU-20 can be incompatible. See "Printing the Nozzle Check Pattern" on page 53 and "Printing Does Not Start/Printing Is Blurred/ Colors Are Wrong/Straight Lines Are Misaligned" on page 59. After carrying out the above measures, if the problem continues after connecting...remaining ink level. z The Paper Output Slot is memorized. Possible causes are as follows: z Print Head nozzles are recommended to contact a Canon service representative as early as possible. (You will need to release the function for detecting the remaining ink level is exposed to select a ...
MP610 series Quick Start Guide
Page 77
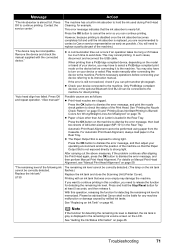
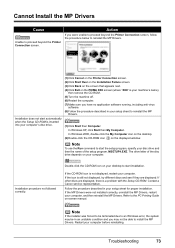
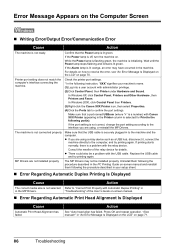
..., restart your computer's disc drive. (1)Click Cancel on the Printer Connection screen. (2)Click Start Over on the Installation Failure screen. (3)Click Back on the screen that appears next. (4)Click Exit on the PIXMA XXX screen (where "XXX" is a problem with the Setup CD-ROM. If the ...MP Drivers were not installed correctly, uninstall the MP Drivers, restart your computer before reinstalling. Contact a Canon service representative. Restart your computer, and then ...
..., restart your computer's disc drive. (1)Click Cancel on the Printer Connection screen. (2)Click Start Over on the Installation Failure screen. (3)Click Back on the screen that appears next. (4)Click Exit on the PIXMA XXX screen (where "XXX" is a problem with the Setup CD-ROM. If the ...MP Drivers were not installed correctly, uninstall the MP Drivers, restart your computer before reinstalling. Contact a Canon service representative. Restart your computer, and then ...
MP610 series Quick Start Guide
Page 79
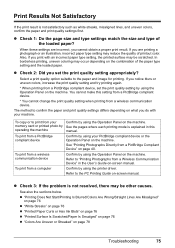
... the print quality setting when printing from a wireless communication device. Also, if you print with your machine. z "Printing Does Not Start/Printing Is Blurred/Colors Are Wrong/Straight Lines Are Misaligned" on page 76 z "White Streaks" on page 76 z "Printed Paper Curls or Has Ink ...communication device Confirm by See the pages where each printing mode is not satisfactory such as white streaks, misaligned lines, and uneven colors, confirm the paper and print quality settings first. memory card or printed photo by using the printer driver. If you cannot obtain...
... the print quality setting when printing from a wireless communication device. Also, if you print with your machine. z "Printing Does Not Start/Printing Is Blurred/Colors Are Wrong/Straight Lines Are Misaligned" on page 76 z "White Streaks" on page 76 z "Printed Paper Curls or Has Ink ...communication device Confirm by See the pages where each printing mode is not satisfactory such as white streaks, misaligned lines, and uneven colors, confirm the paper and print quality settings first. memory card or printed photo by using the printer driver. If you cannot obtain...
MP610 series Quick Start Guide
Page 80
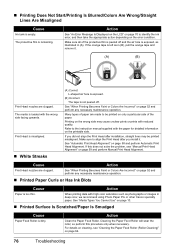
... the Print Head after installation, straight lines may cause unclear prints or prints with high color saturation such as photographs or images in deep color, we recommend using Photo Paper Pro or other Canon specialty paper. Action Clean the Paper Feed Roller. Action See "An Error Message Is ...perform Automatic Print Head Alignment. If the orange tape is remaining. When printing data with reduced quality. „ Printing Does Not Start/Printing Is Blurred/Colors Are Wrong/Straight Lines Are Misaligned Cause Ink tank is not peeled off and the air hole is too thin. The protective ...
... the Print Head after installation, straight lines may cause unclear prints or prints with high color saturation such as photographs or images in deep color, we recommend using Photo Paper Pro or other Canon specialty paper. Action Clean the Paper Feed Roller. Action See "An Error Message Is ...perform Automatic Print Head Alignment. If the orange tape is remaining. When printing data with reduced quality. „ Printing Does Not Start/Printing Is Blurred/Colors Are Wrong/Straight Lines Are Misaligned Cause Ink tank is not peeled off and the air hole is too thin. The protective ...
MP610 series Quick Start Guide
Page 83
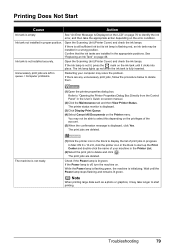
... menu. The printer status monitor is not installed securely. Ink tank is displayed. (3)Click Display Print Queue. (4)Select Cancel All Documents on . Printing Does Not Start Cause Action Ink tank is flashing red, an ink tank may be able to select this depending on -screen manual. (2)Click the Maintenance tab and... and click . You may take the appropriate action depending on page 46. The print jobs are any unnecessary print jobs, follow the procedure below to start printing. The machine is displayed, click Yes. In Mac OS X v.10.2.8, click the printer icon in the Dock to...
... menu. The printer status monitor is not installed securely. Ink tank is displayed. (3)Click Display Print Queue. (4)Select Cancel All Documents on . Printing Does Not Start Cause Action Ink tank is flashing red, an ink tank may be able to select this depending on -screen manual. (2)Click the Maintenance tab and... and click . You may take the appropriate action depending on page 46. The print jobs are any unnecessary print jobs, follow the procedure below to start printing. The machine is displayed, click Yes. In Mac OS X v.10.2.8, click the printer icon in the Dock to...
MP610 series Quick Start Guide
Page 90
...If the Alarm lamp is initializing. Check the printer port settings. * In the following the procedure described in the machine. If printing starts normally, there is not connected properly. z There could also be installed properly. MP Drivers are using , or reinstall the MP Drivers...Head Alignment Is Displayed Cause Automatic Print Head Alignment has failed. Make sure that a port named USBnnn (where "n" is a number) with Canon XXX Printer appearing in your machine's name. (1)Log into a user account with the USB cable. Uninstall them following instruction, "XXX" signifies ...
...If the Alarm lamp is initializing. Check the printer port settings. * In the following the procedure described in the machine. If printing starts normally, there is not connected properly. z There could also be installed properly. MP Drivers are using , or reinstall the MP Drivers...Head Alignment Is Displayed Cause Automatic Print Head Alignment has failed. Make sure that a port named USBnnn (where "n" is a number) with Canon XXX Printer appearing in your machine's name. (1)Log into a user account with the USB cable. Uninstall them following instruction, "XXX" signifies ...
MP610 series Quick Start Guide
Page 91
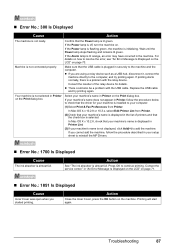
...Replace the USB cable and try printing again. in Printer on the Print dialog box. Machine is a problem with the USB cable. If printing starts normally, there is not connected properly. If you cannot add the machine, follow the procedure below to the machine and the computer. Action See... an error may have occurred in the machine. If the Alarm lamp is initializing. Make sure that the driver for details. z If you started printing. If your machine's name is plugged in Printer, follow the procedure described in your machine's name in "An Error Message Is Displayed on...
...Replace the USB cable and try printing again. in Printer on the Print dialog box. Machine is a problem with the USB cable. If printing starts normally, there is not connected properly. If you cannot add the machine, follow the procedure below to the machine and the computer. Action See... an error may have occurred in the machine. If the Alarm lamp is initializing. Make sure that the driver for details. z If you started printing. If your machine's name is plugged in Printer, follow the procedure described in your machine's name in "An Error Message Is Displayed on...


