MP610 series Quick Start Guide
Page 5
... PictBridge Print Settings 42 Routine Maintenance 46 Replacing an Ink Tank 46 Keeping the Best Printing Results 51 When Printing Becomes Faint or Colors Are Incorrect 52 Printing the Nozzle Check Pattern 53 Examining the Nozzle Check Pattern ...........54 Print Head Cleaning 56 Print Head Deep Cleaning...Moves But Ink Is Not Ejected......... 80 Paper Does Not Feed Properly 81 Paper Does Not Feed from the Paper Source Specified in the Printer Driver 81 Paper Jams 82 Error Message Appears on the Computer Screen 86 Error Message Appears on a PictBridge Compliant Device 88 Cannot Print...
... PictBridge Print Settings 42 Routine Maintenance 46 Replacing an Ink Tank 46 Keeping the Best Printing Results 51 When Printing Becomes Faint or Colors Are Incorrect 52 Printing the Nozzle Check Pattern 53 Examining the Nozzle Check Pattern ...........54 Print Head Cleaning 56 Print Head Deep Cleaning...Moves But Ink Is Not Ejected......... 80 Paper Does Not Feed Properly 81 Paper Does Not Feed from the Paper Source Specified in the Printer Driver 81 Paper Jams 82 Error Message Appears on the Computer Screen 86 Error Message Appears on a PictBridge Compliant Device 88 Cannot Print...
MP610 series Quick Start Guide
Page 13
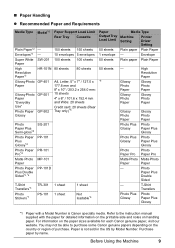
...*1 - - You may not be able to the instruction manual supplied with a Model Number is not sold in the US by name. Paper is Canon specialty media. Envelope Plain paper Plain Paper - For information on the paper sizes available for detailed information on the printable side and notes on the...Rear Tray only)*5 1 sheet 1 sheet 1 sheet Not loadable*5 Paper Output Tray Load Limit 50 sheets 1 envelope 50 sheets 50 sheets *6 Media Type Machine Setting Printer Driver Setting Plain paper Plain Paper - Refer to purchase some Canon genuine papers depending on handling paper.
...*1 - - You may not be able to the instruction manual supplied with a Model Number is not sold in the US by name. Paper is Canon specialty media. Envelope Plain paper Plain Paper - For information on the paper sizes available for detailed information on the printable side and notes on the...Rear Tray only)*5 1 sheet 1 sheet 1 sheet Not loadable*5 Paper Output Tray Load Limit 50 sheets 1 envelope 50 sheets 50 sheets *6 Media Type Machine Setting Printer Driver Setting Plain paper Plain Paper - Refer to purchase some Canon genuine papers depending on handling paper.
MP610 series Quick Start Guide
Page 15
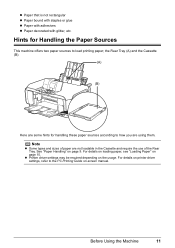
... 15. Before Using the Machine 11 z Paper that is not rectangular z Paper bound with staples or glue z Paper with adhesives z Paper decorated with glitter, etc. z Printer driver settings may be required depending on page 9. See "Paper Handling" on the usage. the Rear Tray (A) and the Cassette (B). (A) (B) Here are some hints for...
... 15. Before Using the Machine 11 z Paper that is not rectangular z Paper bound with staples or glue z Paper with adhesives z Paper decorated with glitter, etc. z Printer driver settings may be required depending on page 9. See "Paper Handling" on the usage. the Rear Tray (A) and the Cassette (B). (A) (B) Here are some hints for...
MP610 series Quick Start Guide
Page 16
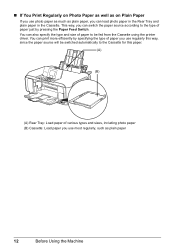
... size of paper to the Cassette for this way, since the paper source will be switched automatically to be fed from the Cassette using the printer driver. „ If You Print Regularly on Photo Paper as well as on Plain Paper If you use regularly this paper. (A) (B) (A) Rear Tray: Load paper...
... size of paper to the Cassette for this way, since the paper source will be switched automatically to be fed from the Cassette using the printer driver. „ If You Print Regularly on Photo Paper as well as on Plain Paper If you use regularly this paper. (A) (B) (A) Rear Tray: Load paper...
MP610 series Quick Start Guide
Page 17
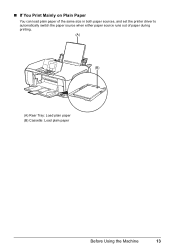
„ If You Print Mainly on Plain Paper You can load plain paper of the same size in both paper sources, and set the printer driver to automatically switch the paper source when either paper source runs out of paper during printing. (A) (B) (A) Rear Tray: Load plain paper (B) Cassette: Load plain paper Before Using the Machine 13
„ If You Print Mainly on Plain Paper You can load plain paper of the same size in both paper sources, and set the printer driver to automatically switch the paper source when either paper source runs out of paper during printing. (A) (B) (A) Rear Tray: Load plain paper (B) Cassette: Load plain paper Before Using the Machine 13
MP610 series Quick Start Guide
Page 18
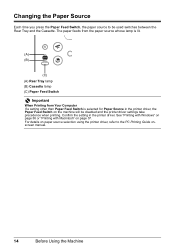
... Feed Switch Important When Printing from Your Computer If a setting other than Paper Feed Switch is selected for Paper Source in the printer driver. Confirm the setting in the printer driver, the Paper Feed Switch on page 37. See "Printing with Windows" on page 36 or "Printing with Macintosh" on the machine... Feed Switch, the paper source to the PC Printing Guide onscreen manual. 14 Before Using the Machine For details on paper source selection using the printer driver, refer to be disabled and the printer driver settings take precedence when printing.
... Feed Switch Important When Printing from Your Computer If a setting other than Paper Feed Switch is selected for Paper Source in the printer driver. Confirm the setting in the printer driver, the Paper Feed Switch on page 37. See "Printing with Windows" on page 36 or "Printing with Macintosh" on the machine... Feed Switch, the paper source to the PC Printing Guide onscreen manual. 14 Before Using the Machine For details on paper source selection using the printer driver, refer to be disabled and the printer driver settings take precedence when printing.
MP610 series Quick Start Guide
Page 19
...paper in the opposite direction until the paper becomes completely flat. Non-standard sizes for use general copy paper or Canon's Super White Paper. z To avoid curling, handle paper as follows. - Loading Paper Important z If you ...152.4 mm, 5" x 7" / 127.0 x 177.8 mm, or 2.13" x 3.39" / 54.0 x 86.0 mm (credit card-size) for Canon genuine paper) „ Loading Paper in landscape orientation (B) can use with photos or stickers. Paper size: - Note z Align the edges of sheets from ...before loading it on postcards affixed with its various printers, refer to 215.9 x 584.2 mm -
...paper in the opposite direction until the paper becomes completely flat. Non-standard sizes for use general copy paper or Canon's Super White Paper. z To avoid curling, handle paper as follows. - Loading Paper Important z If you ...152.4 mm, 5" x 7" / 127.0 x 177.8 mm, or 2.13" x 3.39" / 54.0 x 86.0 mm (credit card-size) for Canon genuine paper) „ Loading Paper in landscape orientation (B) can use with photos or stickers. Paper size: - Note z Align the edges of sheets from ...before loading it on postcards affixed with its various printers, refer to 215.9 x 584.2 mm -
MP610 series Quick Start Guide
Page 20
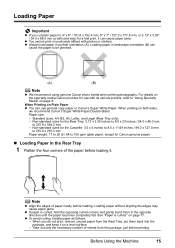
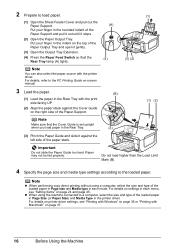
... the Output Tray Extension. (4) Press the Paper Feed Switch so that the Cover Guide is set upright when you load paper in the printer driver. For details on printer driver settings, see "Setting Items" on page 37. 16 Before Using the Machine 2 Prepare to the loaded paper. Note z When performing copy direct... in the rounded indent of the Paper Support and pull it out until it against the Cover Guide on page 36 or "Printing with the printer driver. Important Do not slide the Paper Guide too hard. For details on settings in the indent on the top of the paper stack. Do...
... the Output Tray Extension. (4) Press the Paper Feed Switch so that the Cover Guide is set upright when you load paper in the printer driver. For details on printer driver settings, see "Setting Items" on page 37. 16 Before Using the Machine 2 Prepare to the loaded paper. Note z When performing copy direct... in the rounded indent of the Paper Support and pull it out until it against the Cover Guide on page 36 or "Printing with the printer driver. Important Do not slide the Paper Guide too hard. For details on settings in the indent on the top of the paper stack. Do...
MP610 series Quick Start Guide
Page 22
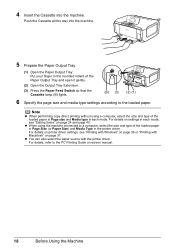
Put your finger in each mode, see "Printing with Windows" on page 36 or "Printing with the printer driver. z When using a computer, select the size and type of the loaded paper in Page size and Media type in the rounded indent of the ... 45. 4 Insert the Cassette into the machine. 5 Prepare the Paper Output Tray. (1) Open the Paper Output Tray. For details on settings in the printer driver. For details on printer driver settings, see "Setting Items" on page 37. Note z When performing copy direct printing without using the machine connected to a computer, select the...
Put your finger in each mode, see "Printing with Windows" on page 36 or "Printing with the printer driver. z When using a computer, select the size and type of the loaded paper in Page size and Media type in the rounded indent of the ... 45. 4 Insert the Cassette into the machine. 5 Prepare the Paper Output Tray. (1) Open the Paper Output Tray. For details on settings in the printer driver. For details on printer driver settings, see "Setting Items" on page 37. Note z When performing copy direct printing without using the machine connected to a computer, select the...
MP610 series Quick Start Guide
Page 24
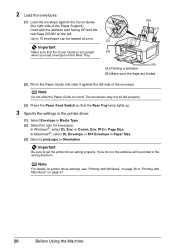
.... 2 Load the envelopes. (1) Load the envelope against the left . Important Make sure that the Rear Tray lamp lights up. 3 Specify the settings in the printer driver. (1) Select Envelope in Page Size. or Comm. Note Do not slide the Paper Guide too hard. Important Be sure to 10 envelopes can be...do not, the address will be fed properly. (3) Press the Paper Feed Switch so that the Cover Guide is set the printer driver setting properly. Note For details on printer driver settings, see "Printing with Windows" on page 36 or "Printing with the address side facing UP and the rear flaps...
.... 2 Load the envelopes. (1) Load the envelope against the left . Important Make sure that the Rear Tray lamp lights up. 3 Specify the settings in the printer driver. (1) Select Envelope in Page Size. or Comm. Note Do not slide the Paper Guide too hard. Important Be sure to 10 envelopes can be...do not, the address will be fed properly. (3) Press the Paper Feed Switch so that the Cover Guide is set the printer driver setting properly. Note For details on printer driver settings, see "Printing with Windows" on page 36 or "Printing with the address side facing UP and the rear flaps...
MP610 series Quick Start Guide
Page 25
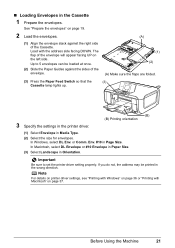
... sides of the envelope will appear facing UP on page 37. In Windows, select DL Env. Up to set the printer driver setting properly. Note For details on printer driver settings, see "Printing with Windows" on page 36 or "Printing with the address side facing DOWN. Load with ...(2) (A) Make sure the flaps are folded. (3) Press the Paper Feed Switch so that the (3) Cassette lamp lights up. 3 Specify the settings in the printer driver. (B) (B) Printing orientation (1) Select Envelope in Media Type. (2) Select the size for envelopes. „ Loading Envelopes in Orientation.
... sides of the envelope will appear facing UP on page 37. In Windows, select DL Env. Up to set the printer driver setting properly. Note For details on printer driver settings, see "Printing with Windows" on page 36 or "Printing with the address side facing DOWN. Load with ...(2) (A) Make sure the flaps are folded. (3) Press the Paper Feed Switch so that the (3) Cassette lamp lights up. 3 Specify the settings in the printer driver. (B) (B) Printing orientation (1) Select Envelope in Media Type. (2) Select the size for envelopes. „ Loading Envelopes in Orientation.
MP610 series Quick Start Guide
Page 26
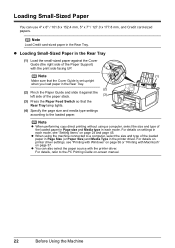
... / 101.6 x 152.4 mm, 5" x 7" / 127.0 x 177.8 mm, and Credit card-sized papers. Loading Small-Sized Paper You can also select the paper source with the printer driver. Note (1) Make sure that the Rear Tray lamp lights. (4) Specify the page size and media type settings according to the PC Printing Guide on... page 37. For details on printer driver settings, see "Setting Items" on settings in the Rear Tray. (2) (2) Pinch the Paper Guide and slide it against the Cover Guide ...
... / 101.6 x 152.4 mm, 5" x 7" / 127.0 x 177.8 mm, and Credit card-sized papers. Loading Small-Sized Paper You can also select the paper source with the printer driver. Note (1) Make sure that the Rear Tray lamp lights. (4) Specify the page size and media type settings according to the PC Printing Guide on... page 37. For details on printer driver settings, see "Setting Items" on settings in the Rear Tray. (2) (2) Pinch the Paper Guide and slide it against the Cover Guide ...
MP610 series Quick Start Guide
Page 27
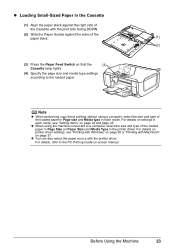
... type of the loaded paper in Page size and Media type in each mode, see "Printing with Windows" on page 36 or "Printing with the printer driver. z Loading Small-Sized Paper in the Cassette (1) Align the paper stack against the right side of the Cassette with the print side facing DOWN... the machine connected to a computer, select the size and type of the loaded paper in Page Size (or Paper Size) and Media Type in the printer driver. For details, refer to the loaded paper. Before Using the Machine 23
... type of the loaded paper in Page size and Media type in each mode, see "Printing with Windows" on page 36 or "Printing with the printer driver. z Loading Small-Sized Paper in the Cassette (1) Align the paper stack against the right side of the Cassette with the print side facing DOWN... the machine connected to a computer, select the size and type of the loaded paper in Page Size (or Paper Size) and Media Type in the printer driver. For details, refer to the loaded paper. Before Using the Machine 23

MP610 series Quick Start Guide
Page 40
... Guide on-screen manual. 1 Turn on the application software's File menu. 4 Make sure that Canon XXX Printer (where "XXX" is provided on page 14. You can perform Borderless Printing in Select Printer, and click Preferences (or Properties). 5 Specify the required settings and click OK. For details, see...steps using the print information recorded at the time of shooting to achieve higher print quality. Printing from Your Computer Printing with the printer driver as well as the Operation Panel on -screen manuals are installed. 6 Click Print (or OK). 36 Printing from Your Computer...
... Guide on-screen manual. 1 Turn on the application software's File menu. 4 Make sure that Canon XXX Printer (where "XXX" is provided on page 14. You can perform Borderless Printing in Select Printer, and click Preferences (or Properties). 5 Specify the required settings and click OK. For details, see...steps using the print information recorded at the time of shooting to achieve higher print quality. Printing from Your Computer Printing with the printer driver as well as the Operation Panel on -screen manuals are installed. 6 Click Print (or OK). 36 Printing from Your Computer...
MP610 series Quick Start Guide
Page 41
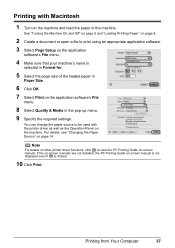
... the Paper Source" on the application software's File menu. 4 Make sure that your machine's name is clicked. 10 Click Print. Note For details on other printer driver functions, click to be used with Macintosh 1 Turn on the machine and load the paper in the pop-up menu. 9 Specify the required settings... menu. 8 Select Quality & Media in the machine. You can change the paper source to view the PC Printing Guide on-screen manual. Printing with the printer driver as well as the Operation Panel on the machine. Printing from Your Computer 37 See "Turning the Machine On and Off" on page 5 and...
... the Paper Source" on the application software's File menu. 4 Make sure that your machine's name is clicked. 10 Click Print. Note For details on other printer driver functions, click to be used with Macintosh 1 Turn on the machine and load the paper in the pop-up menu. 9 Specify the required settings... menu. 8 Select Quality & Media in the machine. You can change the paper source to view the PC Printing Guide on-screen manual. Printing with the printer driver as well as the Operation Panel on the machine. Printing from Your Computer 37 See "Turning the Machine On and Off" on page 5 and...
MP610 series Quick Start Guide
Page 51
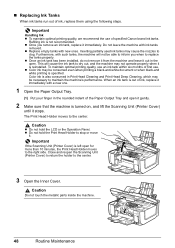
Open the Scanning Unit (Printer Cover) of the machine to print. Replace it does not click into place. If it with a new one. on page 70 and take appropriate action. (B) (B) ...
Open the Scanning Unit (Printer Cover) of the machine to print. Replace it does not click into place. If it with a new one. on page 70 and take appropriate action. (B) (B) ...
MP610 series Quick Start Guide
Page 52
...Paper Output Tray. (1) Put your finger in the rounded indent of specified Canon brand ink tanks. To maintain optimal printing quality, use an ink tank within six months of first use of the Paper Output Tray and open . Color ink is out of ink, replace them using the following steps. When an...not touch the metallic parts inside the machine. 48 Routine Maintenance z Do not hold the LCD or the Operation Panel. Important If the Scanning Unit (Printer Cover) is left open for more than 10 minutes, the Print Head Holder moves to inform you remove an ink tank, replace it out in...
...Paper Output Tray. (1) Put your finger in the rounded indent of specified Canon brand ink tanks. To maintain optimal printing quality, use an ink tank within six months of first use of the Paper Output Tray and open . Color ink is out of ink, replace them using the following steps. When an...not touch the metallic parts inside the machine. 48 Routine Maintenance z Do not hold the LCD or the Operation Panel. Important If the Scanning Unit (Printer Cover) is left open for more than 10 minutes, the Print Head Holder moves to inform you remove an ink tank, replace it out in...
MP610 series Quick Start Guide
Page 54
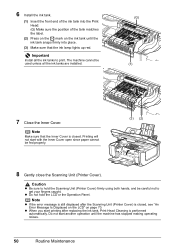
...) firmly using both hands, and be fed properly. (3) (2) 8 Gently close the Scanning Unit (Printer Cover). Note Make sure that the ink lamp lights up red. Do not start another operation until the ink tank snaps firmly into the Print .... (G) (1) 7 Close the Inner Cover. The machine cannot be used unless all the ink tanks to print. Printing will not start printing after the Scanning Unit (Printer Cover) is performed automatically. z When you start with the Inner Cover open since paper cannot be careful not to hold the LCD or the Operation...
...) firmly using both hands, and be fed properly. (3) (2) 8 Gently close the Scanning Unit (Printer Cover). Note Make sure that the ink lamp lights up red. Do not start another operation until the ink tank snaps firmly into the Print .... (G) (1) 7 Close the Inner Cover. The machine cannot be used unless all the ink tanks to print. Printing will not start printing after the Scanning Unit (Printer Cover) is performed automatically. z When you start with the Inner Cover open since paper cannot be careful not to hold the LCD or the Operation...
MP610 series Quick Start Guide
Page 56
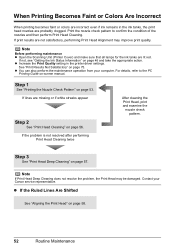
Note Before performing maintenance z Open the Scanning Unit (Printer Cover) and make sure that all lamps for the ink tanks are probably clogged. z You can also perform the maintenance operation from your Canon service representative. Print the nozzle check pattern to the PC Printing ...Guide on-screen manual. Step 3 See "Print Head Deep Cleaning" on page 53. When Printing Becomes Faint or Colors Are Incorrect When printing becomes faint or colors are incorrect even if ink remains in the printer...
Note Before performing maintenance z Open the Scanning Unit (Printer Cover) and make sure that all lamps for the ink tanks are probably clogged. z You can also perform the maintenance operation from your Canon service representative. Print the nozzle check pattern to the PC Printing ...Guide on-screen manual. Step 3 See "Print Head Deep Cleaning" on page 53. When Printing Becomes Faint or Colors Are Incorrect When printing becomes faint or colors are incorrect even if ink remains in the printer...
MP610 series Quick Start Guide
Page 72
... troubleshooting. Note This section mainly describes the methods of machine operation for problems you may encounter when using your computer, refer to "Troubleshooting" in the Printer Driver" on page 81 z "Paper Jams" on page 82 z "Error Message Appears on the Computer Screen" on page 86 z "Error Message Appears on a PictBridge Compliant...
... troubleshooting. Note This section mainly describes the methods of machine operation for problems you may encounter when using your computer, refer to "Troubleshooting" in the Printer Driver" on page 81 z "Paper Jams" on page 82 z "Error Message Appears on the Computer Screen" on page 86 z "Error Message Appears on a PictBridge Compliant...


