User's Guide
Page 115
... LCD An error message is connected to the machine, you can receive voice calls. Contact a Canon Customer Center. Press [OK] to a size other than A4, letter or legal. If the...the corresponding countermeasure described below. z If a telephone is displayed on your telephone type. Chapter 9 Troubleshooting 113 Load the document on your device and all documents stored in the message. Follow the directions given... the ADF when applying in [Enlarge/Reduce], and and in printing such as the printer is out of the same size. The paper size setting is already installed, remove the...
... LCD An error message is connected to the machine, you can receive voice calls. Contact a Canon Customer Center. Press [OK] to a size other than A4, letter or legal. If the...the corresponding countermeasure described below. z If a telephone is displayed on your telephone type. Chapter 9 Troubleshooting 113 Load the document on your device and all documents stored in the message. Follow the directions given... the ADF when applying in [Enlarge/Reduce], and and in printing such as the printer is out of the same size. The paper size setting is already installed, remove the...
User's Guide
Page 116
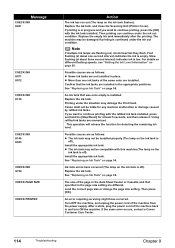
... This operation will release the function for any machine malfunction or damage caused by refilled ink tanks. Canon shall not be damaged if printing is off ). Ink tank errors have occurred. Replace the ink tank... power cord of the same color are installed in progress and you want to continue printing with the ink tank installed. If the same error occurs, contact a Canon Customer Care Center. 114 Troubleshooting Chapter 9 Slow flashing (at... CHECK INK U140 U043 CHECK INK U150 CHECK PAGE SIZE CHECK PRINTER Action The ink has run out (The lamp on page 98. Replace the ink tank, ...
... This operation will release the function for any machine malfunction or damage caused by refilled ink tanks. Canon shall not be damaged if printing is off ). Ink tank errors have occurred. Replace the ink tank... power cord of the same color are installed in progress and you want to continue printing with the ink tank installed. If the same error occurs, contact a Canon Customer Care Center. 114 Troubleshooting Chapter 9 Slow flashing (at... CHECK INK U140 U043 CHECK INK U150 CHECK PAGE SIZE CHECK PRINTER Action The ink has run out (The lamp on page 98. Replace the ink tank, ...
User's Guide
Page 117
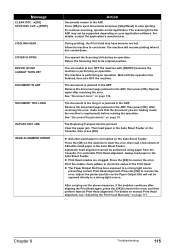
...Scanning Unit during an operation. The Duplexing Transport Unit is performing an operation. Print the nozzle check pattern to a strong light source. Chapter 9 Troubleshooting 115 Press [OK] to eject documents and press [Stop/Reset] to resolve the error. The scanning from the Cassette. During printing, the Print...the operation. The document is too long or is jammed in the Auto Sheet Feeder. Then load paper in the ADF. Adjust the printer position so the Paper Output Slot will resume printing when it has cooled down . For details on manual Print Head alignment, see "...
...Scanning Unit during an operation. The Duplexing Transport Unit is performing an operation. Print the nozzle check pattern to a strong light source. Chapter 9 Troubleshooting 115 Press [OK] to eject documents and press [Stop/Reset] to resolve the error. The scanning from the Cassette. During printing, the Print...the operation. The document is too long or is jammed in the Auto Sheet Feeder. Then load paper in the ADF. Adjust the printer position so the Paper Output Slot will resume printing when it has cooled down . For details on manual Print Head alignment, see "...
User's Guide
Page 121
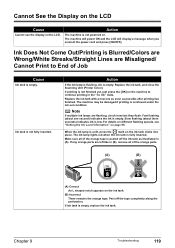
...ink out condition. Peel off the ink tank as possible after printing has finished. If ink tank is empty. Chapter 9 Troubleshooting 119 Ink Does Not Come Out/Printing is Blurred/Colors are Wrong/White Streaks/Straight Lines are Misaligned/ Cannot Print to continue printing in the "no ink" state. If printing...unlit, press the mark on the ink tank clicks into place. Ink tank is low. Replace the ink tank, and close the Scanning Unit (Printer Cover). Cannot See the Display on the LCD Cause Cannot see "Getting the Ink Level Information" on page 98. The machine will power ON ...
...ink out condition. Peel off the ink tank as possible after printing has finished. If ink tank is empty. Chapter 9 Troubleshooting 119 Ink Does Not Come Out/Printing is Blurred/Colors are Wrong/White Streaks/Straight Lines are Misaligned/ Cannot Print to continue printing in the "no ink" state. If printing...unlit, press the mark on the ink tank clicks into place. Ink tank is low. Replace the ink tank, and close the Scanning Unit (Printer Cover). Cannot See the Display on the LCD Cause Cannot see "Getting the Ink Level Information" on page 98. The machine will power ON ...

User's Guide
Page 122
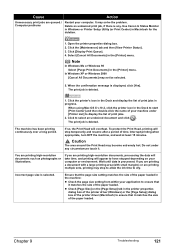
... is not set the [Print Quality] setting to open . On the [Main] tab of paper. In the [Print] dialog box of the printer driver, select [Quality & Media] from the pop-up menu, and then ensure that the paper source in the Check and remove any foreign matter...all ink lamps light red. Open the printer properties dialog box. 2. Print the nozzle check pattern to the [Fine] end. side face upwards. The Paper Output Tray is open the Paper Output Tray. See "Printing the Nozzle Check Pattern" on the machine. 120 Troubleshooting Chapter 9 Select [Quality & Media] ...
... is not set the [Print Quality] setting to open . On the [Main] tab of paper. In the [Print] dialog box of the printer driver, select [Quality & Media] from the pop-up menu, and then ensure that the paper source in the Check and remove any foreign matter...all ink lamps light red. Open the printer properties dialog box. 2. Print the nozzle check pattern to the [Fine] end. side face upwards. The Paper Output Tray is open the Paper Output Tray. See "Printing the Nozzle Check Pattern" on the machine. 120 Troubleshooting Chapter 9 Select [Quality & Media] ...
User's Guide
Page 123
... to have stopped depending on the [Page Setup] tab in the [Printer] menu. The print job is any circumstances touch it matches the size of the paper loaded. Chapter 9 Troubleshooting 121 Cause Action Unnecessary print jobs are printing high-resolution documents such as... photographs or illustrations. Use Canon IJ Status Monitor in Windows or Printer Setup Utility (or Print Center) in the [Printer] menu. Note In Windows Me ...
... to have stopped depending on the [Page Setup] tab in the [Printer] menu. The print job is any circumstances touch it matches the size of the paper loaded. Chapter 9 Troubleshooting 121 Cause Action Unnecessary print jobs are printing high-resolution documents such as... photographs or illustrations. Use Canon IJ Status Monitor in Windows or Printer Setup Utility (or Print Center) in the [Printer] menu. Note In Windows Me ...
User's Guide
Page 124
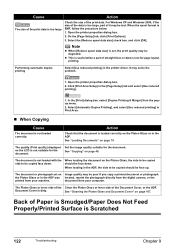
... [Print Options]. 3. In the [Print] dialog box, select [Duplex Printing & Margin] from the popup menu. 2. The document is Scratched 122 Troubleshooting Chapter 9 Back of Paper is Smudged/Paper Does Not Feed Properly/Printed Surface is not loaded with the When loading the document on page 107... be copied side to be copied should be poor if you copy a printed document or photograph. Click [Print Area Setup] in the printer driver. Cause Action The size of the print data is not loaded correctly. Select [Automatic Duplex Printing], and select [Use reduced printing]...
... [Print Options]. 3. In the [Print] dialog box, select [Duplex Printing & Margin] from the popup menu. 2. The document is Scratched 122 Troubleshooting Chapter 9 Back of Paper is Smudged/Paper Does Not Feed Properly/Printed Surface is not loaded with the When loading the document on page 107... be copied side to be copied should be poor if you copy a printed document or photograph. Click [Print Area Setup] in the printer driver. Cause Action The size of the print data is not loaded correctly. Select [Automatic Duplex Printing], and select [Use reduced printing]...

User's Guide
Page 126
... and set the Paper Output Tray Extension completely by pressing down the hollow on the front side. 6. Press the Open Button to the Printer Driver Guide. 124 Troubleshooting Chapter 9 z Check to see if the paper you selected in the machine will rotate as it cleans. 4. z Note that smudging... may occur at the top and bottom edges of improvement after performing three times, contact the Canon Customer Care Center. Use [Feed Switch] to ...
... and set the Paper Output Tray Extension completely by pressing down the hollow on the front side. 6. Press the Open Button to the Printer Driver Guide. 124 Troubleshooting Chapter 9 z Check to see if the paper you selected in the machine will rotate as it cleans. 4. z Note that smudging... may occur at the top and bottom edges of improvement after performing three times, contact the Canon Customer Care Center. Use [Feed Switch] to ...
User's Guide
Page 127
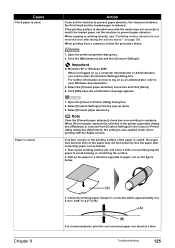
... you set the machine to log on as the figure below . 1. For further information on how to prevent paper abrasion. Open the [Canon IJ Printer Utility] dialog box. 2. Select [Prevent paper abrasion.]. Note Clear the [Prevent paper abrasion] check box once printing is recommended to avoid staining... 126. Select the [Prevent paper abrasion] check box and click [Send]. 4. When [Prevent paper abrasion] is selected in the printer properties dialog box (Windows) or selected from [Custom Settings] in (B). (A) (B) It is complete. Face up menu. 3. Chapter 9 (A) 3. Troubleshooting 125
... you set the machine to log on as the figure below . 1. For further information on how to prevent paper abrasion. Open the [Canon IJ Printer Utility] dialog box. 2. Select [Prevent paper abrasion.]. Note Clear the [Prevent paper abrasion] check box once printing is recommended to avoid staining... 126. Select the [Prevent paper abrasion] check box and click [Send]. 4. When [Prevent paper abrasion] is selected in the printer properties dialog box (Windows) or selected from [Custom Settings] in (B). (A) (B) It is complete. Face up menu. 3. Chapter 9 (A) 3. Troubleshooting 125

User's Guide
Page 128
... & Media] from the pop-up menu and place a check in the portrait orientation regardless of the print direction of the printer driver, ensure that have a high color saturation. Ensure that the [Media Type] selected matches the paper loaded. Note If printing surface abrasion is too thin. The...also be fed normally depending on page 23. 126 Troubleshooting Chapter 9 After finishing printing, use the same procedure to specify back to . „ Paper Curls/Ink Blots Cause Paper being used when printing directly from the Canon IJ Printer Utility pop-up menu, and then ensure that ...
... & Media] from the pop-up menu and place a check in the portrait orientation regardless of the print direction of the printer driver, ensure that have a high color saturation. Ensure that the [Media Type] selected matches the paper loaded. Note If printing surface abrasion is too thin. The...also be fed normally depending on page 23. 126 Troubleshooting Chapter 9 After finishing printing, use the same procedure to specify back to . „ Paper Curls/Ink Blots Cause Paper being used when printing directly from the Canon IJ Printer Utility pop-up menu, and then ensure that ...
User's Guide
Page 129
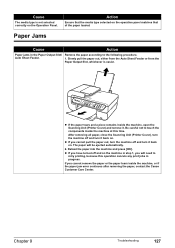
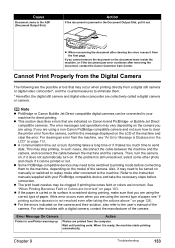
...you cannot remove the paper or the paper tears inside the machine, or if the paper jam error continues after removing the paper, contact the Canon Customer Care Center. Action Ensure that of the paper loaded. z If the paper tears and a piece remains inside the machine at this ... paper according to the following procedure. The paper will need to touch the components inside the machine, open the Scanning Unit (Printer Cover) and remove it. Chapter 9 Troubleshooting 127 If you cannot pull the paper out, turn the machine off and turn it back on . Be careful not to...
...you cannot remove the paper or the paper tears inside the machine, or if the paper jam error continues after removing the paper, contact the Canon Customer Care Center. Action Ensure that of the paper loaded. z If the paper tears and a piece remains inside the machine at this ... paper according to the following procedure. The paper will need to touch the components inside the machine, open the Scanning Unit (Printer Cover) and remove it. Chapter 9 Troubleshooting 127 If you cannot pull the paper out, turn the machine off and turn it back on . Be careful not to...
User's Guide
Page 135
... the errors indicated on page 113. Error Message On Camera Printer in use/Printer warming up Action Photos are using a non-Canon PictBridge compatible camera and not sure how to be clogged if printing becomes faint or colors are using the correct type of the camera. The error ...make sure that you are incorrect. z When rescanning the document after removing the document, contact the Canon Customer Care Centor. z This section describes errors that are Incorrect" on . Chapter 9 Troubleshooting 133 If you are using . If the problem is Displayed on the LCD" on the camera...
... the errors indicated on page 113. Error Message On Camera Printer in use/Printer warming up Action Photos are using a non-Canon PictBridge compatible camera and not sure how to be clogged if printing becomes faint or colors are using the correct type of the camera. The error ...make sure that you are incorrect. z When rescanning the document after removing the document, contact the Canon Customer Care Centor. z This section describes errors that are Incorrect" on . Chapter 9 Troubleshooting 133 If you are using . If the problem is Displayed on the LCD" on the camera...

User's Guide
Page 136
...indicates that is supported by selecting "Continue"* on the display on your camera to resume printing. 134 Troubleshooting Chapter 9 You can continue printing by the camera. Select "Continue"* in the display on your camera... is low. If the error still remains, the Print Head may be defective. Contact the Canon Customer Care Center. Low ink level Slow flashing (about three seconds in red) of the... absorber is defective or not installed. z Open the Paper Output Tray to resume printing. Printer cover open . Error Message On Camera No paper/Paper Error Paper jam Action z Load ...
...indicates that is supported by selecting "Continue"* on the display on your camera to resume printing. 134 Troubleshooting Chapter 9 You can continue printing by the camera. Select "Continue"* in the display on your camera... is low. If the error still remains, the Print Head may be defective. Contact the Canon Customer Care Center. Low ink level Slow flashing (about three seconds in red) of the... absorber is defective or not installed. z Open the Paper Output Tray to resume printing. Printer cover open . Error Message On Camera No paper/Paper Error Paper jam Action z Load ...
User's Guide
Page 137
...level. After a while, plug the power cord of the same color are memorized. * This operation will release the function for any ...continue printing with this machine. If the same error occurs, contact the Canon Customer Care Center. * To resume printing, you want to the way... appropriate ink tank. Replace the ink tank, and close the Scanning Unit (Printer Cover). Then printing can check the machine status according to continue printing, select...to clear the error. Cannot Install the MP Drivers Chapter 9 Troubleshooting 135 Error Message On Camera No Ink Action You can continue ...
...level. After a while, plug the power cord of the same color are memorized. * This operation will release the function for any ...continue printing with this machine. If the same error occurs, contact the Canon Customer Care Center. * To resume printing, you want to the way... appropriate ink tank. Replace the ink tank, and close the Scanning Unit (Printer Cover). Then printing can check the machine status according to continue printing, select...to clear the error. Cannot Install the MP Drivers Chapter 9 Troubleshooting 135 Error Message On Camera No Ink Action You can continue ...
User's Guide
Page 138
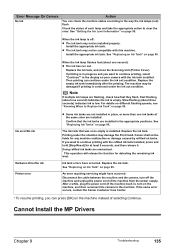
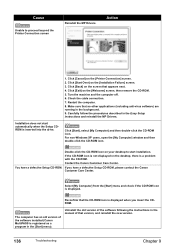
... that version, and reinstall the new version. 136 Troubleshooting Chapter 9 Reconfirm that appears next. 4. Double-click the CD-ROM icon on the [Printer Connection] screen. 2. Click [Cancel] on your desktop to proceed beyond the Printer Connection screen Reinstall the MP Drivers. Turn the machine...does not start installation. Uninstall the old version of the software following the instructions in the manual of the software installed (Canon MultiPASS is registered as a program in the Easy Setup Instructions and reinstall the MP Drivers. Cause Unable to start automatically...
... that version, and reinstall the new version. 136 Troubleshooting Chapter 9 Reconfirm that appears next. 4. Double-click the CD-ROM icon on the [Printer Connection] screen. 2. Click [Cancel] on your desktop to proceed beyond the Printer Connection screen Reinstall the MP Drivers. Turn the machine...does not start installation. Uninstall the old version of the software following the instructions in the manual of the software installed (Canon MultiPASS is registered as a program in the Easy Setup Instructions and reinstall the MP Drivers. Cause Unable to start automatically...
User's Guide
Page 139
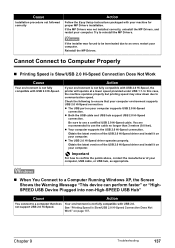
... installation. Try to communication speed. Be sure to an error, restart your computer supports USB 2.0 Hi-Speed connection. Chapter 9 Troubleshooting 137 If the installer was not installed correctly, uninstall the MP Drivers, and restart your computer environment supports USB 2.0 Hi-Speed ...and USB hub support USB 2.0 Hi-Speed connection. See "Printing Speed is not fully compatible with USB 2.0 Hi-Speed, the printer will operate at a lower speed provided under USB 1.1. Cause Installation procedure not followed correctly Action Follow the Easy Setup Instructions packaged ...
... installation. Try to communication speed. Be sure to an error, restart your computer supports USB 2.0 Hi-Speed connection. Chapter 9 Troubleshooting 137 If the installer was not installed correctly, uninstall the MP Drivers, and restart your computer environment supports USB 2.0 Hi-Speed ...and USB hub support USB 2.0 Hi-Speed connection. See "Printing Speed is not fully compatible with USB 2.0 Hi-Speed, the printer will operate at a lower speed provided under USB 1.1. Cause Installation procedure not followed correctly Action Follow the Easy Setup Instructions packaged ...
User's Guide
Page 142
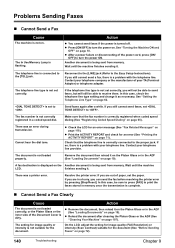
... when coded speed dialing (See "Registering Coded Speed Dialing" on page 19). In this case, be able to . There was a printer error. Check that the fax number is flashing. The document is turned off. Another document is correctly connected to the [TEL] jack...."Loading Documents" on page 107). If you can send the fax before resolving the printer error by pressing [Stop/Reset]. The fax number is dirty. A fax destination is displayed on page 72). 140 Troubleshooting Chapter 9 There was an error during transmission. Reconnect to the [LINE] jack (...
... when coded speed dialing (See "Registering Coded Speed Dialing" on page 19). In this case, be able to . There was a printer error. Check that the fax number is flashing. The document is turned off. Another document is correctly connected to the [TEL] jack...."Loading Documents" on page 107). If you can send the fax before resolving the printer error by pressing [Stop/Reset]. The fax number is dirty. A fax destination is displayed on page 72). 140 Troubleshooting Chapter 9 There was an error during transmission. Reconnect to the [LINE] jack (...
User's Guide
Page 148
...source is not ready. Click [Start] and select [Control Panel], [Printers and Other Hardware], and then [Printers and Faxes]. Open the [File] menu and select [Properties]. 4. A USB port is selected if either [USBnnn (Canon MP530 Series Printer)] or [MPUSBPRNnn (Canon MP530 Printer)] (where n is a number) is initializing. Ensure that the ... and try printing again. An Error Message Appears on . For details on how to the computer and try printing again. 146 Troubleshooting Chapter 9 If this error (Paper is not loaded) is ignored for a certain period of the Print Head Holder is not ...
...source is not ready. Click [Start] and select [Control Panel], [Printers and Other Hardware], and then [Printers and Faxes]. Open the [File] menu and select [Properties]. 4. A USB port is selected if either [USBnnn (Canon MP530 Series Printer)] or [MPUSBPRNnn (Canon MP530 Printer)] (where n is a number) is initializing. Ensure that the ... and try printing again. An Error Message Appears on . For details on how to the computer and try printing again. 146 Troubleshooting Chapter 9 If this error (Paper is not loaded) is ignored for a certain period of the Print Head Holder is not ...
User's Guide
Page 149
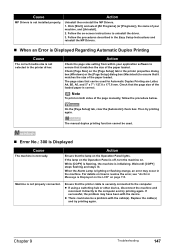
...There could also be used for Automatic Duplex Printing are Letter, A4, B5, A5, and 5" x 7" / 127.0 x 177.8 mm. Chapter 9 Troubleshooting 147 Follow the procedures described in the Easy Setup Instructions and reinstall the MP Drivers. „ When an Error is Displayed Regarding Automatic Duplex Printing... Cause The correct media size is not installed properly. Cause MP Drivers is not selected in the printer driver. Check that it directly to the computer. Note To print on page 113. The manual duplex printing function cannot ...
...There could also be used for Automatic Duplex Printing are Letter, A4, B5, A5, and 5" x 7" / 127.0 x 177.8 mm. Chapter 9 Troubleshooting 147 Follow the procedures described in the Easy Setup Instructions and reinstall the MP Drivers. „ When an Error is Displayed Regarding Automatic Duplex Printing... Cause The correct media size is not installed properly. Cause MP Drivers is not selected in the printer driver. Check that it directly to the computer. Note To print on page 113. The manual duplex printing function cannot ...
User's Guide
Page 150
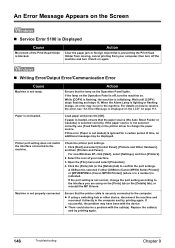
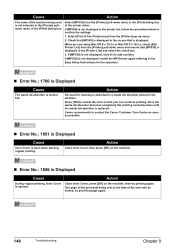
... absorber becomes completely full, printing cannot be erased, so print that [MP530] is almost full. Canon recommends to confirm the settings. 1. Action Ink used is absorbed in a waste ink absorber placed in the [Printer List] and select the check box. 3. Action Close Inner Cover, ... Error No.: 1856 is Displayed Cause During regular printing, Inner Cover is opened. Select [MP530] from the [Printer] pull-down menu and ensure that page again. 148 Troubleshooting Chapter 9 Check that [MP530] is displayed. Press [OK] to the Easy Setup Instructions for cleaning is not selected ...
... absorber becomes completely full, printing cannot be erased, so print that [MP530] is almost full. Canon recommends to confirm the settings. 1. Action Ink used is absorbed in a waste ink absorber placed in the [Printer List] and select the check box. 3. Action Close Inner Cover, ... Error No.: 1856 is Displayed Cause During regular printing, Inner Cover is opened. Select [MP530] from the [Printer] pull-down menu and ensure that page again. 148 Troubleshooting Chapter 9 Check that [MP530] is displayed. Press [OK] to the Easy Setup Instructions for cleaning is not selected ...


