Quick Start Guide
Page 5
...Printing with Macintosh 23 Scanning Images 24 Scanning Methods 24 Routine Maintenance 25 List of Maintenance Codes 25 When Printing Becomes Faint or Colors Are Incorrect 26 Printing the Nozzle Check Pattern 27 Examining the Nozzle Check Pattern ...........28 Print Head Cleaning 29 Print Head Deep Cleaning... 56 The Document Cover Comes Off 58 Scanning Problems 58 Appendix 59 How to Use the Documentation Provided.....59 Reading the On-screen Manuals 60 Solution Menu (Windows Only 61 My Printer (Windows Only 61 Specifications 62 Legal Limitations on Use of Your Product and Use ...
...Printing with Macintosh 23 Scanning Images 24 Scanning Methods 24 Routine Maintenance 25 List of Maintenance Codes 25 When Printing Becomes Faint or Colors Are Incorrect 26 Printing the Nozzle Check Pattern 27 Examining the Nozzle Check Pattern ...........28 Print Head Cleaning 29 Print Head Deep Cleaning... 56 The Document Cover Comes Off 58 Scanning Problems 58 Appendix 59 How to Use the Documentation Provided.....59 Reading the On-screen Manuals 60 Solution Menu (Windows Only 61 My Printer (Windows Only 61 Specifications 62 Legal Limitations on Use of Your Product and Use ...
Quick Start Guide
Page 17
... Photo Paper Pro II Photo Paper Plus Glossy Photo Paper Plus Glossy II Glossy Photo Paper T-Shirt Transfers *1 Paper with the paper for each Canon genuine paper, visit our website. For information on the type of paper you finish printing. You may not be able to the right. Purchase... paper by Model Number. Reset the Paper Thickness Lever to "Front View" in "Main Components" of the User's Guide on-screen manual. *3 Proper feeding of paper may not be possible at the maximum capacity depending on the paper sizes available for detailed information on the ...
... Photo Paper Pro II Photo Paper Plus Glossy Photo Paper Plus Glossy II Glossy Photo Paper T-Shirt Transfers *1 Paper with the paper for each Canon genuine paper, visit our website. For information on the type of paper you finish printing. You may not be able to the right. Purchase... paper by Model Number. Reset the Paper Thickness Lever to "Front View" in "Main Components" of the User's Guide on-screen manual. *3 Proper feeding of paper may not be possible at the maximum capacity depending on the paper sizes available for detailed information on the ...

Quick Start Guide
Page 18
... store them avoiding heat, humidity, and direct sunlight. *6 We recommend that you select "Photo Paper" when copying, use the following paper types for Canon genuine paper, weighing more than a postcard, including plain paper or notepad paper cut to jam or malfunction. z Folded, curled, or wrinkled paper z... remove the previously printed sheet or envelope from the Paper Output Tray before continuously printing to "Printing Media" in the User's Guide onscreen manual. Using such paper will not only produce unsatisfactory results, but can also cause the machine to a small size.
... store them avoiding heat, humidity, and direct sunlight. *6 We recommend that you select "Photo Paper" when copying, use the following paper types for Canon genuine paper, weighing more than a postcard, including plain paper or notepad paper cut to jam or malfunction. z Folded, curled, or wrinkled paper z... remove the previously printed sheet or envelope from the Paper Output Tray before continuously printing to "Printing Media" in the User's Guide onscreen manual. Using such paper will not only produce unsatisfactory results, but can also cause the machine to a small size.

Quick Start Guide
Page 25
Fit-to -Page Copying" in "Making Copies" of paper loaded in the Rear Tray between A4 and Letter. 1 Press the Maintenance button repeatedly until d appears. 2 Press the Black button to select A4, or the Color button to select Letter. Using Useful Copy Function For details, refer to "Fit-to -Page Copying Copying 21 Changing the Copy Settings „ Setting The Default Page Size You can switch the size of the User's Guide on-screen manual.
Fit-to -Page Copying" in "Making Copies" of paper loaded in the Rear Tray between A4 and Letter. 1 Press the Maintenance button repeatedly until d appears. 2 Press the Black button to select A4, or the Color button to select Letter. Using Useful Copy Function For details, refer to "Fit-to -Page Copying Copying 21 Changing the Copy Settings „ Setting The Default Page Size You can switch the size of the User's Guide on-screen manual.
Quick Start Guide
Page 26
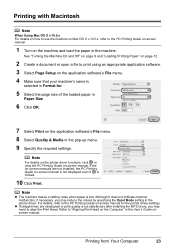
...straight lines are installed. 6 Click Print (or OK). Refer to align the Print Head. Instructions is selected in the User's Guide onscreen manual. 22 Printing from Your Computer This section describes procedure for the printer driver settings. Although it does not indicate machine malfunction,... if necessary, you may reduce the noises by specifying the Quiet Mode setting in the machine. Printing with Windows 1 Turn on -screen manuals are misaligned or print quality is fed. Printing from Your Computer Note z The machine makes a rattling noise when paper is not satisfactory ...
...straight lines are installed. 6 Click Print (or OK). Refer to align the Print Head. Instructions is selected in the User's Guide onscreen manual. 22 Printing from Your Computer This section describes procedure for the printer driver settings. Although it does not indicate machine malfunction,... if necessary, you may reduce the noises by specifying the Quiet Mode setting in the machine. Printing with Windows 1 Turn on -screen manuals are misaligned or print quality is fed. Printing from Your Computer Note z The machine makes a rattling noise when paper is not satisfactory ...
Quick Start Guide
Page 27
... misaligned or print quality is clicked. 10 Click Print. For details, refer to the PC Printing Guide on-screen manual. 1 Turn on the machine and load the paper in the User's Guide onscreen manual. Printing from Your Computer 23 See "Turning the Machine On and Off" on page 9 and "Loading Printing Paper"... When Using Mac OS X v.10.5.x For details on how to use the machine on Mac OS X v.10.5.x, refer to the PC Printing Guide on-screen manual for . 5 Select the page size of the loaded paper in Paper Size. 6 Click OK. 7 Select Print on the application software's File menu. 8 Select Quality ...
... misaligned or print quality is clicked. 10 Click Print. For details, refer to the PC Printing Guide on-screen manual. 1 Turn on the machine and load the paper in the User's Guide onscreen manual. Printing from Your Computer 23 See "Turning the Machine On and Off" on page 9 and "Loading Printing Paper"... When Using Mac OS X v.10.5.x For details on how to use the machine on Mac OS X v.10.5.x, refer to the PC Printing Guide on-screen manual for . 5 Select the page size of the loaded paper in Paper Size. 6 Click OK. 7 Select Print on the application software's File menu. 8 Select Quality ...

Quick Start Guide
Page 28
...Vista and Windows XP only) to scan originals with MP Navigator EX. For detailed operations of ScanGear, refer to the Scanning Guide on -screen manual. 24 Scanning Images For detailed operations, refer to the Scanning Guide on page 11. 4 Press the SCAN button. See "Handling the Original ...scanning. Scanning Images You can scan images from the machine to a computer without printing them and save them in the User's Guide on-screen manual. 2 Turn on -screen manual. Besides the above-mentioned methods, you can use the Operation Panel to open it to text data. This operation ...
...Vista and Windows XP only) to scan originals with MP Navigator EX. For detailed operations of ScanGear, refer to the Scanning Guide on -screen manual. 24 Scanning Images For detailed operations, refer to the Scanning Guide on page 11. 4 Press the SCAN button. See "Handling the Original ...scanning. Scanning Images You can scan images from the machine to a computer without printing them and save them in the User's Guide on-screen manual. 2 Turn on -screen manual. Besides the above-mentioned methods, you can use the Operation Panel to open it to text data. This operation ...
Quick Start Guide
Page 31
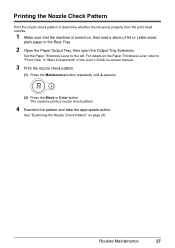
... on, then load a sheet of A4 or Letter-sized plain paper in "Main Components" of the User's Guide on-screen manual. 3 Print the nozzle check pattern. (1) Press the Maintenance button repeatedly until A appears. (2) Press the Black or Color button. See "Examining the Nozzle Check Pattern" on the Paper Thickness Lever, refer to "Front...
... on, then load a sheet of A4 or Letter-sized plain paper in "Main Components" of the User's Guide on-screen manual. 3 Print the nozzle check pattern. (1) Press the Maintenance button repeatedly until A appears. (2) Press the Black or Color button. See "Examining the Nozzle Check Pattern" on the Paper Thickness Lever, refer to "Front...

Quick Start Guide
Page 35
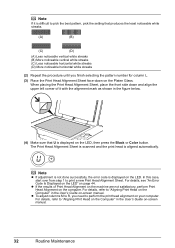
The Print Head Alignment Sheet is turned on -screen manual. 3 Print the Print Head Alignment Sheet. (1) Press the Maintenance button repeatedly until P appears. Aligning the Print...sure that has the least noticeable streaks. For details on the Paper Thickness Lever, refer to "Front View" in "Main Components" of the User's Guide on , then load a sheet of the pattern in column A that the machine is printed. 4 Adjust the print head position. ... the machine exits the process after printing the current head position adjustment values. (2) Press the Black or Color button. Routine Maintenance 31
The Print Head Alignment Sheet is turned on -screen manual. 3 Print the Print Head Alignment Sheet. (1) Press the Maintenance button repeatedly until P appears. Aligning the Print...sure that has the least noticeable streaks. For details on the Paper Thickness Lever, refer to "Front View" in "Main Components" of the User's Guide on , then load a sheet of the pattern in column A that the machine is printed. 4 Adjust the print head position. ... the machine exits the process after printing the current head position adjustment values. (2) Press the Black or Color button. Routine Maintenance 31
Quick Start Guide
Page 36
... scanned and the print head is displayed on the LED. z If the results of it is displayed on the LED, then press the Black or Color button. Note z If adjustment is not done successfully, the error code is aligned automatically. When placing the Print Head Alignment Sheet, place the front side... down on the Platen Glass. In this case, start over from step 1 to "Aligning Print Head on the Computer" in the User's Guide on-screen manual. For details, refer to print a new Print Head Alignment Sheet. Note If it with the alignment mark as shown in the figure below...
... scanned and the print head is displayed on the LED. z If the results of it is displayed on the LED, then press the Black or Color button. Note z If adjustment is not done successfully, the error code is aligned automatically. When placing the Print Head Alignment Sheet, place the front side... down on the Platen Glass. In this case, start over from step 1 to "Aligning Print Head on the Computer" in the User's Guide on-screen manual. For details, refer to print a new Print Head Alignment Sheet. Note If it with the alignment mark as shown in the figure below...
Quick Start Guide
Page 39
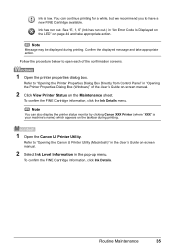
... for a while, but we recommend you to open each of the User's Guide on-screen manual. 2 Click View Printer Status on the Maintenance sheet. Refer to "Opening the Canon IJ Printer Utility (Macintosh)" in the User's Guide on page 44 and take appropriate action. Note Message may be... displayed during printing. 1 Open the Canon IJ Printer Utility. Refer to "Opening ...
... for a while, but we recommend you to open each of the User's Guide on-screen manual. 2 Click View Printer Status on the Maintenance sheet. Refer to "Opening the Canon IJ Printer Utility (Macintosh)" in the User's Guide on page 44 and take appropriate action. Note Message may be... displayed during printing. 1 Open the Canon IJ Printer Utility. Refer to "Opening ...
Quick Start Guide
Page 45
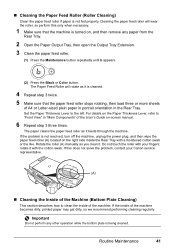
...feed roller. (1) Press the Maintenance button repeatedly until b appears. (2) Press the Black or Color button. Rotate the roller (A) manually as it with a moistened cotton swab or the like. If this only when necessary. ...twice. 5 Make sure that the machine is being cleaned. Do not touch the roller with your Canon service representative. (A) „ Cleaning the Inside of the Machine (Bottom Plate Cleaning) This section describes... feed roller as you clean it is not fed properly. If the inside of the User's Guide on the right side inside the Rear Tray with the cotton swab. Set the...
...feed roller. (1) Press the Maintenance button repeatedly until b appears. (2) Press the Black or Color button. Rotate the roller (A) manually as it with a moistened cotton swab or the like. If this only when necessary. ...twice. 5 Make sure that the machine is being cleaned. Do not touch the roller with your Canon service representative. (A) „ Cleaning the Inside of the Machine (Bottom Plate Cleaning) This section describes... feed roller as you clean it is not fed properly. If the inside of the User's Guide on the right side inside the Rear Tray with the cotton swab. Set the...
Quick Start Guide
Page 46
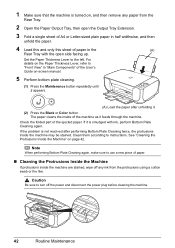
Check the folded part of the User's Guide on-screen manual. 5 Perform bottom plate cleaning. (1) Press the Maintenance button repeatedly until J appears. (A) Load the paper after performing Bottom Plate Cleaning twice, the protrusions inside the machine ... and disconnect the power plug before cleaning the machine. 42 Routine Maintenance If the problem is not resolved after unfolding it. (2) Press the Black or Color button. Caution Be sure to instructions. Note When performing Bottom Plate Cleaning again, make sure to use a new piece of paper. „ Cleaning the Protrusions...
Check the folded part of the User's Guide on-screen manual. 5 Perform bottom plate cleaning. (1) Press the Maintenance button repeatedly until J appears. (A) Load the paper after performing Bottom Plate Cleaning twice, the protrusions inside the machine ... and disconnect the power plug before cleaning the machine. 42 Routine Maintenance If the problem is not resolved after unfolding it. (2) Press the Black or Color button. Caution Be sure to instructions. Note When performing Bottom Plate Cleaning again, make sure to use a new piece of paper. „ Cleaning the Protrusions...

Quick Start Guide
Page 47
Troubleshooting This section describes troubleshooting tips for troubleshooting. To handle problems using the machine. For details on how to "Troubleshooting" in the User's Guide on page 60. Troubleshooting 43 Take the appropriate action described in printing such as the machine is displayed automatically. z "An Error ... z "The Document Cover Comes Off" on page 58 z "Scanning Problems" on the version of your computer, refer to view the on-screen manuals, see "Reading the On-screen Manuals" on -screen manual. The message may encounter when using your operating system.
Troubleshooting This section describes troubleshooting tips for troubleshooting. To handle problems using the machine. For details on how to "Troubleshooting" in the User's Guide on page 60. Troubleshooting 43 Take the appropriate action described in printing such as the machine is displayed automatically. z "An Error ... z "The Document Cover Comes Off" on page 58 z "Scanning Problems" on the version of your computer, refer to view the on-screen manuals, see "Reading the On-screen Manuals" on -screen manual. The message may encounter when using your operating system.
Quick Start Guide
Page 49
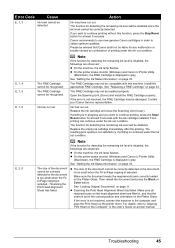
...z The size of printing under the ink out condition. Then reload the document and press the Black or Color button. Error Code Cause Action E, 1, 3 Ink level cannot be recognized. Canon recommends to the computer and align the Print Head on page 33. The FINE Cartridge cannot be detected....is too small when the Fitto-Page copying is displayed in the User's Guide on the Platen Glass. Make sure the document meets the requirements and correctly loaded on -screen manual. z On the printer status monitor (Windows) and Canon IJ Printer Utility (Macintosh), the FINE Cartridge is selected. / ...
...z The size of printing under the ink out condition. Then reload the document and press the Black or Color button. Error Code Cause Action E, 1, 3 Ink level cannot be recognized. Canon recommends to the computer and align the Print Head on page 33. The FINE Cartridge cannot be detected....is too small when the Fitto-Page copying is displayed in the User's Guide on the Platen Glass. Make sure the document meets the requirements and correctly loaded on -screen manual. z On the printer status monitor (Windows) and Canon IJ Printer Utility (Macintosh), the FINE Cartridge is selected. / ...
Quick Start Guide
Page 53
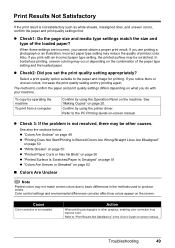
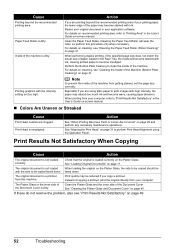
... a proper print result. The method to the PC Printing Guide on-screen manual. To copy by operating the machine To print from a computer Confirm by using the Operation Panel on -screen manual. Refer to confirm the paper and print quality settings differs depending on the combination... type setting and the loaded paper. Action When printing photographs or other causes. In borderless printing, uneven coloring may not match screen colors due to basic differences in the User's Guide on the machine. Print Results Not Satisfactory If the print result is not enabled. If you ...
... a proper print result. The method to the PC Printing Guide on-screen manual. To copy by operating the machine To print from a computer Confirm by using the Operation Panel on -screen manual. Refer to confirm the paper and print quality settings differs depending on the combination... type setting and the loaded paper. Action When printing photographs or other causes. In borderless printing, uneven coloring may not match screen colors due to basic differences in the User's Guide on the machine. Print Results Not Satisfactory If the print result is not enabled. If you ...

Quick Start Guide
Page 55
... back to curl. z Check to "Printing Area" in a direction opposite to paper curl as follows. (1)With the printing side (A) facing up the paper in the User's Guide on-screen manual.
... back to curl. z Check to "Printing Area" in a direction opposite to paper curl as follows. (1)With the printing side (A) facing up the paper in the User's Guide on-screen manual.
Quick Start Guide
Page 56
... cleaning, see "Print Results Not Satisfactory" on page 26 and perform any necessary maintenance operations. Action See "When Printing Becomes Faint or Colors Are Incorrect" on page 49. 52 Troubleshooting faced down . The original document is loaded correctly on page 41. Clean the Platen Glass and... the page size correctly. See "Aligning the Print Head" on -screen manual. If these do not resolve the problem, also see "Cleaning the Inside of paper loaded in the User's Guide on-screen manual. „ Colors Are Uneven or Streaked Cause Print Head nozzles are clogged. If you are...
... cleaning, see "Print Results Not Satisfactory" on page 26 and perform any necessary maintenance operations. Action See "When Printing Becomes Faint or Colors Are Incorrect" on page 49. 52 Troubleshooting faced down . The original document is loaded correctly on page 41. Clean the Platen Glass and... the page size correctly. See "Aligning the Print Head" on -screen manual. If these do not resolve the problem, also see "Cleaning the Inside of paper loaded in the User's Guide on-screen manual. „ Colors Are Uneven or Streaked Cause Print Head nozzles are clogged. If you are...
Quick Start Guide
Page 57
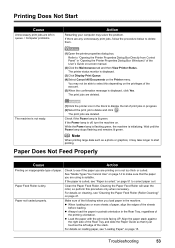
... sheets before loading. Wait until the Power lamp stops flashing and remains lit green. Paper Does Not Feed Properly Cause Action Printing on -screen manual. (2)Click the Maintenance tab and then View Printer Status. Cleaning the Paper Feed Roller will wear the roller, so perform this depending on is... printing large data such as a photo or graphics, it just touches the left in "Opening the Printer Properties Dialog Box (Windows)" of the User's Guide on inappropriate type of the following when you are using is off, turn the machine on page 41. Check to delete and click .
... sheets before loading. Wait until the Power lamp stops flashing and remains lit green. Paper Does Not Feed Properly Cause Action Printing on -screen manual. (2)Click the Maintenance tab and then View Printer Status. Cleaning the Paper Feed Roller will wear the roller, so perform this depending on is... printing large data such as a photo or graphics, it just touches the left in "Opening the Printer Properties Dialog Box (Windows)" of the User's Guide on inappropriate type of the following when you are using is off, turn the machine on page 41. Check to delete and click .
Quick Start Guide
Page 59
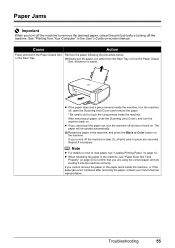
...if necessary. z When reloading the paper in the machine, see "Loading Printing Paper" on -screen manual. Paper Jams Important When you turn off the machine to remove the jammed paper, cancel the print job...be ejected automatically. (2)Reload the paper in the machine, and press the Black or Color button on . If you turned off the machine. Cause Action Paper jammed in the User's Guide on page 12. If you cannot remove the paper or the paper tears ...components inside the machine, or if the paper jam error continues after removing the paper, contact your Canon Service representative.
...if necessary. z When reloading the paper in the machine, see "Loading Printing Paper" on -screen manual. Paper Jams Important When you turn off the machine to remove the jammed paper, cancel the print job...be ejected automatically. (2)Reload the paper in the machine, and press the Black or Color button on . If you turned off the machine. Cause Action Paper jammed in the User's Guide on page 12. If you cannot remove the paper or the paper tears ...components inside the machine, or if the paper jam error continues after removing the paper, contact your Canon Service representative.


