Quick Start Guide
Page 5
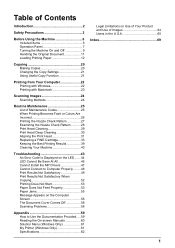
...Function 21 Printing from Your Computer 22 Printing with Windows 22 Printing with Macintosh 23 Scanning Images 24 Scanning Methods 24 Routine Maintenance 25 List of Maintenance Codes 25 When Printing Becomes Faint or Colors Are Incorrect 26 Printing the Nozzle Check Pattern 27 Examining the Nozzle Check Pattern ... 53 Paper Does Not Feed Properly 53 Paper Jams 55 Message Appears on the Computer Screen 56 The Document Cover Comes Off 58 Scanning Problems 58 Appendix 59 How to Use the Documentation Provided.....59 Reading the On-screen Manuals 60 Solution Menu (Windows Only 61 My...
...Function 21 Printing from Your Computer 22 Printing with Windows 22 Printing with Macintosh 23 Scanning Images 24 Scanning Methods 24 Routine Maintenance 25 List of Maintenance Codes 25 When Printing Becomes Faint or Colors Are Incorrect 26 Printing the Nozzle Check Pattern 27 Examining the Nozzle Check Pattern ... 53 Paper Does Not Feed Properly 53 Paper Jams 55 Message Appears on the Computer Screen 56 The Document Cover Comes Off 58 Scanning Problems 58 Appendix 59 How to Use the Documentation Provided.....59 Reading the On-screen Manuals 60 Solution Menu (Windows Only 61 My...
Quick Start Guide
Page 11
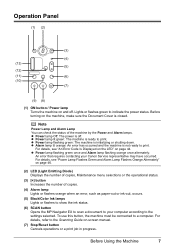
... Document Cover is closed. For details, refer to the settings selected. Before Using the Machine 7 z Power lamp flashing green: The machine is ready to your Canon Service representative may have occurred. Operation Panel (1) (2) (3) (4) (13) (5) (12) (11) (6) (10) (7) (9) (8) (1) ON button / Power lamp Turns the machine on...orange when an error, such as paper-out or ink-out, occurs. (5) Black/Color Ink lamps Lights or flashes to show the ink status. (6) SCAN button Opens the MP Navigator EX to scan a document to print. For details, see "Power Lamp Flashes Green and Alarm ...
... Document Cover is closed. For details, refer to the settings selected. Before Using the Machine 7 z Power lamp flashing green: The machine is ready to your Canon Service representative may have occurred. Operation Panel (1) (2) (3) (4) (13) (5) (12) (11) (6) (10) (7) (9) (8) (1) ON button / Power lamp Turns the machine on...orange when an error, such as paper-out or ink-out, occurs. (5) Black/Color Ink lamps Lights or flashes to show the ink status. (6) SCAN button Opens the MP Navigator EX to scan a document to print. For details, see "Power Lamp Flashes Green and Alarm ...

Quick Start Guide
Page 15
... to load the original document on the Platen Glass. „ Original Document Requirements The original documents you load on the Platen Glass for copying or scanning must meet these requirements: Document type Size (W x L) Thickness z Paper documents z Photographs z Books Max. 8.5 x 11.7 inches / 216 x 297 ...mm Max. 0.6 inches / 15 mm „ Loading Original Documents Load originals to copy or scan on the Platen (1) Glass. (1) Lift the Document Cover. Note Make sure any objects weighing more than 4.4 lb / 2 kg on the original with the side...
... to load the original document on the Platen Glass. „ Original Document Requirements The original documents you load on the Platen Glass for copying or scanning must meet these requirements: Document type Size (W x L) Thickness z Paper documents z Photographs z Books Max. 8.5 x 11.7 inches / 216 x 297 ...mm Max. 0.6 inches / 15 mm „ Loading Original Documents Load originals to copy or scan on the Platen (1) Glass. (1) Lift the Document Cover. Note Make sure any objects weighing more than 4.4 lb / 2 kg on the original with the side...

Quick Start Guide
Page 28
...popular image types such as open MP Navigator EX as well as JPEG, TIFF, bitmaps, or PDF. z If You Want to Edit or Print the Scanned Images with advanced settings such as optimizing or trimming. See "Opening MP Navigator EX Using the Operation Panel" on the machine. or WIA- (Windows ...Vista and Windows XP only) compliant application software and the Control Panel (Windows Vista and Windows XP only) to the Scanning Guide on -screen manual. You can also use the Operation Panel to open it to text data. For detailed operations of MP Navigator EX, refer...
...popular image types such as open MP Navigator EX as well as JPEG, TIFF, bitmaps, or PDF. z If You Want to Edit or Print the Scanned Images with advanced settings such as optimizing or trimming. See "Opening MP Navigator EX Using the Operation Panel" on the machine. or WIA- (Windows ...Vista and Windows XP only) compliant application software and the Control Panel (Windows Vista and Windows XP only) to the Scanning Guide on -screen manual. You can also use the Operation Panel to open it to text data. For detailed operations of MP Navigator EX, refer...
Quick Start Guide
Page 29
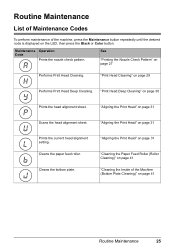
... page 31 Prints the current head alignment setting. Maintenance Operation Code Prints the nozzle check pattern. See "Printing the Nozzle Check Pattern" on page 31 Scans the head alignment sheet. "Aligning the Print Head" on page 27 Performs Print Head Cleaning. Cleans the bottom plate. "Aligning the Print Head" on the...
... page 31 Prints the current head alignment setting. Maintenance Operation Code Prints the nozzle check pattern. See "Printing the Nozzle Check Pattern" on page 31 Scans the head alignment sheet. "Aligning the Print Head" on page 27 Performs Print Head Cleaning. Cleans the bottom plate. "Aligning the Print Head" on the...
Quick Start Guide
Page 36
... details, refer to "Aligning Print Head on the Computer" in the User's Guide on the LED, then press the Black or Color button. The Print Head Alignment Sheet is scanned and the print head is displayed on -screen manual. 32 Routine Maintenance For details, see "An Error Code Is Displayed on the...
... details, refer to "Aligning Print Head on the Computer" in the User's Guide on the LED, then press the Black or Color button. The Print Head Alignment Sheet is scanned and the print head is displayed on -screen manual. 32 Routine Maintenance For details, see "An Error Code Is Displayed on the...
Quick Start Guide
Page 41
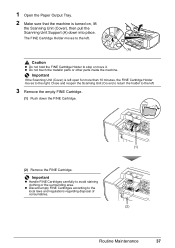
... z Handle FINE Cartridges carefully to stop or move it. Close and reopen the Scanning Unit (Cover) to return the holder to the right. Important If the Scanning Unit (Cover) is turned on, lift the Scanning Unit (Cover), then pull the Scanning Unit Support (A) down the FINE Cartridge. (2) Remove the FINE Cartridge. z Discard empty FINE...
... z Handle FINE Cartridges carefully to stop or move it. Close and reopen the Scanning Unit (Cover) to return the holder to the right. Important If the Scanning Unit (Cover) is turned on, lift the Scanning Unit (Cover), then pull the Scanning Unit Support (A) down the FINE Cartridge. (2) Remove the FINE Cartridge. z Discard empty FINE...
Quick Start Guide
Page 43
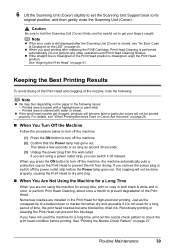
...(Cover) slightly to set the Scanning Unit Support back to get clogged, printouts will not be printed properly. Keeping the Best Printing Results To avoid drying of the Print Head and clogging of time, the print head nozzles become faint or particular colors will not be done properly, ... Head. Routine Maintenance 39 z If the straight line is misaligned or the Print Head position is closed, see "When Printing Becomes Faint or Colors Are Incorrect" on the Print Head to prevent degradation of a ballpoint pen or marker becomes dry and unusable if it off the machine. (2)...
...(Cover) slightly to set the Scanning Unit Support back to get clogged, printouts will not be printed properly. Keeping the Best Printing Results To avoid drying of the Print Head and clogging of time, the print head nozzles become faint or particular colors will not be done properly, ... Head. Routine Maintenance 39 z If the straight line is misaligned or the Print Head position is closed, see "When Printing Becomes Faint or Colors Are Incorrect" on the Print Head to prevent degradation of a ballpoint pen or marker becomes dry and unusable if it off the machine. (2)...

Quick Start Guide
Page 47
..." on page 53 z "Paper Jams" on page 55 z "Message Appears on the Computer Screen" on page 56 z "The Document Cover Comes Off" on page 58 z "Scanning Problems" on the version of paper or paper is jammed, a troubleshooting message is displayed automatically.
..." on page 53 z "Paper Jams" on page 55 z "Message Appears on the Computer Screen" on page 56 z "The Document Cover Comes Off" on page 58 z "Scanning Problems" on the version of paper or paper is jammed, a troubleshooting message is displayed automatically.
Quick Start Guide
Page 48
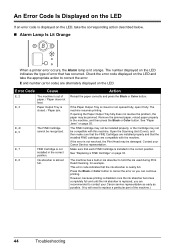
The number displayed on page 55. Error Code Cause E, 2 The machine is closed . / Paper jam. Open the Scanning Unit (Cover), and then make sure that the FINE Cartridges are installed properly and that has occurred. However, because printing is disabled once ...Head may not be damaged. Action Reload the paper correctly and press the Black or Color button. The FINE Cartridge may not be installed properly, or the Cartridge may be compatible with the machine. Contact your Canon service representative as early as possible. (You will need to correct the error. See ...
The number displayed on page 55. Error Code Cause E, 2 The machine is closed . / Paper jam. Open the Scanning Unit (Cover), and then make sure that the FINE Cartridges are installed properly and that has occurred. However, because printing is disabled once ...Head may not be damaged. Action Reload the paper correctly and press the Black or Color button. The FINE Cartridge may not be installed properly, or the Cartridge may be compatible with the machine. Contact your Canon service representative as early as possible. (You will need to correct the error. See ...
Quick Start Guide
Page 49
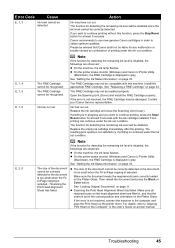
... least 5 seconds. Replace the empty ink cartridge immediately after the printing. Then reload the document and press the Black or Color button. See "Loading Original Documents" on the printer driver. If the error is in progress and you want to the computer... not be compatible with the ink cartridge installed. z On the printer status monitor (Windows) and Canon IJ Printer Utility (Macintosh), the FINE Cartridge is selected. / Scanning the Print Head Alignment Sheet has failed. Canon recommends to obtain optimum qualities. E, 1, 4 E, 1, 5 E, 1, 6 The FINE Cartridge cannot be...
... least 5 seconds. Replace the empty ink cartridge immediately after the printing. Then reload the document and press the Black or Color button. See "Loading Original Documents" on the printer driver. If the error is in progress and you want to the computer... not be compatible with the ink cartridge installed. z On the printer status monitor (Windows) and Canon IJ Printer Utility (Macintosh), the FINE Cartridge is selected. / Scanning the Print Head Alignment Sheet has failed. Canon recommends to obtain optimum qualities. E, 1, 4 E, 1, 5 E, 1, 6 The FINE Cartridge cannot be...
Quick Start Guide
Page 52
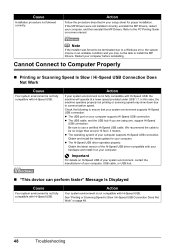
... Action If your system environment is not fully compatible with Hi-Speed USB. Be sure to Computer Properly „ Printing or Scanning Speed Is Slow / Hi-Speed USB Connection Does Not Work Cause Your system environment is not fully compatible with your computer supports... Hi-Speed USB connection. Obtain the latest version of your computer. See "Printing or Scanning Speed Is Slow / Hi-Speed USB Connection Does Not Work" on your computer before reinstalling. Cause Installation procedure not followed correctly. ...
... Action If your system environment is not fully compatible with Hi-Speed USB. Be sure to Computer Properly „ Printing or Scanning Speed Is Slow / Hi-Speed USB Connection Does Not Work Cause Your system environment is not fully compatible with your computer supports... Hi-Speed USB connection. Obtain the latest version of your computer. See "Printing or Scanning Speed Is Slow / Hi-Speed USB Connection Does Not Work" on your computer before reinstalling. Cause Installation procedure not followed correctly. ...
Quick Start Guide
Page 59
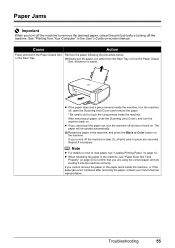
...the paper tears and a piece remains inside the machine, turn the machine off and turn the machine off , open the Scanning Unit (Cover) and remove the paper. * Be careful not to confirm that you cannot pull the paper out, turn it...into the machine correctly. Reprint if necessary. z When reloading the paper in the machine, and press the Black or Color button on -screen manual. After removing all print jobs in the Paper Output Slot Remove the paper following the procedure ...or if the paper jam error continues after removing the paper, contact your Canon Service representative.
...the paper tears and a piece remains inside the machine, turn the machine off and turn the machine off , open the Scanning Unit (Cover) and remove the paper. * Be careful not to confirm that you cannot pull the paper out, turn it...into the machine correctly. Reprint if necessary. z When reloading the paper in the machine, and press the Black or Color button on -screen manual. After removing all print jobs in the Paper Output Slot Remove the paper following the procedure ...or if the paper jam error continues after removing the paper, contact your Canon Service representative.

Quick Start Guide
Page 62
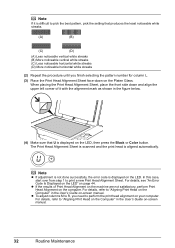
... Refer to reattach the Document Cover. Action If the Document Cover is not Follow the procedure described in the figure below to the Scanning Guide on one side of the Document Cover hinge into the holder. (2)Hold the middle of the Document Cover and press down above the second ... Cover Comes Off Cause The Document Cover was opened too hard, it according to the following procedure. (1)Insert the protrusion on -screen manual. 58 Troubleshooting Scanning Problems „ ScanGear Won't Start Cause Action The scanner driver (ScanGear) is opened too hard.
... Refer to reattach the Document Cover. Action If the Document Cover is not Follow the procedure described in the figure below to the Scanning Guide on one side of the Document Cover hinge into the holder. (2)Hold the middle of the Document Cover and press down above the second ... Cover Comes Off Cause The Document Cover was opened too hard, it according to the following procedure. (1)Insert the protrusion on -screen manual. 58 Troubleshooting Scanning Problems „ ScanGear Won't Start Cause Action The scanner driver (ScanGear) is opened too hard.
Quick Start Guide
Page 63
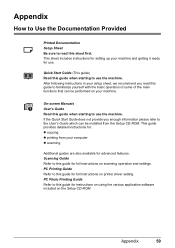
...when starting to read this guide for advanced features. This guide provides detailed instructions for instructions on using the various application software included on scanning operation and settings. If the Quick Start Guide does not provide you read this sheet first. Appendix How to Use the Documentation Provided Printed... Documentation Setup Sheet Be sure to use the machine. This sheet includes instructions for setting up your computer z scanning Additional guides are also available for full instructions on the Setup CD-ROM. Appendix 59
...when starting to read this guide for advanced features. This guide provides detailed instructions for instructions on using the various application software included on scanning operation and settings. If the Quick Start Guide does not provide you read this sheet first. Appendix How to Use the Documentation Provided Printed... Documentation Setup Sheet Be sure to use the machine. This sheet includes instructions for setting up your computer z scanning Additional guides are also available for full instructions on the Setup CD-ROM. Appendix 59
Quick Start Guide
Page 66
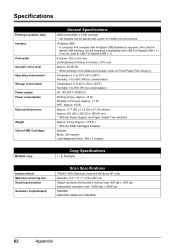
... (dpi) Interface Print width Acoustic noise level Operating environment Storage environment Power supply Power consumption External dimensions Weight Canon FINE Cartridges General Specifications 4800 (horizontal)* x 1200 (vertical) * Ink droplets can be placed with Hi-... Black: 320 nozzles Cyan/Magenta/Yellow: 384 x 3 nozzles Multiple copy Copy Specifications 1 - 9, 20 pages Scanner driver Maximum scanning size Scanning resolution Gradation (Input/Output) Scan Specifications TWAIN / WIA (Windows Vista and Windows XP only) A4/Letter, 8.5" x 11.7" / 216 x 297 mm Optical resolution...
... (dpi) Interface Print width Acoustic noise level Operating environment Storage environment Power supply Power consumption External dimensions Weight Canon FINE Cartridges General Specifications 4800 (horizontal)* x 1200 (vertical) * Ink droplets can be placed with Hi-... Black: 320 nozzles Cyan/Magenta/Yellow: 384 x 3 nozzles Multiple copy Copy Specifications 1 - 9, 20 pages Scanner driver Maximum scanning size Scanning resolution Gradation (Input/Output) Scan Specifications TWAIN / WIA (Windows Vista and Windows XP only) A4/Letter, 8.5" x 11.7" / 216 x 297 mm Optical resolution...

Quick Start Guide
Page 68
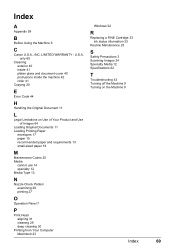
... with a legal representative in your jurisdiction. Legal Limitations on Use of Your Product and Use of Images It may be unlawful to make copies of, scan, print, or use reproductions of copyright owner 64 Appendix The list provided is non-exhaustive.
... with a legal representative in your jurisdiction. Legal Limitations on Use of Your Product and Use of Images It may be unlawful to make copies of, scan, print, or use reproductions of copyright owner 64 Appendix The list provided is non-exhaustive.
Quick Start Guide
Page 73
... Using the Machine 6 C Canon U.S.A., INC. U.S.A. LIMITED WARRANTY - only 65 Cleaning exterior 40 inside 41 platen glass and document cover 40 protrusions inside the machine 42 roller 41 Copying 20 E Error Code 44 Windows 22 R Replacing a FINE Cartridge 33 ink status information 33 Routine Maintenance 25 S Safety Precautions 3 Scanning Images 24 Specialty Media...
... Using the Machine 6 C Canon U.S.A., INC. U.S.A. LIMITED WARRANTY - only 65 Cleaning exterior 40 inside 41 platen glass and document cover 40 protrusions inside the machine 42 roller 41 Copying 20 E Error Code 44 Windows 22 R Replacing a FINE Cartridge 33 ink status information 33 Routine Maintenance 25 S Safety Precautions 3 Scanning Images 24 Specialty Media...
Easy Setup Instructions
Page 1
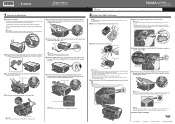
...out the power cord and the Black and Color FINE Cartridges from its original position, and then gently close the Scanning Unit (Cover). Wait until the LED stops flashing and displays 1. Scanning Unit (Cover) h Lift the Scanning Unit (Cover), and pull the Scanning Unit Support down into place. Protective Tape...to turn on the right side. c Insert the Black FINE Cartridge slightly slanted into the left . QT5-1488-V01 XXXXXXXX © CANON INC. 2008 PRINTED IN VIETNAM Do not lift the machine by grasping the Paper Support Extension. a Remove the Black FINE Cartridge from ...
...out the power cord and the Black and Color FINE Cartridges from its original position, and then gently close the Scanning Unit (Cover). Wait until the LED stops flashing and displays 1. Scanning Unit (Cover) h Lift the Scanning Unit (Cover), and pull the Scanning Unit Support down into place. Protective Tape...to turn on the right side. c Insert the Black FINE Cartridge slightly slanted into the left . QT5-1488-V01 XXXXXXXX © CANON INC. 2008 PRINTED IN VIETNAM Do not lift the machine by grasping the Paper Support Extension. a Remove the Black FINE Cartridge from ...
Easy Setup Instructions
Page 2
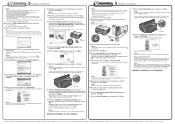
...in the Quick Start Guide. You will not be detected. Note If you can agree, click Agree. a Connect one end of Canon printers. Note To register later, click Cancel and go to the next procedure after restarting the computer. c Double-click the Setup... flashing. After software installation is necessary to these. j When the User Registration screen appears, click Next. Follow on-screen instructions to "Scanning Images" in the U.S. The MP Drivers, On-screen Manuals, and application software are trademarks of each application. Note If you are using...
...in the Quick Start Guide. You will not be detected. Note If you can agree, click Agree. a Connect one end of Canon printers. Note To register later, click Cancel and go to the next procedure after restarting the computer. c Double-click the Setup... flashing. After software installation is necessary to these. j When the User Registration screen appears, click Next. Follow on-screen instructions to "Scanning Images" in the U.S. The MP Drivers, On-screen Manuals, and application software are trademarks of each application. Note If you are using...


