LV User's Manual
Page 2
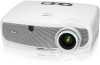
...This symbol warns the user that important information concerning the operation and maintenance of this manual carefully before using your Canon LV-7365/LV-7265/LV-7260/LV-X7 projector and keep the manual handy for a prolonged period of time. CAUTION Avoid displaying stationary images for future reference. ...LCD panel. The information should happen, continue to use your projector. ALL SERVICING MUST BE DONE BY QUALIFIED SERVICE PERSONNEL. CAUTION Do not put the projector on its side when the lamp is dangerous to the projector. Doing so may be sure to cause electrical shock. ...
...This symbol warns the user that important information concerning the operation and maintenance of this manual carefully before using your Canon LV-7365/LV-7265/LV-7260/LV-X7 projector and keep the manual handy for a prolonged period of time. CAUTION Avoid displaying stationary images for future reference. ...LCD panel. The information should happen, continue to use your projector. ALL SERVICING MUST BE DONE BY QUALIFIED SERVICE PERSONNEL. CAUTION Do not put the projector on its side when the lamp is dangerous to the projector. Doing so may be sure to cause electrical shock. ...
LV User's Manual
Page 4
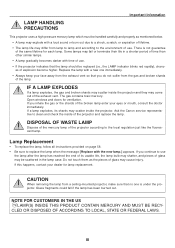
...use . NOTE FOR CUSTOMERS IN THE US Hg LAMP(S) INSIDE THIS PRODUCT CONTAIN MERCURY AND MUST BE RECYCLED OR DISPOSED OF ACCORDING TO LOCAL, STATE OR FEDERAL LAWS. Ask the Canon service representative to the environment of use . • If the projector indicates that you do not suffer from the ...exhaust vent so that the lamp should be handled carefully and properly as the pieces of glass may ...
...use . NOTE FOR CUSTOMERS IN THE US Hg LAMP(S) INSIDE THIS PRODUCT CONTAIN MERCURY AND MUST BE RECYCLED OR DISPOSED OF ACCORDING TO LOCAL, STATE OR FEDERAL LAWS. Ask the Canon service representative to the environment of use . • If the projector indicates that you do not suffer from the ...exhaust vent so that the lamp should be handled carefully and properly as the pieces of glass may ...
LV User's Manual
Page 5
... qualified technicians in a dusty, smoky or steamy environment. - Important Safeguards These safety instructions are unobstructed to prevent the build-up of the projector. • Do not touch the power plug during a thunderstorm. on top of heat in the following conditions: - In addition, the... way other than the desktop and ceiling mount, otherwise lamp life could decrease dramatically. 10˚ Fire and Shock Precautions • Ensure that there is not supplied with any local building codes. - Please consult your projector. Do Not Use in the Following Environments Do not ...
... qualified technicians in a dusty, smoky or steamy environment. - Important Safeguards These safety instructions are unobstructed to prevent the build-up of the projector. • Do not touch the power plug during a thunderstorm. on top of heat in the following conditions: - In addition, the... way other than the desktop and ceiling mount, otherwise lamp life could decrease dramatically. 10˚ Fire and Shock Precautions • Ensure that there is not supplied with any local building codes. - Please consult your projector. Do Not Use in the Following Environments Do not ...
LV User's Manual
Page 6
...the power plug with wet hands. • Turn off the AC power for 60 seconds after the lamp is turned on and while the POWER indicator is blinking green. If the projector has been dropped or the cabinet has been damaged. - Doing so could result. • Keep any... and have the projector serviced by a qualified service personnel under the projector, or any other cables before carrying the projector • Turn off the projector and unplug the power cord before cleaning the cabinet or replacing the lamp. • Turn off the projector and unplug the power cord if the projector is damaged or...
...the power plug with wet hands. • Turn off the AC power for 60 seconds after the lamp is turned on and while the POWER indicator is blinking green. If the projector has been dropped or the cabinet has been damaged. - Doing so could result. • Keep any... and have the projector serviced by a qualified service personnel under the projector, or any other cables before carrying the projector • Turn off the projector and unplug the power cord before cleaning the cabinet or replacing the lamp. • Turn off the projector and unplug the power cord if the projector is damaged or...
LV User's Manual
Page 7
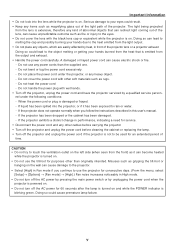
.... Do not give a shock to your local regulations. When carrying the projector with the carrying bag. The projector can cause the lamp to overcool, causing the image to protect the projector from dust and scratches on it down . LV-7265/LV-7260/LV-X7 • On LV-7265, LV-7260, and LV-X7 [Fan mode] menu does not have the batteries' polarity...
.... Do not give a shock to your local regulations. When carrying the projector with the carrying bag. The projector can cause the lamp to overcool, causing the image to protect the projector from dust and scratches on it down . LV-7265/LV-7260/LV-X7 • On LV-7265, LV-7260, and LV-X7 [Fan mode] menu does not have the batteries' polarity...
LV User's Manual
Page 9
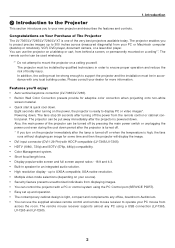
...and Sound 34 ❷ Freezing a Picture...34 ❸ Enlarging and Moving a Picture 34 ❹ Using the Remote Mouse Receiver (LV-7365/LV-7265/LV-7260 35 ❺ Preventing the Unauthorized Use of D-Sub ANALOG Input Connector 67 ❺ Compatible Input Signal List 68 ❻ ... ❷ Cleaning the Cabinet and the Lens 57 ❸ Replacing the Lamp...58 7. Appendix ...61 ❶ Troubleshooting...61 ❷ Specifications...64 ❸ Cabinet Dimensions 66 ❹ Pin Assignments of the Projector 37 5. Using On-Screen Menu 40 ❶ Using the Menus...40 ...
...and Sound 34 ❷ Freezing a Picture...34 ❸ Enlarging and Moving a Picture 34 ❹ Using the Remote Mouse Receiver (LV-7365/LV-7265/LV-7260 35 ❺ Preventing the Unauthorized Use of D-Sub ANALOG Input Connector 67 ❺ Compatible Input Signal List 68 ❻ ... ❷ Cleaning the Cabinet and the Lens 57 ❸ Replacing the Lamp...58 7. Appendix ...61 ❶ Troubleshooting...61 ❷ Specifications...64 ❸ Cabinet Dimensions 66 ❹ Pin Assignments of the Projector 37 5. Using On-Screen Menu 40 ❶ Using the Menus...40 ...
LV User's Manual
Page 10
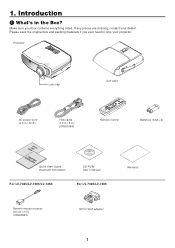
... (AAA2) GuidSetaQrtuick InfoIrmmpaotirotannt Quick Start Guide Important Information CD-ROM User's manual For LV-7365/LV-7265/LV-7260 For LV-7365/LV-7265 Warranty Remote mouse receiver (10 cm / 0.3') (7N900563) DVI to ship your projector. Projector +VOL BACK MENU KEYSTONE AUTO PC INPUT -VOL R LAMP WARNING POWE Lens cap AC power cord (4.5 m / 14.8') VGA cable (1.8 m / 5.9') [7N520068] Soft case...
... (AAA2) GuidSetaQrtuick InfoIrmmpaotirotannt Quick Start Guide Important Information CD-ROM User's manual For LV-7365/LV-7265/LV-7260 For LV-7365/LV-7265 Warranty Remote mouse receiver (10 cm / 0.3') (7N900563) DVI to ship your projector. Projector +VOL BACK MENU KEYSTONE AUTO PC INPUT -VOL R LAMP WARNING POWE Lens cap AC power cord (4.5 m / 14.8') VGA cable (1.8 m / 5.9') [7N520068] Soft case...
LV User's Manual
Page 11
...; Auto vertical keystone correction (LV-7365/LV-7265). • Built-in Wall Color Correction presets provide for adaptive color correction when projecting onto non-white screen material. • Quick start & quick cool down. The fans stop 30 seconds after the lamp is one of bodily injury. The projector can use the projector on the power, the...
...; Auto vertical keystone correction (LV-7365/LV-7265). • Built-in Wall Color Correction presets provide for adaptive color correction when projecting onto non-white screen material. • Quick start & quick cool down. The fans stop 30 seconds after the lamp is one of bodily injury. The projector can use the projector on the power, the...

LV User's Manual
Page 13
... 7) S-VIINDEO VIDINEO L AUDIO IN R SERVICE PORT LAMP R WARNING POWE AUTO PC INPUT -VOL ADNIGAILTOAGL IINN-/2 AUDIO IN AUDIO OUT ANALOG IN-1 +VOL BACK MENU KEYSTONE Remote sensor (LV-7365/LV-7265) (See page 10) Monaural Speaker (LV-7365/LV-7265: 5W) (LV-7260/LV-X7: 1W) Ventilation (outlet) Heated air is in...AUTO PC INPUT -VOL E R WARNING POW LAMP Ventilation (inlet) / Filter Cover (See page 56) Do not block this vent. Two filters on LV-7365/LV-7265/LV-7260 One filter on the Main Power, the POWER indicator turns orange and the projector is exhausted from here. ❸ Part ...
... 7) S-VIINDEO VIDINEO L AUDIO IN R SERVICE PORT LAMP R WARNING POWE AUTO PC INPUT -VOL ADNIGAILTOAGL IINN-/2 AUDIO IN AUDIO OUT ANALOG IN-1 +VOL BACK MENU KEYSTONE Remote sensor (LV-7365/LV-7265) (See page 10) Monaural Speaker (LV-7365/LV-7265: 5W) (LV-7260/LV-X7: 1W) Ventilation (outlet) Heated air is in...AUTO PC INPUT -VOL E R WARNING POW LAMP Ventilation (inlet) / Filter Cover (See page 56) Do not block this vent. Two filters on LV-7365/LV-7265/LV-7260 One filter on the Main Power, the POWER indicator turns orange and the projector is exhausted from here. ❸ Part ...
LV User's Manual
Page 14
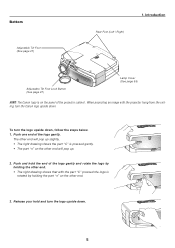
Push one end of the projector cabinet . Introduction Adjustable Tilt Foot Lock Button (See page 27) Lamp Cover (See page 58) HINT: The Canon logo is on the panel of the logo gently. When projecting an image with the part "C" pressed the logo is pressed gently. • The part "n" ... end of the logo gently and rotate the logo by holding the other end. • The right drawing shows that with the projector hung from the ceiling, turn the Canon logo upside down. Bottom Adjustable Tilt Foot (See page 27) Rear Foot (Left / Right) 1. To turn the logo upside down , follow the...
Push one end of the projector cabinet . Introduction Adjustable Tilt Foot Lock Button (See page 27) Lamp Cover (See page 58) HINT: The Canon logo is on the panel of the logo gently. When projecting an image with the part "C" pressed the logo is pressed gently. • The part "n" ... end of the logo gently and rotate the logo by holding the other end. • The right drawing shows that with the projector hung from the ceiling, turn the Canon logo upside down. Bottom Adjustable Tilt Foot (See page 27) Rear Foot (Left / Right) 1. To turn the logo upside down , follow the...
LV User's Manual
Page 15
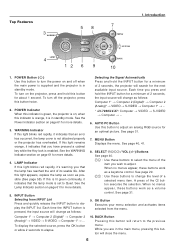
...green continually, it 's warning you that you are in standby mode. If this button twice. 2. See the Lamp Indicator section on and off the projector, press this is set to turn the power on page 61 for more details. 5. When no menus appear... seconds, the projector will search for a minimum of the but- A press of 2 seconds, the input source will return to elapse. when this button will change as follows: Computer 1* → Computer 2 (Digital)* → Computer 2 (Analog)* → VIDEO → S-VIDEO → Computer 1* → ... * LV-7260/LV-X7: Computer ...
...green continually, it 's warning you that you are in standby mode. If this button twice. 2. See the Lamp Indicator section on and off the projector, press this is set to turn the power on page 61 for more details. 5. When no menus appear... seconds, the projector will search for a minimum of the but- A press of 2 seconds, the input source will return to elapse. when this button will change as follows: Computer 1* → Computer 2 (Digital)* → Computer 2 (Analog)* → VIDEO → S-VIDEO → Computer 1* → ... * LV-7260/LV-X7: Computer ...
LV User's Manual
Page 32
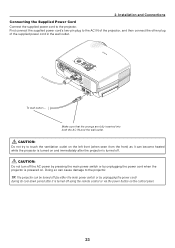
... LAMP R WARNING POWE AUTO PC INPUT -VOL ADNIGAILTOAGL IINN-/2 AUDIO IN AUDIO OUT ANALOG IN-1 +VOL BACK MENU KEYSTONE To wall outlet ← Make sure that the prongs are fully inserted into both the AC IN and the wall outlet. 2. First connect the supplied power cord's two-pin plug to the projector...
... LAMP R WARNING POWE AUTO PC INPUT -VOL ADNIGAILTOAGL IINN-/2 AUDIO IN AUDIO OUT ANALOG IN-1 +VOL BACK MENU KEYSTONE To wall outlet ← Make sure that the prongs are fully inserted into both the AC IN and the wall outlet. 2. First connect the supplied power cord's two-pin plug to the projector...
LV User's Manual
Page 33
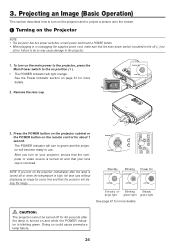
...AUTO PC ASPECT VOL M-ENU NO SHOW VOL + KEYSTONE BACK Standby WARNING Blinking WARNING Power On WARNING LAMP LAMP LAMP S t e a d y o r- Failure to do so may cause damage to green and the projector will light orange. WARNING • The POWER indicator will become ready to project a picture onto the...POWER INFO. Projecting an Image (Basic Operation) This section describes how to turn on the projector and to use. LAMP See the Power Indicator section on the Projector NOTE: • The projector has two power switches: a main power switch and a POWER button. • When ...
...AUTO PC ASPECT VOL M-ENU NO SHOW VOL + KEYSTONE BACK Standby WARNING Blinking WARNING Power On WARNING LAMP LAMP LAMP S t e a d y o r- Failure to do so may cause damage to green and the projector will light orange. WARNING • The POWER indicator will become ready to project a picture onto the...POWER INFO. Projecting an Image (Basic Operation) This section describes how to turn on the projector and to use. LAMP See the Power Indicator section on the Projector NOTE: • The projector has two power switches: a main power switch and a POWER button. • When ...
LV User's Manual
Page 34
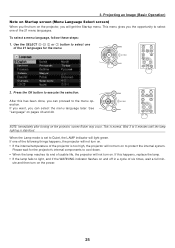
... 49. This is set to the menu operation. This menu gives you will light green. Press the OK button to 5 minutes until the lamp lighting is too high, the projector will not turn on to light, and if the WARNING indicator flashes on and off in a cycle of six times, wait a full... wait for the menu. Use the SELECT or button to cool down. • When the lamp reaches its end of the 21 languages for the projector's internal components to select one of the following things happens, the projector will not turn on . If you want, you can select the menu language later. When...
... 49. This is set to the menu operation. This menu gives you will light green. Press the OK button to 5 minutes until the lamp lighting is too high, the projector will not turn on to light, and if the WARNING indicator flashes on and off in a cycle of six times, wait a full... wait for the menu. Use the SELECT or button to cool down. • When the lamp reaches its end of the 21 languages for the projector's internal components to select one of the following things happens, the projector will not turn on . If you want, you can select the menu language later. When...

LV User's Manual
Page 36
... the screen then use the tilt-foot for proper adjustment. Lower the front of the projector to the desired height. Release the adjustable tilt foot lock button to lock the adjustable tilt LAMP foot. 3 WARNING POWE There is square to 30. Misuses such as it can become... heated while the projector is turned off. AUTO PC INPUT -VOL E R R LAMP WARNING POW 2. CAUTION: Do not use the Keystone feature for purposes other than originally intended. Up Down 27 See page...
... the screen then use the tilt-foot for proper adjustment. Lower the front of the projector to the desired height. Release the adjustable tilt foot lock button to lock the adjustable tilt LAMP foot. 3 WARNING POWE There is square to 30. Misuses such as it can become... heated while the projector is turned off. AUTO PC INPUT -VOL E R R LAMP WARNING POW 2. CAUTION: Do not use the Keystone feature for purposes other than originally intended. Up Down 27 See page...
LV User's Manual
Page 40
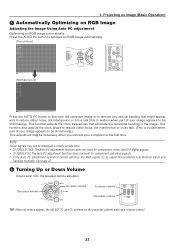
...or Down Volume Sound level from the speaker can be displayed correctly or take time. • LV-7365/LV-7265: The Auto PC adjustment function does not work for the first time. IMAGE INPUT AUTO PC ... Some signals may be shimmering). Projecting an Image (Basic Operation) ❺ Automatically Optimizing on the projector cabinet work for component and video signals. • If the Auto PC adjustment operation cannot optimize ... an RGB image automatically. [Poor picture] WARNING POWER LAMP INPUT AUTO PC VOL - Press the AUTO PC button to be shimmering.) This adjustment may not...
...or Down Volume Sound level from the speaker can be displayed correctly or take time. • LV-7365/LV-7265: The Auto PC adjustment function does not work for the first time. IMAGE INPUT AUTO PC ... Some signals may be shimmering). Projecting an Image (Basic Operation) ❺ Automatically Optimizing on the projector cabinet work for component and video signals. • If the Auto PC adjustment operation cannot optimize ... an RGB image automatically. [Poor picture] WARNING POWER LAMP INPUT AUTO PC VOL - Press the AUTO PC button to be shimmering.) This adjustment may not...
LV User's Manual
Page 41
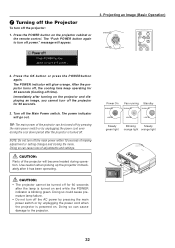
...off the main power within 10 seconds of the projector will glow orange. Doing so could cause premature lamp failure. • Do not turn off the projector: 1. Use caution when picking up the projector immediately after the lamp is turned on and while the POWER indicator is.... 3. Power On WARNING Fan running Standby WARNING WARNING LAMP LAMP LAMP Steady Blinking Steady green light orange light orange light 32 Immediately after turning on the projector and displaying an image, you cannot turn off the projector for 60 seconds after it has been operating. CAUTION:...
...off the main power within 10 seconds of the projector will glow orange. Doing so could cause premature lamp failure. • Do not turn off the projector: 1. Use caution when picking up the projector immediately after the lamp is turned on and while the POWER indicator is.... 3. Power On WARNING Fan running Standby WARNING WARNING LAMP LAMP LAMP Steady Blinking Steady green light orange light orange light 32 Immediately after turning on the projector and displaying an image, you cannot turn off the projector for 60 seconds after it has been operating. CAUTION:...
LV User's Manual
Page 58
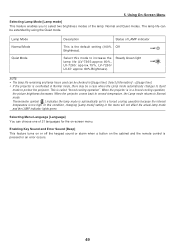
...] →[Usage time]. • If the projector is pressed or an error occurs. 49 In this mode to increase the Steady Green light lamp life (LV-7365:approx 80%, LAMP LV-7265: approx.75%, LV-7260/ LV-X7: approx. 80% Brightness). Selecting Menu Language [Language] You can choose one of the lamp: Normal and Quiet modes. Enabling Key Sound...
...] →[Usage time]. • If the projector is pressed or an error occurs. 49 In this mode to increase the Steady Green light lamp life (LV-7365:approx 80%, LAMP LV-7265: approx.75%, LV-7260/ LV-X7: approx. 80% Brightness). Selecting Menu Language [Language] You can choose one of the lamp: Normal and Quiet modes. Enabling Key Sound...
LV User's Manual
Page 60
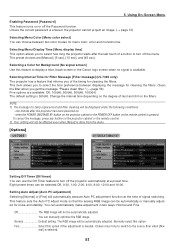
...the Canon logo screen when no signal is done from the menu. [Options] LV-7365 LV-7265/LV-7260/LV-X7 Setting Off Timer [Off timer] You can manually optimize the RGB image. mal] is needed. Change the interval time depending on the degree of a button to turn off the projector automatically... at the time of the timing for lamp replacement and filter...
...the Canon logo screen when no signal is done from the menu. [Options] LV-7365 LV-7265/LV-7260/LV-X7 Setting Off Timer [Off timer] You can manually optimize the RGB image. mal] is needed. Change the interval time depending on the degree of a button to turn off the projector automatically... at the time of the timing for lamp replacement and filter...
LV User's Manual
Page 61
... done from the Computer 1 Input [ANALOG IN-1] connector every time the projector is turned on . This eliminates the need to the increased temperature of the lamp after power off (at a high altitude or under low atmospheric pressure because LV-7265, LV-7260, and LV-X7 do not have the [High altitude] option in [Fan mode]. •...
... done from the Computer 1 Input [ANALOG IN-1] connector every time the projector is turned on . This eliminates the need to the increased temperature of the lamp after power off (at a high altitude or under low atmospheric pressure because LV-7265, LV-7260, and LV-X7 do not have the [High altitude] option in [Fan mode]. •...


