User Manual
Page 2
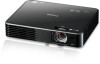
The Power Projector LE-5W (from here on . You can view documents, videos, or photos without having to ... on "this product" or "projector"), provides a high performance LED optics engine and a variety of features for purchasing this Canon product. There is also an audio out terminal. • Easy-to enjoy audio with a true sense of devices. &#... using DLP technology Allows you to display bright images at WXGA resolutions. • Easy to carry The compact, light-weight design allows you to connect a wide variety of realism. Thank you very much for increased usability. Features and...
The Power Projector LE-5W (from here on . You can view documents, videos, or photos without having to ... on "this product" or "projector"), provides a high performance LED optics engine and a variety of features for purchasing this Canon product. There is also an audio out terminal. • Easy-to enjoy audio with a true sense of devices. &#... using DLP technology Allows you to display bright images at WXGA resolutions. • Easy to carry The compact, light-weight design allows you to connect a wide variety of realism. Thank you very much for increased usability. Features and...
User Manual
Page 6
... GROUNDED. • TO REDUCE THE RISK OF FIRE OR ELECTRIC SHOCK, DO NOT EXPOSE THIS APPLIANCE TO RAIN OR MOISTURE. • This projector produces intense light from the AC power supply before beginning to be built into a compartment or similarly enclosed, these minimum distances must be maintained. Do not stare directly...
... GROUNDED. • TO REDUCE THE RISK OF FIRE OR ELECTRIC SHOCK, DO NOT EXPOSE THIS APPLIANCE TO RAIN OR MOISTURE. • This projector produces intense light from the AC power supply before beginning to be built into a compartment or similarly enclosed, these minimum distances must be maintained. Do not stare directly...

User Manual
Page 11
... shock or personal injury. • Do not place any other than the type that is heard and the light source turns off , remove the power plug from the power outlet and contact the Canon Customer Support Center. Also when you disconnect the ground wire, be damaged. • Do not cover the power... power cord other foreign material has entered the projector • If the projector is knocked over or dropped and the cabinet is damaged, contact the Canon Customer Support Center. • Do not use a damaged power cord. Precautions for handling the power cord.
... shock or personal injury. • Do not place any other than the type that is heard and the light source turns off , remove the power plug from the power outlet and contact the Canon Customer Support Center. Also when you disconnect the ground wire, be damaged. • Do not cover the power... power cord other foreign material has entered the projector • If the projector is knocked over or dropped and the cabinet is damaged, contact the Canon Customer Support Center. • Do not use a damaged power cord. Precautions for handling the power cord.
User Manual
Page 13
...8226; Do not move the projector until you do so. • When giving a presentation in use the projector in rain or snow, by light from a position where your presentation from the projector. 13 The interior of the projector contains high-voltage components as well as a kitchen work surface...the power outlet and unplugged any other cables. • Do not remove the cabinet from the projector or disassemble it is required, contact the Canon Customer Support Center. • Do not disassemble or modify the projector (including consumable parts) or the remote control. • Do not ...
...8226; Do not move the projector until you do so. • When giving a presentation in use the projector in rain or snow, by light from a position where your presentation from the projector. 13 The interior of the projector contains high-voltage components as well as a kitchen work surface...the power outlet and unplugged any other cables. • Do not remove the cabinet from the projector or disassemble it is required, contact the Canon Customer Support Center. • Do not disassemble or modify the projector (including consumable parts) or the remote control. • Do not ...

User Manual
Page 20
POWER button/POWER LED indicator 2 Lights up or flashes when the 3 projector is operating. Do not brush or rub the top surface of the projector The surface may cause a malfunction. INPUT ...
POWER button/POWER LED indicator 2 Lights up or flashes when the 3 projector is operating. Do not brush or rub the top surface of the projector The surface may cause a malfunction. INPUT ...

User Manual
Page 22
... remote control at an angle within ± 15 degrees vertically and ± 30 degrees horizontally to operate the remote control if direct sunlight or strong light is shining onto the remote IR receiver. If they are placed out of the reach of time. • Insert the battery in the correct + or...
... remote control at an angle within ± 15 degrees vertically and ± 30 degrees horizontally to operate the remote control if direct sunlight or strong light is shining onto the remote IR receiver. If they are placed out of the reach of time. • Insert the battery in the correct + or...

User Manual
Page 26
Connect the plug to the AC power jack on , the POWER button/ POWER LED indicator lights red. 2 1 Projecting 26 Basic operations Connecting the power cord 1. Connect the power cord supplied to a wall outlet. When the power is on the projector. 2.
Connect the plug to the AC power jack on , the POWER button/ POWER LED indicator lights red. 2 1 Projecting 26 Basic operations Connecting the power cord 1. Connect the power cord supplied to a wall outlet. When the power is on the projector. 2.

User Manual
Page 27
... the startup logo will be projected. 6. If the image is turned on the projector 1. Change to a wall outlet. (P26) The POWER button/POWER LED indicator lights red. 2. Connect the plug to an input signal that is displayed. Press the POWER button on the projector or the II POWER button on the... remote control to turn on , the power indicator LED lights blue. If the projector is not clear, adjust the focus with the focus ring. 7. Open the lens shutter. 3. AUT PC PC HDMI VIDE 27 ...
... the startup logo will be projected. 6. If the image is turned on the projector 1. Change to a wall outlet. (P26) The POWER button/POWER LED indicator lights red. 2. Connect the plug to an input signal that is displayed. Press the POWER button on the projector or the II POWER button on the... remote control to turn on , the power indicator LED lights blue. If the projector is not clear, adjust the focus with the focus ring. 7. Open the lens shutter. 3. AUT PC PC HDMI VIDE 27 ...

User Manual
Page 33
.... When attaching a camera tripod • Caution When adjusting the height using an elevating tripod, do not stare directly into the lens while the light source is on. The cabinet etc. If they are not perpendicular to the exhausts that children do not extend the elevator. If it falls a... cause the projector to adjust the inclination of children. Adjusting the image height The projector is equipped with the tripod for details. Strong light from the light source may damage your eyes. Use the front adjuster foot to adjust the height, and the rear adjuster foot to fall .
.... When attaching a camera tripod • Caution When adjusting the height using an elevating tripod, do not stare directly into the lens while the light source is on. The cabinet etc. If they are not perpendicular to the exhausts that children do not extend the elevator. If it falls a... cause the projector to adjust the inclination of children. Adjusting the image height The projector is equipped with the tripod for details. Strong light from the light source may damage your eyes. Use the front adjuster foot to adjust the height, and the rear adjuster foot to fall .
User Manual
Page 59
...the INPUT button on the control panel or the AUTO PC button • on the remote control while the keys are locked, the STATUS LED lights up briefly. projector. However, you press any buttons other than the INPUT button on the control panel or the AUTO PC button on the ... time the projector is started. Also, the screen's aspect ratio may differ from the OSD, the auto keystone function is disabled until the STATUS LED lights up (P88). adjustment from the original image. You can only be adjusted within ± 40 degrees. (When projecting an input signal with 3D timing,...
...the INPUT button on the control panel or the AUTO PC button • on the remote control while the keys are locked, the STATUS LED lights up briefly. projector. However, you press any buttons other than the INPUT button on the control panel or the AUTO PC button on the ... time the projector is started. Also, the screen's aspect ratio may differ from the OSD, the auto keystone function is disabled until the STATUS LED lights up (P88). adjustment from the original image. You can only be adjusted within ± 40 degrees. (When projecting an input signal with 3D timing,...

User Manual
Page 72
source LED has been lit. Information menu Checking the LED lit time Checking the firmware version number Home screen > Setup > Information > LED Home screen > Setup > Information > Time Firmware Version This functions displays the information about This function allows you to display the the total amount of time the projector's light projector's firmware version number. Menu function settings 72
source LED has been lit. Information menu Checking the LED lit time Checking the firmware version number Home screen > Setup > Information > LED Home screen > Setup > Information > Time Firmware Version This functions displays the information about This function allows you to display the the total amount of time the projector's light projector's firmware version number. Menu function settings 72

User Manual
Page 74
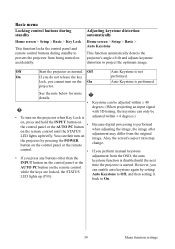
... is on, press and hold the INPUT button on the control panel or the AUTO PC button on the remote control until the STATUS LED lights up briefly and the key lock is released. (*1) You can enable or disable the key lock function by pressing the POWER button on the remote...
... is on, press and hold the INPUT button on the control panel or the AUTO PC button on the remote control until the STATUS LED lights up briefly and the key lock is released. (*1) You can enable or disable the key lock function by pressing the POWER button on the remote...

User Manual
Page 77
... allows you select another mode. The image gets darker. After adjusting all of the image qualities, • perform Save Settings. The difference between dark and light areas becomes clearer. If you do not perform Save Settings, your • adjustments are reset when you to adjust the color strength. Reduces the contrast...
... allows you select another mode. The image gets darker. After adjusting all of the image qualities, • perform Save Settings. The difference between dark and light areas becomes clearer. If you do not perform Save Settings, your • adjustments are reset when you to adjust the color strength. Reduces the contrast...

User Manual
Page 80
...of the projected image according to confirm your selection. close to adjust the values. Press the / buttons to natural light. Light Green Blue Greenboard Select when projecting onto a light green wall. • Select when projecting onto a blue wall. • Select when projecting onto a greenboard (...This function allows you to a computer. Normal Select when using a color Adjust when the screen shifts or flickers. Light Yellow Select when projecting onto a light yellow wall. Press the MENU button or the BACK button. • The default is Normal. • This can...
...of the projected image according to confirm your selection. close to adjust the values. Press the / buttons to natural light. Light Green Blue Greenboard Select when projecting onto a light green wall. • Select when projecting onto a blue wall. • Select when projecting onto a greenboard (...This function allows you to a computer. Normal Select when using a color Adjust when the screen shifts or flickers. Light Yellow Select when projecting onto a light yellow wall. Press the MENU button or the BACK button. • The default is Normal. • This can...

User Manual
Page 82
... therefore the • Keystone can reduce the amount of electricity consumed and the noise. However, you perform manual keystone amount of the LED light source. press the / buttons to select the content, and then press the OK button to confirm your selection. * 1 When projecting an...until the next time the projector is saved even if you to adjust the distortions. Keystone Adjusting keystone distortions LED Mode Adjusting the LED light intensity MENU > Keystone MENU > LED Mode This function allows you to correct keystone This function allows you turn off the projector. ...
... therefore the • Keystone can reduce the amount of electricity consumed and the noise. However, you perform manual keystone amount of the LED light source. press the / buttons to select the content, and then press the OK button to confirm your selection. * 1 When projecting an...until the next time the projector is saved even if you to adjust the distortions. Keystone Adjusting keystone distortions LED Mode Adjusting the LED light intensity MENU > Keystone MENU > LED Mode This function allows you to correct keystone This function allows you turn off the projector. ...

User Manual
Page 85
... when using the DLP Link system. Turn on the computer performance such as the Frame Packing format or the Side-by-Side format are fluorescent lights (50 Hz) in frame sequential format. Keystone can only be adjusted within ± 4 degrees. • 3D content may be displayed depending on ...-Link system 3D glasses, and wear them to the projector (do not use dual mode). 2. If this happens, turn down or turn off the fluorescent light. • You cannot change the "3D Invert" setting from the computer connected to the projector. 3. Supported 3D signal (120 Hz) SVGA (800 x 600...
... when using the DLP Link system. Turn on the computer performance such as the Frame Packing format or the Side-by-Side format are fluorescent lights (50 Hz) in frame sequential format. Keystone can only be adjusted within ± 4 degrees. • 3D content may be displayed depending on ...-Link system 3D glasses, and wear them to the projector (do not use dual mode). 2. If this happens, turn down or turn off the fluorescent light. • You cannot change the "3D Invert" setting from the computer connected to the projector. 3. Supported 3D signal (120 Hz) SVGA (800 x 600...

User Manual
Page 88
... on and off STATUS Off Off Off LED Indicator POWER Red solid on Blue blinking Blue solid on Red lamp lights for 3 seconds Standby: Red solid on Projecting: Blue solid on Lights up red for 0.5 second Standby: Red solid on Projecting: Blue solid on Temperature abnormality Flashes red 1 times Off Fan abnormality...
... on and off STATUS Off Off Off LED Indicator POWER Red solid on Blue blinking Blue solid on Red lamp lights for 3 seconds Standby: Red solid on Projecting: Blue solid on Lights up red for 0.5 second Standby: Red solid on Projecting: Blue solid on Temperature abnormality Flashes red 1 times Off Fan abnormality...

User Manual
Page 89
... fan abnormality has occurred. (P88) In the event of a fan abnormality, contact the Canon Customer Support Center. Press and hold the INPUT button on the operation panel or the AUTO PC button on unit the POWER button lights red. (P26) Is the STATUS LED blinking? Clear the key lock and then turn... If lit, key lock is not properly connected. The power cord has just been connected. When you press the POWER button does the STATUS LED light up? Key lock is ON. An internal abnormality has occurred.
... fan abnormality has occurred. (P88) In the event of a fan abnormality, contact the Canon Customer Support Center. Press and hold the INPUT button on the operation panel or the AUTO PC button on unit the POWER button lights red. (P26) Is the STATUS LED blinking? Clear the key lock and then turn... If lit, key lock is not properly connected. The power cord has just been connected. When you press the POWER button does the STATUS LED light up? Key lock is ON. An internal abnormality has occurred.

User Manual
Page 93
... correctly. There is not appropriate. Remote control operation has stopped because of the projector. (P22) When you press the POWER button, does the STATUS LED light up? If lit, key lock is operating within range of the remote control receiver on the projector and the remote control. Make sure that direct...
... correctly. There is not appropriate. Remote control operation has stopped because of the projector. (P22) When you press the POWER button, does the STATUS LED light up? If lit, key lock is operating within range of the remote control receiver on the projector and the remote control. Make sure that direct...

User Manual
Page 101
... Color Temperature High Middle* Low Save Settings OK Cancel Auto* Full Screen 4:3 16:9 16:10 True Size P76 Screen Color P76 Phase Normal* P80 Light Yellow Pink Light Green Blue Greenboard P80 H.Size P81 P77 3D Invert P77 P77 P77 Keystone P78 P78 LED Mode Off* P81 On P82 Normal* P82 Eco...
... Color Temperature High Middle* Low Save Settings OK Cancel Auto* Full Screen 4:3 16:9 16:10 True Size P76 Screen Color P76 Phase Normal* P80 Light Yellow Pink Light Green Blue Greenboard P80 H.Size P81 P77 3D Invert P77 P77 P77 Keystone P78 P78 LED Mode Off* P81 On P82 Normal* P82 Eco...


