
Operation Guide
Page 11
... Machine? Users in Canada xxix Pre-Installation Requirements for Canon Facsimile Equipment xxix Notice...xxx Utilisation au Canada xxxii Conditions à Remplir Préalablement à L'installation d'un Télécopieur Canon xxxii Remarques xxxiii Laser Safety xxxiv CDRH Regulations xxxiv 1 Before Using the Machine...Department/User ID Management 1-11 Procedure before Using the Machine 1-11 Procedure after Using the Machine 1-12 Toner Cartridge 1-13 Maintaining the Toner Cartridge 1-14 Timer Settings 1-16 Setting the Sleep Mode 1-16 Setting Auto Clear Time 1-18 Setting ...
... Machine? Users in Canada xxix Pre-Installation Requirements for Canon Facsimile Equipment xxix Notice...xxx Utilisation au Canada xxxii Conditions à Remplir Préalablement à L'installation d'un Télécopieur Canon xxxii Remarques xxxiii Laser Safety xxxiv CDRH Regulations xxxiv 1 Before Using the Machine...Department/User ID Management 1-11 Procedure before Using the Machine 1-11 Procedure after Using the Machine 1-12 Toner Cartridge 1-13 Maintaining the Toner Cartridge 1-14 Timer Settings 1-16 Setting the Sleep Mode 1-16 Setting Auto Clear Time 1-18 Setting ...
Operation Guide
Page 16
Replacing the Toner Cartridge 10-11 Redistributing Toner 10-11 Replacing the Toner Cartridge with This Machine? PROGRAM 10-21 CANADA PROGRAM-CANADA PROGRAMME 10-24 Transporting the Machine 10-26 11 Troubleshooting 11-1 Clearing Jams 11-2 Document ...
Replacing the Toner Cartridge 10-11 Redistributing Toner 10-11 Replacing the Toner Cartridge with This Machine? PROGRAM 10-21 CANADA PROGRAM-CANADA PROGRAMME 10-24 Transporting the Machine 10-26 11 Troubleshooting 11-1 Clearing Jams 11-2 Document ...

Operation Guide
Page 18
...protective bag or wrap it in its interior covers will expose you to fall into the slots or openings on the machine. - Place the toner cartridge in a thick cloth to prevent exposure to service the machine yourself. Do not insert any of the machine, do not attempt to ...instructions marked on the machine since they may result in burn injury. - Follow all service, contact Canon Customer Care Center, or a Canon Authorized Service Facility. Do not subject the machine to remove the toner cartridge from output trays or when aligning it, because it . - Even if the machine is ...
...protective bag or wrap it in its interior covers will expose you to fall into the slots or openings on the machine. - Place the toner cartridge in a thick cloth to prevent exposure to service the machine yourself. Do not insert any of the machine, do not attempt to ...instructions marked on the machine since they may result in burn injury. - Follow all service, contact Canon Customer Care Center, or a Canon Authorized Service Facility. Do not subject the machine to remove the toner cartridge from output trays or when aligning it, because it . - Even if the machine is ...
Operation Guide
Page 37
... Handset 1-10 Maintaining the Handset 1-10 Department/User ID Management 1-11 Procedure before Using the Machine 1-11 Procedure after Using the Machine 1-12 Toner Cartridge 1-13 Maintaining the Toner Cartridge 1-14 Timer Settings 1-16 Setting the Sleep Mode 1-16 Setting Auto Clear Time 1-18 Setting Time Zone 1-20 Setting Daylight Saving Time...
... Handset 1-10 Maintaining the Handset 1-10 Department/User ID Management 1-11 Procedure before Using the Machine 1-11 Procedure after Using the Machine 1-12 Toner Cartridge 1-13 Maintaining the Toner Cartridge 1-14 Timer Settings 1-16 Setting the Sleep Mode 1-16 Setting Auto Clear Time 1-18 Setting Time Zone 1-20 Setting Daylight Saving Time...
Operation Guide
Page 39
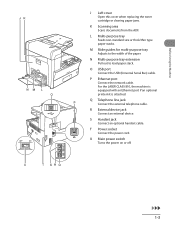
For the LASER CLASS 810, the machine is equipped with an Ethernet port if an optional printer kit is attached. S Handset jack Connect an optional handset cable. Q Telephone line ... cable. N Multi-purpose tray extension Pull out to the width of the paper. Before Using the Machine J Left cover Open this cover when replacing the toner cartridge or clearing paper jams. K Scanning area Scans documents from the ADF. L Multi-purpose tray Feeds non-standard size or thick/thin type paper stacks...
For the LASER CLASS 810, the machine is equipped with an Ethernet port if an optional printer kit is attached. S Handset jack Connect an optional handset cable. Q Telephone line ... cable. N Multi-purpose tray extension Pull out to the width of the paper. Before Using the Machine J Left cover Open this cover when replacing the toner cartridge or clearing paper jams. K Scanning area Scans documents from the ADF. L Multi-purpose tray Feeds non-standard size or thick/thin type paper stacks...
Operation Guide
Page 49
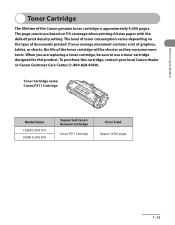
... depending on 5% coverage when printing A4 size paper with the default print density setting. Toner Cartridge name: Canon FX11 Cartridge Model Name LASER CLASS 810 LASER CLASS 830i Supported Canon Genuine Cartridge Canon FX11 Cartridge Print Yield Approx. 4,500 pages 1-13 If your local Canon dealer or Canon Customer Care Center (1-800-828-4040). The level of documents printed. Before Using...
... depending on 5% coverage when printing A4 size paper with the default print density setting. Toner Cartridge name: Canon FX11 Cartridge Model Name LASER CLASS 810 LASER CLASS 830i Supported Canon Genuine Cartridge Canon FX11 Cartridge Print Yield Approx. 4,500 pages 1-13 If your local Canon dealer or Canon Customer Care Center (1-800-828-4040). The level of documents printed. Before Using...
Operation Guide
Page 50
...direct sunlight or bright light for more than five minutes. ● Store the toner cartridge in a salty atmosphere or where there are corrosive gases such as from aerosol sprays. ● Do not remove the toner cartridge from computer screens, disk drives, and floppy disks. Print quality may ...deteriorate if the drum surface is exposed to light or is damaged. ● Always hold the toner cartridge by its protective bag. The magnet inside the toner cartridge may become impossible to avoid touching the drum protective shutter. ● Do not stand the...
...direct sunlight or bright light for more than five minutes. ● Store the toner cartridge in a salty atmosphere or where there are corrosive gases such as from aerosol sprays. ● Do not remove the toner cartridge from computer screens, disk drives, and floppy disks. Print quality may ...deteriorate if the drum surface is exposed to light or is damaged. ● Always hold the toner cartridge by its protective bag. The magnet inside the toner cartridge may become impossible to avoid touching the drum protective shutter. ● Do not stand the...
Operation Guide
Page 51
... this happens, rinse with cold water using soap. Do not place the toner cartridge in contact with your skin or inhale the powder, consult a doctor immediately. ● When removing the toner cartridge from the machine, make sure not to remove it comes in contact... a doctor immediately. ● Keep the toner cartridge away from small children. Toner powder is a toner powder leakage, make sure to inhale or touch the toner powder. If they ingest the toner powder, consult a doctor immediately. ● Do not disassemble the toner cartridge. Before Using the Machine ● ...
... this happens, rinse with cold water using soap. Do not place the toner cartridge in contact with your skin or inhale the powder, consult a doctor immediately. ● When removing the toner cartridge from the machine, make sure not to remove it comes in contact... a doctor immediately. ● Keep the toner cartridge away from small children. Toner powder is a toner powder leakage, make sure to inhale or touch the toner powder. If they ingest the toner powder, consult a doctor immediately. ● Do not disassemble the toner cartridge. Before Using the Machine ● ...
Operation Guide
Page 187
... on p. 11-7. 5-3 The job is canceled, and the display returns to the standby mode. ● The message appears: The toner cartridge is connected to the machine. : Receives faxes automatically and records voice messages. : Distinguishes between fax and voice calls automatically if ..., make sure an answering machine is required. For , subscription to a DRPD service is connected to cancel a job: The message appears. Replace the toner cartridge. For details on this error message, see "LCD Messages," on these settings, see Reference Guide > Send/Receive. - You have to select ...
... on p. 11-7. 5-3 The job is canceled, and the display returns to the standby mode. ● The message appears: The toner cartridge is connected to the machine. : Receives faxes automatically and records voice messages. : Distinguishes between fax and voice calls automatically if ..., make sure an answering machine is required. For , subscription to a DRPD service is connected to cancel a job: The message appears. Replace the toner cartridge. For details on this error message, see "LCD Messages," on these settings, see Reference Guide > Send/Receive. - You have to select ...

Operation Guide
Page 192
...fax which was stored in memory when printing is required. 5-8 The main memory of the LASER CLASS 830i can store data for a maximum of 90 jobs or approximately 1,500 pages.*1 The main memory of the LASER CLASS 810 can store data for a maximum of 90 jobs or approximately 512 (1,500*2) pages.... Contact the other party sends the fax by the LASER CLASS 830i with ITU-T Standard Chart No. 1, standard mode. The maximum number of the fax. *2 For the LASER CLASS 810, an optional network printer kit is disabled under certain conditions (e.g., toner or paper has run out). If the memory becomes ...
...fax which was stored in memory when printing is required. 5-8 The main memory of the LASER CLASS 830i can store data for a maximum of 90 jobs or approximately 1,500 pages.*1 The main memory of the LASER CLASS 810 can store data for a maximum of 90 jobs or approximately 512 (1,500*2) pages.... Contact the other party sends the fax by the LASER CLASS 830i with ITU-T Standard Chart No. 1, standard mode. The maximum number of the fax. *2 For the LASER CLASS 810, an optional network printer kit is disabled under certain conditions (e.g., toner or paper has run out). If the memory becomes ...

Operation Guide
Page 263
10 Maintenance Cleaning the Machine 10-2 Exterior 10-2 Interior 10-3 Fuser Roller 10-6 Scanning area 10-7 Cleaning the ADF Automatically 10-9 Transcription Roller 10-10 Replacing the Toner Cartridge 10-11 Redistributing Toner 10-11 Replacing the Toner Cartridge with a New One 10-14 Replacing the Stamp Cartridge 10-17 Recycling Used Cartridges 10-19 The Clean Earth Campaign 10-19 U.S.A. PROGRAM 10-21 CANADA PROGRAM-CANADA PROGRAMME 10-24 Transporting the Machine 10-26 Maintenance
10 Maintenance Cleaning the Machine 10-2 Exterior 10-2 Interior 10-3 Fuser Roller 10-6 Scanning area 10-7 Cleaning the ADF Automatically 10-9 Transcription Roller 10-10 Replacing the Toner Cartridge 10-11 Redistributing Toner 10-11 Replacing the Toner Cartridge with a New One 10-14 Replacing the Stamp Cartridge 10-17 Recycling Used Cartridges 10-19 The Clean Earth Campaign 10-19 U.S.A. PROGRAM 10-21 CANADA PROGRAM-CANADA PROGRAMME 10-24 Transporting the Machine 10-26 Maintenance
Operation Guide
Page 265
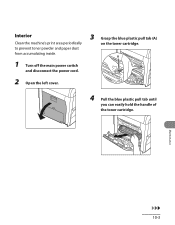
Interior Clean the machine's print area periodically to prevent toner powder and paper dust from accumulating inside. 1 Turn off the main power switch and disconnect the power cord. 2 Open the left cover. 3 Grasp the blue plastic pull tab (A) on the toner cartridge. 4 Pull the blue plastic pull tab until you can easily hold the handle of the toner cartridge. Maintenance 10-3
Interior Clean the machine's print area periodically to prevent toner powder and paper dust from accumulating inside. 1 Turn off the main power switch and disconnect the power cord. 2 Open the left cover. 3 Grasp the blue plastic pull tab (A) on the toner cartridge. 4 Pull the blue plastic pull tab until you can easily hold the handle of the toner cartridge. Maintenance 10-3
Operation Guide
Page 266
...clothing, wash with cold water. To avoid exposing the toner cartridge to light, place it in its handle. - Maintenance 10-4 5 Remove the toner cartridge. 6 Use a clean, soft, dry, lint-free cloth to light or is exposed to remove any toner or paper debris from the machine's interior. - ...the drum surface is damaged. - The arrows (A) on the toner cartridge. Do not open the drum protective shutter on the toner cartridge should be pointing toward the machine. Warm water will set the toner. 7 Hold the toner cartridge by its protective bag or wrap it becomes very hot during...
...clothing, wash with cold water. To avoid exposing the toner cartridge to light, place it in its handle. - Maintenance 10-4 5 Remove the toner cartridge. 6 Use a clean, soft, dry, lint-free cloth to light or is exposed to remove any toner or paper debris from the machine's interior. - ...the drum surface is damaged. - The arrows (A) on the toner cartridge. Do not open the drum protective shutter on the toner cartridge should be pointing toward the machine. Warm water will set the toner. 7 Hold the toner cartridge by its protective bag or wrap it becomes very hot during...
Operation Guide
Page 267
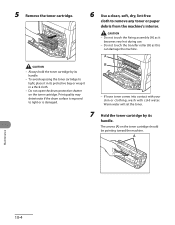
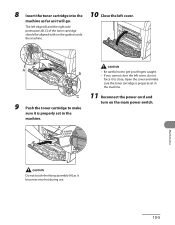
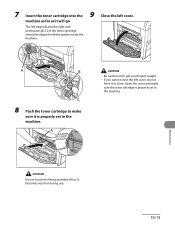
... properly set in the machine. 11 Reconnect the power cord and turn on the guides inside the machine. 10 Close the left cover. 9 Push the toner cartridge to make sure it is properly set in the machine. - The left cover, do not force it to get your fingers caught. - Maintenance Do... not touch the fixing assembly (A) as it will go. If you cannot close the left edge (A) and the right side protrusions (B, C) of the toner cartridge should be aligned with on the main power switch. 8 Insert the toner cartridge into the machine as far as it becomes very hot during use. 10-5
... properly set in the machine. 11 Reconnect the power cord and turn on the guides inside the machine. 10 Close the left cover. 9 Push the toner cartridge to make sure it is properly set in the machine. - The left cover, do not force it to get your fingers caught. - Maintenance Do... not touch the fixing assembly (A) as it will go. If you cannot close the left edge (A) and the right side protrusions (B, C) of the toner cartridge should be aligned with on the main power switch. 8 Insert the toner cartridge into the machine as far as it becomes very hot during use. 10-5
Operation Guide
Page 268
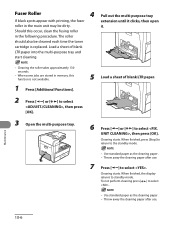
... be dirty. When some jobs are stored in memory, this occur, clean the fusing roller in the main unit may be cleaned each time the toner cartridge is not available. 1 Press [Additional Functions]. 5 Load a sheet of blank LTR paper into the multi-purpose tray and start cleaning. Throw away the cleaning...
... be dirty. When some jobs are stored in memory, this occur, clean the fusing roller in the main unit may be cleaned each time the toner cartridge is not available. 1 Press [Additional Functions]. 5 Load a sheet of blank LTR paper into the multi-purpose tray and start cleaning. Throw away the cleaning...
Operation Guide
Page 273
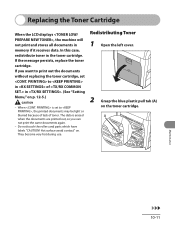
...- When is erased when the documents are printed out, so you want to print out the documents without replacing the toner cartridge, set to in of toner. Do not touch the rollers and parts which have labels "CAUTION! Maintenance 10-11 Hot surface avoid contact" on the... toner cartridge. In this case, redistribute toner in memory if it receives data. Redistributing Toner 1 Open the left cover. 2 Grasp the blue plastic pull tab (A) on . If the message persists, replace the toner cartridge. They become very hot during use. The...
...- When is erased when the documents are printed out, so you want to print out the documents without replacing the toner cartridge, set to in of toner. Do not touch the rollers and parts which have labels "CAUTION! Maintenance 10-11 Hot surface avoid contact" on the... toner cartridge. In this case, redistribute toner in memory if it receives data. Redistributing Toner 1 Open the left cover. 2 Grasp the blue plastic pull tab (A) on . If the message persists, replace the toner cartridge. They become very hot during use. The...
Operation Guide
Page 274
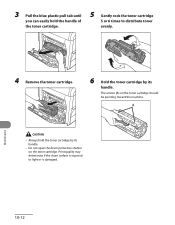
3 Pull the blue plastic pull tab until you can easily hold the toner cartridge by its handle. - Print quality may deteriorate if the drum surface is damaged. Maintenance 10-12 Do not open the drum protective shutter on the toner cartridge should be pointing toward the machine. - The arrows (A) on the toner cartridge. Always hold the handle of the toner cartridge. 5 Gently rock the toner cartridge 5 or 6 times to light or is exposed to distribute toner evenly. 4 Remove the toner cartridge. 6 Hold the toner cartridge by its handle.
3 Pull the blue plastic pull tab until you can easily hold the toner cartridge by its handle. - Print quality may deteriorate if the drum surface is damaged. Maintenance 10-12 Do not open the drum protective shutter on the toner cartridge should be pointing toward the machine. - The arrows (A) on the toner cartridge. Always hold the handle of the toner cartridge. 5 Gently rock the toner cartridge 5 or 6 times to light or is exposed to distribute toner evenly. 4 Remove the toner cartridge. 6 Hold the toner cartridge by its handle.
Operation Guide
Page 275
... during use. 10-13 Open the cover and make sure it to get your fingers caught. - If you cannot close . The left cover. 7 9 Insert the toner cartridge into the Close the left edge (A) and the right side protrusions (B, C) of the...
... during use. 10-13 Open the cover and make sure it to get your fingers caught. - If you cannot close . The left cover. 7 9 Insert the toner cartridge into the Close the left edge (A) and the right side protrusions (B, C) of the...
Operation Guide
Page 276
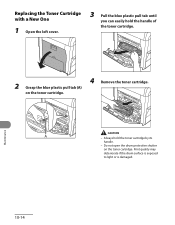
Maintenance 10-14 Replacing the Toner Cartridge with a New One 1 Open the left cover. 3 Pull the blue plastic pull tab until you can easily hold the toner cartridge by its handle. - Always hold the handle of the toner cartridge. 2 Grasp the blue plastic pull tab (A) on the toner cartridge. Do not open the drum protective shutter on the toner cartridge. 4 Remove the toner cartridge. - Print quality may deteriorate if the drum surface is exposed to light or is damaged.
Maintenance 10-14 Replacing the Toner Cartridge with a New One 1 Open the left cover. 3 Pull the blue plastic pull tab until you can easily hold the toner cartridge by its handle. - Always hold the handle of the toner cartridge. 2 Grasp the blue plastic pull tab (A) on the toner cartridge. Do not open the drum protective shutter on the toner cartridge. 4 Remove the toner cartridge. - Print quality may deteriorate if the drum surface is exposed to light or is damaged.

Operation Guide
Page 277
Do not pull out the seal at an angle. Maintenance 10-15 Do not remove the pull tab as it is used to distribute toner evenly. 5 Remove the new toner cartridge from the protective material. 8 Bend back the blue plastic pull tab. 6 Gently rock the toner cartridge 5 or 6 times to pull out the toner when the cartridge needs replaced. 9 Pull out the seal completely. 7 Remove the seals (2 places).
Do not pull out the seal at an angle. Maintenance 10-15 Do not remove the pull tab as it is used to distribute toner evenly. 5 Remove the new toner cartridge from the protective material. 8 Bend back the blue plastic pull tab. 6 Gently rock the toner cartridge 5 or 6 times to pull out the toner when the cartridge needs replaced. 9 Pull out the seal completely. 7 Remove the seals (2 places).


