Instruction Manual
Page 3
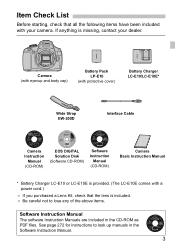
... the CD-ROM as PDF files. Camera (with eyecup and body cap) Battery Pack LP-E10 (with protective cover) Battery Charger LC-E10/LC-E10E* Wide Strap EW-200D Interface Cable Camera Instruction Manual (CD-ROM) EOS DIGITAL Solution Disk (Software CD-ROM) Software Instruction Manual (CD-ROM) Camera... Basic Instruction Manual * Battery Charger LC-E10 or LC-E10E is provided. (The LC-E10E comes with a power cord.) If ...
... the CD-ROM as PDF files. Camera (with eyecup and body cap) Battery Pack LP-E10 (with protective cover) Battery Charger LC-E10/LC-E10E* Wide Strap EW-200D Interface Cable Camera Instruction Manual (CD-ROM) EOS DIGITAL Solution Disk (Software CD-ROM) Software Instruction Manual (CD-ROM) Camera... Basic Instruction Manual * Battery Charger LC-E10 or LC-E10E is provided. (The LC-E10E comes with a power cord.) If ...

Instruction Manual
Page 8
Index to Features Power Battery • Charging • Installing/Removing • Battery check Power outlet Auto power off Î p.26 Î p.28 Î p.32 Î p.228 Î p.31 Card Inserting/Removing Î p.28 Format Î p.44 Release ...
Index to Features Power Battery • Charging • Installing/Removing • Battery check Power outlet Auto power off Î p.26 Î p.28 Î p.32 Î p.228 Î p.31 Card Inserting/Removing Î p.28 Format Î p.44 Release ...
Instruction Manual
Page 10
... Manual 4 Chapters ...5 Contents at a Glance 6 Index to Features 8 Handling Precautions 14 Quick Start Guide 16 Nomenclature 18 1 Getting Started 25 Charging the Battery 26 Installing and Removing the Battery and Card 28 Turning on the Power 31 Setting the Date and Time 33 Selecting the Interface Language 34 Attaching and Detaching a Lens...
... Manual 4 Chapters ...5 Contents at a Glance 6 Index to Features 8 Handling Precautions 14 Quick Start Guide 16 Nomenclature 18 1 Getting Started 25 Charging the Battery 26 Installing and Removing the Battery and Card 28 Turning on the Power 31 Setting the Date and Time 33 Selecting the Interface Language 34 Attaching and Detaching a Lens...

Instruction Manual
Page 14
... or lens. Avoid storing the camera where there are corrosive chemicals such as a large antenna. If you have the camera checked by your nearest Canon Service Center. High temperatures can cause the camera to the warmer temperature before using the camera. Use a blower to check that contain organic solvents... camera has not been used for an extended period, test all its functions before taking it is condensation, remove the lens, card and battery from corroding. Handling Precautions Camera Care This camera is not waterproof and cannot be used for an extended period, remove the...
... or lens. Avoid storing the camera where there are corrosive chemicals such as a large antenna. If you have the camera checked by your nearest Canon Service Center. High temperatures can cause the camera to the warmer temperature before using the camera. Use a blower to check that contain organic solvents... camera has not been used for an extended period, test all its functions before taking it is condensation, remove the lens, card and battery from corroding. Handling Precautions Camera Care This camera is not waterproof and cannot be used for an extended period, remove the...

Instruction Manual
Page 16
Quick Start Guide 1 Insert the battery. (p.28) To charge the battery, see page 26. 2 Insert the card. (p.28) With the card's label facing toward the camera back, insert it into the slot. 3 White index Red index Attach the lens. (p.35) Align the lens' white or red index with the camera's index in the matching color. 4 Set the lens focus mode switch to . (p.35) 5 16 Set the power switch to . (p.31) When the LCD monitor displays the Date/Time setting screen, see page 33.
Quick Start Guide 1 Insert the battery. (p.28) To charge the battery, see page 26. 2 Insert the card. (p.28) With the card's label facing toward the camera back, insert it into the slot. 3 White index Red index Attach the lens. (p.35) Align the lens' white or red index with the camera's index in the matching color. 4 Set the lens focus mode switch to . (p.35) 5 16 Set the power switch to . (p.31) When the LCD monitor displays the Date/Time setting screen, see page 33.

Instruction Manual
Page 19
.../ Movie shooting button (p.122/140) Quick Control button/ Direct print button (p.40/207) Tripod socket Menu button (p.42) Setting button (p.42) Card/Battery compartment cover (p.28) Access lamp (p.30) Card/Battery compartment cover release lever (p.28) Playback button (p.70) Cross keys (p.42) ISO speed setting button (p.77) White balance selection button (p.115...
.../ Movie shooting button (p.122/140) Quick Control button/ Direct print button (p.40/207) Tripod socket Menu button (p.42) Setting button (p.42) Card/Battery compartment cover (p.28) Access lamp (p.30) Card/Battery compartment cover release lever (p.28) Playback button (p.70) Cross keys (p.42) ISO speed setting button (p.77) White balance selection button (p.115...
Instruction Manual
Page 20
... AF Z AI Servo AF g Manual Focusing Quick Control icon (p.40,63) White balance (p.115) Q Auto W Daylight E Shade R Cloudy Y Tungsten light U White fluorescent light I Flash O Custom Battery check (p.32) zxcn Drive mode (p.86,87) u Single shooting i Continuous shooting j Self-timer:10 sec l Self-timer:2 sec q Self-timer:Continuous Shutter speed Aperture Auto...
... AF Z AI Servo AF g Manual Focusing Quick Control icon (p.40,63) White balance (p.115) Q Auto W Daylight E Shade R Cloudy Y Tungsten light U White fluorescent light I Flash O Custom Battery check (p.32) zxcn Drive mode (p.86,87) u Single shooting i Continuous shooting j Self-timer:10 sec l Self-timer:2 sec q Self-timer:Continuous Shutter speed Aperture Auto...

Instruction Manual
Page 26
...°F) will turn green. X Recharging starts automatically and the charge lamp turns orange. For safety reasons, recharging in reverse. LC-E10 3 Recharge the battery. LC-E10E For LC-E10E Connect the power cord to the charger. The time required to fully recharge a completely exhausted... battery at 23°C / 73°F. It takes approx. 2 hours to recharge the battery depends on the ambient temperature and the battery's charge level. For LC-E10 As shown by the arrow, flip out the...
...°F) will turn green. X Recharging starts automatically and the charge lamp turns orange. For safety reasons, recharging in reverse. LC-E10 3 Recharge the battery. LC-E10E For LC-E10E Connect the power cord to the charger. The time required to fully recharge a completely exhausted... battery at 23°C / 73°F. It takes approx. 2 hours to recharge the battery depends on the ambient temperature and the battery's charge level. For LC-E10 As shown by the arrow, flip out the...

Instruction Manual
Page 27
... left in the camera for a prolonged period, a small amount of its power. When not using . Charging the Battery Tips for which Canon cannot be held liable. 27 Recharge the battery on the day before using the camera, remove the battery. Even during storage, a charged battery will gradually drain and lose its service life. If the...
... left in the camera for a prolonged period, a small amount of its power. When not using . Charging the Battery Tips for which Canon cannot be held liable. 27 Recharge the battery on the day before using the camera, remove the battery. Even during storage, a charged battery will gradually drain and lose its service life. If the...

Instruction Manual
Page 28
...Slide the lever as shown by the arrows and open the cover. Installing and Removing the Battery and Card Load a fully-charged Battery Pack LP-E10 into the camera. When you set upward to , the number of possible... shots (p.32) will be an SD, SDHC, or SDXC memory card. Installing the Battery/Card 1 Open the cover. Press the cover until it snaps shut. The captured images are recorded onto ..., face the card's label side toward the camera back. Write-protect switch 2 Insert the battery. The card (sold separately) can be displayed on the LCD monitor. 28 Make sure the...
...Slide the lever as shown by the arrows and open the cover. Installing and Removing the Battery and Card Load a fully-charged Battery Pack LP-E10 into the camera. When you set upward to , the number of possible... shots (p.32) will be an SD, SDHC, or SDXC memory card. Installing the Battery/Card 1 Open the cover. Press the cover until it snaps shut. The captured images are recorded onto ..., face the card's label side toward the camera back. Write-protect switch 2 Insert the battery. The card (sold separately) can be displayed on the LCD monitor. 28 Make sure the...

Instruction Manual
Page 29
... snaps shut. 29 If "Recording ..." The card will prevent you from forgetting to insert a card (p.154). Installing and Removing the Battery and Card After opening the card/battery compartment cover, be sure to attach the protective cover (provided, p.26) to . (p.31) 2 Open the cover. Removing the... Battery/Card 1 Set the power switch to the battery. 4 Remove the card. Gently push in the card, then let go. Pull the card straight out. 5 Close the cover. Setting [1 Release ...
... snaps shut. 29 If "Recording ..." The card will prevent you from forgetting to insert a card (p.154). Installing and Removing the Battery and Card After opening the card/battery compartment cover, be sure to attach the protective cover (provided, p.26) to . (p.31) 2 Open the cover. Removing the... Battery/Card 1 Set the power switch to the battery. 4 Remove the card. Gently push in the card, then let go. Pull the card straight out. 5 Close the cover. Setting [1 Release ...

Instruction Manual
Page 30
...card-related error message is lit or blinking, do not open the card/battery compartment cover and never do any of the following. If the error persists, use a different card. Installing and... Removing the Battery and Card When the access lamp is lit or blinking, it indicates that images are ...normal. 30 Otherwise, the image data may be damaged. • Removing the card. • Removing the battery. • Shaking or banging the camera around. If you can transfer all the images and then format the ...
...card-related error message is lit or blinking, do not open the card/battery compartment cover and never do any of the following. If the error persists, use a different card. Installing and... Removing the Battery and Card When the access lamp is lit or blinking, it indicates that images are ...normal. 30 Otherwise, the image data may be damaged. • Removing the card. • Removing the battery. • Shaking or banging the camera around. If you can transfer all the images and then format the ...

Instruction Manual
Page 31
...-off time with [5 Auto power off and does not operate. Set to this position when not using the camera. 3 About Auto Power Off To save battery power, the camera turns off after about 30 seconds of non-operation.
...-off time with [5 Auto power off and does not operate. Set to this position when not using the camera. 3 About Auto Power Off To save battery power, the camera turns off after about 30 seconds of non-operation.

Instruction Manual
Page 32
... number of possible shots may be recharged. Turning on the Power z Checking the Battery Level When the power switch is set to , the battery level will be indicated in one of four levels: z : Battery level is powered by the camera's battery. Battery Life Temperature No Flash 50% Flash Use At 23°C / 73°F Approx.... 800 shots Approx. 700 shots At 0°C / 32°F Approx. 750 shots Approx. 650 shots The figures above are based on a fully-charged Battery Pack LP-E10, no Live View shooting, and CIPA (Camera & Imaging Products Association) testing standards...
... number of possible shots may be recharged. Turning on the Power z Checking the Battery Level When the power switch is set to , the battery level will be indicated in one of four levels: z : Battery level is powered by the camera's battery. Battery Life Temperature No Flash 50% Flash Use At 23°C / 73°F Approx.... 800 shots Approx. 700 shots At 0°C / 32°F Approx. 750 shots Approx. 650 shots The figures above are based on a fully-charged Battery Pack LP-E10, no Live View shooting, and CIPA (Camera & Imaging Products Association) testing standards...

Instruction Manual
Page 33
... first time or if the date/time has been reset, the Date/Time setting screen will start from when you store the camera without the battery or if the camera's battery becomes exhausted, the date/time might be reset. If you press in step 4. 33
... first time or if the date/time has been reset, the Date/Time setting screen will start from when you store the camera without the battery or if the camera's battery becomes exhausted, the date/time might be reset. If you press in step 4. 33
Instruction Manual
Page 37
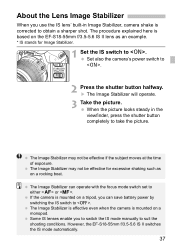
... the EF-S18-55mm f/3.5-5.6 IS II lens as an example. * IS stands for Image Stabilizer. 1 Set the IS switch to . The Image Stabilizer can save battery power by switching the IS switch to . The Image Stabilizer is effective even when the camera is based on a rocking boat. When the picture looks...
... the EF-S18-55mm f/3.5-5.6 IS II lens as an example. * IS stands for Image Stabilizer. 1 Set the IS switch to . The Image Stabilizer can save battery power by switching the IS switch to . The Image Stabilizer is effective even when the camera is based on a rocking boat. When the picture looks...

Instruction Manual
Page 56
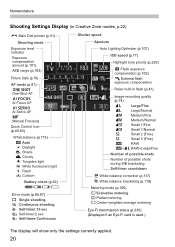
... more in your images. If you want to convey in focus. If flash is raised with set. C Creative Auto Shooting Shutter speed (1) Aperture ISO speed (2) (3) Battery check Image-recording quality Possible shots Pressing the button enables you to set the following: (1) Shoot by ambience selection You can also select it from...
... more in your images. If you want to convey in focus. If flash is raised with set. C Creative Auto Shooting Shutter speed (1) Aperture ISO speed (2) (3) Battery check Image-recording quality Possible shots Pressing the button enables you to set the following: (1) Shoot by ambience selection You can also select it from...

Instruction Manual
Page 123
... Shooting Conditions No Flash 50% Flash Use 240 220 At 0°C / 32°F 230 210 The figures above are on a fully-charged Battery Pack LP-E10 and CIPA (Camera & Imaging Products Association) testing standards. at 23°C / 73°F and approx. 1 hr. 40 min.... Battery Life with [5 Auto power off automatically as set to [Enable]. With a fully-charged Battery Pack LP-E10, continuous Live View shooting is not operated for a prolonged period, the power will be displayed ...
... Shooting Conditions No Flash 50% Flash Use 240 220 At 0°C / 32°F 230 210 The figures above are on a fully-charged Battery Pack LP-E10 and CIPA (Camera & Imaging Products Association) testing standards. at 23°C / 73°F and approx. 1 hr. 40 min.... Battery Life with [5 Auto power off automatically as set to [Enable]. With a fully-charged Battery Pack LP-E10, continuous Live View shooting is not operated for a prolonged period, the power will be displayed ...

Instruction Manual
Page 124
... off y Flash exposure compensation 0 External flash exposure compensation e High-speed sync Shutter speed Picture Style Aperture Eye-Fi card transmission status FEB AEB Exposure simulation Battery check Highlight tone priority ISO speed Possible shots Exposure level indicator/ AEB range When is displayed in low- If flash is used or bulb is...
... off y Flash exposure compensation 0 External flash exposure compensation e High-speed sync Shutter speed Picture Style Aperture Eye-Fi card transmission status FEB AEB Exposure simulation Battery check Highlight tone priority ISO speed Possible shots Exposure level indicator/ AEB range When is displayed in low- If flash is used or bulb is...

Instruction Manual
Page 141
... screen bottom is compatible with a LED Light This camera is for movie shooting are set the exposure compensation. When you shoot a movie. With a fully-charged Battery Pack LP-E10, the total shooting time will be adjusted automatically. The sun's heat can set automatically. For details, see the EX Speedlite's instruction manual...
... screen bottom is compatible with a LED Light This camera is for movie shooting are set the exposure compensation. When you shoot a movie. With a fully-charged Battery Pack LP-E10, the total shooting time will be adjusted automatically. The sun's heat can set automatically. For details, see the EX Speedlite's instruction manual...