
Instruction Manual
Page 7
All the necessary camera settings will be set it to take the picture. 9 Review the picture. Press the shutter button completely to (Scene Intelligent Auto) (p.23). Look through the viewfinder and aim the viewfinder center over the subject. Quick ...
All the necessary camera settings will be set it to take the picture. 9 Review the picture. Press the shutter button completely to (Scene Intelligent Auto) (p.23). Look through the viewfinder and aim the viewfinder center over the subject. Quick ...

Instruction Manual
Page 61
... monitor just after shooting. Under the [54] tab, select [Clear all camera settings]. Select the desired setting, then press . Before You Start 3 Setting the Image Review Time You can set how long the image is set, the image will be displayed until the auto power off time elapses. 3 Reverting the Camera... can be reverted to their defaults. 1 Select [Clear all camera settings], then press . 2 Select [OK]. 61 To keep the image displayed, set [Off]. 1 Select [Image review]. To not have the image displayed, set [Hold].
... monitor just after shooting. Under the [54] tab, select [Clear all camera settings]. Select the desired setting, then press . Before You Start 3 Setting the Image Review Time You can set how long the image is set, the image will be displayed until the auto power off time elapses. 3 Reverting the Camera... can be reverted to their defaults. 1 Select [Clear all camera settings], then press . 2 Select [OK]. 61 To keep the image displayed, set [Off]. 1 Select [Image review]. To not have the image displayed, set [Hold].

Instruction Manual
Page 159
... the magnified view, press the button or button and the single-image display will be magnified as you turn the dial clockwise. During the image review after image capture, and 3. u Magnifying Images You can magnify a captured image by approx. 1.5x to 10x on the lower right of 1 and 3 only, turning the...
... the magnified view, press the button or button and the single-image display will be magnified as you turn the dial clockwise. During the image review after image capture, and 3. u Magnifying Images You can magnify a captured image by approx. 1.5x to 10x on the lower right of 1 and 3 only, turning the...

Advanced Owners Manual
Page 7
Press the shutter button halfway, and the camera will be set it to take the picture. 9 Review the picture. Press the shutter button completely to (Scene Intelligent Auto) (p.29). Look through the viewfinder and aim the viewfinder center over the subject. To ...
Press the shutter button halfway, and the camera will be set it to take the picture. 9 Review the picture. Press the shutter button completely to (Scene Intelligent Auto) (p.29). Look through the viewfinder and aim the viewfinder center over the subject. To ...
Advanced Owners Manual
Page 10
... 64 Before You Start 67 Formatting the Card 67 Disabling the Beeper 69 Setting the Power-off Time/Auto Power Off 69 Setting the Image Review Time 70 Reverting the Camera to the Default Settings 70 10
... 64 Before You Start 67 Formatting the Card 67 Disabling the Beeper 69 Setting the Power-off Time/Auto Power Off 69 Setting the Image Review Time 70 Reverting the Camera to the Default Settings 70 10

Advanced Owners Manual
Page 19
...; p.346 Movie recording quality Î p.330 Sound recording Î p.336 Time code Î p.339 HDMI output Î p.348 Still photo shooting Î p.327 Playback Image review time Single-image display Shooting information Index display Image browsing (Jump display) Magnified view Two-image display Image rotation Protect Rating Movie playback Slide show...
...; p.346 Movie recording quality Î p.330 Sound recording Î p.336 Time code Î p.339 HDMI output Î p.348 Still photo shooting Î p.327 Playback Image review time Single-image display Shooting information Index display Image browsing (Jump display) Magnified view Two-image display Image rotation Protect Rating Movie playback Slide show...

Advanced Owners Manual
Page 70
... settings will be reverted to their defaults. 1 Select [Clear all camera settings], then press . 2 Select [OK]. Under the [z1] tab, select [Image review], then press . 2 Set the desired time. Select the desired setting, then press . To keep the image displayed, set how long the image is set ...[Off]. 1 Select [Image review]. Before You Start 3 Setting the Image Review Time You can be displayed until the auto power off time elapses. 3 Reverting the Camera to the Default SettingsN The camera's ...
... settings will be reverted to their defaults. 1 Select [Clear all camera settings], then press . 2 Select [OK]. Under the [z1] tab, select [Image review], then press . 2 Set the desired time. Select the desired setting, then press . To keep the image displayed, set how long the image is set ...[Off]. 1 Select [Image review]. Before You Start 3 Setting the Image Review Time You can be displayed until the auto power off time elapses. 3 Reverting the Camera to the Default SettingsN The camera's ...
Advanced Owners Manual
Page 72
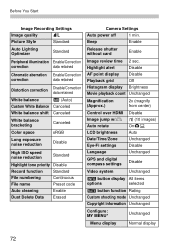
... Rating Custom shooting mode Unchanged Copyright information Unchanged Configure: MY MENU* Unchanged Menu display Normal display 72 Beep Enable Release shutter without card Enable Image review time 2 sec. Before You Start Image Recording Settings Image quality 73 Picture Style Standard Auto Lighting Optimizer Standard Peripheral illumination Enable/Correction correction data retained...
... Rating Custom shooting mode Unchanged Copyright information Unchanged Configure: MY MENU* Unchanged Menu display Normal display 72 Beep Enable Release shutter without card Enable Image review time 2 sec. Before You Start Image Recording Settings Image quality 73 Picture Style Standard Auto Lighting Optimizer Standard Peripheral illumination Enable/Correction correction data retained...

Advanced Owners Manual
Page 238
... multiple exposure setting screen will not be saved.) You can see how the single exposures are disabled during shooting: menu viewing, Live View display, image review after image capture, image playback, and undo last image (p.244). If you shoot multiple-exposure images with [z3: Multiple exposure]. 238 Also, only the multiple...
... multiple exposure setting screen will not be saved.) You can see how the single exposures are disabled during shooting: menu viewing, Live View display, image review after image capture, image playback, and undo last image (p.244). If you shoot multiple-exposure images with [z3: Multiple exposure]. 238 Also, only the multiple...

Advanced Owners Manual
Page 364
... can magnify a captured image by approx. 1.5x to 10x on the lower right of 1 and 3 only, you can turn the dial clockwise. During the image review after image capture, and 3. The image magnification increases as you turn the dial to view another image while the magnification is maintained. You can be...
... can magnify a captured image by approx. 1.5x to 10x on the lower right of 1 and 3 only, you can turn the dial clockwise. During the image review after image capture, and 3. The image magnification increases as you turn the dial to view another image while the magnification is maintained. You can be...

Advanced Owners Manual
Page 395
... may not be automatically rotated for playback. If the vertical image is taken while the camera is unable to [On] for the image review just after shooting. Changing Image Playback Settings 3 Auto Rotation of horizontally. If the vertical image is automatically rotated during playback on both the...and on the computer. The vertical image will not work with vertical images captured while auto rotation was [Off]. Using the EOS software is not automatically rotated. You can change the setting for playback. OnzD The vertical image is not automatically rotated on the computer.
... may not be automatically rotated for playback. If the vertical image is taken while the camera is unable to [On] for the image review just after shooting. Changing Image Playback Settings 3 Auto Rotation of horizontally. If the vertical image is automatically rotated during playback on both the...and on the computer. The vertical image will not work with vertical images captured while auto rotation was [Off]. Using the EOS software is not automatically rotated. You can change the setting for playback. OnzD The vertical image is not automatically rotated on the computer.

Advanced Owners Manual
Page 444
If [Erase] is set, you press the button, the erase menu appears (p.392). 3 Setting Custom FunctionsN Default Erase option During image playback and image review after image capture, when you can set which option, [Cancel] or [Erase], is set, be preselected on this screen. You can just press to quickly erase the image. : [Cancel] selected L : [Erase] selected If [Erase] is to be careful not to erase an image accidentally. 444
If [Erase] is set, you press the button, the erase menu appears (p.392). 3 Setting Custom FunctionsN Default Erase option During image playback and image review after image capture, when you can set which option, [Cancel] or [Erase], is set, be preselected on this screen. You can just press to quickly erase the image. : [Cancel] selected L : [Erase] selected If [Erase] is to be careful not to erase an image accidentally. 444

Advanced Owners Manual
Page 453
If [Direct AF point selection] is assigned to , you cannot use to scroll up/down the shooting information display (p.354, 357) during the image review just after shooting. 453 To register the AF point, see page 450. : Direct AF point selection: Vertical During metering, you can turn the dial to ...
If [Direct AF point selection] is assigned to , you cannot use to scroll up/down the shooting information display (p.354, 357) during the image review just after shooting. 453 To register the AF point, see page 450. : Direct AF point selection: Vertical During metering, you can turn the dial to ...
Advanced Owners Manual
Page 465
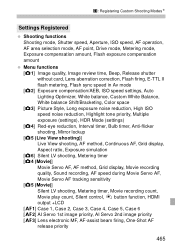
..., AF point, Drive mode, Metering mode, Exposure compensation amount, Flash exposure compensation amount Menu functions [z1] Image quality, Image review time, Beep, Release shutter without card, Lens aberration correction, Flash firing, E-TTL II flash metering, Flash sync speed in Av mode [z2] Exposure compensation/AEB, ISO speed settings, Auto Lighting Optimizer, White...
..., AF point, Drive mode, Metering mode, Exposure compensation amount, Flash exposure compensation amount Menu functions [z1] Image quality, Image review time, Beep, Release shutter without card, Lens aberration correction, Flash firing, E-TTL II flash metering, Flash sync speed in Av mode [z2] Exposure compensation/AEB, ISO speed settings, Auto Lighting Optimizer, White...

Advanced Owners Manual
Page 484
... Shooting z: Shooting 1 (Red) Page Image quality 1 / 41 / 61 149 73 / 83 / 74 / 84 / 7a / 8a / b / c Image review time Off / 2 sec. / 4 sec. / 8 sec. / Hold 70 Beep Enable / Disable 69 Release shutter without card Enable / Disable 42 Peripheral illumination: ...Enable / Disable Lens aberration correction Chromatic aberration: Enable / Disable 181 Distortion: Disable / Enable Flash control Flash firing / E-TTL II metering / Flash sync. If [Rec. separately] is displayed under [z1: Image quality] depends on the [Record func.] (p.146) setting under...
... Shooting z: Shooting 1 (Red) Page Image quality 1 / 41 / 61 149 73 / 83 / 74 / 84 / 7a / 8a / b / c Image review time Off / 2 sec. / 4 sec. / 8 sec. / Hold 70 Beep Enable / Disable 69 Release shutter without card Enable / Disable 42 Peripheral illumination: ...Enable / Disable Lens aberration correction Chromatic aberration: Enable / Disable 181 Distortion: Disable / Enable Flash control Flash firing / E-TTL II metering / Flash sync. If [Rec. separately] is displayed under [z1: Image quality] depends on the [Record func.] (p.146) setting under...

Advanced Owners Manual
Page 500
... be applied for flash photography. Even if I cannot set the exposure compensation while both manual exposure and Auto ISO are set , Live View display, image review after image capture, or image playback is performed, it will be ISO 200 - See page 223 to [Disable].
... be applied for flash photography. Even if I cannot set the exposure compensation while both manual exposure and Auto ISO are set , Live View display, image review after image capture, or image playback is performed, it will be ISO 200 - See page 223 to [Disable].

Advanced Owners Manual
Page 543
... View shooting 84, 285 Aspect ratio 295 Exposure simulation 296 Face+Tracking 300 FlexiZone - Index Image dust prevention 405 Image-recording quality ........149, 330 Image review time 70 Image Stabilizer (lens 53 Images AF point display 359 Auto playback 382 Auto rotation 395 Copying 388 Downloading images (to a computer 534 Erase...
... View shooting 84, 285 Aspect ratio 295 Exposure simulation 296 Face+Tracking 300 FlexiZone - Index Image dust prevention 405 Image-recording quality ........149, 330 Image review time 70 Image Stabilizer (lens 53 Images AF point display 359 Auto playback 382 Auto rotation 395 Copying 388 Downloading images (to a computer 534 Erase...
Quick Reference Guide
Page 1
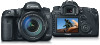
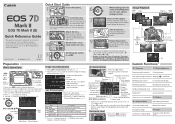
...CPQ-E105-000 © CANON INC. 2014 E English 5 Set the power switch to display the menu. 2. Press the button to . A Picture StyleN ooPress the button. R Landscape Vivid blue skies and greenery, and very sharp images. Take the picture. Review the picture. ooIn the...LCD monitor Quick Control Dial button 1. A Mode Image-recording Quality ooSelect [z1: Image quality], then press . ooTurn the or dial to the EOS 7D Mark II (G) Instruction Manual. 2 Insert the card. ooFor (Neutral) and (Faithful), refer to set it . ooSelect [A], then press . ooTurn the dial...
...CPQ-E105-000 © CANON INC. 2014 E English 5 Set the power switch to display the menu. 2. Press the button to . A Picture StyleN ooPress the button. R Landscape Vivid blue skies and greenery, and very sharp images. Take the picture. Review the picture. ooIn the...LCD monitor Quick Control Dial button 1. A Mode Image-recording Quality ooSelect [z1: Image quality], then press . ooTurn the or dial to the EOS 7D Mark II (G) Instruction Manual. 2 Insert the card. ooFor (Neutral) and (Faithful), refer to set it . ooSelect [A], then press . ooTurn the dial...
