Instruction Manual
Page 3
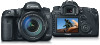
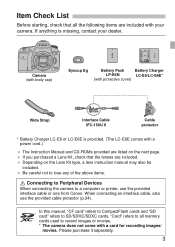
...Please purchase it separately. 3 Depending on the next page. When connecting an interface cable, also use the provided interface cable or one from Canon. Camera (with body cap) Eyecup Eg Battery Pack Battery Charger LP-E6N LC-E6/LC-E6E* (with protective cover) Wide Strap Interface Cable IFC-150U... II Cable protector * Battery Charger LC-E6 or LC-E6E is missing, contact your camera. Item Check List Before starting, check that the ...
...Please purchase it separately. 3 Depending on the next page. When connecting an interface cable, also use the provided interface cable or one from Canon. Camera (with body cap) Eyecup Eg Battery Pack Battery Charger LP-E6N LC-E6/LC-E6E* (with protective cover) Wide Strap Interface Cable IFC-150U... II Cable protector * Battery Charger LC-E6 or LC-E6E is missing, contact your camera. Item Check List Before starting, check that the ...
Instruction Manual
Page 13
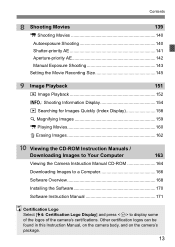
...] and press to display some of the logos of the camera's certifications. Other certification logos can be found in this Instruction Manual, on the camera body, and on the camera's package. 13
...] and press to display some of the logos of the camera's certifications. Other certification logos can be found in this Instruction Manual, on the camera body, and on the camera's package. 13
Instruction Manual
Page 14
...condensation has evaporated before taking it . If the camera is suddenly brought in a while to check that contain organic solvents to clean the camera body or lens. If there is still working. If the camera will not be used for an extended period, remove the battery and store the ... Even while the camera is in storage, press the shutter button a few times once in from the cold into water, promptly consult the nearest Canon Service Center. The camera is to avoid damaging the camera. Do not use the dedicated tool that result in direct sunlight. To prevent condensation, first...
...condensation has evaporated before taking it . If the camera is suddenly brought in a while to check that contain organic solvents to clean the camera body or lens. If there is still working. If the camera will not be used for an extended period, remove the battery and store the ... Even while the camera is in storage, press the shutter button a few times once in from the cold into water, promptly consult the nearest Canon Service Center. The camera is to avoid damaging the camera. Do not use the dedicated tool that result in direct sunlight. To prevent condensation, first...

Instruction Manual
Page 16
...) Main Dial (p.48) Shutter button (p.47) Self-timer lamp (p.90) Remote control sensor Grip (Battery compartment) DC coupler cord hole Depth-of-field preview button Body cap (p.42) 16 Drive mode selection/ AF operation/AF method selection button (p.89/74/131) White balance selection/ Metering mode selection button (p.99/121) EF...
...) Main Dial (p.48) Shutter button (p.47) Self-timer lamp (p.90) Remote control sensor Grip (Battery compartment) DC coupler cord hole Depth-of-field preview button Body cap (p.42) 16 Drive mode selection/ AF operation/AF method selection button (p.89/74/131) White balance selection/ Metering mode selection button (p.99/121) EF...

Instruction Manual
Page 29
When storing the camera without a lens attached, be sure to attach the body cap to the camera. Remove dust on the body cap before you start shooting and basic camera operations. 1 Getting Started This chapter explains preparatory steps before attaching it quickly in a place with minimal dust. Minimizing Dust When changing lenses, do it . 29
When storing the camera without a lens attached, be sure to attach the body cap to the camera. Remove dust on the body cap before you start shooting and basic camera operations. 1 Getting Started This chapter explains preparatory steps before attaching it quickly in a place with minimal dust. Minimizing Dust When changing lenses, do it . 29
Instruction Manual
Page 42
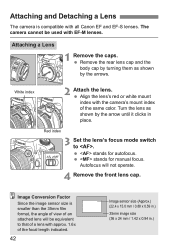
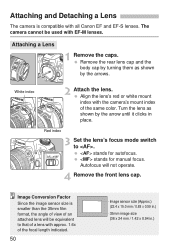
... for manual focus. stands for autofocus. Attaching a Lens 1 Remove the caps. Red index 3 Set the lens's focus mode switch to that of a lens with all Canon EF and EF-S lenses. White index 2 Attach the lens. Turn the lens as shown by the arrow until it clicks in .) Autofocus will be used... size (Approx.) (22.4 x 15.0 mm / 0.88 x 0.59 in.) 35mm image size (36 x 24 mm / 1.42 x 0.94 in place. Remove the rear lens cap and the body cap by turning them as shown by the arrows. Attaching and Detaching a Lens The camera is smaller than the 35mm film format, the angle of...
... for manual focus. stands for autofocus. Attaching a Lens 1 Remove the caps. Red index 3 Set the lens's focus mode switch to that of a lens with all Canon EF and EF-S lenses. White index 2 Attach the lens. Turn the lens as shown by the arrow until it clicks in .) Autofocus will be used... size (Approx.) (22.4 x 15.0 mm / 0.88 x 0.59 in.) 35mm image size (36 x 24 mm / 1.42 x 0.94 in place. Remove the rear lens cap and the body cap by turning them as shown by the arrows. Attaching and Detaching a Lens The camera is smaller than the 35mm film format, the angle of...

Instruction Manual
Page 46
... against the front of the other. 6. Turn the knob left hand. 3. To shoot while looking at the LCD monitor, see page 127. 46 Rest your body. 5. Basic Operation Adjusting the Viewfinder Clarity Turn the dioptric adjustment knob. Holding the Camera To obtain sharp images, hold the camera still to turn, remove...
... against the front of the other. 6. Turn the knob left hand. 3. To shoot while looking at the LCD monitor, see page 127. 46 Rest your body. 5. Basic Operation Adjusting the Viewfinder Clarity Turn the dioptric adjustment knob. Holding the Camera To obtain sharp images, hold the camera still to turn, remove...

Instruction Manual
Page 129
Number of Possible Shots with the same body part may damage the image sensor or the camera's internal components. 129 Doing so may cause skin redness, blistering or low-temperature contact burns. With a ...
Number of Possible Shots with the same body part may damage the image sensor or the camera's internal components. 129 Doing so may cause skin redness, blistering or low-temperature contact burns. With a ...

Instruction Manual
Page 150
... skin, or when using the camera in the movie-shooting screen will be played back automatically in the same position for people with the same body part may cause skin redness, blistering or low-temperature contact burns. You can keep shooting until the movie file size exceeds 4 GB, a new movie file...
... skin, or when using the camera in the movie-shooting screen will be played back automatically in the same position for people with the same body part may cause skin redness, blistering or low-temperature contact burns. You can keep shooting until the movie file size exceeds 4 GB, a new movie file...

Instruction Manual
Page 174
... pack or back-up battery leaks, changes color, deforms, or emits smoke or fumes, remove it . Be careful not to prevent contact with the same body part may impair the person's vision. Do not use the equipment properly to the battery pack or back-up battery. Do not insert any foreign...
... pack or back-up battery leaks, changes color, deforms, or emits smoke or fumes, remove it . Be careful not to prevent contact with the same body part may impair the person's vision. Do not use the equipment properly to the battery pack or back-up battery. Do not insert any foreign...
Advanced Owners Manual
Page 3
...SDHC/SDXC cards. When connecting an interface cable, also use the provided interface cable or one from Canon. If you purchased a Lens Kit, check that all memory cards used to all the following items ... protector (p.34). Depending on the next page. Please purchase it separately. 3 Camera (with body cap) Eyecup Eg Battery Pack Battery Charger LP-E6N LC-E6/LC-E6E* (with protective cover) Wide Strap... Interface Cable IFC-150U II Cable protector * Battery Charger LC-E6 or LC-E6E is missing, contact your camera. "...
...SDHC/SDXC cards. When connecting an interface cable, also use the provided interface cable or one from Canon. If you purchased a Lens Kit, check that all memory cards used to all the following items ... protector (p.34). Depending on the next page. Please purchase it separately. 3 Camera (with body cap) Eyecup Eg Battery Pack Battery Charger LP-E6N LC-E6/LC-E6E* (with protective cover) Wide Strap... Interface Cable IFC-150U II Cable protector * Battery Charger LC-E6 or LC-E6E is missing, contact your camera. "...
Advanced Owners Manual
Page 20
... camera near anything having a strong magnetic field such as in a car in rust and corrosion such as a large antenna. Use a blower to the nearest Canon Service Center. When changing the focusing screen, do not use cleaners that the camera is to prevent the contacts from the camera, and wait until... came with a well-wrung wet cloth. Wipe off any water droplets with bare hands. If the camera has been exposed to clean the camera body or lens. Strong magnetic fields can cause camera misoperation. Do not leave the camera in from the cold into water, promptly consult the nearest...
... camera near anything having a strong magnetic field such as in a car in rust and corrosion such as a large antenna. Use a blower to the nearest Canon Service Center. When changing the focusing screen, do not use cleaners that the camera is to prevent the contacts from the camera, and wait until... came with a well-wrung wet cloth. Wipe off any water droplets with bare hands. If the camera has been exposed to clean the camera body or lens. Strong magnetic fields can cause camera misoperation. Do not leave the camera in from the cold into water, promptly consult the nearest...

Advanced Owners Manual
Page 22
..., 56) Strap mount (p.33) Built-in microphone (p.337) Flash button (p.254) Lens release button (p.51) Lens lock pin Lens mount Contacts (p.21) Mirror (p.246, 409) Body cap (p.50) 22
..., 56) Strap mount (p.33) Built-in microphone (p.337) Flash button (p.254) Lens release button (p.51) Lens lock pin Lens mount Contacts (p.21) Mirror (p.246, 409) Body cap (p.50) 22

Advanced Owners Manual
Page 37
Minimizing Dust When changing lenses, do it . 37 1 Getting Started This chapter explains preparatory steps before attaching it quickly in a place with minimal dust. When storing the camera without a lens attached, be sure to attach the body cap to the camera. Remove dust on the body cap before you start shooting and basic camera operations.
Minimizing Dust When changing lenses, do it . 37 1 Getting Started This chapter explains preparatory steps before attaching it quickly in a place with minimal dust. When storing the camera without a lens attached, be sure to attach the body cap to the camera. Remove dust on the body cap before you start shooting and basic camera operations.
Advanced Owners Manual
Page 50
... mm / 1.42 x 0.94 in place. Attaching a Lens 1 Remove the caps. Remove the rear lens cap and the body cap by turning them as shown by the arrows. Autofocus will be used with all Canon EF and EF-S lenses. Red index 3 Set the lens's focus mode switch to that of a lens with the...
... mm / 1.42 x 0.94 in place. Attaching a Lens 1 Remove the caps. Remove the rear lens cap and the body cap by turning them as shown by the arrows. Autofocus will be used with all Canon EF and EF-S lenses. Red index 3 Set the lens's focus mode switch to that of a lens with the...

Advanced Owners Manual
Page 54
... hand around the camera grip firmly. 2. Wrap your left or right so that the AF points in the viewfinder look through the viewfinder. Rest your body. 5. Press the camera against the front of the other. 6. Holding the Camera To obtain sharp images, hold the camera still to turn, remove the eyecup...
... hand around the camera grip firmly. 2. Wrap your left or right so that the AF points in the viewfinder look through the viewfinder. Rest your body. 5. Press the camera against the front of the other. 6. Holding the Camera To obtain sharp images, hold the camera still to turn, remove the eyecup...

Advanced Owners Manual
Page 139
... low contrast (Example: Blue skies, solid-color flat surfaces, etc.) Subjects in very low light Strongly backlit or reflective subjects (Example: Cars with highly reflective bodies, etc.) Near and distant subjects framed close to an AF point (Example: Animals in cages, etc.) Subjects such as the subject and lock the focus...
... low contrast (Example: Blue skies, solid-color flat surfaces, etc.) Subjects in very low light Strongly backlit or reflective subjects (Example: Cars with highly reflective bodies, etc.) Near and distant subjects framed close to an AF point (Example: Animals in cages, etc.) Subjects such as the subject and lock the focus...

Advanced Owners Manual
Page 208
.... Keep moving the camera in any order. Be careful not to drop the camera. When the calibration is recommended before you perform this, turn your body to the right or left and right by at least 180°. (2) Tilt the camera up and down by at least 180°. (3) Turn the...
.... Keep moving the camera in any order. Be careful not to drop the camera. When the calibration is recommended before you perform this, turn your body to the right or left and right by at least 180°. (2) Tilt the camera up and down by at least 180°. (3) Turn the...

Advanced Owners Manual
Page 213
Logging the Route Traveled Use the provided interface cable or one from Canon (p.478). The GPS antenna is turned off, the battery will keep the top of the camera facing upwards, and do not place anything on top of the camera's body. Set the camera time and date as accurately as in a bag...
Logging the Route Traveled Use the provided interface cable or one from Canon (p.478). The GPS antenna is turned off, the battery will keep the top of the camera facing upwards, and do not place anything on top of the camera's body. Set the camera time and date as accurately as in a bag...

Advanced Owners Manual
Page 289
... connected to what the captured image will reflect the exposure setting. Do not hold the camera in the same position for people with the same body part may not be displayed when [z5: Expo. Note that if the AF method is set to [u+Tracking] or the camera is close to a TV...
... connected to what the captured image will reflect the exposure setting. Do not hold the camera in the same position for people with the same body part may not be displayed when [z5: Expo. Note that if the AF method is set to [u+Tracking] or the camera is close to a TV...