Instruction Manual
Page 1
EOS 6D (WG) Wi-Fi Function Instruction Manual E INSTRUCTION MANUAL
EOS 6D (WG) Wi-Fi Function Instruction Manual E INSTRUCTION MANUAL
Instruction Manual
Page 6
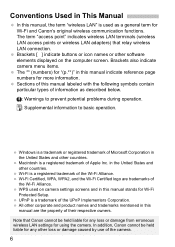
...wireless LAN access points or wireless LAN adapters) that Canon cannot be held liable for any other corporate and product names and trademarks mentioned in this manual are trademarks of the camera. 6 Sections of this manual labeled with the following symbols contain particular types of ... information as a general term for Wi-Fi and Canon's original wireless communication functions. Conventions Used in This Manual In this manual, the term "wireless LAN" is a registered trademark of the Wi-Fi Alliance. In addition, Canon cannot be held liable for more information. Brackets also...
...wireless LAN access points or wireless LAN adapters) that Canon cannot be held liable for any other corporate and product names and trademarks mentioned in this manual are trademarks of the camera. 6 Sections of this manual labeled with the following symbols contain particular types of ... information as a general term for Wi-Fi and Canon's original wireless communication functions. Conventions Used in This Manual In this manual, the term "wireless LAN" is a registered trademark of the Wi-Fi Alliance. In addition, Canon cannot be held liable for more information. Brackets also...
Instruction Manual
Page 8
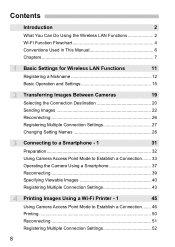
Contents Introduction 2 What You Can Do Using the Wireless LAN Functions 2 Wi-Fi Function Flowchart 4 Conventions Used in This Manual 6 Chapters 7 1 Basic Settings for Wireless LAN Functions 11 Registering a Nickname 12 Basic Operation and Settings 15 2 Transferring Images Between Cameras 19 Selecting the Connection Destination ...
Contents Introduction 2 What You Can Do Using the Wireless LAN Functions 2 Wi-Fi Function Flowchart 4 Conventions Used in This Manual 6 Chapters 7 1 Basic Settings for Wireless LAN Functions 11 Registering a Nickname 12 Basic Operation and Settings 15 2 Transferring Images Between Cameras 19 Selecting the Connection Destination ...
Instruction Manual
Page 9
... Checking the Type of Access Point 56 Easy Connection via WPS (PBC Mode 57 Easy Connection via WPS (PIN Mode 62 Manual Connection by Searching Networks 67 6 Connecting to a Smartphone - 2 75 Using Infrastructure Mode to Establish a Connection 76 Operating ...to Establish a Connection 88 Printing 90 Reconnecting 91 Registering Multiple Connection Settings 92 8 Remote Operation Using EOS Utility 93 Configuring EOS Utility Communication Settings 94 Using EOS Utility 98 Reconnecting 99 Registering Multiple Connection Settings 100 9 Sending Images to a Web Service 103 ...
... Checking the Type of Access Point 56 Easy Connection via WPS (PBC Mode 57 Easy Connection via WPS (PIN Mode 62 Manual Connection by Searching Networks 67 6 Connecting to a Smartphone - 2 75 Using Infrastructure Mode to Establish a Connection 76 Operating ...to Establish a Connection 88 Printing 90 Reconnecting 91 Registering Multiple Connection Settings 92 8 Remote Operation Using EOS Utility 93 Configuring EOS Utility Communication Settings 94 Using EOS Utility 98 Reconnecting 99 Registering Multiple Connection Settings 100 9 Sending Images to a Web Service 103 ...
Instruction Manual
Page 10
Contents Manual Connection by Searching Networks 115 Sending Images to a Web Service 120 Reconnecting 126 Registering Multiple Connection Settings 127 10 Viewing Images Using a Media Player 131 ...
Contents Manual Connection by Searching Networks 115 Sending Images to a Web Service 120 Reconnecting 126 Registering Multiple Connection Settings 127 10 Viewing Images Using a Media Player 131 ...
Instruction Manual
Page 20
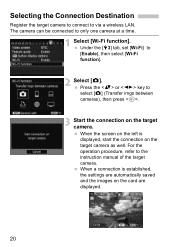
... a wireless LAN. For the operation procedure, refer to [Enable], then select [Wi-Fi function]. 2 Select [z]. Under the [53] tab, set [Wi-Fi] to the instruction manual of the target camera. The camera can be connected to only one camera at a time. 1 Select [Wi-Fi function].
... a wireless LAN. For the operation procedure, refer to [Enable], then select [Wi-Fi function]. 2 Select [z]. Under the [53] tab, set [Wi-Fi] to the instruction manual of the target camera. The camera can be connected to only one camera at a time. 1 Select [Wi-Fi function].
Instruction Manual
Page 33
Select [OK] and press to go to the smartphone instruction manual. 1 Select [Wi-Fi function]. For manual connection, see page 36. 33 Under the [53] tab, set [Wi-Fi] to the next screen. For details, refer to the next screen. 4 Select [Easy ...
Select [OK] and press to go to the smartphone instruction manual. 1 Select [Wi-Fi function]. For manual connection, see page 36. 33 Under the [53] tab, set [Wi-Fi] to the next screen. For details, refer to the next screen. 4 Select [Easy ...
Instruction Manual
Page 36
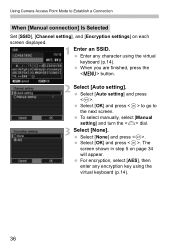
Select [OK] and press to go to Establish a Connection When [Manual connection] Is Selected Set [SSID], [Channel setting], and [Encryption settings] on page 34 will appear. Select [OK] and press . For encryption, select [AES], then enter ... screen displayed. 1 Enter an SSID. Using Camera Access Point Mode to the next screen. Select [Auto setting] and press . Select [None] and press . To select manually, select [Manual setting] and turn the dial. 3 Select [None].
Select [OK] and press to go to Establish a Connection When [Manual connection] Is Selected Set [SSID], [Channel setting], and [Encryption settings] on page 34 will appear. Select [OK] and press . For encryption, select [AES], then enter ... screen displayed. 1 Enter an SSID. Using Camera Access Point Mode to the next screen. Select [Auto setting] and press . Select [None] and press . To select manually, select [Manual setting] and turn the dial. 3 Select [None].

Instruction Manual
Page 46
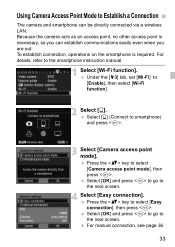
... press to go to [Enable], then select [Wi-Fi function]. 2 Select [l]. Because the camera acts as an access point, no matter where you are. For manual connection, see "Using a Wi-Fi Wireless LAN Access Point" (p.55). 1 Select [Wi-Fi function]. Press the key to the next screen. Using Camera Access Point...
... press to go to [Enable], then select [Wi-Fi function]. 2 Select [l]. Because the camera acts as an access point, no matter where you are. For manual connection, see "Using a Wi-Fi Wireless LAN Access Point" (p.55). 1 Select [Wi-Fi function]. Press the key to the next screen. Using Camera Access Point...
Instruction Manual
Page 47
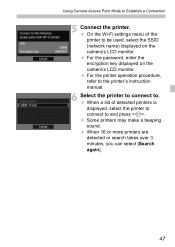
... takes over 3 minutes, you can select [Search again]. 47 X Some printers may make a beeping sound. For the printer operation procedure, refer to the printer's instruction manual. 6 Select the printer to connect to Establish a Connection 5 Connect the printer. On the Wi-Fi settings menu of detected printers is displayed, select the printer...
... takes over 3 minutes, you can select [Search again]. 47 X Some printers may make a beeping sound. For the printer operation procedure, refer to the printer's instruction manual. 6 Select the printer to connect to Establish a Connection 5 Connect the printer. On the Wi-Fi settings menu of detected printers is displayed, select the printer...
Instruction Manual
Page 49
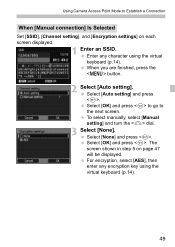
.... 3 Select [None]. Select [OK] and press . Enter any encryption key using the virtual keyboard (p.14). Select [OK] and press to go to Establish a Connection When [Manual connection] Is Selected Set [SSID], [Channel setting], and [Encryption settings] on page 47 will be displayed. For encryption, select [AES], then enter any character using...
.... 3 Select [None]. Select [OK] and press . Enter any encryption key using the virtual keyboard (p.14). Select [OK] and press to go to Establish a Connection When [Manual connection] Is Selected Set [SSID], [Channel setting], and [Encryption settings] on page 47 will be displayed. For encryption, select [AES], then enter any character using...
Instruction Manual
Page 50
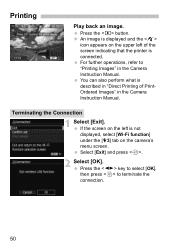
Press the key to select [OK], then press to "Printing Images" in the Camera Instruction Manual. You can also perform what is described in the Camera Instruction Manual. If the screen on the left is not displayed, select [Wi-Fi function] under the [53] tab on the upper left of PrintOrdered Images" in...
Press the key to select [OK], then press to "Printing Images" in the Camera Instruction Manual. You can also perform what is described in the Camera Instruction Manual. If the screen on the left is not displayed, select [Wi-Fi function] under the [53] tab on the upper left of PrintOrdered Images" in...
Instruction Manual
Page 56
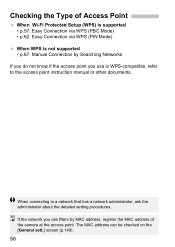
...) is supported • p.57: Easy Connection via WPS (PBC Mode) • p.62: Easy Connection via WPS (PIN Mode) When WPS is not supported • p.67: Manual Connection by Searching Networks If you do not know if the access point you use is WPS-compatible, refer to a network that has a network administrator...
...) is supported • p.57: Easy Connection via WPS (PBC Mode) • p.62: Easy Connection via WPS (PIN Mode) When WPS is not supported • p.67: Manual Connection by Searching Networks If you do not know if the access point you use is WPS-compatible, refer to a network that has a network administrator...
Instruction Manual
Page 58
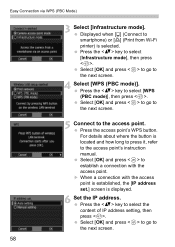
.... Select [OK] and press to go to select the content of IP address setting, then press . Select [OK] and press to the access point's instruction manual. Press the access point's WPS button. Press the key to the next screen. 58 Displayed when [q] (Connect to smartphone) or [l] (Print from Wi-Fi printer...
.... Select [OK] and press to go to select the content of IP address setting, then press . Select [OK] and press to the access point's instruction manual. Press the access point's WPS button. Press the key to the next screen. 58 Displayed when [q] (Connect to smartphone) or [l] (Print from Wi-Fi printer...
Instruction Manual
Page 59
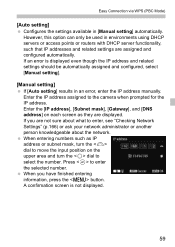
.... Press to select the number. A confirmation screen is displayed even though the IP address and related settings should be used in [Manual setting] automatically. If you have finished entering information, press the button. Enter the IP address assigned to enter, see "Checking Network...knowledgeable about the network. However, this option can only be automatically assigned and configured, select [Manual setting]. [Manual setting] If [Auto setting] results in an error, enter the IP address manually. If an error is not displayed. 59 Enter the [IP address], [Subnet mask], [...
.... Press to select the number. A confirmation screen is displayed even though the IP address and related settings should be used in [Manual setting] automatically. If you have finished entering information, press the button. Enter the IP address assigned to enter, see "Checking Network...knowledgeable about the network. However, this option can only be automatically assigned and configured, select [Manual setting]. [Manual setting] If [Auto setting] results in an error, enter the IP address manually. If an error is not displayed. 59 Enter the [IP address], [Subnet mask], [...

Instruction Manual
Page 63
... the IP address. Select [OK] and press to go to select [WPS (PIN mode)], then press . Select [OK] and press to the access point's instruction manual.
... the IP address. Select [OK] and press to go to select [WPS (PIN mode)], then press . Select [OK] and press to the access point's instruction manual.
Instruction Manual
Page 64
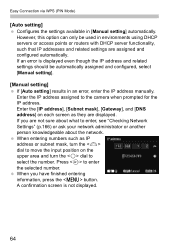
... press the button. Easy Connection via WPS (PIN Mode) [Auto setting] Configures the settings available in an error, enter the IP address manually. When you are assigned and configured automatically. A confirmation screen is displayed even though the IP address and related settings should be used in ... input position on each screen as they are displayed. However, this option can only be automatically assigned and configured, select [Manual setting]. [Manual setting] If [Auto setting] results in [Manual setting] automatically. Press to the camera when prompted for the IP address.
... press the button. Easy Connection via WPS (PIN Mode) [Auto setting] Configures the settings available in an error, enter the IP address manually. When you are assigned and configured automatically. A confirmation screen is displayed even though the IP address and related settings should be used in ... input position on each screen as they are displayed. However, this option can only be automatically assigned and configured, select [Manual setting]. [Manual setting] If [Auto setting] results in [Manual setting] automatically. Press to the camera when prompted for the IP address.
Instruction Manual
Page 67
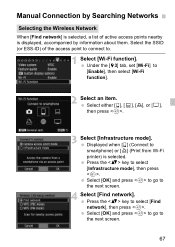
... the key to select [Find network], then press . Select either [q], [D], [l], or [ ], then press . 3 Select [Infrastructure mode]. Press the key to select [Infrastructure mode], then press . Manual Connection by information about them. Under the [53] tab, set [Wi-Fi] to . 1 Select [Wi-Fi function].
... the key to select [Find network], then press . Select either [q], [D], [l], or [ ], then press . 3 Select [Infrastructure mode]. Press the key to select [Infrastructure mode], then press . Manual Connection by information about them. Under the [53] tab, set [Wi-Fi] to . 1 Select [Wi-Fi function].

Instruction Manual
Page 68
... or WPA2PSK [Encryption settings]: WEP, TKIP, and AES [Enter connection] and [Search again] To configure settings for the access point manually, select [Enter connection] and press . Press to complete the settings. Follow the procedures displayed to enable the selection of an access ... point is encrypted (3) First nine characters of the SSID (4) Channel used by Searching Networks (1) (2) (3) (4) 5 Select an access point. Manual Connection by the access point should be one of the following options for [Authentication] and [Encryption settings]. Select [OK] and press to go...
... or WPA2PSK [Encryption settings]: WEP, TKIP, and AES [Enter connection] and [Search again] To configure settings for the access point manually, select [Enter connection] and press . Press to complete the settings. Follow the procedures displayed to enable the selection of an access ... point is encrypted (3) First nine characters of the SSID (4) Channel used by Searching Networks (1) (2) (3) (4) 5 Select an access point. Manual Connection by the access point should be one of the following options for [Authentication] and [Encryption settings]. Select [OK] and press to go...

Instruction Manual
Page 69
... specified for the access point, then press . Select [OK] and press to go to the next screen. 2 Press the key to the access point's instruction manual. Manual Connection by the access point.
... specified for the access point, then press . Select [OK] and press to go to the next screen. 2 Press the key to the access point's instruction manual. Manual Connection by the access point.


