

Digital Video Software (Windows) Ver.20 Instruction Manual
Page 3
Extracting Still Images from Movies (Windows XP Only 74 Saving on CD-R/RW Disks (Windows XP Only 77 Adding Still Images from Your Computer to the Memory Card 80 Adding Still Images to the Memory Card 80 Adding Sample Images to the Memory Card 82 Using Various Functions 85 E Attaching Still Images to E-mail Messages 85 Running a Slide Show 88 Adding Sound to an Image 90 Reviewing and Changing the Owner Name of the Camcorder 91 Uninstalling the Software 93 Uninstalling ZoomBrowser EX 93 Uninstalling the TWAIN Driver/WIA Driver 94 Troubleshooting ...95 Windows Contents 3
Extracting Still Images from Movies (Windows XP Only 74 Saving on CD-R/RW Disks (Windows XP Only 77 Adding Still Images from Your Computer to the Memory Card 80 Adding Still Images to the Memory Card 80 Adding Sample Images to the Memory Card 82 Using Various Functions 85 E Attaching Still Images to E-mail Messages 85 Running a Slide Show 88 Adding Sound to an Image 90 Reviewing and Changing the Owner Name of the Camcorder 91 Uninstalling the Software 93 Uninstalling ZoomBrowser EX 93 Uninstalling the TWAIN Driver/WIA Driver 94 Troubleshooting ...95 Windows Contents 3
Digital Video Software (Windows) Ver.20 Instruction Manual
Page 24
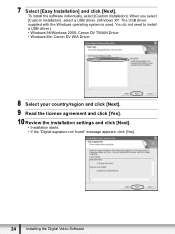
...]. You do not need to install a USB driver.) • Windows 98/Windows 2000: Canon DV TWAIN Driver • Windows Me: Canon DV WIA Driver 8 Select your country/region and click [Next]. 9 Read the license agreement and click [Yes]. 10 Review the installation settings and click [Next]. • Installation starts. • If the "Digital...
...]. You do not need to install a USB driver.) • Windows 98/Windows 2000: Canon DV TWAIN Driver • Windows Me: Canon DV WIA Driver 8 Select your country/region and click [Next]. 9 Read the license agreement and click [Yes]. 10 Review the installation settings and click [Next]. • Installation starts. • If the "Digital...

Digital Video Software (Windows) Ver.20 Instruction Manual
Page 91
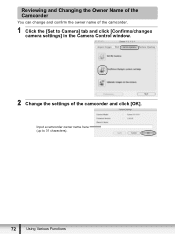
Reviewing and Changing the Owner Name of the Camcorder You can change and confirm the owner name of the camcorder. 1 Connect the camcorder to Camera] tab and click [Confirms/changes camera settings]. Windows Using Various Functions 91 E 2 Select [Canon CameraWindow] and click [OK]. 3 Click the [Set to the computer ( 26).
Reviewing and Changing the Owner Name of the Camcorder You can change and confirm the owner name of the camcorder. 1 Connect the camcorder to Camera] tab and click [Confirms/changes camera settings]. Windows Using Various Functions 91 E 2 Select [Canon CameraWindow] and click [OK]. 3 Click the [Set to the computer ( 26).
Digital Video Software (Macintosh) Ver.20 Instruction Manual
Page 3
Playing Back Movies 54 Editing Movies ...55 Exporting Images ...58 Changing the File Type and Save 58 Extracting Still Images from Movies 61 Adding Still Images from Your Computer to the Memory Card 63 E Adding Still Images to the Memory Card 63 Adding Sample Images to the Memory Card 64 Using Various Functions 67 Attaching Images to E-mail Messages 67 Running a Slide Show 70 Adding Sound to a Still Image 71 Reviewing and Changing the Owner Name of the Camcorder 72 Uninstalling the Software 73 Uninstalling ImageBrowser 73 Troubleshooting ...74 Macintosh Contents 3
Playing Back Movies 54 Editing Movies ...55 Exporting Images ...58 Changing the File Type and Save 58 Extracting Still Images from Movies 61 Adding Still Images from Your Computer to the Memory Card 63 E Adding Still Images to the Memory Card 63 Adding Sample Images to the Memory Card 64 Using Various Functions 67 Attaching Images to E-mail Messages 67 Running a Slide Show 70 Adding Sound to a Still Image 71 Reviewing and Changing the Owner Name of the Camcorder 72 Uninstalling the Software 73 Uninstalling ImageBrowser 73 Troubleshooting ...74 Macintosh Contents 3

Digital Video Software (Macintosh) Ver.20 Instruction Manual
Page 23
4 Click Digital Video Software [Install]. Installing the Digital Video Software 23 Macintosh To install the software individually, select [Custom Installation]. 6 Read the license agreement and click [Agree]. 7 Review the installation settings and click [Next]. Installer Panel E 5 Select [Easy Installation] and click [Next].
4 Click Digital Video Software [Install]. Installing the Digital Video Software 23 Macintosh To install the software individually, select [Custom Installation]. 6 Read the license agreement and click [Agree]. 7 Review the installation settings and click [Next]. Installer Panel E 5 Select [Easy Installation] and click [Next].
Digital Video Software (Macintosh) Ver.20 Instruction Manual
Page 72
Reviewing and Changing the Owner Name of the Camcorder You can change and confirm the owner name of the camcorder. 1 Click the [Set to 31 characters). 72 Using Various Functions Input a camcorder owner name here (up to Camera] tab and click [Confirms/changes camera settings] in the Camera Control window. 2 Change the settings of the camcorder and click [OK].
Reviewing and Changing the Owner Name of the Camcorder You can change and confirm the owner name of the camcorder. 1 Click the [Set to 31 characters). 72 Using Various Functions Input a camcorder owner name here (up to Camera] tab and click [Confirms/changes camera settings] in the Camera Control window. 2 Change the settings of the camcorder and click [OK].
ELURA100 Instruction Manual
Page 30
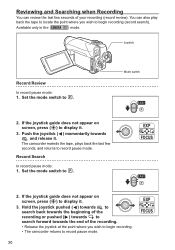
... search forward towards and release it . 3. The camcorder rewinds the tape, plays back the last few seconds of the recording. • Release the joystick at the point where you wish to display it. 3. You can review the last few seconds, and returns to record pause...the joystick guide does not appear on screen, press ( ) to begin recording. • The camcorder returns to record pause mode. Push the joystick ( ) momentarily towards the end of your recording (record review). Record Search In record pause mode: 1. If the joystick guide does not appear on screen,...
... search forward towards and release it . 3. The camcorder rewinds the tape, plays back the last few seconds of the recording. • Release the joystick at the point where you wish to display it. 3. You can review the last few seconds, and returns to record pause...the joystick guide does not appear on screen, press ( ) to begin recording. • The camcorder returns to record pause mode. Push the joystick ( ) momentarily towards the end of your recording (record review). Record Search In record pause mode: 1. If the joystick guide does not appear on screen,...

ELURA100 Instruction Manual
Page 55
... ( MOVIE REC OFF) ( 320x240), ( 160x120) S( S.FINE/640x480), S( FINE/640x480), S( NORMAL/640x480) L ( 1152x864), S ( 640x480) ( SUPER FINE), ( FINE), ( NORMAL) Speaker volume Recording - protection Print order - button while reviewing the image immediately after recording it. 55 Menu - 44 56 58 52 80, 52 59 78 76 96 76 41 88, 90 73 2 83 82...
... ( MOVIE REC OFF) ( 320x240), ( 160x120) S( S.FINE/640x480), S( FINE/640x480), S( NORMAL/640x480) L ( 1152x864), S ( 640x480) ( SUPER FINE), ( FINE), ( NORMAL) Speaker volume Recording - protection Print order - button while reviewing the image immediately after recording it. 55 Menu - 44 56 58 52 80, 52 59 78 76 96 76 41 88, 90 73 2 83 82...
ELURA100 Instruction Manual
Page 65
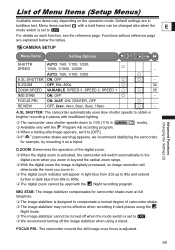
...Functions without reference page are in places with insufficient lighting. The camcorder uses shutter speeds down to compensate a normal degree of Menu Items (Setup Menus) Available menu items vary depending on the operation mode. REVIEW OFF, 2sec, 4sec, 6sec, 8sec, 10sec - For details on a... When a trailing afterimage appears, set it on each function, see the reference page. A.SL SHUTTER: The camcorder automatically uses slow shutter speeds to obtain a brighter recording in boldface text. AUTO, 1/60, 1/100, 1/250 A.SL SHUTTER ON, OFF - ON: AiAF, ON: CENTER, OFF -
...Functions without reference page are in places with insufficient lighting. The camcorder uses shutter speeds down to compensate a normal degree of Menu Items (Setup Menus) Available menu items vary depending on the operation mode. REVIEW OFF, 2sec, 4sec, 6sec, 8sec, 10sec - For details on a... When a trailing afterimage appears, set it on each function, see the reference page. A.SL SHUTTER: The camcorder automatically uses slow shutter speeds to obtain a brighter recording in boldface text. AUTO, 1/60, 1/100, 1/250 A.SL SHUTTER ON, OFF - ON: AiAF, ON: CENTER, OFF -

ELURA100 Instruction Manual
Page 66
... NORMAL TV, WIDE TV 42 REC MODE: You can erase ( 83) or protect ( 84) the image when you press the FUNC. button while you are reviewing the image, or when you play ). NO, YES ALL ERASE 109 ERASE ALL IMAGES NO, YES 83 INITIALIZE NO, YES 85 PROTECT1 84 PRINT ORDER1... image will be displayed after recording. [REVIEW] cannot be distorted. We recommend using the SP mode for audio dubbing. Depending on the nature and usage condition of the tape, picture and sound recorded in both SP and LP modes on this camcorder, or vice versa, picture and sound may be...
... NORMAL TV, WIDE TV 42 REC MODE: You can erase ( 83) or protect ( 84) the image when you press the FUNC. button while you are reviewing the image, or when you play ). NO, YES ALL ERASE 109 ERASE ALL IMAGES NO, YES 83 INITIALIZE NO, YES 85 PROTECT1 84 PRINT ORDER1... image will be displayed after recording. [REVIEW] cannot be distorted. We recommend using the SP mode for audio dubbing. Depending on the nature and usage condition of the tape, picture and sound recorded in both SP and LP modes on this camcorder, or vice versa, picture and sound may be...

ELURA100 Instruction Manual
Page 83
... erase menu appears only when you want to erase the images, then close the Erasing All Images Available only in the and modes. 1. button while reviewing a still image immediately after recording it . 2. Select ( ) [YES] and press ( ) to erase. 3. Select ( menu. ) [ERASE] and press ( ) to select the image you press the FUNC...
... erase menu appears only when you want to erase the images, then close the Erasing All Images Available only in the and modes. 1. button while reviewing a still image immediately after recording it . 2. Select ( ) [YES] and press ( ) to erase. 3. Select ( menu. ) [ERASE] and press ( ) to select the image you press the FUNC...

ELURA100 Instruction Manual
Page 84
... only when you want to protect from accidental erasure when displaying a single image or index screen. Select ( ) the image you press the FUNC. button while reviewing a still image immediately after recording it to 6 images appear. 2. MENU ( 64) CARD OPERATIONS PROTECT 1. Move the zoom lever toward W. Open the menu, select ( ) the [CARD...
... only when you want to protect from accidental erasure when displaying a single image or index screen. Select ( ) the image you press the FUNC. button while reviewing a still image immediately after recording it to 6 images appear. 2. MENU ( 64) CARD OPERATIONS PROTECT 1. Move the zoom lever toward W. Open the menu, select ( ) the [CARD...

ELURA100 Instruction Manual
Page 129
... . 16 Power save 68 Print order 102 Printing still images 97 Program AE (recording program) . . . . . 44 Protecting still images 84 R Record review/search 30 Recording - Dioptric adjustment 21 Volume 41 W White balance 56 Wide angle 34 Widescreen TV (16:9 36 Wind screen 70 Wireless controller 22 Z Zero... 44 SP mode 66 Speaker 41 Sports (recording program 44 Spotlight (recording program 44 Still image quality/size 76 Still image review 66 Still images 31 Sunset (recording program 44 Additional Information T Telephoto 34 Time code 29 Time zone 26 Transfer order 109...
... . 16 Power save 68 Print order 102 Printing still images 97 Program AE (recording program) . . . . . 44 Protecting still images 84 R Record review/search 30 Recording - Dioptric adjustment 21 Volume 41 W White balance 56 Wide angle 34 Widescreen TV (16:9 36 Wind screen 70 Wireless controller 22 Z Zero... 44 SP mode 66 Speaker 41 Sports (recording program 44 Spotlight (recording program 44 Still image quality/size 76 Still image review 66 Still images 31 Sunset (recording program 44 Additional Information T Telephoto 34 Time code 29 Time zone 26 Transfer order 109...


