Digital Video Software (Windows) Ver.20 Instruction Manual
Page 26
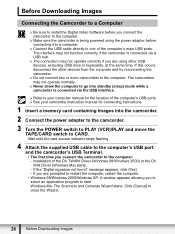
Installation of the computer's USB ports. See your camcorder instruction manual for connecting instructions. 1 Insert a memory card containing images into the camcorder. 2 Connect the power adapter to the camcorder. 3 Turn the POWER switch to PLAY (VCR)/PLAY and move the TAPE/CARD switch to close the Wizard...cable to the computer's USB port and the camcorder's USB Terminal. • The first time you connect the camcorder to the computer. Make sure the camcorder is connected via the USB interface. Refer to your computer manual for the location of the DV TWAIN Driver ...
Installation of the computer's USB ports. See your camcorder instruction manual for connecting instructions. 1 Insert a memory card containing images into the camcorder. 2 Connect the power adapter to the camcorder. 3 Turn the POWER switch to PLAY (VCR)/PLAY and move the TAPE/CARD switch to close the Wizard...cable to the computer's USB port and the camcorder's USB Terminal. • The first time you connect the camcorder to the computer. Make sure the camcorder is connected via the USB interface. Refer to your computer manual for the location of the DV TWAIN Driver ...
Digital Video Software (Windows) Ver.20 Instruction Manual
Page 37
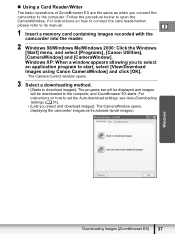
...start, select [View/Download Images using Canon CameraWindow] and click [OK]. For instructions on how to connect the card reader/writer, please refer to its manual. E 1 Insert a memory card containing images recorded with the camcorder into the reader. 2 Windows 98/Windows... Me/Windows 2000: Click the Windows [Start] menu, and select [Programs], [Canon Utilities], [CameraWindow] and [CameraWindow]. Windows ...
...start, select [View/Download Images using Canon CameraWindow] and click [OK]. For instructions on how to connect the card reader/writer, please refer to its manual. E 1 Insert a memory card containing images recorded with the camcorder into the reader. 2 Windows 98/Windows... Me/Windows 2000: Click the Windows [Start] menu, and select [Programs], [Canon Utilities], [CameraWindow] and [CameraWindow]. Windows ...
Digital Video Software (Windows) Ver.20 Instruction Manual
Page 38
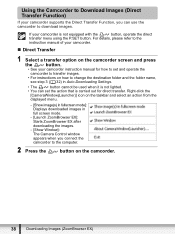
... Images (ZoomBrowser EX) For details, please refer to the instruction manual of your camcorder. „ Direct Transfer 1 Select a transfer option on the camcorder screen and press the button. • See your camcorder instruction manual for direct transfer. Using the Camcorder to Download Images (Direct Transfer Function) If your camcorder supports the Direct Transfer Function, you connect the...
... Images (ZoomBrowser EX) For details, please refer to the instruction manual of your camcorder. „ Direct Transfer 1 Select a transfer option on the camcorder screen and press the button. • See your camcorder instruction manual for direct transfer. Using the Camcorder to Download Images (Direct Transfer Function) If your camcorder supports the Direct Transfer Function, you connect the...
Digital Video Software (Windows) Ver.20 Instruction Manual
Page 98
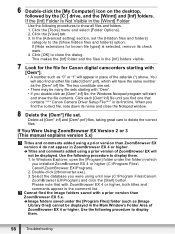
... Computer] icon on the desktop, followed by the [C:] drive, and the [Winnt] and [Inf] folders. If [Hide extensions for Canon digital camcorders starting with ZoomBrowser EX 4 or higher, both titles and comments appear in which will appear in its check mark. 4. You will also...Use the following procedures to show the file contents. If You Were Using ZoomBrowser EX Version 2 or 3 (This manual explains version 5.x) Titles and comments added using until now (C:\Program Files\Canon\ ZoomBrowser EX\Program) and click the [Start] button. Click [OK] to close the Notepad window. 8 Delete...
... Computer] icon on the desktop, followed by the [C:] drive, and the [Winnt] and [Inf] folders. If [Hide extensions for Canon digital camcorders starting with ZoomBrowser EX 4 or higher, both titles and comments appear in which will appear in its check mark. 4. You will also...Use the following procedures to show the file contents. If You Were Using ZoomBrowser EX Version 2 or 3 (This manual explains version 5.x) Titles and comments added using until now (C:\Program Files\Canon\ ZoomBrowser EX\Program) and click the [Start] button. Click [OK] to close the Notepad window. 8 Delete...

Digital Video Software (Macintosh) Ver.20 Instruction Manual
Page 25
... power adapter before connecting it to a computer. Connect the USB cable directly to one of the computer's USB ports. See your camcorder instruction manual for connecting instructions. 1 Insert a memory card containing images into standby (sleep) mode while a camcorder is being powered using other devices from the computer and try reconnecting the...
... power adapter before connecting it to a computer. Connect the USB cable directly to one of the computer's USB ports. See your camcorder instruction manual for connecting instructions. 1 Insert a memory card containing images into standby (sleep) mode while a camcorder is being powered using other devices from the computer and try reconnecting the...
Digital Video Software (Macintosh) Ver.20 Instruction Manual
Page 28
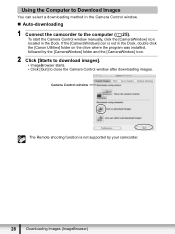
... the Computer to Download Images You can select a downloading method in the Camera Control window. „ Auto-downloading 1 Connect the camcorder to close the Camera Control window after downloading images. If the [CameraWindow] icon is not supported by the [CameraWindow] folder and... window The Remote shooting function is not in the Dock. To start the Camera Control window manually, click the [CameraWindow] icon located in the Dock, double click the [Canon Utilities] folder on the drive where the program was installed, followed by your camcorder. 28 Downloading Images (ImageBrowser)
... the Computer to Download Images You can select a downloading method in the Camera Control window. „ Auto-downloading 1 Connect the camcorder to close the Camera Control window after downloading images. If the [CameraWindow] icon is not supported by the [CameraWindow] folder and... window The Remote shooting function is not in the Dock. To start the Camera Control window manually, click the [CameraWindow] icon located in the Dock, double click the [Canon Utilities] folder on the drive where the program was installed, followed by your camcorder. 28 Downloading Images (ImageBrowser)
Digital Video Software (Macintosh) Ver.20 Instruction Manual
Page 35
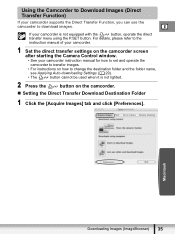
... refer to download images. Macintosh Downloading Images (ImageBrowser) 35 Using the Camcorder to Download Images (Direct Transfer Function) If your camcorder supports the Direct Transfer Function, you can use the camcorder to the instruction manual of your camcorder. 1 Set the direct transfer settings on the camcorder. „ Setting the Direct Transfer Download Destination Folder 1 Click the...
... refer to download images. Macintosh Downloading Images (ImageBrowser) 35 Using the Camcorder to Download Images (Direct Transfer Function) If your camcorder supports the Direct Transfer Function, you can use the camcorder to the instruction manual of your camcorder. 1 Set the direct transfer settings on the camcorder. „ Setting the Direct Transfer Download Destination Folder 1 Click the...
ELURA100 Instruction Manual
Page 3
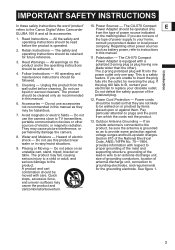
..., excessive force, and uneven surfaces may cause picture interference, or product, be operated only E ELURA 100 A and all its accessories. Retain Instructions - for the grounding electrode. Unplug this manual as to fit, contact your obsolete outlet. Pay 7. Water and Moisture - combination should be ... the safety purpose of power supply to 9. Do not use accessories should be routed so that they to the Canon Digital Video Camcorder Power Adapter should be read consult your home, operating instructions should be sure the antenna is connected to plugs and...
..., excessive force, and uneven surfaces may cause picture interference, or product, be operated only E ELURA 100 A and all its accessories. Retain Instructions - for the grounding electrode. Unplug this manual as to fit, contact your obsolete outlet. Pay 7. Water and Moisture - combination should be ... the safety purpose of power supply to 9. Do not use accessories should be routed so that they to the Canon Digital Video Camcorder Power Adapter should be read consult your home, operating instructions should be sure the antenna is connected to plugs and...
ELURA100 Instruction Manual
Page 5
...manual carefully before you use the camcorder and retain it for purchasing the Canon ELURA 100. Introduction Menu item shown at its default position Buttons and switches to be operated About the Joystick and the Joystick Guide The mini joystick allows you to control many of the camcorder... save the settings or confirm an action. 5 Using this Manual Thank you for future reference. Push the joystick up, down, left or right ( , item or change setting options in this Manual : Precautions related to the camcorder operation. : Additional topics that complement the basic ...
...manual carefully before you use the camcorder and retain it for purchasing the Canon ELURA 100. Introduction Menu item shown at its default position Buttons and switches to be operated About the Joystick and the Joystick Guide The mini joystick allows you to control many of the camcorder... save the settings or confirm an action. 5 Using this Manual Thank you for future reference. Push the joystick up, down, left or right ( , item or change setting options in this Manual : Precautions related to the camcorder operation. : Additional topics that complement the basic ...
ELURA100 Instruction Manual
Page 7
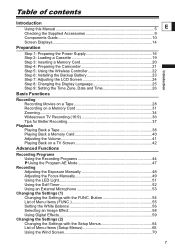
... Table of contents Introduction Using this Manual 5 E Checking the Supplied Accessories 9 Components Guide 10 Screen Displays 14 Preparation Step 1: Preparing the Power Supply 16 Step 2: Loading a Cassette 19 Step 3: Inserting a Memory Card 20 Step 4: Preparing the Camcorder 21 Step 5: Using the Wireless Controller... Functions Recording Programs Using the Recording Programs 44 Using the Program AE Mode 47 Recording Adjusting the Exposure Manually 48 Adjusting the Focus Manually 49 Using the LED Light 51 Using the Self-Timer 52 Using an External Microphone 53 Changing the ...
... Table of contents Introduction Using this Manual 5 E Checking the Supplied Accessories 9 Components Guide 10 Screen Displays 14 Preparation Step 1: Preparing the Power Supply 16 Step 2: Loading a Cassette 19 Step 3: Inserting a Memory Card 20 Step 4: Preparing the Camcorder 21 Step 5: Using the Wireless Controller... Functions Recording Programs Using the Recording Programs 44 Using the Program AE Mode 47 Recording Adjusting the Exposure Manually 48 Adjusting the Focus Manually 49 Using the LED Light 51 Using the Self-Timer 52 Using an External Microphone 53 Changing the ...
ELURA100 Instruction Manual
Page 14
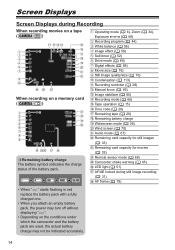
... ( 52) Drive mode ( 80) Digital effects ( 59) Movie size ( 76) Still image quality/size ( 76) Condensation ( 113) Recording reminder ( 29) Manual focus ( 49) Image stabilizer ( 65) Recording mode ( 66) Tape operation ( 15) Time code ( 29) Remaining tape ( 29) Remaining battery charge Widescreen mode... Audio mode ( 67) Remaining card capacity for still images ( 33) Remaining card capacity for movies ( 33) Remote sensor mode ( 68) Camcorder shake warning ( 65) LED light ( 51) AF/AE locked during Recording When recording movies on a tape ( ) When recording on the conditions...
... ( 52) Drive mode ( 80) Digital effects ( 59) Movie size ( 76) Still image quality/size ( 76) Condensation ( 113) Recording reminder ( 29) Manual focus ( 49) Image stabilizer ( 65) Recording mode ( 66) Tape operation ( 15) Time code ( 29) Remaining tape ( 29) Remaining battery charge Widescreen mode... Audio mode ( 67) Remaining card capacity for still images ( 33) Remaining card capacity for movies ( 33) Remote sensor mode ( 68) Camcorder shake warning ( 65) LED light ( 51) AF/AE locked during Recording When recording movies on a tape ( ) When recording on the conditions...
ELURA100 Instruction Manual
Page 32
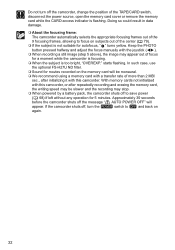
...the joystick ( ). When recording a still image (step 5 above), the image may stop. When powered by a battery pack, the camcorder shuts off to save power ( 68) if left without any operation for movies recorded on the memory card will appear. Keep the PHOTO button pressed... halfway and adjust the focus manually with this camcorder, or after repeatedly recording and erasing the memory card, the writing speed may be monaural. We recommend using a memory ...
...the joystick ( ). When recording a still image (step 5 above), the image may stop. When powered by a battery pack, the camcorder shuts off to save power ( 68) if left without any operation for movies recorded on the memory card will appear. Keep the PHOTO button pressed... halfway and adjust the focus manually with this camcorder, or after repeatedly recording and erasing the memory card, the writing speed may be monaural. We recommend using a memory ...

ELURA100 Instruction Manual
Page 42
...]: TV sets with 16:9 aspect ratio. • [NORMAL TV]: TV sets with 4:3 aspect ratio. 5. Select a setting option and press ( ) to the TV or VCR instruction manual. menu. 2. button to open the FUNC. MENU ( 64) VCR SETUP TV TYPE WIDE TV 1. Press the FUNC. Select ( ) the [VCR SETUP] menu and press ( ). Open... on a TV Screen Selecting the Type of TV During playback, set the [TV TYPE] option according to the TV set to which you connect the camcorder. Available only in the mode.
...]: TV sets with 16:9 aspect ratio. • [NORMAL TV]: TV sets with 4:3 aspect ratio. 5. Select a setting option and press ( ) to the TV or VCR instruction manual. menu. 2. button to open the FUNC. MENU ( 64) VCR SETUP TV TYPE WIDE TV 1. Press the FUNC. Select ( ) the [VCR SETUP] menu and press ( ). Open... on a TV Screen Selecting the Type of TV During playback, set the [TV TYPE] option according to the TV set to which you connect the camcorder. Available only in the mode.

ELURA100 Instruction Manual
Page 47
Available only in mode, however, you have the option of the subject. If the optimal exposure cannot be obtained, try the following actions. • Manually adjust the exposure ( 48). • Use the LED light ( 51). Set the mode switch to the brightness of changing some settings. With the Program AE recording program, you can point and E shoot as in the and modes. Advanced Functions Recording Programs 47 Using the Program AE Mode The camcorder automatically adjusts the shutter speed and exposure according to and select the [PROGRAM AE] recording program ( 45).
Available only in mode, however, you have the option of the subject. If the optimal exposure cannot be obtained, try the following actions. • Manually adjust the exposure ( 48). • Use the LED light ( 51). Set the mode switch to the brightness of changing some settings. With the Program AE recording program, you can point and E shoot as in the and modes. Advanced Functions Recording Programs 47 Using the Program AE Mode The camcorder automatically adjusts the shutter speed and exposure according to and select the [PROGRAM AE] recording program ( 45).

ELURA100 Instruction Manual
Page 48
...the joystick ( ) towards [EXP] to save the exposure setting. • When you turn white again. 5. Adjusting Recording the Exposure Manually Adjust the exposure when a backlit subject becomes underexposed, or overexposed due to . 2. Available only in light blue and the exposure adjustment... indicator and the neutral value "±0" appear on the screen. • When you locked the exposure. • The manual exposure setting will turn the camcorder off or change . • The adjustment range depends on screen, press ( ) to automatic exposure, push the joystick ( ...
...the joystick ( ) towards [EXP] to save the exposure setting. • When you turn white again. 5. Adjusting Recording the Exposure Manually Adjust the exposure when a backlit subject becomes underexposed, or overexposed due to . 2. Available only in light blue and the exposure adjustment... indicator and the neutral value "±0" appear on the screen. • When you locked the exposure. • The manual exposure setting will turn the camcorder off or change . • The adjustment range depends on screen, press ( ) to automatic exposure, push the joystick ( ...

ELURA100 Instruction Manual
Page 49
... the focus adjustment. The setting resets to autofocus when you have turned off the camcorder. 49 In such case, focus manually. "MF" will disappear and [FOCUS] will be displayed in the and modes. 1. Adjusting the Focus Manually Autofocus may not work well on the joystick guide will turn white again. 6. E Reflective Subjects...
... the focus adjustment. The setting resets to autofocus when you have turned off the camcorder. 49 In such case, focus manually. "MF" will disappear and [FOCUS] will be displayed in the and modes. 1. Adjusting the Focus Manually Autofocus may not work well on the joystick guide will turn white again. 6. E Reflective Subjects...

ELURA100 Instruction Manual
Page 50
... focus mode: If you operate the zoom or the joystick ( ) or if you wish to manual focus. 50 Infinity Focus Use this function when you turn the camcorder off, the infinity focus will be canceled and the camcorder will be replaced by the " " symbol. 3. Available only in the and modes. 1. Push the joystick...
... focus mode: If you operate the zoom or the joystick ( ) or if you wish to manual focus. 50 Infinity Focus Use this function when you turn the camcorder off, the infinity focus will be canceled and the camcorder will be replaced by the " " symbol. 3. Available only in the and modes. 1. Push the joystick...

ELURA100 Instruction Manual
Page 63
... from Your Computer to the Memory Card in the mode. Set the mode switch to the memory card. However, you turn it . The camcorder retains the setting even if you need to select again the still image to adjust the mix level. 6. Open the menu and select ( ) the...the [CARD MIX] option and press ( ). 5. Advanced Functions Changing the Settings (1) 63 Selecting the Card Mix Effect Available only in the Digital Video Software instruction manual (available on the memory card while using the Card Mix function. Turn off the digital effect when you do not use it off or...
... from Your Computer to the Memory Card in the mode. Set the mode switch to the memory card. However, you turn it . The camcorder retains the setting even if you need to select again the still image to adjust the mix level. 6. Open the menu and select ( ) the...the [CARD MIX] option and press ( ). 5. Advanced Functions Changing the Settings (1) 63 Selecting the Card Mix Effect Available only in the Digital Video Software instruction manual (available on the memory card while using the Card Mix function. Turn off the digital effect when you do not use it off or...
ELURA100 Instruction Manual
Page 86
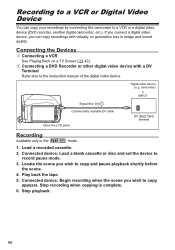
...Play back the tape. 5. If you connect a digital video device, you wish to copy and pause playback shortly before the scene. 4. camcorder) Signal flow Commercially available DV cable Open the LCD panel INPUT DV (IEEE1394) terminal Recording Available only in image and sound quality. Stop playback... Connecting a VCR See Playing Back on a TV Screen ( 42). Locate the scene you can copy your recordings by connecting the camcorder to copy appears. Stop recording when copying is complete. 6. Connected device: Load a blank cassette or disc and set the device to the instruction...
...Play back the tape. 5. If you connect a digital video device, you wish to copy and pause playback shortly before the scene. 4. camcorder) Signal flow Commercially available DV cable Open the LCD panel INPUT DV (IEEE1394) terminal Recording Available only in image and sound quality. Stop playback... Connecting a VCR See Playing Back on a TV Screen ( 42). Locate the scene you can copy your recordings by connecting the camcorder to copy appears. Stop recording when copying is complete. 6. Connected device: Load a blank cassette or disc and set the device to the instruction...
ELURA100 Instruction Manual
Page 88
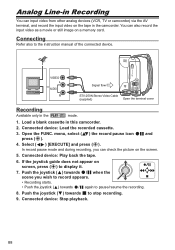
...again to display it. 7. Connected device: Stop playback. 88 Connected device: Load the recorded cassette. 3. Push the joystick ( ) towards to the instruction manual of the connected device. Open the FUNC. Select ( ) [EXECUTE] and press ( ). If the joystick guide does not appear on a memory card.... recording. 9. VIDEO L AUDIO R Signal flow STV-250N Stereo Video Cable (supplied) Open the terminal cover Recording Available only in this camcorder. 2. Load a blank cassette in the mode. 1. Push the joystick ( ) towards / when the scene you can input video from other...
...again to display it. 7. Connected device: Stop playback. 88 Connected device: Load the recorded cassette. 3. Push the joystick ( ) towards to the instruction manual of the connected device. Open the FUNC. Select ( ) [EXECUTE] and press ( ). If the joystick guide does not appear on a memory card.... recording. 9. VIDEO L AUDIO R Signal flow STV-250N Stereo Video Cable (supplied) Open the terminal cover Recording Available only in this camcorder. 2. Load a blank cassette in the mode. 1. Push the joystick ( ) towards / when the scene you can input video from other...


