User Manual
Page 13
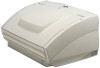
q USB Cable w Document Eject Guide e Auxiliary Paper Support Plate r Setup Disc (CD-ROM) t Startup Manual (This Manual) y Quick Reference Guide u Warranty Card (U.S.A. and Canada only) i Adjustment Sheet o Power Cord !0 Scanner • The contents of the carton in which this scanner is shipped are subject to store or transport the scanner. Before Using ... to change without notice. • Keep the carton and the packing material for future use if it is missing or damaged, contact your local authorized Canon dealer or service representative.
q USB Cable w Document Eject Guide e Auxiliary Paper Support Plate r Setup Disc (CD-ROM) t Startup Manual (This Manual) y Quick Reference Guide u Warranty Card (U.S.A. and Canada only) i Adjustment Sheet o Power Cord !0 Scanner • The contents of the carton in which this scanner is shipped are subject to store or transport the scanner. Before Using ... to change without notice. • Keep the carton and the packing material for future use if it is missing or damaged, contact your local authorized Canon dealer or service representative.

User Manual
Page 52
... so that the originals are not stained or marked in parentheses are millimeters) IMPORTANT ● When you copy the originals, adjust the size and density settings to match the originals. Also, take care to avoid staining or marking the effective area for detecting patch code ...patterns. Damaged or marked Patch Code Sheets cannot be read correctly. ● To avoid a reading error, make sure that the scanning density for Patch Code Sheets is in the effective area for detecting patch code patterns. ● Make sure that the...
... so that the originals are not stained or marked in parentheses are millimeters) IMPORTANT ● When you copy the originals, adjust the size and density settings to match the originals. Also, take care to avoid staining or marking the effective area for detecting patch code ...patterns. Damaged or marked Patch Code Sheets cannot be read correctly. ● To avoid a reading error, make sure that the scanning density for Patch Code Sheets is in the effective area for detecting patch code patterns. ● Make sure that the...

User Manual
Page 64
... Specifications Load it into the scanner with the arrow pointing in Windows, select [Programs] - [Canon DR-3080CII] then click [DR-3080CII Shading Tool]. Locate the adjustment sheet (shading paper) that calibrating the scanner will permanently delete any existing calibration configuration. Adjustment sheet After loading the adjustment sheet, click the [Start] button in the direction illustrated. Follow the instructions on the screen...
... Specifications Load it into the scanner with the arrow pointing in Windows, select [Programs] - [Canon DR-3080CII] then click [DR-3080CII Shading Tool]. Locate the adjustment sheet (shading paper) that calibrating the scanner will permanently delete any existing calibration configuration. Adjustment sheet After loading the adjustment sheet, click the [Start] button in the direction illustrated. Follow the instructions on the screen...
User Manual
Page 68
... eject guide attachment 41 Document eject tray extension opening 40 position 13 Document positioning mark adjustment 43 position 13 Documents feeding 43 paper jam 51 stacking limit marks 44 DR-3080CII cleaning 54 I Installation location 5 Interface boards SCSI boards 18 USB 2.0 interface board ...18 ISIS/TWAIN Driver 35 Install 26 Uninstall 29 M Maintenance 54 P Paper jam cleaning 51 Paper side guides adjustment 43 position 13 Patch Code Sheets 48 PDF ...
... eject guide attachment 41 Document eject tray extension opening 40 position 13 Document positioning mark adjustment 43 position 13 Documents feeding 43 paper jam 51 stacking limit marks 44 DR-3080CII cleaning 54 I Installation location 5 Interface boards SCSI boards 18 USB 2.0 interface board ...18 ISIS/TWAIN Driver 35 Install 26 Uninstall 29 M Maintenance 54 P Paper jam cleaning 51 Paper side guides adjustment 43 position 13 Patch Code Sheets 48 PDF ...


