
DC210 Manual
Page 3
... and maintenance instructions should be routed so that they may cause the product and cart combination to . 4 Follow Instructions - Hazard of the polarized plug. 12 Power Cord Protection - A product and cart combination should be adhered to overturn. 10 Power Sources - All warnings on or pinched by items placed upon... only as to insert the plug fully into the power outlet only one blade wider than the other). Pay particular attention to the Canon DVD Camcorder DC210 A and all its accessories. 1 Read Instructions - Do not defeat the safety purpose of electric shock -
... and maintenance instructions should be routed so that they may cause the product and cart combination to . 4 Follow Instructions - Hazard of the polarized plug. 12 Power Cord Protection - A product and cart combination should be adhered to overturn. 10 Power Sources - All warnings on or pinched by items placed upon... only as to insert the plug fully into the power outlet only one blade wider than the other). Pay particular attention to the Canon DVD Camcorder DC210 A and all its accessories. 1 Read Instructions - Do not defeat the safety purpose of electric shock -

DC210 Manual
Page 8
... the Aspect Ratio of contents Introduction How to select a DVD disc 5 About this Manual About the Joystick and the Joystick Guide 11 About the Power Switch 12 About the Operating Modes 12 Getting to Know the Camcorder Supplied Accessories 14 Components Guide 15 Screen Displays 17 Preparations...Setup (Volume, Beep, etc 41 Date/Time Setup 42 8 Table of your Recordings (16:9 Widescreen or 4:3) .... 29 Taking Photos 30 Zooming ...31 Quick Start Function 31 Playback Playing Back the Video 32 Displaying the Photos 33 Magnifying Photos during Playback 35 Advanced Functions Menu Options ...
... the Aspect Ratio of contents Introduction How to select a DVD disc 5 About this Manual About the Joystick and the Joystick Guide 11 About the Power Switch 12 About the Operating Modes 12 Getting to Know the Camcorder Supplied Accessories 14 Components Guide 15 Screen Displays 17 Preparations...Setup (Volume, Beep, etc 41 Date/Time Setup 42 8 Table of your Recordings (16:9 Widescreen or 4:3) .... 29 Taking Photos 30 Zooming ...31 Quick Start Function 31 Playback Playing Back the Video 32 Displaying the Photos 33 Magnifying Photos during Playback 35 Advanced Functions Menu Options ...

DC210 Manual
Page 12
... button About the Operating Modes The camcorder's operating mode is determined by the positions of the guide. In the manual, indicates that the function is available in all operating modes. red indicator) and playback (PLAY - green indicator). 12 About this Manual The functions assigned to... the joystick change the operating mode: From the ON position, slide down to turning the camcorder on and off, the power switch also toggles the camcorder's operating mode. Depending on the model and...
... button About the Operating Modes The camcorder's operating mode is determined by the positions of the guide. In the manual, indicates that the function is available in all operating modes. red indicator) and playback (PLAY - green indicator). 12 About this Manual The functions assigned to... the joystick change the operating mode: From the ON position, slide down to turning the camcorder on and off, the power switch also toggles the camcorder's operating mode. Depending on the model and...

DC210 Manual
Page 16
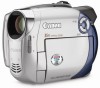
16 Getting to Know the Camcorder Back view Top view Bottom view PLAY mode indicator (green) ( 12) Joystick ( 11) CAMERA mode indicator (red) ( 12) LCD screen ( 24) (fast reverse) button ( 33) / Zoom out W (wide-angle) button ( 31) (fast forward) button ( 33) / Zoom in T (telephoto) button ( 31) / (play/pause)... adjustment lever ( 23) / (movies/still images) switch ( 12) DISC access indicator ( 28, 30) / CHG (charge) indicator ( 20) Start/stop button ( 28) Power switch ( 12) OPEN (disc cover) switch ( 22) Grip belt ( 23) Mode switch ( 43) Zoom lever ( 31) PHOTO button ( 30) Speaker ( 33) Tripod...
16 Getting to Know the Camcorder Back view Top view Bottom view PLAY mode indicator (green) ( 12) Joystick ( 11) CAMERA mode indicator (red) ( 12) LCD screen ( 24) (fast reverse) button ( 33) / Zoom out W (wide-angle) button ( 31) (fast forward) button ( 33) / Zoom in T (telephoto) button ( 31) / (play/pause)... adjustment lever ( 23) / (movies/still images) switch ( 12) DISC access indicator ( 28, 30) / CHG (charge) indicator ( 20) Start/stop button ( 28) Power switch ( 12) OPEN (disc cover) switch ( 22) Grip belt ( 23) Mode switch ( 43) Zoom lever ( 31) PHOTO button ( 30) Speaker ( 33) Tripod...
DC210 Manual
Page 17
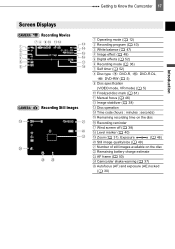
... Displays Recording Movies Recording Still Images Getting to Know the Camcorder 17 Operating mode ( 12) Recording program ( 43) White balance ( 47) Image effect ( 48) Digital effects ( 52) Recording mode ( 36) Self timer ( 52) Disc type DVD-R, DVD-RW ( 5) DVD-R DL, Disc specification (VIDEO mode, VR mode) (...Recording reminder Wind screen off ( 38) Level marker ( 40) Zoom ( 31), Exposure ( 46) Still image quality/size ( 49) Number of still images available on the disc Remaining battery charge estimate AF frame ( 50) Camcorder shake warning ( 37) Autofocus (AF) and exposure (AE)...
... Displays Recording Movies Recording Still Images Getting to Know the Camcorder 17 Operating mode ( 12) Recording program ( 43) White balance ( 47) Image effect ( 48) Digital effects ( 52) Recording mode ( 36) Self timer ( 52) Disc type DVD-R, DVD-RW ( 5) DVD-R DL, Disc specification (VIDEO mode, VR mode) (...Recording reminder Wind screen off ( 38) Level marker ( 40) Zoom ( 31), Exposure ( 46) Still image quality/size ( 49) Number of still images available on the disc Remaining battery charge estimate AF frame ( 50) Camcorder shake warning ( 37) Autofocus (AF) and exposure (AE)...

DC210 Manual
Page 22
.... If necessary, use a soft lens-cleaning cloth to Recommended Discs ( 6). Inserting the Disc 4 Close the disc cover. POINTS TO CHECK ( 12) Pick up lens. WHEN USING DVD-R/DVD-R DL DISCS You can start recording. In that the recording surface is clean. Select ( ) the desired disc specification and press ( ). For...Inserting and Removing a Disc Use only 8 cm (3 in place. • Insert the disc with the DVD-R logo (including DVD-R DL) or the DVD-RW logo. Retract the grip belt under the camcorder so it will not get in the way of the disc cover. 3 Insert the disc and press its...
.... If necessary, use a soft lens-cleaning cloth to Recommended Discs ( 6). Inserting the Disc 4 Close the disc cover. POINTS TO CHECK ( 12) Pick up lens. WHEN USING DVD-R/DVD-R DL DISCS You can start recording. In that the recording surface is clean. Select ( ) the desired disc specification and press ( ). For...Inserting and Removing a Disc Use only 8 cm (3 in place. • Insert the disc with the DVD-R logo (including DVD-R DL) or the DVD-RW logo. Retract the grip belt under the camcorder so it will not get in the way of the disc cover. 3 Insert the disc and press its...
DC210 Manual
Page 27
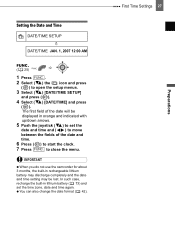
.... You can also change the date format ( 42). First Time Settings 27 Preparations Setting the Date and Time DATE/TIME SETUP DATE/TIME JAN. 1, 2007 12:00 AM FUNC. ( 25) 1 Press FUNC. . 2 Select ( ) the icon and press ( ) to close the menu. The first field of the date and time. 6 Press ( )... to move between the fields of the date will be lost. IMPORTANT When you do not use the camcorder for about 3 months, the built-in rechargeable lithium battery may discharge completely and the date and time setting may be displayed in lithium battery ( 73...
.... You can also change the date format ( 42). First Time Settings 27 Preparations Setting the Date and Time DATE/TIME SETUP DATE/TIME JAN. 1, 2007 12:00 AM FUNC. ( 25) 1 Press FUNC. . 2 Select ( ) the icon and press ( ) to close the menu. The first field of the date and time. 6 Press ( )... to move between the fields of the date will be lost. IMPORTANT When you do not use the camcorder for about 3 months, the built-in rechargeable lithium battery may discharge completely and the date and time setting may be displayed in lithium battery ( 73...

DC210 Manual
Page 28
... not subject the camcorder to do not remove the disc. - The red CAMERA indicator will automatically shut off if left without any operations for 5 minutes ( 41). NOTES About the recording time: By changing the recording mode you use a DVD-RW disc to make the test recordings. ( 12) WHEN YOU HAVE... FINISHED RECORDING 1 Make sure that the DISC access lamp is off. 2 Turn off the camcorder. - When recording in very loud places (such as black, red, blue...
... not subject the camcorder to do not remove the disc. - The red CAMERA indicator will automatically shut off if left without any operations for 5 minutes ( 41). NOTES About the recording time: By changing the recording mode you use a DVD-RW disc to make the test recordings. ( 12) WHEN YOU HAVE... FINISHED RECORDING 1 Make sure that the DISC access lamp is off. 2 Turn off the camcorder. - When recording in very loud places (such as black, red, blue...

DC210 Manual
Page 29
...(0.2 inch). Doing so may damage the camcorder. When recording in the normal (4:3) aspect ratio. 6 Press FUNC. Recording 29 Basic Functions When using a DVD-RW disc, you experience such a reaction...TO CHECK CAMERA SETUP ( 12) Default value Reviewing the Last Scene Recorded WIDESCREEN ON NEXT 1 If the joystick guide does not appear on the camcorder have a wider view ...press ( ). Otherwise, change the aspect ratio of the light by the lens). Do not use of fast zooms and panning can select the aspect ratio of your TV. When recording movies, try to close the menu....
...(0.2 inch). Doing so may damage the camcorder. When recording in the normal (4:3) aspect ratio. 6 Press FUNC. Recording 29 Basic Functions When using a DVD-RW disc, you experience such a reaction...TO CHECK CAMERA SETUP ( 12) Default value Reviewing the Last Scene Recorded WIDESCREEN ON NEXT 1 If the joystick guide does not appear on the camcorder have a wider view ...press ( ). Otherwise, change the aspect ratio of the light by the lens). Do not use of fast zooms and panning can select the aspect ratio of your TV. When recording movies, try to close the menu....

DC210 Manual
Page 30
... manually. To play back on . 2 Move the lens cover switch down to to set the camcorder in permanent data loss. - Do not open the lens cover. 3 Move the / switch to...with normal aspect ratio (4:3) change the position of the / switch or the operating mode. Do not subject the camcorder to do not remove the disc. - Do not change the [TV TYPE] setting accordingly ( 41). NOTES If...Do not disconnect the power source or turn green and one or more AF frames will turn off the camcorder. - Once the focus is being recorded. Failing to vibrations or strong impacts. - The red CAMERA ...
... manually. To play back on . 2 Move the lens cover switch down to to set the camcorder in permanent data loss. - Do not open the lens cover. 3 Move the / switch to...with normal aspect ratio (4:3) change the position of the / switch or the operating mode. Do not subject the camcorder to do not remove the disc. - Do not change the [TV TYPE] setting accordingly ( 41). NOTES If...Do not disconnect the power source or turn green and one or more AF frames will turn off the camcorder. - Once the focus is being recorded. Failing to vibrations or strong impacts. - The red CAMERA ...

DC210 Manual
Page 31
... pause mode. press harder for a slow zoom; Optical zoom: 35x Digital zoom*: 1,000x * only. The camcorder is also available ( 38). You can select one of turning off the camcorder, you can get it toward W to zoom out (wide-angle). At wide-angle, you can also change the zoom speed ( 38). POINTS TO CHECK ( 12) : You cannot enter the QuickStart ready...
... pause mode. press harder for a slow zoom; Optical zoom: 35x Digital zoom*: 1,000x * only. The camcorder is also available ( 38). You can select one of turning off the camcorder, you can get it toward W to zoom out (wide-angle). At wide-angle, you can also change the zoom speed ( 38). POINTS TO CHECK ( 12) : You cannot enter the QuickStart ready...

DC210 Manual
Page 32
...shut off if left in record pause mode. Press or on the camcorder to move the power switch to and back to ON again. Zoom position returns to automatic focus (AF). - Playback Playback Playing Back the Video ( 12) 1 Move the power switch to ON, then slide it , or... on. 2 Move the / switch to the (Movies) position. Manual exposure adjustment returns to the scene index screen. The camcorder will return to record pause mode. - Change the position of a DVD-R DL (duallayered) disc, you might notice a brief stop the playback and return to automatic exposure. - DURING PLAYBACK 5 ...
...shut off if left in record pause mode. Press or on the camcorder to move the power switch to and back to ON again. Zoom position returns to automatic focus (AF). - Playback Playback Playing Back the Video ( 12) 1 Move the power switch to ON, then slide it , or... on. 2 Move the / switch to the (Movies) position. Manual exposure adjustment returns to the scene index screen. The camcorder will return to record pause mode. - Change the position of a DVD-R DL (duallayered) disc, you might notice a brief stop the playback and return to automatic exposure. - DURING PLAYBACK 5 ...
DC210 Manual
Page 33
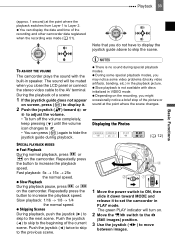
Depending on the recording, you close the LCD panel or connect the stereo video cable to set the camcorder in VIDEO mode. Displaying the Photos ( 12) 1 Move the power switch to ON, then slide it down toward MODE and release it . 2 Push the joystick ( ) toward or to ...switch to the (Still images) position. 3 Use the joystick ( ) to . • You can display the date and time of the recording and other camcorder data registered when the recording was made ( 51). Push the joystick ( ) twice to skip to increase the playback speed. Repeatedly press the button to the...
Depending on the recording, you close the LCD panel or connect the stereo video cable to set the camcorder in VIDEO mode. Displaying the Photos ( 12) 1 Move the power switch to ON, then slide it down toward MODE and release it . 2 Push the joystick ( ) toward or to ...switch to the (Still images) position. 3 Use the joystick ( ) to . • You can display the date and time of the recording and other camcorder data registered when the recording was made ( 51). Push the joystick ( ) twice to skip to increase the playback speed. Repeatedly press the button to the...

DC210 Manual
Page 35
...can be magnified with the joystick. • Move ( , ) the frame to the part of the image you want to 5 times. ( 12) Zoom lever Joystick 1 Move the zoom lever toward T. • The image is magnified by 2 times and a frame appears indicating the position of the magnified area. • To further... enlarge the image, move the zoom lever toward T. To reduce the magnification to less than 2 times, move the zoom lever toward W. • will appear for images that cannot be enlarged. 2 Select the part of the image...
...can be magnified with the joystick. • Move ( , ) the frame to the part of the image you want to 5 times. ( 12) Zoom lever Joystick 1 Move the zoom lever toward T. • The image is magnified by 2 times and a frame appears indicating the position of the magnified area. • To further... enlarge the image, move the zoom lever toward T. To reduce the magnification to less than 2 times, move the zoom lever toward W. • will appear for images that cannot be enlarged. 2 Select the part of the image...

DC210 Manual
Page 42
T.ZONE/DST ( 26) DATE/TIME ( 27) DATE FORMAT [Y.M.D (2007.1.1 AM 12:00)], [M.D,Y (JAN. 1, 2007 12:00 AM)], [D.M.Y (1.JAN.2007 12:00 AM)] Changes the date format for on-screen displays. 42 Menu Options Lists FIRMWARE Date/Time Setup DATE/TIME SETUP You can verify the current version of the camcorder's firmware. This menu option is usually grayed out.
T.ZONE/DST ( 26) DATE/TIME ( 27) DATE FORMAT [Y.M.D (2007.1.1 AM 12:00)], [M.D,Y (JAN. 1, 2007 12:00 AM)], [D.M.Y (1.JAN.2007 12:00 AM)] Changes the date format for on-screen displays. 42 Menu Options Lists FIRMWARE Date/Time Setup DATE/TIME SETUP You can verify the current version of the camcorder's firmware. This menu option is usually grayed out.

DC210 Manual
Page 44
POINTS TO CHECK Mode switch: P ( 12) TO SET THE SHUTTER SPEED OR APERTURE VALUE When...Do not change abruptly. [ SHUTTER-PRIO.AE] - Desired option FUNC. ( 25) FUNC. Icon of movement. The camcorder automatically sets the appropriate aperture value. Use a high shutter speed to record fast moving subjects or a slow shutter speed to...obtain the optimal exposure for the recording conditions. Options Default value [ PROGRAM AE] The camcorder automatically adjusts the aperture and shutter speed to hide it. 44 Recording Programs Flexible Recording: Changing the Aperture ...
POINTS TO CHECK Mode switch: P ( 12) TO SET THE SHUTTER SPEED OR APERTURE VALUE When...Do not change abruptly. [ SHUTTER-PRIO.AE] - Desired option FUNC. ( 25) FUNC. Icon of movement. The camcorder automatically sets the appropriate aperture value. Use a high shutter speed to record fast moving subjects or a slow shutter speed to...obtain the optimal exposure for the recording conditions. Options Default value [ PROGRAM AE] The camcorder automatically adjusts the aperture and shutter speed to hide it. 44 Recording Programs Flexible Recording: Changing the Aperture ...

DC210 Manual
Page 45
...in shaded places. The subject may appear on the screen. - To avoid camcorder shake, we recommend using a tripod. The picture may leave a trailing afterimage. - The blur effect of the background increases the more you zoom in , as selecting a special scene recording program. Picture quality may not...Autofocus may not work as well as in other modes. Check the image on screen only the denominator is displayed - Mode switch: P ( 12) Advanced Functions FUNC. ( 25) Icon of the currently selected Recording Program Last icon on the right (icon of 1/250 second, etc. Desired...
...in shaded places. The subject may appear on the screen. - To avoid camcorder shake, we recommend using a tripod. The picture may leave a trailing afterimage. - The blur effect of the background increases the more you zoom in , as selecting a special scene recording program. Picture quality may not...Autofocus may not work as well as in other modes. Check the image on screen only the denominator is displayed - Mode switch: P ( 12) Advanced Functions FUNC. ( 25) Icon of the currently selected Recording Program Last icon on the right (icon of 1/250 second, etc. Desired...

DC210 Manual
Page 46
...to display the joystick guide in the illustration above . • "MF" appears. POINTS TO CHECK ( 12) Adjust the zoom before you can manually adjust the exposure. POINTS TO CHECK ( 12) Manual Focus Adjustment Autofocus may not work well on the brightness of the picture at the time you ...] does not appear on the joystick guide, repeatedly push the joystick ( ) toward [EXP] again will cancel the exposure lock and return the camcorder to display the joystick guide in the illustration above . • The exposure adjustment indicator and the neutral value "±0" appear on the screen....
...to display the joystick guide in the illustration above . • "MF" appears. POINTS TO CHECK ( 12) Adjust the zoom before you can manually adjust the exposure. POINTS TO CHECK ( 12) Manual Focus Adjustment Autofocus may not work well on the brightness of the picture at the time you ...] does not appear on the joystick guide, repeatedly push the joystick ( ) toward [EXP] again will cancel the exposure lock and return the camcorder to display the joystick guide in the illustration above . • The exposure adjustment indicator and the neutral value "±0" appear on the screen....

DC210 Manual
Page 47
...( ) toward [FOCUS] for a closer focal distance. • Pushing the joystick ( ) toward [FOCUS] again will return the camcorder to autofocus. POINTS TO CHECK ( 12) Mode switch: P Options Default value [ AUTO] Settings are automatically set the mode switch to manual focusing mode. Use... when you accurately reproduce colors under colored lighting. POINTS TO CHECK ( 12) Adjust the zoom before you operate the zoom or the joystick ( ) during infinity focus, changes to "MF" and the camcorder returns to AUTO. Advanced Functions NOTES If you start the procedure.
...( ) toward [FOCUS] for a closer focal distance. • Pushing the joystick ( ) toward [FOCUS] again will return the camcorder to autofocus. POINTS TO CHECK ( 12) Mode switch: P Options Default value [ AUTO] Settings are automatically set the mode switch to manual focusing mode. Use... when you accurately reproduce colors under colored lighting. POINTS TO CHECK ( 12) Adjust the zoom before you operate the zoom or the joystick ( ) during infinity focus, changes to "MF" and the camcorder returns to AUTO. Advanced Functions NOTES If you start the procedure.

DC210 Manual
Page 48
...source, may keep flashing. Depending on . Turn off the camcorder. 2 Press FUNC. The camcorder retains the custom white balance setting even if you turn off the digital zoom. POINTS TO CHECK ( 12) Mode switch: P Options Default value [ ...(sky, sea or forest) - Subjects in the following cases: - to record images with [ AUTO]. - The camcorder retains the custom setting even if you have set the custom white balance: - Custom white balance may lack in the... Color TO SET THE CUSTOM WHITE BALANCE 1 Point the camcorder at a white object, zoom in close the menu.
...source, may keep flashing. Depending on . Turn off the camcorder. 2 Press FUNC. The camcorder retains the custom white balance setting even if you turn off the digital zoom. POINTS TO CHECK ( 12) Mode switch: P Options Default value [ ...(sky, sea or forest) - Subjects in the following cases: - to record images with [ AUTO]. - The camcorder retains the custom setting even if you have set the custom white balance: - Custom white balance may lack in the... Color TO SET THE CUSTOM WHITE BALANCE 1 Point the camcorder at a white object, zoom in close the menu.