
User Manual
Page 2
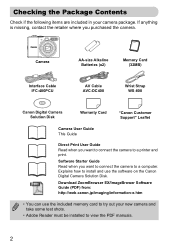
... IFC-400PCU AV Cable AVC-DC400 Wrist Strap WS-800 Canon Digital Camera Solution Disk Warranty Card "Canon Customer Support" Leaflet Camera User Guide This Guide Direct Print User Guide Read when you purchased the camera. Software Starter Guide Read when you want to connect the camera to a computer. Checking the Package Contents Check if the following...
... IFC-400PCU AV Cable AVC-DC400 Wrist Strap WS-800 Canon Digital Camera Solution Disk Warranty Card "Canon Customer Support" Leaflet Camera User Guide This Guide Direct Print User Guide Read when you purchased the camera. Software Starter Guide Read when you want to connect the camera to a computer. Checking the Package Contents Check if the following...
User Manual
Page 3
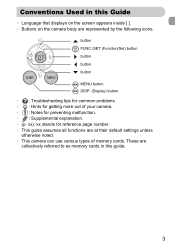
... Used in this Guide • Language that displays on the screen appears inside [ ]. • Buttons on the camera body are at their default settings unless otherwise noted. • This camera can use various types of your camera. • : Notes for preventing malfunction. • : Supplemental explanation. • (p. These are collectively referred to as memory...
... Used in this Guide • Language that displays on the screen appears inside [ ]. • Buttons on the camera body are at their default settings unless otherwise noted. • This camera can use various types of your camera. • : Notes for preventing malfunction. • : Supplemental explanation. • (p. These are collectively referred to as memory...
User Manual
Page 4
...or commercial properties by means of a camera or other device may contravene copyright or other legal rights even if the image was shot for personal use. More than 99.99% of a camera or accessory, including memory cards, that Canon digital cameras are not liable for an extended ...period as bright or dark dots. The camera is machine readable. Camera Body Temperature Please take care when operating the camera for any malfunction of the pixels operate...
...or commercial properties by means of a camera or other device may contravene copyright or other legal rights even if the image was shot for personal use. More than 99.99% of a camera or accessory, including memory cards, that Canon digital cameras are not liable for an extended ...period as bright or dark dots. The camera is machine readable. Camera Body Temperature Please take care when operating the camera for any malfunction of the pixels operate...
User Manual
Page 6
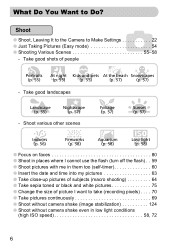
... 58, 72 6 What Do You Want to Do? 4 Shoot ● Shoot, Leaving It to the Camera to take (recording pixels) . . . . 70 ● Take pictures continuously 69 ● Shoot without camera shake (image stabilization 124 ● Shoot without camera shake even in them too (self-timer 60 ● Insert the date and time into...
... 58, 72 6 What Do You Want to Do? 4 Shoot ● Shoot, Leaving It to the Camera to take (recording pixels) . . . . 70 ● Take pictures continuously 69 ● Shoot without camera shake (image stabilization 124 ● Shoot without camera shake even in them too (self-timer 60 ● Insert the date and time into...
User Manual
Page 8
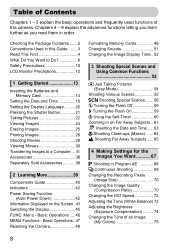
Chapters 4 - 9 explain the advanced functions letting you learn further as you read them in this camera. Basic Operations.. 47 Resetting the Camera 48 Formatting Memory Cards 49 Changing Sounds 51 Changing the Image Display Time .. 52 3 Shooting Special Scenes and Using Common ...56 ! Checking the Package Contents .......2 Conventions Used in order. Turning the Flash Off 59 h Turning the Flash On 59 Q Using the Self-Timer 60 Zooming in on Far Away Subjects .. 61 Inserting the Date and Time ..... 63 e Shooting Close-ups (Macro) ....... 64 u Shooting Far Away Subjects...... 65...
Chapters 4 - 9 explain the advanced functions letting you learn further as you read them in this camera. Basic Operations.. 47 Resetting the Camera 48 Formatting Memory Cards 49 Changing Sounds 51 Changing the Image Display Time .. 52 3 Shooting Special Scenes and Using Common ...56 ! Checking the Package Contents .......2 Conventions Used in order. Turning the Flash Off 59 h Turning the Flash On 59 Q Using the Self-Timer 60 Zooming in on Far Away Subjects .. 61 Inserting the Date and Time ..... 63 e Shooting Close-ups (Macro) ....... 64 u Shooting Far Away Subjects...... 65...
User Manual
Page 9
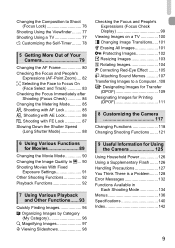
... a TV 77 $ Customizing the Self-Timer ........ 78 5 Getting More Out of Your Camera 79 Changing the AF Frame 80 Checking the Focus and People's Expressions (AF-Point Zoom).... 82 0 Selecting the Face to Focus On (Face Select and Track 83 Checking the ... { Designating Images for Transfer (DPOF 109 Designating Images for Printing (DPOF 111 8 Customizing the Camera 117 Changing Functions 118 Changing Shooting Functions ....... 121 6 Using Various Functions for Using the Camera 125 Using Household Power 126 Using a Supplementary Flash ....... 126 Handling Precautions 127 You Think There...
... a TV 77 $ Customizing the Self-Timer ........ 78 5 Getting More Out of Your Camera 79 Changing the AF Frame 80 Checking the Focus and People's Expressions (AF-Point Zoom).... 82 0 Selecting the Face to Focus On (Face Select and Track 83 Checking the ... { Designating Images for Transfer (DPOF 109 Designating Images for Printing (DPOF 111 8 Customizing the Camera 117 Changing Functions 118 Changing Shooting Functions ....... 121 6 Using Various Functions for Using the Camera 125 Using Household Power 126 Using a Supplementary Flash ....... 126 Handling Precautions 127 You Think There...
User Manual
Page 10
Safety Precautions • Before using the flash. • Do not attempt to disassemble or alter any part of the equipment that the camera is not expressly described in fire or electrical shock. Exposure to the intense light may damage eyesight. Strap: Putting the strap around a child's..., day/date battery: Dangerous if accidentally swallowed. Warnings Denotes the possibility of injury or damage to also check the guides included with the camera interior, immediately turn the camera power off and remove the batteries. • Do not use . If this equipment out of the reach of the...
Safety Precautions • Before using the flash. • Do not attempt to disassemble or alter any part of the equipment that the camera is not expressly described in fire or electrical shock. Exposure to the intense light may damage eyesight. Strap: Putting the strap around a child's..., day/date battery: Dangerous if accidentally swallowed. Warnings Denotes the possibility of injury or damage to also check the guides included with the camera interior, immediately turn the camera power off and remove the batteries. • Do not use . If this equipment out of the reach of the...
User Manual
Page 11
... other liquids. • Do not attempt to disassemble, alter or apply heat to batteries. • Avoid dropping or subjecting batteries to enter the camera. Places subject to temperatures above 40° C (104° F). - Places subject to strong sunlight. - High temperatures may cause malfunction or ...impacts or shocks when hanging it by leakage may cause explosions or leaks, resulting in the following places. - This may cause the camera to malfunction. 11 Safety Precautions Batteries • Use only recommended batteries. • Do not place batteries near or in waste containers...
... other liquids. • Do not attempt to disassemble, alter or apply heat to batteries. • Avoid dropping or subjecting batteries to enter the camera. Places subject to temperatures above 40° C (104° F). - Places subject to strong sunlight. - High temperatures may cause malfunction or ...impacts or shocks when hanging it by leakage may cause explosions or leaks, resulting in the following places. - This may cause the camera to malfunction. 11 Safety Precautions Batteries • Use only recommended batteries. • Do not place batteries near or in waste containers...

User Manual
Page 12
If this occurs, it may cause malfunction or damage the LCD monitor. 12 Doing so may cause malfunction or damage the LCD monitor. • Do not attach accessories to the strap. Doing so may cause malfunction or damage the LCD monitor. • When putting the camera in your bag, ensure that hard objects do not come into contact with the camera in a chair with the LCD monitor. LCD Monitor Precautions • Do not sit in your pocket.
If this occurs, it may cause malfunction or damage the LCD monitor. 12 Doing so may cause malfunction or damage the LCD monitor. • Do not attach accessories to the strap. Doing so may cause malfunction or damage the LCD monitor. • When putting the camera in your bag, ensure that hard objects do not come into contact with the camera in a chair with the LCD monitor. LCD Monitor Precautions • Do not sit in your pocket.
User Manual
Page 13
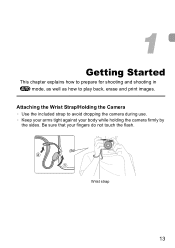
Wrist strap 13 1 Getting Started This chapter explains how to prepare for shooting and shooting in A mode, as well as how to avoid dropping the camera during use. • Keep your arms tight against your fingers do not touch the flash. Attaching the Wrist Strap/Holding the Camera • Use the included strap to play back, erase and print images. Be sure that your body while holding the camera firmly by the sides.
Wrist strap 13 1 Getting Started This chapter explains how to prepare for shooting and shooting in A mode, as well as how to avoid dropping the camera during use. • Keep your arms tight against your fingers do not touch the flash. Attaching the Wrist Strap/Holding the Camera • Use the included strap to play back, erase and print images. Be sure that your body while holding the camera firmly by the sides.
User Manual
Page 14
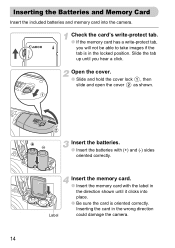
Slide the tab up until it clicks into the camera. Label Insert the memory card. ● Insert the memory card with (+) and (-) sides oriented correctly. Insert the batteries. ● Insert the batteries with the label ... and Memory Card Insert the included batteries and memory card into place. ● Be sure the card is in the wrong direction could damage the camera. 14
Slide the tab up until it clicks into the camera. Label Insert the memory card. ● Insert the memory card with (+) and (-) sides oriented correctly. Insert the batteries. ● Insert the batteries with the label ... and Memory Card Insert the included batteries and memory card into place. ● Be sure the card is in the wrong direction could damage the camera. 14
User Manual
Page 16
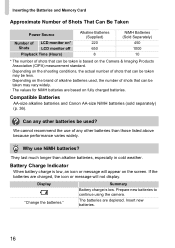
... use NiMH batteries? Summary Battery charge is low, an icon or message will not display. Prepare new batteries to continue using the camera. Insert new batteries. 16 Why use of any other batteries than alkaline batteries, especially in cold weather. The batteries are charged, ...the icon or message will appear on the screen. Battery Charge Indicator When battery charge is low. Compatible Batteries AA-size alkaline batteries and Canon AA-size NiMH batteries (sold separately) (p. 36). If the batteries are depleted. Can any other batteries be taken may be less....
... use NiMH batteries? Summary Battery charge is low, an icon or message will not display. Prepare new batteries to continue using the camera. Insert new batteries. 16 Why use of any other batteries than alkaline batteries, especially in cold weather. The batteries are charged, ...the icon or message will appear on the screen. Battery Charge Indicator When battery charge is low. Compatible Batteries AA-size alkaline batteries and Canon AA-size NiMH batteries (sold separately) (p. 36). If the batteries are depleted. Can any other batteries be taken may be less....

User Manual
Page 17
Number of shots that can be saved appear on the screen when the camera is in Shooting Mode (p. 22). If this tab is the Write-Protect Tab? will appear on the screen and you check the number of shots ...; MultiMediaCards • MMCplus memory cards • HC MMCplus memory cards What is in the locked position, "Card Locked!" How do you will vary depending on camera settings, the subject and the memory card used. Inserting the Batteries and Memory Card Approximate Number of Shots That Can Be Saved in a Memory Card...
Number of shots that can be saved appear on the screen when the camera is in Shooting Mode (p. 22). If this tab is the Write-Protect Tab? will appear on the screen and you check the number of shots ...; MultiMediaCards • MMCplus memory cards • HC MMCplus memory cards What is in the locked position, "Card Locked!" How do you will vary depending on camera settings, the subject and the memory card used. Inserting the Batteries and Memory Card Approximate Number of Shots That Can Be Saved in a Memory Card...

User Manual
Page 18
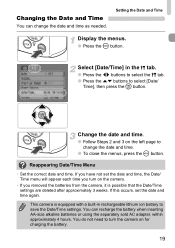
X The Date/Time menu will close. 18 X Once the date and time have been set a value. Setting the Date and Time The Date/Time menu will appear the first time the camera is turned on the camera. ● Press the power button. Since the date and time recorded into your images are based on these settings, be sure to set , the Date/Time menu will appear. Turn on . Set the Date and Time. ● Press the qr buttons to select a setting. ● Press the op buttons to make them. Make the setting. ● Press the m button.
X The Date/Time menu will close. 18 X Once the date and time have been set a value. Setting the Date and Time The Date/Time menu will appear the first time the camera is turned on the camera. ● Press the power button. Since the date and time recorded into your images are based on these settings, be sure to set , the Date/Time menu will appear. Turn on . Set the Date and Time. ● Press the qr buttons to select a setting. ● Press the op buttons to make them. Make the setting. ● Press the m button.
User Manual
Page 19
...in rechargeable lithium ion battery to change the date and time as needed. This camera is possible that the Date/Time settings are deleted after approximately 3 weeks. You...and time again. Change the date and time. ● Follow Steps 2 and 3 on the camera. • If you turn the camera on for charging the battery. 19 Setting the Date and Time Display the menus. ● Press... set the date and time, the Date/ Time menu will appear each time you removed the batteries from the camera, it is equipped with a built-in the 3 tab. ● Press the qr buttons to select the ...
...in rechargeable lithium ion battery to change the date and time as needed. This camera is possible that the Date/Time settings are deleted after approximately 3 weeks. You...and time again. Change the date and time. ● Follow Steps 2 and 3 on the camera. • If you turn the camera on for charging the battery. 19 Setting the Date and Time Display the menus. ● Press... set the date and time, the Date/ Time menu will appear each time you removed the batteries from the camera, it is equipped with a built-in the 3 tab. ● Press the qr buttons to select the ...
User Manual
Page 21
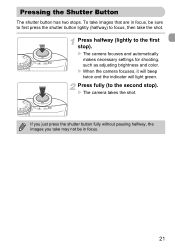
... and automatically makes necessary settings for shooting, such as adjusting brightness and color. Press fully (to the second stop ). To take the shot. X The camera takes the shot. Pressing the Shutter Button The shutter button has two stops. If you just press the shutter button fully without pausing halfway, the ... button lightly (halfway) to the first stop ). Press halfway (lightly to focus, then take images that are in focus, be in focus. 21 X When the camera focuses, it will beep twice and the indicator will light green.
... and automatically makes necessary settings for shooting, such as adjusting brightness and color. Press fully (to the second stop ). To take the shot. X The camera takes the shot. Pressing the Shutter Button The shutter button has two stops. If you just press the shutter button fully without pausing halfway, the ... button lightly (halfway) to the first stop ). Press halfway (lightly to focus, then take images that are in focus, be in focus. 21 X When the camera focuses, it will beep twice and the indicator will light green.
User Manual
Page 22
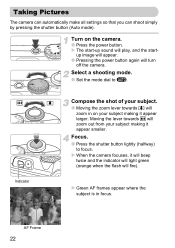
... mode. ● Set the mode dial to focus. Moving the lever towards i will zoom in focus. X When the camera focuses, it appear larger. up sound will zoom out from your subject. ● Moving the zoom lever towards j will play, and the start- Indicator Compose the shot of your subject ...making it will beep twice and the indicator will light green (orange when the flash will turn off the camera. X The start...
... mode. ● Set the mode dial to focus. Moving the lever towards i will zoom in focus. X When the camera focuses, it appear larger. up sound will zoom out from your subject. ● Moving the zoom lever towards j will play, and the start- Indicator Compose the shot of your subject ...making it will beep twice and the indicator will light green (orange when the flash will turn off the camera. X The start...
User Manual
Page 23
...screen for about 50 cm (1.6 ft.) or more away from your subject. It also emits when assisting the focus (AF-assist Beam). 23 X The camera will automatically fire in dark conditions using the flash. X The image will appear on sound, press the · button, select the 3 tab, then... m (1.0 - 13 ft.) at maximum wide angle (j side), and approximately 30 cm - 2.0 m (1.0 - 6.6 ft.) at maximum telephoto (i side). • the indicator blinks yellow and the camera only beeps once when the shutter button is too close. The lamp (Red-Eye Reduction Lamp) lights in order to reduce the red-eye effect...
...screen for about 50 cm (1.6 ft.) or more away from your subject. It also emits when assisting the focus (AF-assist Beam). 23 X The camera will automatically fire in dark conditions using the flash. X The image will appear on sound, press the · button, select the 3 tab, then... m (1.0 - 13 ft.) at maximum wide angle (j side), and approximately 30 cm - 2.0 m (1.0 - 6.6 ft.) at maximum telephoto (i side). • the indicator blinks yellow and the camera only beeps once when the shutter button is too close. The lamp (Red-Eye Reduction Lamp) lights in order to reduce the red-eye effect...
User Manual
Page 24
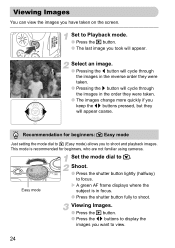
... to Playback mode. ● Press the 1 button. ● The last image you have taken on the screen. Recommendation for beginners, who are not familiar using cameras. This mode is in the order they were taken. ● The images change more quickly if you keep the qr buttons pressed, but they were...
... to Playback mode. ● Press the 1 button. ● The last image you have taken on the screen. Recommendation for beginners, who are not familiar using cameras. This mode is in the order they were taken. ● The images change more quickly if you keep the qr buttons pressed, but they were...
User Manual
Page 26
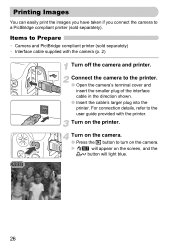
... 1 button to turn on the screen, and the c button will appear on the camera. X will light blue. 26 Turn on the printer. Connect the camera to the printer. ● Open the camera's terminal cover and insert the smaller plug of the interface cable in the direction shown.... the cable's larger plug into the printer. Items to Prepare • Camera and PictBridge compliant printer (sold separately). For connection details, refer to the user guide provided with the camera (p. 2) Turn off the camera and printer. Printing Images You can easily print the images you have taken...
... 1 button to turn on the screen, and the c button will appear on the camera. X will light blue. 26 Turn on the printer. Connect the camera to the printer. ● Open the camera's terminal cover and insert the smaller plug of the interface cable in the direction shown.... the cable's larger plug into the printer. Items to Prepare • Camera and PictBridge compliant printer (sold separately). For connection details, refer to the user guide provided with the camera (p. 2) Turn off the camera and printer. Printing Images You can easily print the images you have taken...


