
Instruction Manual
Page 2
Read the "a Safe Use of shooting at 0 lux (Night mode) ■ High-speed high-precision camera head movement ■ Noise reduction circuitry for purchasing the Canon Communication Camera VC-C50i/VC-C50iR. Features of the VC-C50i/VC-C50iR Communication Camera ■ Genuine Canon 26× optical zoom and 12× digital zoom for highmagnification imaging ■ Capable of Equipment" section first...
Read the "a Safe Use of shooting at 0 lux (Night mode) ■ High-speed high-precision camera head movement ■ Noise reduction circuitry for purchasing the Canon Communication Camera VC-C50i/VC-C50iR. Features of the VC-C50i/VC-C50iR Communication Camera ■ Genuine Canon 26× optical zoom and 12× digital zoom for highmagnification imaging ■ Capable of Equipment" section first...

Instruction Manual
Page 4
...or maintaining. 4 Model No. For Users in case of theft. Please check your instruction manual to make sure that your purchase to the VC-C50i/VC-C50iR from a standard AC power outlet. The socket-outlet should be installed near the equipment and should record the number and other vital ... fuse only a correctly rated approved type should be used and be easily accessible. - The AC adapter can be found on the back of the camera head. a Important Warnings a CAUTION: TO REDUCE THE RISK OF ELECTRIC SHOCK, DO NOT REMOVE COVERS. NO USER-SERVICEABLE PARTS INSIDE. Unplug the...
...or maintaining. 4 Model No. For Users in case of theft. Please check your instruction manual to make sure that your purchase to the VC-C50i/VC-C50iR from a standard AC power outlet. The socket-outlet should be installed near the equipment and should record the number and other vital ... fuse only a correctly rated approved type should be used and be easily accessible. - The AC adapter can be found on the back of the camera head. a Important Warnings a CAUTION: TO REDUCE THE RISK OF ELECTRIC SHOCK, DO NOT REMOVE COVERS. NO USER-SERVICEABLE PARTS INSIDE. Unplug the...

Instruction Manual
Page 7
... use specified connection cables. An equipment and cart combination should be retained for future reference. 3. If you are not likely to be adhered to the Canon communication camera VC-C50i/VC-C50iR and all its accessories. 1. Retain Instructions - All operating and maintenance instructions should be sure the antenna is operated. 2. When using chemicallytreated cleaning cloths...
... use specified connection cables. An equipment and cart combination should be retained for future reference. 3. If you are not likely to be adhered to the Canon communication camera VC-C50i/VC-C50iR and all its accessories. 1. Retain Instructions - All operating and maintenance instructions should be sure the antenna is operated. 2. When using chemicallytreated cleaning cloths...

Instruction Manual
Page 11
...Clock 28 Entering Characters 29 Selecting Display/Hide Clock and Text 29 Setting the Camera Head Movement Speed and Pan Operation 30 Setting the Range of Camera Head Movement 31 Setting the AE 32 Night Mode Settings 33 VC-C4 Mode Setting Menu 33 RS-232C Settings 34 ID Mode ...35 Setting the... ID Number 35 Selecting the Camera to be Controlled 36 Cancelling ID Mode 37 Troubleshooting ......
...Clock 28 Entering Characters 29 Selecting Display/Hide Clock and Text 29 Setting the Camera Head Movement Speed and Pan Operation 30 Setting the Range of Camera Head Movement 31 Setting the AE 32 Night Mode Settings 33 VC-C4 Mode Setting Menu 33 RS-232C Settings 34 ID Mode ...35 Setting the... ID Number 35 Selecting the Camera to be Controlled 36 Cancelling ID Mode 37 Troubleshooting ......
Instruction Manual
Page 12
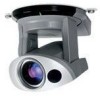
...VC-C50i (Front) (Rear) VC-C50iR Wireless controller sensor (→ P.20) LED (→ P.18) Base (→ P.13) Camera...product package. or VC-C50i camera VC-C50iR camera Multiconnector Plug AC adapter... PA-V16 (NTSC model only) AC cable (NTSC model only) ● Instruction Manual ● Warranty Card (NTSC model only) ■ Optional Product ● Wireless Controller WL-V5 (→ P.19) ● Wide-angle Converter WL-37 (→ P.14) Cannot be used on the VC...-C50iR. If any of the camera. 12 Before You Use the Product Checking the Camera...
...VC-C50i (Front) (Rear) VC-C50iR Wireless controller sensor (→ P.20) LED (→ P.18) Base (→ P.13) Camera...product package. or VC-C50i camera VC-C50iR camera Multiconnector Plug AC adapter... PA-V16 (NTSC model only) AC cable (NTSC model only) ● Instruction Manual ● Warranty Card (NTSC model only) ■ Optional Product ● Wireless Controller WL-V5 (→ P.19) ● Wide-angle Converter WL-37 (→ P.14) Cannot be used on the VC...-C50iR. If any of the camera. 12 Before You Use the Product Checking the Camera...
Instruction Manual
Page 13
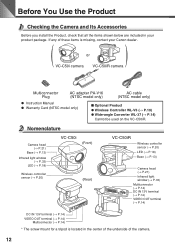
....) or wider Less than 6.0 mm (0.24 in.) in .) aWARNING Install the camera securely. ● When installing the camera on the ceiling, contact your Canon dealer. ● When installing the camera on the VC-C50iR. Before You Use the Product ENGLISH Installing the Product VC-C50i Installation Install in .) Mounting screw 13 The use a tripod mounting screw that...
....) or wider Less than 6.0 mm (0.24 in.) in .) aWARNING Install the camera securely. ● When installing the camera on the ceiling, contact your Canon dealer. ● When installing the camera on the VC-C50iR. Before You Use the Product ENGLISH Installing the Product VC-C50i Installation Install in .) Mounting screw 13 The use a tripod mounting screw that...

Instruction Manual
Page 14
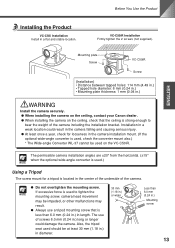
... in night mode. (→ P.33) Connecting the Components 14 AC cable B1 DC IN 13V VIDEO OUT A1 (Rear of camera) B10 A10 Multiconnector plug • PC • Another VC-C50i/ VC-C50iR • Network camera server • Sensor • Alarm • Monitor AC Adapter BNC connector To VIDEO IN terminal Monitor NOTE ● The...
... in night mode. (→ P.33) Connecting the Components 14 AC cable B1 DC IN 13V VIDEO OUT A1 (Rear of camera) B10 A10 Multiconnector plug • PC • Another VC-C50i/ VC-C50iR • Network camera server • Sensor • Alarm • Monitor AC Adapter BNC connector To VIDEO IN terminal Monitor NOTE ● The...
Instruction Manual
Page 18
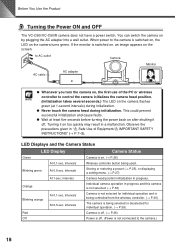
... You Use the Product Turning the Power ON and OFF The VC-C50i/VC-C50iR camera does not have a power switch. LED Displays and the Camera Status LED Display Camera Status Green Camera is switched on, the LED on . (→ P.26) Blinking green At 0.1-sec. intervals Camera head position initialization in "a Safe Use of the PC or wireless...
... You Use the Product Turning the Power ON and OFF The VC-C50i/VC-C50iR camera does not have a power switch. LED Displays and the Camera Status LED Display Camera Status Green Camera is switched on, the LED on . (→ P.26) Blinking green At 0.1-sec. intervals Camera head position initialization in "a Safe Use of the PC or wireless...

Instruction Manual
Page 20
... Loading the Batteries into a fire, and do not heat, short-circuit or attempt to disassemble the batteries. ● Do not attempt to the VC-C50iR.) 5 m (16.4 ft.) 90° 30° 90° 30° 20 aWARNING Observe the following precautions when handling batteries. ...corrosive fluid. ● Do not throw the batteries into the Wireless Controller The wireless controller requires two AA-type batteries. 1. Controlling the Camera from other objects. (This applies equally to recharge the batteries. The operable range of the wireless controller varies depending on the amount of...
... Loading the Batteries into a fire, and do not heat, short-circuit or attempt to disassemble the batteries. ● Do not attempt to the VC-C50iR.) 5 m (16.4 ft.) 90° 30° 90° 30° 20 aWARNING Observe the following precautions when handling batteries. ...corrosive fluid. ● Do not throw the batteries into the Wireless Controller The wireless controller requires two AA-type batteries. 1. Controlling the Camera from other objects. (This applies equally to recharge the batteries. The operable range of the wireless controller varies depending on the amount of...

Instruction Manual
Page 21
...° 10° 170° 30° 170° VC-C50i 90° VC-C50iR 21 The deviation from a horizontal position. To move the camera head to the Home position Press the h button. ■ This moves the camera head to ON, the camera head moves in order. Low speed → Medium speed →...Use the procedures below show the range of camera head movement from the position that the camera memorizes will be corrected and the operation will be set to the center position at high speed. The default range of upward movement for the VC-C50i is accidentally moved, either by hand or...
...° 10° 170° 30° 170° VC-C50i 90° VC-C50iR 21 The deviation from a horizontal position. To move the camera head to the Home position Press the h button. ■ This moves the camera head to ON, the camera head moves in order. Low speed → Medium speed →...Use the procedures below show the range of camera head movement from the position that the camera memorizes will be corrected and the operation will be set to the center position at high speed. The default range of upward movement for the VC-C50i is accidentally moved, either by hand or...
Instruction Manual
Page 23
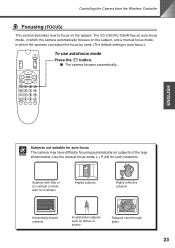
... CANCEL AF 1 MF 4 ∞ 7 ON SCREEN Fn 23 56 89 0 ID MENU ENGLISH MEMO Subjects not suitable for auto-focus The camera may have difficulty focusing automatically on the subject, and a manual focus mode, in which the operator can adjust the focus by hand. (The ... T W To use autofocus mode Press the a button. ■ The camera focuses automatically. The VC-C50i/VC-C50iR has an auto-focus mode, in which the camera automatically focuses on subjects of the type shown below. Controlling the Camera from the Wireless Controller Focusing (FOCUS) This section describes how to focus on...
... CANCEL AF 1 MF 4 ∞ 7 ON SCREEN Fn 23 56 89 0 ID MENU ENGLISH MEMO Subjects not suitable for auto-focus The camera may have difficulty focusing automatically on the subject, and a manual focus mode, in which the operator can adjust the focus by hand. (The ... T W To use autofocus mode Press the a button. ■ The camera focuses automatically. The VC-C50i/VC-C50iR has an auto-focus mode, in which the camera automatically focuses on subjects of the type shown below. Controlling the Camera from the Wireless Controller Focusing (FOCUS) This section describes how to focus on...

Instruction Manual
Page 25
... 56 89 0 ID MENU 2. To restore a preset position Press a button from 1 to auto-focus mode or focus the camera manually. 25 BRIGHT ZOOM T W To store a position 1. Press a button from 1 to 9. ■ The VC-C50i/VC-C50iR returns to 9) preset positions can only be incorrect when a preset position is overwritten. However, the preset position is...
... 56 89 0 ID MENU 2. To restore a preset position Press a button from 1 to auto-focus mode or focus the camera manually. 25 BRIGHT ZOOM T W To store a position 1. Press a button from 1 to 9. ■ The VC-C50i/VC-C50iR returns to 9) preset positions can only be incorrect when a preset position is overwritten. However, the preset position is...
Instruction Manual
Page 31
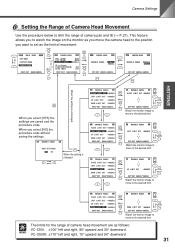
...DOWN L I M I T SET +000DEG NEXT SET BACK CANCEL MOVABLE RANGE DOWN L I M I MI T SET +000DEG SET SET CANCEL CANCEL Watch the monitor image to move the camera head to the position you select [NO] the procedure ends without saving the settings. This feature allows you to watch the image on the monitor... as follows: VC-C50i: ±100° left and right, 90° upward and 30° downward VC-C50iR: ±170° left and right, 10° upward and 90° downward 31 Camera Settings Setting the Range of Camera Head Movement Use the procedure below to the...
...DOWN L I M I T SET +000DEG NEXT SET BACK CANCEL MOVABLE RANGE DOWN L I M I MI T SET +000DEG SET SET CANCEL CANCEL Watch the monitor image to move the camera head to the position you select [NO] the procedure ends without saving the settings. This feature allows you to watch the image on the monitor... as follows: VC-C50i: ±100° left and right, 90° upward and 30° downward VC-C50iR: ±170° left and right, 10° upward and 90° downward 31 Camera Settings Setting the Range of Camera Head Movement Use the procedure below to the...

Instruction Manual
Page 33
... photography. MA I N MENU SET MENU D I SPLAY MENU CAMERA MENU NEXT SET BACK CANCEL CAMERA MENU PAN SPEED AUTO T I NGS . . D I RECT I ON M I RROR OFF NEXT SET BACK CANCEL AE SETTING AE SETT I NG AE REFERENCE DEFAULT FL I D 0 COMMAND VC - REMOTE CONTROLLER I CKERLESS AE OFF NEXT SET BACK CANCEL If...each mode. 33 The infrared lighting can be used for more than 30 minutes. When you switch the camera back on . VC-C4 Mode Setting Menu The default mode for this camera is used in VC-C3 mode, the settings screens shown below appear. MAIN MENU MA I N MENU SET MENU...
... photography. MA I N MENU SET MENU D I SPLAY MENU CAMERA MENU NEXT SET BACK CANCEL CAMERA MENU PAN SPEED AUTO T I NGS . . D I RECT I ON M I RROR OFF NEXT SET BACK CANCEL AE SETTING AE SETT I NG AE REFERENCE DEFAULT FL I D 0 COMMAND VC - REMOTE CONTROLLER I CKERLESS AE OFF NEXT SET BACK CANCEL If...each mode. 33 The infrared lighting can be used for more than 30 minutes. When you switch the camera back on . VC-C4 Mode Setting Menu The default mode for this camera is used in VC-C3 mode, the settings screens shown below appear. MAIN MENU MA I N MENU SET MENU...

Instruction Manual
Page 34
The DATA 8 BIT and NON PARITY settings are fixed, and the menu is set when using the VC-C50i/VC-C50iR in Canon Communication Camera VC-C3 mode (→ P.33). (3) To restore the default values for the settings (→ P.40), select [SET] in the RESTORE DEFAULT setting. 34 REMOTE CONTROLLER I NGS... the REMOTE CONTROLLER ID setting. (2) COMMAND is used for information on the SET MENU, see below. (1) See page 35 for controlling the VC-C50i/VC-C50iR from a PC or other device. MA I N MENU SET MENU D I SPLAY MENU CAMERA MENU NEXT SET BACK CANCEL SET MENU RS - 232C SETT I D 0 COMMAND...
The DATA 8 BIT and NON PARITY settings are fixed, and the menu is set when using the VC-C50i/VC-C50iR in Canon Communication Camera VC-C3 mode (→ P.33). (3) To restore the default values for the settings (→ P.40), select [SET] in the RESTORE DEFAULT setting. 34 REMOTE CONTROLLER I NGS... the REMOTE CONTROLLER ID setting. (2) COMMAND is used for information on the SET MENU, see below. (1) See page 35 for controlling the VC-C50i/VC-C50iR from a PC or other device. MA I N MENU SET MENU D I SPLAY MENU CAMERA MENU NEXT SET BACK CANCEL SET MENU RS - 232C SETT I D 0 COMMAND...
Instruction Manual
Page 35
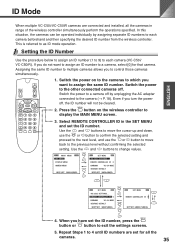
... assigning separate ID numbers to assign the same ID number. Even if you do not want to each camera (VC-C50i/ VC-C50iR). Use the 5 and 8 buttons to each camera beforehand and then specifying the desired ID number from the wireless controller. C4 MODE RESTORE DEFAULT NEXT SET... REMOTE CONTROLLER I D 5 SET SET CANCEL CANCEL 4. ENGLISH ID Mode When multiple VC-C50i/VC-C50iR cameras are set the ID number. This is referred to control those cameras simultaneously. Assigning the same ID number to multiple cameras allows you have set the ID number, press the m button or c button to...
... assigning separate ID numbers to assign the same ID number. Even if you do not want to each camera (VC-C50i/ VC-C50iR). Use the 5 and 8 buttons to each camera beforehand and then specifying the desired ID number from the wireless controller. C4 MODE RESTORE DEFAULT NEXT SET... REMOTE CONTROLLER I D 5 SET SET CANCEL CANCEL 4. ENGLISH ID Mode When multiple VC-C50i/VC-C50iR cameras are set the ID number. This is referred to control those cameras simultaneously. Assigning the same ID number to multiple cameras allows you have set the ID number, press the m button or c button to...

Instruction Manual
Page 40
...) Item Default Focus Brightness * Auto * Normal Item Preset Clock and Text Default None Not displayed (Setting Screen Default Settings) Item Setting SET MENU DISPLAY MENU CAMERA MENU BAUD RATE STOP BIT DATA 8 BIT NON PARITY REMOTE CONTROLLER ID COMMAND DATE DISPLAY TIME DISPLAY TXT DISPLAY SET DATE SET TIME TIME STYLE... DATE STYLE Specified text PAN SPEED TILT SPEED MOVABLE RANGE DIRECTION MIRROR NIGHT MODE AE REFERENCE FLICKERLESS AE 9600 1 Read only Read only 0 VC-C4 MODE OFF OFF OFF * 01.JAN.'00 * 00:00:00AM * AM/PM * DD/MM/YY * None AUTO (10 for MANUAL) AUTO (10 for ...
...) Item Default Focus Brightness * Auto * Normal Item Preset Clock and Text Default None Not displayed (Setting Screen Default Settings) Item Setting SET MENU DISPLAY MENU CAMERA MENU BAUD RATE STOP BIT DATA 8 BIT NON PARITY REMOTE CONTROLLER ID COMMAND DATE DISPLAY TIME DISPLAY TXT DISPLAY SET DATE SET TIME TIME STYLE... DATE STYLE Specified text PAN SPEED TILT SPEED MOVABLE RANGE DIRECTION MIRROR NIGHT MODE AE REFERENCE FLICKERLESS AE 9600 1 Read only Read only 0 VC-C4 MODE OFF OFF OFF * 01.JAN.'00 * 00:00:00AM * AM/PM * DD/MM/YY * None AUTO (10 for MANUAL) AUTO (10 for ...

Instruction Manual
Page 41
... f/4.0, 26× power zoom (shooting at 1/30 sec.) /Night mode: 0 lux Normal mode, Night mode VC-C50i Pan Mechanism: Rotation angle Left 100°, Right 100°; ENGLISH Specifications Item Details Video Signal Image Sensor Total number...VC-C50i: Approx. 420 g (Approx. 0.9 lb.) VC-C50iR: Approx. 490 g (Approx.1.1 lb.) * If you are using a computer to inf.; Rotation speed: 1°-90° per sec.* VIDEO OUT: BNC composite video output S-Video output, RS-232C control (input/output), sensor input, alarm output, external lighting control DC IN (rated at 13 V) Up to 9 cameras...
... f/4.0, 26× power zoom (shooting at 1/30 sec.) /Night mode: 0 lux Normal mode, Night mode VC-C50i Pan Mechanism: Rotation angle Left 100°, Right 100°; ENGLISH Specifications Item Details Video Signal Image Sensor Total number...VC-C50i: Approx. 420 g (Approx. 0.9 lb.) VC-C50iR: Approx. 490 g (Approx.1.1 lb.) * If you are using a computer to inf.; Rotation speed: 1°-90° per sec.* VIDEO OUT: BNC composite video output S-Video output, RS-232C control (input/output), sensor input, alarm output, external lighting control DC IN (rated at 13 V) Up to 9 cameras...


