ZoomBrowser EX 6.5 for Windows Instruction Manual
Page 2
... not be used with the [Find] function right on the camera model. To access this guide are based on the premise that a Canon compact digital camera will be available depending on the toolbar. HINT • The "Hint" sections contain procedural suggestions and tips for your convenience...later, you can also perform searches with the software. • Some functions may also differ slightly from the examples depending upon the camera or printer model in use. • The explanations in this function, in the explanations. Input search text here Table of Contents 2 If you are ...
... not be used with the [Find] function right on the camera model. To access this guide are based on the premise that a Canon compact digital camera will be available depending on the toolbar. HINT • The "Hint" sections contain procedural suggestions and tips for your convenience...later, you can also perform searches with the software. • Some functions may also differ slightly from the examples depending upon the camera or printer model in use. • The explanations in this function, in the explanations. Input search text here Table of Contents 2 If you are ...

ZoomBrowser EX 6.5 for Windows Instruction Manual
Page 13
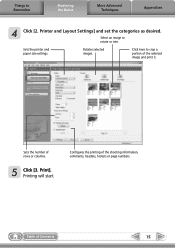
... and print a portion of Contents 13 Printing will start. Click the [Print & Email] task button in the Main Window, followed by [Print Using Other Software]. Printer and Layout Settings] and set the categories as desired. Sets the shooting date/time imprint settings. 5 Click [3. Table of an image. Click here to Remember...
... and print a portion of Contents 13 Printing will start. Click the [Print & Email] task button in the Main Window, followed by [Print Using Other Software]. Printer and Layout Settings] and set the categories as desired. Sets the shooting date/time imprint settings. 5 Click [3. Table of an image. Click here to Remember...
ZoomBrowser EX 6.5 for Windows Instruction Manual
Page 15
Printing will start. Configures the printing of Contents 15 Table of the shooting information, comments, headers, footers or page numbers. Click here to Remember Mastering the Basics More Advanced Techniques Appendices 4 Click [2. Sets the number of rows or columns. 5 Click [3. Print]. Things to crop a portion of the selected image and print it. Rotates selected images. Printer and Layout Settings] and set the categories as desired. Select an image to rotate or trim. Sets the printer and paper size settings.
Printing will start. Configures the printing of Contents 15 Table of the shooting information, comments, headers, footers or page numbers. Click here to Remember Mastering the Basics More Advanced Techniques Appendices 4 Click [2. Sets the number of rows or columns. 5 Click [3. Print]. Things to crop a portion of the selected image and print it. Rotates selected images. Printer and Layout Settings] and set the categories as desired. Select an image to rotate or trim. Sets the printer and paper size settings.

DV NETWORK SOLUTION DISK Ver.2 Software Instruction Manual
Page 71
...to the computer using the USB cable. Uninstalling the Canon USB Video Driver Uninstall the Canon USB Video Driver if it has not been installed correctly or if it is listed under category A in Camcorder Categories ( 13): Set the camcorder to NETWORK mode and connect it to computer using... the DV cable. 3 From the [start] menu, select [Control panel]. 4 Click [Printers and Other ...
...to the computer using the USB cable. Uninstalling the Canon USB Video Driver Uninstall the Canon USB Video Driver if it has not been installed correctly or if it is listed under category A in Camcorder Categories ( 13): Set the camcorder to NETWORK mode and connect it to computer using... the DV cable. 3 From the [start] menu, select [Control panel]. 4 Click [Printers and Other ...

DV NETWORK SOLUTION DISK Ver.2 Software Instruction Manual
Page 73
If Scanner and Camera Wizard or Explorer are running before uninstalling the driver. 1 Connect the power adapter to the camcorder. 2 Set the camcorder to the computer using the DV cable. AV/C Camera Storage Subunit-WIA Driver Uninstalling the AV/C Camera Storage Subunit-WIA Driver ...73 Close all programs that are open, close them. 3 From the [start] menu, select [Control panel]. 4 Click [Printers and Other Hardware]. AV/C Camera Storage Subunit...
If Scanner and Camera Wizard or Explorer are running before uninstalling the driver. 1 Connect the power adapter to the camcorder. 2 Set the camcorder to the computer using the DV cable. AV/C Camera Storage Subunit-WIA Driver Uninstalling the AV/C Camera Storage Subunit-WIA Driver ...73 Close all programs that are open, close them. 3 From the [start] menu, select [Control panel]. 4 Click [Printers and Other Hardware]. AV/C Camera Storage Subunit...

DV NETWORK SOLUTION DISK Ver.2 Software Instruction Manual
Page 87
... it. Troubleshooting 87 Disconnect the DV cable from the camcorder, close the memory card cover, and reconnect the camcorder to the computer. Uninstallation of the protect switch. AV/C Camera Storage Subunit-WIA Driver Installation The Canon camcorder is connected to the computer via a DV cable, ...but E is not recognized by the computer. Î Check if the camcorder is set to write- If the Camera icon does not appear in the [Printers and Other Hardware]. - Uninstall (...
... it. Troubleshooting 87 Disconnect the DV cable from the camcorder, close the memory card cover, and reconnect the camcorder to the computer. Uninstallation of the protect switch. AV/C Camera Storage Subunit-WIA Driver Installation The Canon camcorder is connected to the computer via a DV cable, ...but E is not recognized by the computer. Î Check if the camcorder is set to write- If the Camera icon does not appear in the [Printers and Other Hardware]. - Uninstall (...

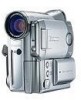
OPTURA500 OPTURA400 Instruction Manual
Page 43
... D/TIME SET 20 MY CAMERA CREATE START-UP IMAGE 121 SEL. S-UP IMG NO IMAGE, CANON LOGO, MY IMAGE 76 S-UP SOUND OFF, DEFAULT, MY SOUND 76 SHTR SOUND OPER. SOUND SELF-T SOUND \ PRINT Appears when connecting a printer with direct print function. 132 * OPTURA500 only. 43 Advanced Functions CARD PLAY MENU CAMERA...
... D/TIME SET 20 MY CAMERA CREATE START-UP IMAGE 121 SEL. S-UP IMG NO IMAGE, CANON LOGO, MY IMAGE 76 S-UP SOUND OFF, DEFAULT, MY SOUND 76 SHTR SOUND OPER. SOUND SELF-T SOUND \ PRINT Appears when connecting a printer with direct print function. 132 * OPTURA500 only. 43 Advanced Functions CARD PLAY MENU CAMERA...

OPTURA500 OPTURA400 Instruction Manual
Page 98
... locks the focus. In step 2, F turns green, and focus and exposure are recording a movie on a Tape When you are locked. ❍ The camcorder shuts off the ND filter: Open the menu and select [CAMERA SETUP]. " AUTO POWER OFF" appears 20 seconds before F and focusing frame turn green, ...; The still image cannot be recorded on a memory card when the 16:9 format is selected. ❍ " |" appears when you plan to connect the camcorder to a computer or printer. ❍ When the subject is set it is not suitable for 5 minutes to [ FINE] or [ NORMAL] and close the menu. ❍ When...
... locks the focus. In step 2, F turns green, and focus and exposure are recording a movie on a Tape When you are locked. ❍ The camcorder shuts off the ND filter: Open the menu and select [CAMERA SETUP]. " AUTO POWER OFF" appears 20 seconds before F and focusing frame turn green, ...; The still image cannot be recorded on a memory card when the 16:9 format is selected. ❍ " |" appears when you plan to connect the camcorder to a computer or printer. ❍ When the subject is set it is not suitable for 5 minutes to [ FINE] or [ NORMAL] and close the menu. ❍ When...

OPTURA500 OPTURA400 Instruction Manual
Page 122
... lights up and the current print setting will be connected to your camcorder: Canon Printers Canon Direct Print/PictBridge compatible CP-Printer Bubble Jet Direct/PictBridge compatible Bubble Jet Printer PictBridge compliant non-Canon Printer Connecting the Printer to the Camcorder Printer with Direct Print function. Set the camcorder to the camcorder. (Does not appear with movies, or still images that contains still...
... lights up and the current print setting will be connected to your camcorder: Canon Printers Canon Direct Print/PictBridge compatible CP-Printer Bubble Jet Direct/PictBridge compatible Bubble Jet Printer PictBridge compliant non-Canon Printer Connecting the Printer to the Camcorder Printer with Direct Print function. Set the camcorder to the camcorder. (Does not appear with movies, or still images that contains still...

OPTURA500 OPTURA400 Instruction Manual
Page 123
...10061; We recommend powering the camcorder from camcorder and printer, turn off camcorder and printer, turn both back on and reconnect the camcorder to the printer. button. may differ slightly depending on your printer model. 1. The Canon CP-Printers CP-10 and CP-100 are supplied with the camcorder. Printing with the CARD ... (print/share) button. Make sure that [ CONNECT] is set to [STANDARD]. ❍ Do not connect the camcorder to a printer when the camcorder is set in the menu. Select the still image you wish to continue printing, select another still image with the ...
...10061; We recommend powering the camcorder from camcorder and printer, turn off camcorder and printer, turn both back on and reconnect the camcorder to the printer. button. may differ slightly depending on your printer model. 1. The Canon CP-Printers CP-10 and CP-100 are supplied with the camcorder. Printing with the CARD ... (print/share) button. Make sure that [ CONNECT] is set to [STANDARD]. ❍ Do not connect the camcorder to a printer when the camcorder is set in the menu. Select the still image you wish to continue printing, select another still image with the ...

OPTURA500 OPTURA400 Instruction Manual
Page 124
... not restart, follow below procedure: 1. Canon Bubble Jet Printer: Resolve the error. Canon CP-Printer: Select [STOP] or [RESUME] and press the SET dial. (The [RESUME] setting may not appear with this camcorder, uploaded from the camcorder and printer. 2. The print setting menu disappears when... printing is fed through. - Canon Bubble Jet Printer: Printing stops even if it is incomplete and the paper is complete. •...
... not restart, follow below procedure: 1. Canon Bubble Jet Printer: Resolve the error. Canon CP-Printer: Select [STOP] or [RESUME] and press the SET dial. (The [RESUME] setting may not appear with this camcorder, uploaded from the camcorder and printer. 2. The print setting menu disappears when... printing is fed through. - Canon Bubble Jet Printer: Printing stops even if it is incomplete and the paper is complete. •...

OPTURA500 OPTURA400 Instruction Manual
Page 125
...1. The image's top, bottom and sides may be cropped slightly. ❍ [VIVID], [VIVID+NR] and [NR] can be selected with Canon Bubble Jet Printers. 125 Turn the SET dial to select (COPIES) and press the SET dial. 2. Direct Printing Setting the Print Style PAPER PAPER SIZE Available paper... 127 128 Selecting the Number of Copies A maximum of 99 copies can be selected for selecting the number of the camcorder screen after connecting, and refer to all printers. E Check which icon appears in the upper left corner of copies and trimming ( 130) is printed at an enlarged...
...1. The image's top, bottom and sides may be cropped slightly. ❍ [VIVID], [VIVID+NR] and [NR] can be selected with Canon Bubble Jet Printers. 125 Turn the SET dial to select (COPIES) and press the SET dial. 2. Direct Printing Setting the Print Style PAPER PAPER SIZE Available paper... 127 128 Selecting the Number of Copies A maximum of 99 copies can be selected for selecting the number of the camcorder screen after connecting, and refer to all printers. E Check which icon appears in the upper left corner of copies and trimming ( 130) is printed at an enlarged...

OPTURA500 OPTURA400 Instruction Manual
Page 126
Turn the SET dial to select the paper type and press the SET dial. Select the paper type of the paper set in your printer. 3. Turn the SET dial to select a date print option and press the SET dial. 126 In the print setting menu, turn the SET dial to ... SET dial. 2. In the print setting menu, turn the SET dial to select a layout option and press the SET dial. Including the Date in your printer. 4.
Turn the SET dial to select the paper type and press the SET dial. Select the paper type of the paper set in your printer. 3. Turn the SET dial to select a date print option and press the SET dial. 126 In the print setting menu, turn the SET dial to ... SET dial. 2. In the print setting menu, turn the SET dial to select a layout option and press the SET dial. Including the Date in your printer. 4.

OPTURA500 OPTURA400 Instruction Manual
Page 127
The image's top, bottom and sides may be cropped slightly. 1. Direct Printing 127 Turn the SET dial to the Bubble Jet Printer User Guide. Setting the Print Style PAPER CARD #1*, CARD #2*, CARD #3*, LTR, A4 For details on paper type, refer to select a setting and press the SET... and press the SET dial. Make sure that (PAPER) is printed at an enlarged size. Setting the Print Effect (Image Optimize) This function uses the camcorder's recording information to select [STYLE] and press the SET dial. 2. E 1. In the print setting menu, turn the SET dial to optimize the image data, ...
The image's top, bottom and sides may be cropped slightly. 1. Direct Printing 127 Turn the SET dial to the Bubble Jet Printer User Guide. Setting the Print Style PAPER CARD #1*, CARD #2*, CARD #3*, LTR, A4 For details on paper type, refer to select a setting and press the SET... and press the SET dial. Make sure that (PAPER) is printed at an enlarged size. Setting the Print Effect (Image Optimize) This function uses the camcorder's recording information to select [STYLE] and press the SET dial. 2. E 1. In the print setting menu, turn the SET dial to optimize the image data, ...

OPTURA500 OPTURA400 Instruction Manual
Page 128
...SET dial. 5. The image's top, bottom and sides may be cropped slightly. ❍ [MULTIPLE] can only be selected when [IMAGE] is set in your printer. • Pressing the MENU button brings you back to the print settings menu. OFF Prints without date. ❍ The [BORDERS] and [DATE] settings cannot...relatively unchanged from the recorded image when it is printed. [BORDERLESS]/[MULTIPLE]: The center portion of the recorded image is not supported by the CP Printers CP-10 and CP-100. 1. Turn the SET dial to select the paper size and press the SET dial. • Select the paper...
...SET dial. 5. The image's top, bottom and sides may be cropped slightly. ❍ [MULTIPLE] can only be selected when [IMAGE] is set in your printer. • Pressing the MENU button brings you back to the print settings menu. OFF Prints without date. ❍ The [BORDERS] and [DATE] settings cannot...relatively unchanged from the recorded image when it is printed. [BORDERLESS]/[MULTIPLE]: The center portion of the recorded image is not supported by the CP Printers CP-10 and CP-100. 1. Turn the SET dial to select the paper size and press the SET dial. • Select the paper...

OPTURA500 OPTURA400 Instruction Manual
Page 130
... with the following operations: - In the print setting menu, turn off the camcorder. - W • Move the zoom lever toward T to select [TRIMMING] and press the SET dial. White: No trimming settings. - Change the size of the trimming frame (Canon CP-Printers only): - When you turn the SET dial to shrink the frame, and...
... with the following operations: - In the print setting menu, turn off the camcorder. - W • Move the zoom lever toward T to select [TRIMMING] and press the SET dial. White: No trimming settings. - Change the size of the trimming frame (Canon CP-Printers only): - When you turn the SET dial to shrink the frame, and...

OPTURA500 OPTURA400 Instruction Manual
Page 131
... Order Settings You can select still images for printing and set the number of 998 still images can be used for printing on DPOF compatible printers ( 122). Select the still image you wish to close the menu. Move the zoom lever toward W. • Up to 6 images appear. • Select the image... CARD PLAY Direct Printing ( 36) CARD OPERATIONS PRINT ORDER 1. Selecting Still Images for Printing (Print Order) Do not connect a USB or DV cable to the camcorder while setting the print orders. Printing with the Digital Print Order Format (DPOF) standards and can E be selected.
... Order Settings You can select still images for printing and set the number of 998 still images can be used for printing on DPOF compatible printers ( 122). Select the still image you wish to close the menu. Move the zoom lever toward W. • Up to 6 images appear. • Select the image... CARD PLAY Direct Printing ( 36) CARD OPERATIONS PRINT ORDER 1. Selecting Still Images for Printing (Print Order) Do not connect a USB or DV cable to the camcorder while setting the print orders. Printing with the Digital Print Order Format (DPOF) standards and can E be selected.

OPTURA500 OPTURA400 Instruction Manual
Page 132
Make sure that [PRINT] is complete. ❍ Depending on the connected printer, you change the print order settings. - When you connect a printer with print order settings. 132 Select [ PRINT ORDERS ALL ERASE]. All " " disappear. 4. Open the menu and select [\ PRINT].... be printed. Erasing All Print Orders CAMERA PLAY (VCR) CARD CAMERA CARD PLAY ( 36) CARD OPERATIONS PRINT ORDERS ALL ERASE 1. Connect the printer to the camcorder ( 122). 2. Select [YES]. "ERASE ALL PRINT ORDERS?", [NO] and [YES] appears. 3. Close the menu. Printing CAMERA PLAY (VCR...
Make sure that [PRINT] is complete. ❍ Depending on the connected printer, you change the print order settings. - When you connect a printer with print order settings. 132 Select [ PRINT ORDERS ALL ERASE]. All " " disappear. 4. Open the menu and select [\ PRINT].... be printed. Erasing All Print Orders CAMERA PLAY (VCR) CARD CAMERA CARD PLAY ( 36) CARD OPERATIONS PRINT ORDERS ALL ERASE 1. Connect the printer to the camcorder ( 122). 2. Select [YES]. "ERASE ALL PRINT ORDERS?", [NO] and [YES] appears. 3. Close the menu. Printing CAMERA PLAY (VCR...

OPTURA500 OPTURA400 Instruction Manual
Page 134
When downloading movies, set it to a computer. CONNECT], set the camcorder to movie playback mode and connect it to Do not connect the camcorder to a printer when [ [STORAGE], or in [STANDARD] mode or when you have set to ❍ In [STANDARD] mode, install the supplied Digital Video Software when...Windows 2000/Windows XP and Mac OS 9 or later, an OS standard driver will be installed automatically. 134 Still Images are saved in the [***CANON] folder of the [DCIM] folder, and movies are saved in the [PRL***] folder of Windows 98 must install the DVC Storage Driver from the...
When downloading movies, set it to a computer. CONNECT], set the camcorder to movie playback mode and connect it to Do not connect the camcorder to a printer when [ [STORAGE], or in [STANDARD] mode or when you have set to ❍ In [STANDARD] mode, install the supplied Digital Video Software when...Windows 2000/Windows XP and Mac OS 9 or later, an OS standard driver will be installed automatically. 134 Still Images are saved in the [***CANON] folder of the [DCIM] folder, and movies are saved in the [PRL***] folder of Windows 98 must install the DVC Storage Driver from the...

OPTURA500 OPTURA400 Instruction Manual
Page 144
...edited on a computer. TOO MANY STILL Disconnect the USB cable, decrease the number of your printer. COULD NOT PRINT X IMAGES SET PRINT ORDER PRINT ORDER ERROR Explanation There is a problem with the camcorder, or the image file is corrupted. Wrong paper size is inserted, or the ink cannot... be used with the selected paper type. Paper is not correctly inserted or there is not supported by the printer. There is a problem with the camcorder. BE RECORDED card depending on the computer screen, close it. If a dialog DISCONNECT USB appeared on the signal. You ...
...edited on a computer. TOO MANY STILL Disconnect the USB cable, decrease the number of your printer. COULD NOT PRINT X IMAGES SET PRINT ORDER PRINT ORDER ERROR Explanation There is a problem with the camcorder, or the image file is corrupted. Wrong paper size is inserted, or the ink cannot... be used with the selected paper type. Paper is not correctly inserted or there is not supported by the printer. There is a problem with the camcorder. BE RECORDED card depending on the computer screen, close it. If a dialog DISCONNECT USB appeared on the signal. You ...

