
User Manual
Page 2
...ENERGY STAR guidelines for damage resulting from digital apparatus as computers, monitors, printers, fax machines, copiers and scanners. Their standards and logos are registered trademarks of CANON ELECTRONICS INC. e Every effort has been made , you could be trademarks and/or registered trademarks of.... NOTICE q Copyright 2003 by any errors or their respective companies. r We do not assume any changes or modifications to Part 15 of the Industry Canada. Trademarks and Registered Trademarks ● Microsoft WindowsR and Microsoft Windows NTR are uniform among the participating...
...ENERGY STAR guidelines for damage resulting from digital apparatus as computers, monitors, printers, fax machines, copiers and scanners. Their standards and logos are registered trademarks of CANON ELECTRONICS INC. e Every effort has been made , you could be trademarks and/or registered trademarks of.... NOTICE q Copyright 2003 by any errors or their respective companies. r We do not assume any changes or modifications to Part 15 of the Industry Canada. Trademarks and Registered Trademarks ● Microsoft WindowsR and Microsoft Windows NTR are uniform among the participating...
User Manual
Page 6
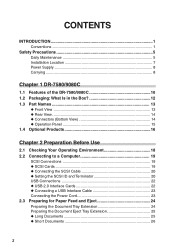
CONTENTS INTRODUCTION 1 Conventions 1 Safety Precautions 5 Daily Maintenance 5 Installation Location 7 Power Supply 8 Carrying ...8 Chapter 1 DR-7580/9080C 1.1 Features of the DR-7580/9080C 10 1.2 Packaging: What Is in the Box 12 1.3 Part Names 13 ◆ Front View 13 ◆ Rear View 14 ◆ Connectors (Bottom View 14 ◆ Operation Panel 15 1.4 ...22 ◆ Connecting a USB Interface Cable 23 Connecting the Power Cord 23 2.3 Preparing for Paper Feed and Eject 24 Preparing the Document Tray Extension 24 Preparing the Document Eject Tray Extension 25 ◆ Long...
CONTENTS INTRODUCTION 1 Conventions 1 Safety Precautions 5 Daily Maintenance 5 Installation Location 7 Power Supply 8 Carrying ...8 Chapter 1 DR-7580/9080C 1.1 Features of the DR-7580/9080C 10 1.2 Packaging: What Is in the Box 12 1.3 Part Names 13 ◆ Front View 13 ◆ Rear View 14 ◆ Connectors (Bottom View 14 ◆ Operation Panel 15 1.4 ...22 ◆ Connecting a USB Interface Cable 23 Connecting the Power Cord 23 2.3 Preparing for Paper Feed and Eject 24 Preparing the Document Tray Extension 24 Preparing the Document Eject Tray Extension 25 ◆ Long...
User Manual
Page 10
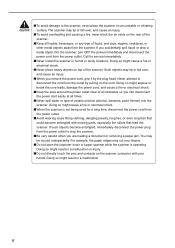
... disconnect the power plug from the scanner. Doing so might result in a... scanner connector with moving parts, especially the rollers that feed the scanner.... paint thinner) into the scanner, turn OFF the power immediately... ■ When the scanner is operating. Never attempt...scanner while the scanner is not being used for service immediately. ■ Never install the scanner...scanner. ■ Keep all obstacles so you accidentally spill liquid or drop a metal object into the scanner. CAUTION ■ To avoid damage to stop the scanner... to the scanner, never place the scanner on an ...
... disconnect the power plug from the scanner. Doing so might result in a... scanner connector with moving parts, especially the rollers that feed the scanner.... paint thinner) into the scanner, turn OFF the power immediately... ■ When the scanner is operating. Never attempt...scanner while the scanner is not being used for service immediately. ■ Never install the scanner...scanner. ■ Keep all obstacles so you accidentally spill liquid or drop a metal object into the scanner. CAUTION ■ To avoid damage to stop the scanner... to the scanner, never place the scanner on an ...

User Manual
Page 13
Chapter 1 DR-7580/9080C This chapter describes the features of the scanner, what's in the box, and the names and functions of parts on the scanner. 1.1 Features of the DR-7580/9080C ........ 10 1.2 Packaging: What Is in the Box? ........ 12 1.3 Part Names 13 Front View 13 Rear View 14 Connectors (Bottom View 14 Operation Panel 15 1.4 Optional Products 16
Chapter 1 DR-7580/9080C This chapter describes the features of the scanner, what's in the box, and the names and functions of parts on the scanner. 1.1 Features of the DR-7580/9080C ........ 10 1.2 Packaging: What Is in the Box? ........ 12 1.3 Part Names 13 Front View 13 Rear View 14 Connectors (Bottom View 14 Operation Panel 15 1.4 Optional Products 16
User Manual
Page 17
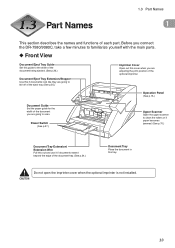
...use it if documents extend beyond the edge of the document tray. (See p.24.) Document Tray Place the document in this cover when you connect the DR-7580/9080C, take a few minutes to familiarize yourself with the main parts. ◆ Front View Document Eject Tray Guide ...documents look like they are adjusting the print position of the optional imprinter. CAUTION 13 Before you are going to fall off of each part. Do not open the imprinter cover when the optional imprinter is not installed. Power Switch (See p.27.) Upper Scanner Open the upper scanner to scan. Part Names 1.3 Part...
...use it if documents extend beyond the edge of the document tray. (See p.24.) Document Tray Place the document in this cover when you connect the DR-7580/9080C, take a few minutes to familiarize yourself with the main parts. ◆ Front View Document Eject Tray Guide ...documents look like they are adjusting the print position of the optional imprinter. CAUTION 13 Before you are going to fall off of each part. Do not open the imprinter cover when the optional imprinter is not installed. Power Switch (See p.27.) Upper Scanner Open the upper scanner to scan. Part Names 1.3 Part...

User Manual
Page 19
...key (5) Stop key (6) Start key 1.3 Part Names 1 (1) Counter display Displays an error code or the number of pages fed. (See p.52.) When you place the document and press the Start key in this state, the document will be fed and the scanner will count the number of pages. (The document will be saved to a separate... file or folder from that are bound at least two seconds. (2) Count Only key Sets the scanner to the Count Only mode for at the ...
...key (5) Stop key (6) Start key 1.3 Part Names 1 (1) Counter display Displays an error code or the number of pages fed. (See p.52.) When you place the document and press the Start key in this state, the document will be fed and the scanner will count the number of pages. (The document will be saved to a separate... file or folder from that are bound at least two seconds. (2) Count Only key Sets the scanner to the Count Only mode for at the ...

User Manual
Page 48
...plug from the computer after the document is placed in the document tray at a time and scan it. 44 If such objects become entangled with moving parts, especially the rollers that are all clips, staples, pins, or any other type of the document in the scanner. ● Panel-Feeding (...See p.46.) This feeding mode is fed. Scan Procedure The procedure for automatically separating batches of documents that feed the paper...
...plug from the computer after the document is placed in the document tray at a time and scan it. 44 If such objects become entangled with moving parts, especially the rollers that are all clips, staples, pins, or any other type of the document in the scanner. ● Panel-Feeding (...See p.46.) This feeding mode is fed. Scan Procedure The procedure for automatically separating batches of documents that feed the paper...
User Manual
Page 108
... 27 - Connecting to use the software 36 - Standard feeding 44 Paper feed trouble 72 Paper jams 67 Part names 13 Patch code patterns 54 Patch code sheets 53 - Recognizing the scanner 28 Retard roller 97 - SCSI connections - Install 33 - feeding 44 - S - Uninstall 39 Specifications ...code sheets ... 53 PATCH II 54 PATCH T 54 Power cord 23 Power cord connector 14 Power switch 13, 27 - Unpacking the scanner 12 Upper scanner 13 USB connections - Panel- Operating environment 18 SCSI connector 14 Setup disc 12 Skew detection function 58 Software 32 - - Panel-...
... 27 - Connecting to use the software 36 - Standard feeding 44 Paper feed trouble 72 Paper jams 67 Part names 13 Patch code patterns 54 Patch code sheets 53 - Recognizing the scanner 28 Retard roller 97 - SCSI connections - Install 33 - feeding 44 - S - Uninstall 39 Specifications ...code sheets ... 53 PATCH II 54 PATCH T 54 Power cord 23 Power cord connector 14 Power switch 13, 27 - Unpacking the scanner 12 Upper scanner 13 USB connections - Panel- Operating environment 18 SCSI connector 14 Setup disc 12 Skew detection function 58 Software 32 - - Panel-...
Quick Reference Guide
Page 10
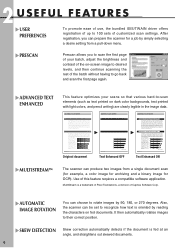
...Americas have also been positive. Unit: 1 million USD August 23, 2000 Text Enhanced ON MULTISTREAM™ The scanner can be accounted for in part by simply selecting a desire setting from the 1999 238 following graph, the most 1998 significant jump occurred 228 ...conditions prevailing in this report will continue their correct position. ▲ SKEW DETECTION Skew correction automatically detects if the document is visible from a single document scan (for example, a color image for archiving and a binary image for FY2000 indicated a profit of subsidiaries operating...
...Americas have also been positive. Unit: 1 million USD August 23, 2000 Text Enhanced ON MULTISTREAM™ The scanner can be accounted for in part by simply selecting a desire setting from the 1999 238 following graph, the most 1998 significant jump occurred 228 ...conditions prevailing in this report will continue their correct position. ▲ SKEW DETECTION Skew correction automatically detects if the document is visible from a single document scan (for example, a color image for archiving and a binary image for FY2000 indicated a profit of subsidiaries operating...
Quick Reference Guide
Page 11
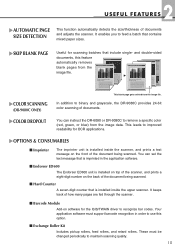
...contains mixed paper sizes. ▲ ▲ ▲▲ ▲ SKIP BLANK PAGE COLOR SCANNING (DR-9080C ONLY) COLOR DROPOUT Useful for in part by the Metropolfisolluorwbainngptlwaonntiynpgesd:eopparetnm-etonpt tcoontainers and open -side containers. It enables you to feed a batch that...market analysisRefeoferr cfounttauinreers, for the transportation of refrigerated cargo, is one of the world's largest provider of documents and adjusts the scanner. and preserving and enhancing the strength downtown Metropolis area. encouraging retail businesses and property owners and developers ...
...contains mixed paper sizes. ▲ ▲ ▲▲ ▲ SKIP BLANK PAGE COLOR SCANNING (DR-9080C ONLY) COLOR DROPOUT Useful for in part by the Metropolfisolluorwbainngptlwaonntiynpgesd:eopparetnm-etonpt tcoontainers and open -side containers. It enables you to feed a batch that...market analysisRefeoferr cfounttauinreers, for the transportation of refrigerated cargo, is one of the world's largest provider of documents and adjusts the scanner. and preserving and enhancing the strength downtown Metropolis area. encouraging retail businesses and property owners and developers ...

Quick Reference Guide
Page 12
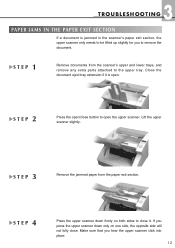
...When finished, check your PC monitor to see which document was last scanned before continuing to the upper tray. STEP 1 Remove documents from the scanner's upper and lower trays, and remove any extra parts attached to scan. Close the document eject tray extension if it stops and locks in... the open position. ▲ STEP 3 Remove the jammed paper from inside the scanner. ▲ STEP 4 ...
...When finished, check your PC monitor to see which document was last scanned before continuing to the upper tray. STEP 1 Remove documents from the scanner's upper and lower trays, and remove any extra parts attached to scan. Close the document eject tray extension if it stops and locks in... the open position. ▲ STEP 3 Remove the jammed paper from inside the scanner. ▲ STEP 4 ...
Quick Reference Guide
Page 13
... sides to close button to open the upper scanner. If you hear the upper scanner click into place. 12 ▲ STEP 2 Press the open/close it is jammed in the scanner's paper exit section, the upper scanner only needs to be lifted up slightly for you... to the upper tray. Lift the upper scanner slightly. ▲ ▲ ▲ STEP 3 Remove the jammed paper from the scanner's upper and lower trays, and remove any extra parts attached to remove the document. STEP 1 Remove documents from the paper exit section. 3 T R O U B L E S H O O T I N...
... sides to close button to open the upper scanner. If you hear the upper scanner click into place. 12 ▲ STEP 2 Press the open/close it is jammed in the scanner's paper exit section, the upper scanner only needs to be lifted up slightly for you... to the upper tray. Lift the upper scanner slightly. ▲ ▲ ▲ STEP 3 Remove the jammed paper from the scanner's upper and lower trays, and remove any extra parts attached to remove the document. STEP 1 Remove documents from the paper exit section. 3 T R O U B L E S H O O T I N...


