User Manual
Page 8
...Document Detection Sensor 81 Cleaning the Scanning Glasses and Rollers 81 Cleaning the Shading Plates 85 Cleaning the Guide Plate (When Using the Imprinter 87 Cleaning the Ink Jet Nozzles (When Using the Imprinter 87 Power Outlet 87 7.2 Replacing the Rollers 88 When to Replace Rollers... 88 Resetting the Counter 89 Installing and Removing the Rollers 91 ◆ Installing and Removing Pickup Rollers 92 ◆ Installing and Removing Feed Rollers 94 ◆ Installing and Removing Retard Rollers 97 Specifications 100 Specifications for the Scanner...
...Document Detection Sensor 81 Cleaning the Scanning Glasses and Rollers 81 Cleaning the Shading Plates 85 Cleaning the Guide Plate (When Using the Imprinter 87 Cleaning the Ink Jet Nozzles (When Using the Imprinter 87 Power Outlet 87 7.2 Replacing the Rollers 88 When to Replace Rollers... 88 Resetting the Counter 89 Installing and Removing the Rollers 91 ◆ Installing and Removing Pickup Rollers 92 ◆ Installing and Removing Feed Rollers 94 ◆ Installing and Removing Retard Rollers 97 Specifications 100 Specifications for the Scanner...
User Manual
Page 10
...9632; Keep the area around the power outlet clear of all obstacles so you are loading a document or removing a paper jam. Doing so might result in a malfunction or injury. ■ ... heavy objects on the scanner connector with moving parts, especially the rollers that could become entangled, immediately disconnect the power plug from the power outlet to stop the scanner. ■ Be very...■ Avoid wearing loose fitting clothing, dangling jewelry, long ties, or even long hair that feed the scanner. You may tip or fall over , and cause an injury. ■ To avoid overheating and...
...9632; Keep the area around the power outlet clear of all obstacles so you are loading a document or removing a paper jam. Doing so might result in a malfunction or injury. ■ ... heavy objects on the scanner connector with moving parts, especially the rollers that could become entangled, immediately disconnect the power plug from the power outlet to stop the scanner. ■ Be very...■ Avoid wearing loose fitting clothing, dangling jewelry, long ties, or even long hair that feed the scanner. You may tip or fall over , and cause an injury. ■ To avoid overheating and...
User Manual
Page 46
... If you want to scan long documents. • Before scanning documents that they are : Width : 2.2" to 12" (55 to 305 mm) Length : 2.8" to 17.0" (70 to 432 mm) (Documents up to 39.4" (1,000 mm) can feed a wide variety of Documents The DR-7580/9080C can be scanned in the extra ...ranges of width and length for a document are not stuck together. • To avoid paper jams, damage to documents, and a scanner malfunction, do not feed the following types of documents and how to clean the scanning rollers. (See p.81.) • If you scan documents with large documents, such as 11" x 17"...
... If you want to scan long documents. • Before scanning documents that they are : Width : 2.2" to 12" (55 to 305 mm) Length : 2.8" to 17.0" (70 to 432 mm) (Documents up to 39.4" (1,000 mm) can feed a wide variety of Documents The DR-7580/9080C can be scanned in the extra ...ranges of width and length for a document are not stuck together. • To avoid paper jams, damage to documents, and a scanner malfunction, do not feed the following types of documents and how to clean the scanning rollers. (See p.81.) • If you scan documents with large documents, such as 11" x 17"...

User Manual
Page 48
.... If such objects become entangled with moving parts, especially the rollers that are different sizes. Scanning starts automatically when the scanner detects a document in the document tray to continue scanning. ● Manual Feeding (See p.50.) Select this feeding mode if the document is useful when scanning documents that could become entangled, immediately disconnect the power plug from the...
.... If such objects become entangled with moving parts, especially the rollers that are different sizes. Scanning starts automatically when the scanner detects a document in the document tray to continue scanning. ● Manual Feeding (See p.50.) Select this feeding mode if the document is useful when scanning documents that could become entangled, immediately disconnect the power plug from the...
User Manual
Page 76
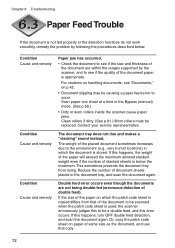
...If this happens, turn OFF double feed detection, and scan the document again. Reduce the number of document sheets placed in the Bypass (manual) mode. (See p.50.) • Dirty or worn rollers inside the scanner cause paper jams. Clean rollers if dirty. (See p.81.) Worn rollers must be replaced. If the ...size of the paper on which the document is stored. Condition Cause and remedy Condition Cause and remedy Condition Cause...
...If this happens, turn OFF double feed detection, and scan the document again. Reduce the number of document sheets placed in the Bypass (manual) mode. (See p.50.) • Dirty or worn rollers inside the scanner cause paper jams. Clean rollers if dirty. (See p.81.) Worn rollers must be replaced. If the ...size of the paper on which the document is stored. Condition Cause and remedy Condition Cause and remedy Condition Cause...

User Manual
Page 87
Feeding Rollers Pickup Rollers Feed Rollers Platen Rollers Retard Rollers 6 Remove the pickup roller, retard roller, and feed roller. (See "Installing and Removing the Rollers," on p.91.) 7 Use cloth from which all the water has been wrung out to wipe off the rollers. 7 83 7.1 Daily Cleaning 5 Wipe the rollers with a firmly wrung cloth moistened with water. Rollers are located at the positions indicated in the figure below.
Feeding Rollers Pickup Rollers Feed Rollers Platen Rollers Retard Rollers 6 Remove the pickup roller, retard roller, and feed roller. (See "Installing and Removing the Rollers," on p.91.) 7 Use cloth from which all the water has been wrung out to wipe off the rollers. 7 83 7.1 Daily Cleaning 5 Wipe the rollers with a firmly wrung cloth moistened with water. Rollers are located at the positions indicated in the figure below.

User Manual
Page 88
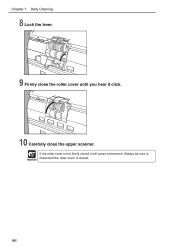
... place. Important If paper jams or double-feed (feeding of two or more document pages) occurs frequently in spite of your service representative. 84 Chapter 7 Daily Cleaning 8 Replace the rollers that you press the upper scanner down only on both sides to close the upper scanner. 10 Press the upper scanner down firmly on one side, the...
... place. Important If paper jams or double-feed (feeding of two or more document pages) occurs frequently in spite of your service representative. 84 Chapter 7 Daily Cleaning 8 Replace the rollers that you press the upper scanner down only on both sides to close the upper scanner. 10 Press the upper scanner down firmly on one side, the...
User Manual
Page 92
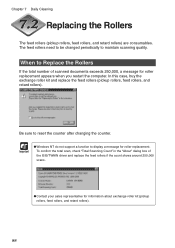
... documents exceeds 250,000, a message for roller replacement appears when you restart the computer. In this case, buy the exchange roller kit and replace the feed rollers (pickup rollers, feed rollers, and retard rollers). When to display a message for information about exchange roller kit (pickup rollers, feed rollers, and retard rollers). 88 Be sure to maintain scanning quality. Chapter 7 Daily Cleaning Replacing the Rollers The feed rollers...
... documents exceeds 250,000, a message for roller replacement appears when you restart the computer. In this case, buy the exchange roller kit and replace the feed rollers (pickup rollers, feed rollers, and retard rollers). When to display a message for information about exchange roller kit (pickup rollers, feed rollers, and retard rollers). 88 Be sure to maintain scanning quality. Chapter 7 Daily Cleaning Replacing the Rollers The feed rollers...

User Manual
Page 93
7.2 Replacing the Rollers Resetting the Counter Do the following procedure to reset the counter after replacing the feed rollers. 1 Click the [Start] button, and then click [Settings]-[Control Panel]. 2 Double click on the [Scanners and Cameras] icon ● Windows NT do not display the "Scanners and Cameras" icon. ● The displayed dialog box differs depending on which Windows operating system Note you are using. 7 89
7.2 Replacing the Rollers Resetting the Counter Do the following procedure to reset the counter after replacing the feed rollers. 1 Click the [Start] button, and then click [Settings]-[Control Panel]. 2 Double click on the [Scanners and Cameras] icon ● Windows NT do not display the "Scanners and Cameras" icon. ● The displayed dialog box differs depending on which Windows operating system Note you are using. 7 89

User Manual
Page 95
...; Turn OFF the power to the scanner and unplug the power cord from the power outlet when you need to clean or replace the pickup, feed, or retard rollers. Pickup Rollers Feed Rollers Retard Rollers 7 91 Leaving the power turned ON may damage them. 7.2 Replacing the Rollers Installing and Removing the Rollers Follow the procedure shown below to remove...
...; Turn OFF the power to the scanner and unplug the power cord from the power outlet when you need to clean or replace the pickup, feed, or retard rollers. Pickup Rollers Feed Rollers Retard Rollers 7 91 Leaving the power turned ON may damage them. 7.2 Replacing the Rollers Installing and Removing the Rollers Follow the procedure shown below to remove...

User Manual
Page 97
If the roller holder and roller cover are closed it click. 7 Carefully close the roller cover until you hear it will cause a feed error. 7.2 Replacing the Rollers 5 Firmly close the roller holder until you hear it click. 6 Firmly close the upper scanner. Important Always be sure to check that the roller holder and roller cover are not firmly closed . 7 93
If the roller holder and roller cover are closed it click. 7 Carefully close the roller cover until you hear it will cause a feed error. 7.2 Replacing the Rollers 5 Firmly close the roller holder until you hear it click. 6 Firmly close the upper scanner. Important Always be sure to check that the roller holder and roller cover are not firmly closed . 7 93

User Manual
Page 98
Chapter 7 Daily Cleaning ◆ Installing and Removing Feed Rollers 1 Open the upper scanner. 2 Open the roller cover. 3 Pull the lever that locks the feed rollers in place towards you. 4 Slide the feed rollers to the right, and then pull them towards you. 94
Chapter 7 Daily Cleaning ◆ Installing and Removing Feed Rollers 1 Open the upper scanner. 2 Open the roller cover. 3 Pull the lever that locks the feed rollers in place towards you. 4 Slide the feed rollers to the right, and then pull them towards you. 94

User Manual
Page 99
5 Remove the feed rollers. 7.2 Replacing the Rollers 6 Place the new feed rollers on the pin. 7 Set the feed rollers in place (q), and align the notch in the roller's axle with the shaft on the scanner (w). 7 95
5 Remove the feed rollers. 7.2 Replacing the Rollers 6 Place the new feed rollers on the pin. 7 Set the feed rollers in place (q), and align the notch in the roller's axle with the shaft on the scanner (w). 7 95
User Manual
Page 100
If the roller cover is closed it click. 10 Carefully close the roller cover until you hear it will cause a feed error. Always be sure to Important check that the roller cover is not firmly closed . 96 Chapter 7 Daily Cleaning 8 Lock the lever. 9 Firmly close the upper scanner.
If the roller cover is closed it click. 10 Carefully close the roller cover until you hear it will cause a feed error. Always be sure to Important check that the roller cover is not firmly closed . 96 Chapter 7 Daily Cleaning 8 Lock the lever. 9 Firmly close the upper scanner.

User Manual
Page 106
Consumables Exchange Roller Kit This kit is for replacing the feed rollers. If a roller replacement message appears, contact your service representative to buy an Exchange Roller Kit. (See "Replacing the Rollers," on p.88.) Exterior Dimensions Units: inches (units in parenthesis are millimeters) ◆ Top view 18.1" (460 mm) 9.4" (239 mm) 9.9" (252 mm) 6.2" (158 mm) 12.3" (312 mm) ◆ Side view 23.7" (603 mm) 16.4" (417 mm) 15.1" (385 mm) 12.5" (317 mm) 6.3" (161 mm) 102 20.7" (525 mm) 25.2" (640 mm) 27.8" (705 mm)
Consumables Exchange Roller Kit This kit is for replacing the feed rollers. If a roller replacement message appears, contact your service representative to buy an Exchange Roller Kit. (See "Replacing the Rollers," on p.88.) Exterior Dimensions Units: inches (units in parenthesis are millimeters) ◆ Top view 18.1" (460 mm) 9.4" (239 mm) 9.9" (252 mm) 6.2" (158 mm) 12.3" (312 mm) ◆ Side view 23.7" (603 mm) 16.4" (417 mm) 15.1" (385 mm) 12.5" (317 mm) 6.3" (161 mm) 102 20.7" (525 mm) 25.2" (640 mm) 27.8" (705 mm)
User Manual
Page 107
... key 15 - Index Index - Type of DR-7580/9080C 10 Feed rollers 88 - B - Main unit 80 - Daily cleaning 80 Daily maintenance 5 DIP switch 14 Document detection function .......... 58 Document detection sensor 49 Document eject tray extension . 13, 25 Document eject tray guide 13 Document guide 13 Document tray 13 Document tray extension .......... 13, 24 Double feed detection function ....... 58 - Guide plate 87...
... key 15 - Index Index - Type of DR-7580/9080C 10 Feed rollers 88 - B - Main unit 80 - Daily cleaning 80 Daily maintenance 5 DIP switch 14 Document detection function .......... 58 Document detection sensor 49 Document eject tray extension . 13, 25 Document eject tray guide 13 Document guide 13 Document tray 13 Document tray extension .......... 13, 24 Double feed detection function ....... 58 - Guide plate 87...
User Manual
Page 108
... code sheets ... 53 PATCH II 54 PATCH T 54 Power cord 23 Power cord connector 14 Power switch 13, 27 - Recognizing the scanner 28 Retard roller 97 - How to set the user mode 62 104 feeding 46 Paper feed methods 44 - Connecting to use the software 36 - How to a computer .......... 22 - SCSI connections - U - Unpacking the...
... code sheets ... 53 PATCH II 54 PATCH T 54 Power cord 23 Power cord connector 14 Power switch 13, 27 - Recognizing the scanner 28 Retard roller 97 - How to set the user mode 62 104 feeding 46 Paper feed methods 44 - Connecting to use the software 36 - How to a computer .......... 22 - SCSI connections - U - Unpacking the...
Quick Reference Guide
Page 2
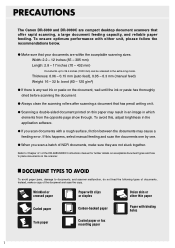
...compact desktop document scanners that offer rapid scanning, a large document feeding capacity, and reliable paper feeding. To avoid this happens, select manual feeding and scan the documents one by one. ● When you scan documents with either...feeding error. Refer to Chapter 4.1 of the DR-6080/9080C Instructions manual for further details on acceptable document types and how to place documents on the document, wait until the ink or paste has thoroughly dried before scanning the document. ● Always clean the scanning rollers after scanning a document that your documents...
...compact desktop document scanners that offer rapid scanning, a large document feeding capacity, and reliable paper feeding. To avoid this happens, select manual feeding and scan the documents one by one. ● When you scan documents with either...feeding error. Refer to Chapter 4.1 of the DR-6080/9080C Instructions manual for further details on acceptable document types and how to place documents on the document, wait until the ink or paste has thoroughly dried before scanning the document. ● Always clean the scanning rollers after scanning a document that your documents...
Quick Reference Guide
Page 11
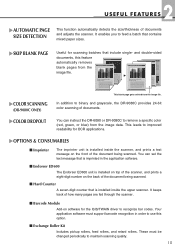
...research and analysis in order to for the Americas, this option. ■ Exchange Roller Kit Includes pickup rollers, feed rollers, and retard rollers. The Asian subsidiary has experienced a sustained period of containers includes dry freight, flat...scanner, and prints a text message on software for scanning batches that contains mixed paper sizes. ▲ ▲ ▲▲ ▲ SKIP BLANK PAGE COLOR SCANNING (DR-9080C ONLY) COLOR DROPOUT Useful for the ISIS/TWAIN driver to feed a batch that include single- This group is currently positioned as one of documents...
...research and analysis in order to for the Americas, this option. ■ Exchange Roller Kit Includes pickup rollers, feed rollers, and retard rollers. The Asian subsidiary has experienced a sustained period of containers includes dry freight, flat...scanner, and prints a text message on software for scanning batches that contains mixed paper sizes. ▲ ▲ ▲▲ ▲ SKIP BLANK PAGE COLOR SCANNING (DR-9080C ONLY) COLOR DROPOUT Useful for the ISIS/TWAIN driver to feed a batch that include single- This group is currently positioned as one of documents...


