
User Manual
Page 3
... Job Registration Tool settings Chapter 9 Practical Examples Hints and additional information about ISIS/TWAIN driver settings i After reading this manual thoroughly before using the scanner. The Hardware section contains general information and instructions for the software required to make the most of its many functions. Hardware Chapter 1 Before Using the Scanner Safety instructions, features, scanner parts Chapter 2 Setup Scanner operation environment and setup procedures Chapter 3 Basic Operation Supported document types, basic scanning procedure, steps for clearing a paper jam...
... Job Registration Tool settings Chapter 9 Practical Examples Hints and additional information about ISIS/TWAIN driver settings i After reading this manual thoroughly before using the scanner. The Hardware section contains general information and instructions for the software required to make the most of its many functions. Hardware Chapter 1 Before Using the Scanner Safety instructions, features, scanner parts Chapter 2 Setup Scanner operation environment and setup procedures Chapter 3 Basic Operation Supported document types, basic scanning procedure, steps for clearing a paper jam...

User Manual
Page 6
... 3-9 Job Registration Tool 3-10 Scanning With the Job Function 3-11 About Launcher 3-12 CapturePerfect 3.0 3-16 What is CapturePerfect 3.0 3-16 Using CapturePerfect 3.0 3-18 Scan Panel 3-21 Using Patchcode Sheets 3-23 About Patchcode Sheets 3-23 Patchcode Pattern Function 3-24 How to Use Patchcode Sheets 3-24 Clearing a Paper Jam 3-26 Other Functions 3-29 Folio Scan 3-29 Double Feed Detection Function 3-30 Long Document Mode 3-30 MultiStream Function 3-34 Maintenance 4-1 Regular Maintenance 4-1 Cleaning the Scanner 4-1 Cleaning the Feed Path 4-1 Cleaning the Sensor Glass...
... 3-9 Job Registration Tool 3-10 Scanning With the Job Function 3-11 About Launcher 3-12 CapturePerfect 3.0 3-16 What is CapturePerfect 3.0 3-16 Using CapturePerfect 3.0 3-18 Scan Panel 3-21 Using Patchcode Sheets 3-23 About Patchcode Sheets 3-23 Patchcode Pattern Function 3-24 How to Use Patchcode Sheets 3-24 Clearing a Paper Jam 3-26 Other Functions 3-29 Folio Scan 3-29 Double Feed Detection Function 3-30 Long Document Mode 3-30 MultiStream Function 3-34 Maintenance 4-1 Regular Maintenance 4-1 Cleaning the Scanner 4-1 Cleaning the Feed Path 4-1 Cleaning the Sensor Glass...

User Manual
Page 12
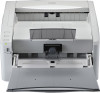
... scanner can scan a maximum of 60 documents per minute in a range of sizes from business cards to the back of Scanning Modes The scanner supports the following scanning modes, depending on the document type: - Single-sided/double-sided mode - Single sheet/dual feeding path • U-Turn Path Documents are fed and ejected from the front of the scanner. (See "3-2 Document Tray and Eject Tray," on p. 3-3.) • Straight Path Documents are ejected to LTR/A4 size. (Scanning conditions: Black...
... scanner can scan a maximum of 60 documents per minute in a range of sizes from business cards to the back of Scanning Modes The scanner supports the following scanning modes, depending on the document type: - Single-sided/double-sided mode - Single sheet/dual feeding path • U-Turn Path Documents are fed and ejected from the front of the scanner. (See "3-2 Document Tray and Eject Tray," on p. 3-3.) • Straight Path Documents are ejected to LTR/A4 size. (Scanning conditions: Black...

User Manual
Page 20
...-ROM drive. The menu screen appears automatically when you select [Typical Installation], all other applications before connecting the scanner to reinstall only specific software that has Administrator privileges. The [Typical Installation] screen appears. If you want to the computer. 1 Log onto Windows with an account that you have previously uninstalled, select [Custom Installation] and specify the software. • The DR-6010C driver installation comprises the Scanner Driver and Job Tool installation...
...-ROM drive. The menu screen appears automatically when you select [Typical Installation], all other applications before connecting the scanner to reinstall only specific software that has Administrator privileges. The [Typical Installation] screen appears. If you want to the computer. 1 Log onto Windows with an account that you have previously uninstalled, select [Custom Installation] and specify the software. • The DR-6010C driver installation comprises the Scanner Driver and Job Tool installation...

User Manual
Page 32
..., as paper size detection and deskew may scratch the sensor glass. Always clean the internal parts of the scanner after scanning such documents. (See "Cleaning the Sensor Glass and the Rollers," on p. 4-2.) • When scanning a two-sided document that is printed on thin paper, the image on a document is dry before scanning it. • Scanning documents that are written in pencil or similar material have a tendency to make sure that glossy paper or business cards may...
..., as paper size detection and deskew may scratch the sensor glass. Always clean the internal parts of the scanner after scanning such documents. (See "Cleaning the Sensor Glass and the Rollers," on p. 4-2.) • When scanning a two-sided document that is printed on thin paper, the image on a document is dry before scanning it. • Scanning documents that are written in pencil or similar material have a tendency to make sure that glossy paper or business cards may...

User Manual
Page 35
... a paper jam. • When continuously scanning documents on thin paper in the page separation mode, the pages may result in the feed tray is called the bypass mode. CAUTION ■ Before you are two methods for feeding documents, the Page Separation mode and Bypass mode. Chapter 3 Basic Operation 3-3 Placing Documents There are using it. Feeding pages continuously from the power outlet to be changed by moving the feed selection lever. Feeding documents one sheet at a time or feeding documents...
... a paper jam. • When continuously scanning documents on thin paper in the page separation mode, the pages may result in the feed tray is called the bypass mode. CAUTION ■ Before you are two methods for feeding documents, the Page Separation mode and Bypass mode. Chapter 3 Basic Operation 3-3 Placing Documents There are using it. Feeding pages continuously from the power outlet to be changed by moving the feed selection lever. Feeding documents one sheet at a time or feeding documents...
User Manual
Page 80
... the PC failing to see if the scanner is not compatible with the scanner. Solution Use a recommended SCSI card. (See p. 2-2.) ✘ Scanning Is Not Performed Check the following are correctly connected. (See p. 2-12.) Problem Solution The SCSI card is not compatible with another device. Refer to the system and set correctly. Has the application software been set up correctly? • Is there a problem in the PC. Solution Remove the USB hub...
... the PC failing to see if the scanner is not compatible with the scanner. Solution Use a recommended SCSI card. (See p. 2-2.) ✘ Scanning Is Not Performed Check the following are correctly connected. (See p. 2-12.) Problem Solution The SCSI card is not compatible with another device. Refer to the system and set correctly. Has the application software been set up correctly? • Is there a problem in the PC. Solution Remove the USB hub...

User Manual
Page 81
.... Check each possible cause. Re-install the scanner driver or application software. • When system errors result in the scanner not functioning at least ten seconds before turning it ON again. Problem Solution The USB port you place your document, thoroughly fan the stack of the document to increase free space on the hard disk. Solution Remove the USB hub. ✘ Documents Do Not Feed Properly The following problems...
.... Check each possible cause. Re-install the scanner driver or application software. • When system errors result in the scanner not functioning at least ten seconds before turning it ON again. Problem Solution The USB port you place your document, thoroughly fan the stack of the document to increase free space on the hard disk. Solution Remove the USB hub. ✘ Documents Do Not Feed Properly The following problems...
User Manual
Page 82
...] setting. 5-4 Check the size, thickness, and weight of a size, thickness, or weight that was used to an appropriate value. Problem Solution The rollers inside the scanner. If the rollers are incorrect ISIS/ TWAIN driver settings or a problem with an application that supports multi-page TIFF files. Contact your service representative about purchasing a roller replacement kit, and then replace the retard roller and the roller unit. ✘ Saved Image Files Do Not Open When image files saved by CapturePerfect 3.0 cannot be opened by other applications. Clean...
...] setting. 5-4 Check the size, thickness, and weight of a size, thickness, or weight that was used to an appropriate value. Problem Solution The rollers inside the scanner. If the rollers are incorrect ISIS/ TWAIN driver settings or a problem with an application that supports multi-page TIFF files. Contact your service representative about purchasing a roller replacement kit, and then replace the retard roller and the roller unit. ✘ Saved Image Files Do Not Open When image files saved by CapturePerfect 3.0 cannot be opened by other applications. Clean...
User Manual
Page 91
... images/min. (not supported) 22 images/min. (not supported) Amount of paper that can be used if they are subject to recognize bar codes. Replacement Parts Exchange roller kit (product code: 1921B001) Kit to replace the roller unit (pickup roller, feed roller) and retard roller. • Refer to "Removing and Attaching the Rollers," on the performance of 20 lb bond (80 g/m2)) Interface Hi-Speed USB 2.0 / SCSI-III Other Functions Double feed detection, Long Document mode Dimensions (with trays...
... images/min. (not supported) 22 images/min. (not supported) Amount of paper that can be used if they are subject to recognize bar codes. Replacement Parts Exchange roller kit (product code: 1921B001) Kit to replace the roller unit (pickup roller, feed roller) and retard roller. • Refer to "Removing and Attaching the Rollers," on the performance of 20 lb bond (80 g/m2)) Interface Hi-Speed USB 2.0 / SCSI-III Other Functions Double feed detection, Long Document mode Dimensions (with trays...

User Manual
Page 93
...4-1 Rollers 4-2 Scanner 4-1 Sensor Glass 4-2 Clearing a Paper Jam 3-26 Connection SCSI Connection 2-12 USB Connection 2-11 Connection to the Computer 2-11 D daisy-chain configuration 2-12 DIP switches 2-12 Disposal 1-4 document eject configurations 3-1 document feed tray 3-7 document guides 3-6 Documents 3-1 Double Feed Detection Function 3-30 DR-6010C monitor 3-11 E Eject Tray 3-3 event 3-12 Event settings 4-6 External Dimensions 6-3 F Features 1-5 Folio Scan 3-29 H Handling 1-3 I Installation Location 1-1 Installation Requirements 2-2 J job buttons 3-9 Job Function...
...4-1 Rollers 4-2 Scanner 4-1 Sensor Glass 4-2 Clearing a Paper Jam 3-26 Connection SCSI Connection 2-12 USB Connection 2-11 Connection to the Computer 2-11 D daisy-chain configuration 2-12 DIP switches 2-12 Disposal 1-4 document eject configurations 3-1 document feed tray 3-7 document guides 3-6 Documents 3-1 Double Feed Detection Function 3-30 DR-6010C monitor 3-11 E Eject Tray 3-3 event 3-12 Event settings 4-6 External Dimensions 6-3 F Features 1-5 Folio Scan 3-29 H Handling 1-3 I Installation Location 1-1 Installation Requirements 2-2 J job buttons 3-9 Job Function...
User Manual
Page 97
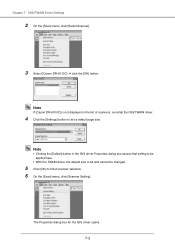
... Properties dialog box for the ISIS driver opens. 7-2 Note If [Canon DR-6010C] is A4 and cannot be changed. 5 Click [OK] to set a default page size. Note • Clicking the [Default] button in the ISIS driver Properties dialog box causes that setting to be applied here. • With the TWAIN driver, the default size is not displayed in the list of scanners, re-install the ISIS/TWAIN driver. 4 Click the [Settings] button to finish scanner selection. 6 On the [Scan] menu, click [Scanner Setting].
... Properties dialog box for the ISIS driver opens. 7-2 Note If [Canon DR-6010C] is A4 and cannot be changed. 5 Click [OK] to set a default page size. Note • Clicking the [Default] button in the ISIS driver Properties dialog box causes that setting to be applied here. • With the TWAIN driver, the default size is not displayed in the list of scanners, re-install the ISIS/TWAIN driver. 4 Click the [Settings] button to finish scanner selection. 6 On the [Scan] menu, click [Scanner Setting].

User Manual
Page 101
... 256-level grayscale images. [24-bit Color] Scans documents such as color photos as full-color images. [Auto Color Detection] Whether a document is black and white or color is detected before the scanned image is saved. ☞ When [Auto Color Detection] is enabled, the [Setting] button is enabled for opening the [Auto Color Detection] dialog box, where you can be made more susceptible to lines appearing due to use for black and white. ☞ Depending on the scanning table glass.
... 256-level grayscale images. [24-bit Color] Scans documents such as color photos as full-color images. [Auto Color Detection] Whether a document is black and white or color is detected before the scanned image is saved. ☞ When [Auto Color Detection] is enabled, the [Setting] button is enabled for opening the [Auto Color Detection] dialog box, where you can be made more susceptible to lines appearing due to use for black and white. ☞ Depending on the scanning table glass.
User Manual
Page 103
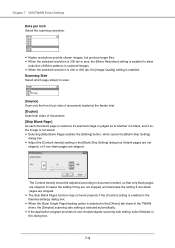
... Gamma Settings dialog box. ☞ When the [Scan Single Page] feeding option is selected in the [Others] tab sheet of the TWAIN driver, the [Simplex] scanning side setting is not saved. ☞ Selecting [Skip Blank Page] enables the [Setting] button, which page side(s) to scan. [Simplex] Scan only the front (top) side of documents loaded at the feeder inlet. [Duplex] Scan both sides of Moire patterns in this dialog box. 7-8 Chapter 7 ISIS/TWAIN Driver Settings Dots per inch Select the scanning resolution...
... Gamma Settings dialog box. ☞ When the [Scan Single Page] feeding option is selected in the [Others] tab sheet of the TWAIN driver, the [Simplex] scanning side setting is not saved. ☞ Selecting [Skip Blank Page] enables the [Setting] button, which page side(s) to scan. [Simplex] Scan only the front (top) side of documents loaded at the feeder inlet. [Duplex] Scan both sides of Moire patterns in this dialog box. 7-8 Chapter 7 ISIS/TWAIN Driver Settings Dots per inch Select the scanning resolution...

User Manual
Page 116
... can adjust the document guide position. [Automatic Feeding] This feeding method is good for scanning batches of documents of different sizes: after loading the documents, press the Job button (assigned as from static electricity,) ultrasonic detection of documents that are loaded one batch at a time: scanning stops when the loaded documents have occurred and document transport is detected until scanning starts. (See "Scanning Multiple Documents," on p. 9-3.) Batch Separation (ISIS driver only) Items available...
... can adjust the document guide position. [Automatic Feeding] This feeding method is good for scanning batches of documents of different sizes: after loading the documents, press the Job button (assigned as from static electricity,) ultrasonic detection of documents that are loaded one batch at a time: scanning stops when the loaded documents have occurred and document transport is detected until scanning starts. (See "Scanning Multiple Documents," on p. 9-3.) Batch Separation (ISIS driver only) Items available...
User Manual
Page 129
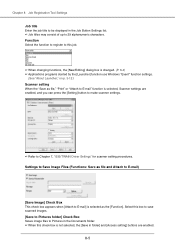
Select this box to save scanned images. [Save to Pictures folder] Check Box Saves image files to Pictures in the Documents folder. ☞ When this job. ☞ When changing functions, the [New/Editing] dialog box is changed. (P. 8-4) ☞ Applications programs started by the [Launcher] function use Windows "Event" function settings. (See "About Launcher," on p. 3-12.) Scanner setting When the "Save as file," "Print" or "Attach to this check box is selected as file and Attach to E-mail) [Save Image] Check Box This check box appears when [Attach...
Select this box to save scanned images. [Save to Pictures folder] Check Box Saves image files to Pictures in the Documents folder. ☞ When this job. ☞ When changing functions, the [New/Editing] dialog box is changed. (P. 8-4) ☞ Applications programs started by the [Launcher] function use Windows "Event" function settings. (See "About Launcher," on p. 3-12.) Scanner setting When the "Save as file," "Print" or "Attach to this check box is selected as file and Attach to E-mail) [Save Image] Check Box This check box appears when [Attach...
User Manual
Page 130
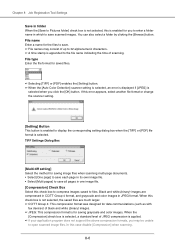
... the [OK] button. If this check box is not selected, the saved files are compressed in CCITT Group 4 format, and grayscale and color images in JPEG format. When this error appears, select another file format or change the scanner setting. [Setting] Button This button is enabled to save all pages in one image file. [Compression] Check Box Select this case disable [Compression] when scanning. 8-6 Chapter 8 Job Registration Tool Settings Save in folder When the [Save to Pictures folder] check box is not...
... the [OK] button. If this check box is not selected, the saved files are compressed in CCITT Group 4 format, and grayscale and color images in JPEG format. When this error appears, select another file format or change the scanner setting. [Setting] Button This button is enabled to save all pages in one image file. [Compression] Check Box Select this case disable [Compression] when scanning. 8-6 Chapter 8 Job Registration Tool Settings Save in folder When the [Save to Pictures folder] check box is not...

User Manual
Page 131
... to display properly. [Apply OCR] Check Box Select this case, users cannot access the shared folder without entering the correct user name and password. When [Black and White] or [Error Diffusion] binary image scanning mode is reduced, image quality may be restricted to users with the image. ☞ Characters within images and to [256-level Gray] or [24-bit Color] mode. Although file size is selected, file size depends on the content of...
... to display properly. [Apply OCR] Check Box Select this case, users cannot access the shared folder without entering the correct user name and password. When [Black and White] or [Error Diffusion] binary image scanning mode is reduced, image quality may be restricted to users with the image. ☞ Characters within images and to [256-level Gray] or [24-bit Color] mode. Although file size is selected, file size depends on the content of...

User Manual
Page 132
...] button in the Job Registration Tool dialog box. Buttons [OK] button Click this button to accept changes and return to the Job Registration Tool dialog box. [Cancel] button Click this button to reject changes and return to the Job Registration Tool dialog box. Chapter 8 Job Registration Tool Settings Setting to Print Scanned Images (Function: Print) [Printer] Shows the printer to use for printing. • Select [Actual size] to print images the same size as their original documents. • Select [Fit to paper] if the scanned documents were...
...] button in the Job Registration Tool dialog box. Buttons [OK] button Click this button to accept changes and return to the Job Registration Tool dialog box. [Cancel] button Click this button to reject changes and return to the Job Registration Tool dialog box. Chapter 8 Job Registration Tool Settings Setting to Print Scanned Images (Function: Print) [Printer] Shows the printer to use for printing. • Select [Actual size] to print images the same size as their original documents. • Select [Fit to paper] if the scanned documents were...

User Manual
Page 135
... particular setting items, see "ISIS/TWAIN Driver Settings," on p. 78.) • If blank pages are not skipped, even when [Skip blank page] is selected Increase the [Content density] in the [Blank Skip Setting] dialog box. To scan non-standard-size documents, select [Auto-detection] as blank pages, and not be skipped. (See "Scanning Side," on p. 7-8.) Scanning Non-Standard-Size Documents • To scan non-standard-size documents If non-standard-size documents are not saved. (See "Scanning Side," on p. 7-1. Duplex scanning is set too...
... particular setting items, see "ISIS/TWAIN Driver Settings," on p. 78.) • If blank pages are not skipped, even when [Skip blank page] is selected Increase the [Content density] in the [Blank Skip Setting] dialog box. To scan non-standard-size documents, select [Auto-detection] as blank pages, and not be skipped. (See "Scanning Side," on p. 7-8.) Scanning Non-Standard-Size Documents • To scan non-standard-size documents If non-standard-size documents are not saved. (See "Scanning Side," on p. 7-1. Duplex scanning is set too...


