
User Manual
Page 1
ENGLISH Camera User Guide Getting Started p. 9 Ensure that you read the Safety Precautions (pp. 248 - 257).
ENGLISH Camera User Guide Getting Started p. 9 Ensure that you read the Safety Precautions (pp. 248 - 257).
User Manual
Page 2
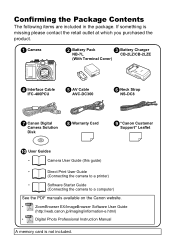
... Cable IFC-400PCU e AV Cable AVC-DC300 f Neck Strap NS-DC8 g Canon Digital Camera Solution Disk h Warranty Card i "Canon Customer Support" Leaflet j User Guides • Camera User Guide (this guide) • Direct Print User Guide (Connecting the camera to a printer) • Software Starter Guide (Connecting the camera to a computer) See the PDF manuals available on the...
... Cable IFC-400PCU e AV Cable AVC-DC300 f Neck Strap NS-DC8 g Canon Digital Camera Solution Disk h Warranty Card i "Canon Customer Support" Leaflet j User Guides • Camera User Guide (this guide) • Direct Print User Guide (Connecting the camera to a printer) • Software Starter Guide (Connecting the camera to a computer) See the PDF manuals available on the...

User Manual
Page 3
Let's Get Started! 1 Let's Get Started! Start out by familiarizing yourself with the camera and mastering the basics. First... Next... Learning More p. 39 Once you have mastered the basics, use and the basics of shooting, viewing and printing images. Details on using each function are described in this section, including how to connect the camera to a television to shoot more challenging photos. This guide is divided into the following two sections. Getting Started p. 9 This section explains how to prepare the camera for use the camera's many features to view images.
Let's Get Started! 1 Let's Get Started! Start out by familiarizing yourself with the camera and mastering the basics. First... Next... Learning More p. 39 Once you have mastered the basics, use and the basics of shooting, viewing and printing images. Details on using each function are described in this section, including how to connect the camera to a television to shoot more challenging photos. This guide is divided into the following two sections. Getting Started p. 9 This section explains how to prepare the camera for use the camera's many features to view images.

User Manual
Page 4
2 Table of Contents Table of Contents Items marked with a are lists or charts that summarize camera functions or procedures. Please Read 7 Getting Started 9 Preparations 10 Shooting Still Images ( Mode 17 Viewing Still Images 19 Erasing 20 Printing 21 Shooting Movies ( Standard ...
2 Table of Contents Table of Contents Items marked with a are lists or charts that summarize camera functions or procedures. Please Read 7 Getting Started 9 Preparations 10 Shooting Still Images ( Mode 17 Viewing Still Images 19 Erasing 20 Printing 21 Shooting Movies ( Standard ...

User Manual
Page 5
... Images 80 Changing the Compression (Still Images 81 Changing the Image Type 82 Setting the Image Stabilizer Function 85 Adjusting the ISO Speed 87 Reducing Camera Shake When Shooting (Auto ISO Shift) 88 Shooting Using the Mode Dial 90 Mode Dial 90 Shooting Modes for Specific Scenes 91 Program AE 95...
... Images 80 Changing the Compression (Still Images 81 Changing the Image Type 82 Setting the Image Stabilizer Function 85 Adjusting the ISO Speed 87 Reducing Camera Shake When Shooting (Auto ISO Shift) 88 Shooting Using the Mode Dial 90 Mode Dial 90 Shooting Modes for Specific Scenes 91 Program AE 95...

User Manual
Page 6
... Protecting Images 197 Erasing Images 202 Print Settings/Transfer Settings 207 Setting the DPOF Print Settings 207 Setting the DPOF Transfer Settings 214 Configuring the Camera 216 Power Saving Function 216
... Protecting Images 197 Erasing Images 202 Print Settings/Transfer Settings 207 Setting the DPOF Print Settings 207 Setting the DPOF Transfer Settings 214 Configuring the Camera 216 Power Saving Function 216

User Manual
Page 7
... to Their Default Values 227 Connecting to a TV 228 Shooting/Playback Using a TV 228 Customizing the Camera (My Camera Settings) 230 Changing My Camera Settings 230 Registering My Camera Settings 231 Troubleshooting 233 List of Messages 244 Appendix 248 Safety Precautions 248 Preventing Malfunctions 254 Using the AC... Externally Mounted Flash (Sold Separately) . . 265 Using a Supplementary Flash (Sold Separately 273 Using the Remote Switch (Sold Separately 275 Camera Care and Maintenance 276 Specifications 277 Index 287 Functions Available in Each Shooting Mode 300
... to Their Default Values 227 Connecting to a TV 228 Shooting/Playback Using a TV 228 Customizing the Camera (My Camera Settings) 230 Changing My Camera Settings 230 Registering My Camera Settings 231 Troubleshooting 233 List of Messages 244 Appendix 248 Safety Precautions 248 Preventing Malfunctions 254 Using the AC... Externally Mounted Flash (Sold Separately) . . 265 Using a Supplementary Flash (Sold Separately 273 Using the Remote Switch (Sold Separately 275 Camera Care and Maintenance 276 Specifications 277 Index 287 Functions Available in Each Shooting Mode 300

User Manual
Page 8
... SDHC (SD High Capacity) memory cards, MultiMediaCards, MMCplus cards and HC MMCplus cards in this guide. These are based on the camera's default settings at time of purchase. Explanations in this Guide 73 Using the Flash Available Shooting Modes 1 Press the button. The ...Mode: Shooting ( )/ Playback ( ) Some functions may not be used in this guide may affect the camera's operation. : This mark denotes additional topics that may differ from the actual camera. 6 About this Guide About this Guide Symbol Conventions in this guide are collectively referred to that effect,...
... SDHC (SD High Capacity) memory cards, MultiMediaCards, MMCplus cards and HC MMCplus cards in this guide. These are based on the camera's default settings at time of purchase. Explanations in this Guide 73 Using the Flash Available Shooting Modes 1 Press the button. The ...Mode: Shooting ( )/ Playback ( ) Some functions may not be used in this guide may affect the camera's operation. : This mark denotes additional topics that may differ from the actual camera. 6 About this Guide About this Guide Symbol Conventions in this guide are collectively referred to that effect,...

User Manual
Page 9
...Before you try to photograph important subjects, we highly recommend that you shoot several trial images to confirm that the camera is in use . For Canon Customer Support contacts, please see the customer support list supplied with a warranty claim to the country of sale. Warranty... personal use abroad, please convey it back to a Canon Customer Support Help Desk. Warning Against Copyright Infringement Please note that Canon digital cameras are not liable for any consequential damages arising from any malfunction of a camera or accessory, including memory cards, that results in the...
...Before you try to photograph important subjects, we highly recommend that you shoot several trial images to confirm that the camera is in use . For Canon Customer Support contacts, please see the customer support list supplied with a warranty claim to the country of sale. Warranty... personal use abroad, please convey it back to a Canon Customer Support Help Desk. Warning Against Copyright Infringement Please note that Canon digital cameras are not liable for any consequential damages arising from any malfunction of a camera or accessory, including memory cards, that results in the...

User Manual
Page 10
... of the pixels operate to change the language setting. More than 0.01% of this and take care when operating the camera for prolonged periods, the camera body may occasionally misfire or appear as red or black dots. This has no effect on the recorded image and does not... constitute a malfunction. About the LCD Monitor The LCD monitor is produced with a TV monitor (p. 228). 8 Please Read Camera Body Temperature If your region before using it with extremely high-precision manufacturing techniques. Please be aware of the pixels may become warm. Language Setting...
... of the pixels operate to change the language setting. More than 0.01% of this and take care when operating the camera for prolonged periods, the camera body may occasionally misfire or appear as red or black dots. This has no effect on the recorded image and does not... constitute a malfunction. About the LCD Monitor The LCD monitor is produced with a TV monitor (p. 228). 8 Please Read Camera Body Temperature If your region before using it with extremely high-precision manufacturing techniques. Please be aware of the pixels may become warm. Language Setting...

User Manual
Page 14
Insert the memory card until it clicks into place. d e Ensure that the write protect tab is correctly oriented before inserting it backward may cause the camera to fail to recognize the memory card or to malfunction. Front Write Protect Tab (only SD and SDHC memory cards) • Confirm that the memory card is unlocked (only SD and SDHC memory cards). • Check the card for the correct orientation. 4. Inserting it in the camera. Close the cover (d) and slide until it clicks (e). Getting Started 12 Preparations 3.
Insert the memory card until it clicks into place. d e Ensure that the write protect tab is correctly oriented before inserting it backward may cause the camera to fail to recognize the memory card or to malfunction. Front Write Protect Tab (only SD and SDHC memory cards) • Confirm that the memory card is unlocked (only SD and SDHC memory cards). • Check the card for the correct orientation. 4. Inserting it in the camera. Close the cover (d) and slide until it clicks (e). Getting Started 12 Preparations 3.

User Manual
Page 15
Attaching the Neck Strap a c b Pull the strap tight in the direction of the camera. Perform the same steps on the other side of the arrow and hold it while pulling the battery out. In order to avoid dropping the camera, we recommend attaching the neck strap before using the camera. Battery Lock To Remove the Memory Card Push the memory card with your finger until the memory card clicks and then release it does not slip. Getting Started Preparations 13 To Remove the Battery Push the battery lock in the buckle so that it .
Attaching the Neck Strap a c b Pull the strap tight in the direction of the camera. Perform the same steps on the other side of the arrow and hold it while pulling the battery out. In order to avoid dropping the camera, we recommend attaching the neck strap before using the camera. Battery Lock To Remove the Memory Card Push the memory card with your finger until the memory card clicks and then release it does not slip. Getting Started Preparations 13 To Remove the Battery Push the battery lock in the buckle so that it .

User Manual
Page 17
...press the MENU button. 3. Getting Started Preparations 15 z A rechargeable lithium battery is built into the camera, or use the separately sold AC Adapter Kit ACK-DC50, the battery will charge even if the camera is turned off. z The date/time settings may be lost after approximately three weeks if you insert... a charged battery into the camera to select a language. 4. Use the , , or button to save such settings as the date/time. Reset the date/time settings if this occurs. Press the...
...press the MENU button. 3. Getting Started Preparations 15 z A rechargeable lithium battery is built into the camera, or use the separately sold AC Adapter Kit ACK-DC50, the battery will charge even if the camera is turned off. z The date/time settings may be lost after approximately three weeks if you insert... a charged battery into the camera to select a language. 4. Use the , , or button to save such settings as the date/time. Reset the date/time settings if this occurs. Press the...

User Manual
Page 19
Select a shooting mode. 1. When the camera focuses, it beeps twice and the indicator lights green (orange when the flash fires). Press the power button. • The start-up sound will play ... power off. 2. Press the shutter button lightly (halfway) to . 3. Button 1. Aim the camera at the subject. Using a tripod is also effective. 4. Set the mode dial to focus. Avoiding Camera Shake Keep your arms tight against your body while holding the camera firmly by the sides. Getting Started Shooting Still Images ( Shooting Still Images...
Select a shooting mode. 1. When the camera focuses, it beeps twice and the indicator lights green (orange when the flash fires). Press the power button. • The start-up sound will play ... power off. 2. Press the shutter button lightly (halfway) to . 3. Button 1. Aim the camera at the subject. Using a tripod is also effective. 4. Set the mode dial to focus. Avoiding Camera Shake Keep your arms tight against your body while holding the camera firmly by the sides. Getting Started Shooting Still Images ( Shooting Still Images...

User Manual
Page 20
... fully Shooting Preparations Complete: Lights green (orange when the flash will fire) Recording: Blinks green AF Frame An AF frame will display in Focus The camera automatically sets the focus when you hold the shutter button down to the first stage is referred to set the focus Correct Beep, beep... You... result in the Set up menu (p. 59). Review). You can change the setting in [Mute] in blurred images. • Recorded images are displayed on the camera power will record. • Movement of focus. Getting Started 18 Shooting Still Images 5. Press the shutter button fully (all...
... fully Shooting Preparations Complete: Lights green (orange when the flash will fire) Recording: Blinks green AF Frame An AF frame will display in Focus The camera automatically sets the focus when you hold the shutter button down to the first stage is referred to set the focus Correct Beep, beep... You... result in the Set up menu (p. 59). Review). You can change the setting in [Mute] in blurred images. • Recorded images are displayed on the camera power will record. • Movement of focus. Getting Started 18 Shooting Still Images 5. Press the shutter button fully (all...

User Manual
Page 23
Press the camera's power. (Playback) button to Canon-brand printers. Connect the camera to a direct print compatible printer. • Open the camera's terminal cover and insert the interface cable all the way into the terminal. • See the printer's user guide for connection instructions. • Since this camera uses a standard protocol (PictBridge), you can use it...
Press the camera's power. (Playback) button to Canon-brand printers. Connect the camera to a direct print compatible printer. • Open the camera's terminal cover and insert the interface cable all the way into the terminal. • See the printer's user guide for connection instructions. • Since this camera uses a standard protocol (PictBridge), you can use it...

User Manual
Page 24
...] in [Print Settings] in the (Print) menu. - See the Direct Print User Guide. - Use the supplied software. See the Software Starter Guide. Set with the camera's Digital Print Order Format (DPOF) function (p. 207). See your printer user guide. - Getting Started 22 Printing 4. Use the or button to select an image to...
...] in [Print Settings] in the (Print) menu. - See the Direct Print User Guide. - Use the supplied software. See the Software Starter Guide. Set with the camera's Digital Print Order Format (DPOF) function (p. 207). See your printer user guide. - Getting Started 22 Printing 4. Use the or button to select an image to...

User Manual
Page 25
You can then print the images from the print list easily, when connecting the camera to the printer. 2. Connect the camera to a printer. Print the image. 1. Press the button (still images only). 2. Use the or button to the print list. 1. Add to select [Add]. 3. Press the ... based on the use the or button to confirm the images added to the Print List 1. Use the or button to select the number of a Canon SELPHY ES series or SELPHY CP series printer. 1.
You can then print the images from the print list easily, when connecting the camera to the printer. 2. Connect the camera to a printer. Print the image. 1. Press the button (still images only). 2. Use the or button to the print list. 1. Add to select [Add]. 3. Press the ... based on the use the or button to confirm the images added to the Print List 1. Use the or button to select the number of a Canon SELPHY ES series or SELPHY CP series printer. 1.

User Manual
Page 26
Microphone Top view Select a shooting mode. 1. z Do not touch the microphone while recording. Set the mode dial to select (Standard). 3. z The sound that buttons and other controls make when used will be recorded in the movie. Use the control dial to (Movie). 2. Aim the camera at the subject. Press the power button. 2. Getting Started 24 Shooting Movies Shooting Movies ( Standard Mode) Mode Dial Shutter Button Power Button Indicators Control Dial 1.
Microphone Top view Select a shooting mode. 1. z Do not touch the microphone while recording. Set the mode dial to select (Standard). 3. z The sound that buttons and other controls make when used will be recorded in the movie. Use the control dial to (Movie). 2. Aim the camera at the subject. Press the power button. 2. Getting Started 24 Shooting Movies Shooting Movies ( Standard Mode) Mode Dial Shutter Button Power Button Indicators Control Dial 1.

User Manual
Page 27
... stop at the moment the recording time reaches 1 hour. Clip Size: 4 GB*. Elapsed Time 6. Press the shutter button fully again to focus. • When the camera focuses, it beeps twice and the indicator lights green. • The exposure, focus and white balance are automatically set. Getting Started 4.
... stop at the moment the recording time reaches 1 hour. Clip Size: 4 GB*. Elapsed Time 6. Press the shutter button fully again to focus. • When the camera focuses, it beeps twice and the indicator lights green. • The exposure, focus and white balance are automatically set. Getting Started 4.


