User Manual
Page 2
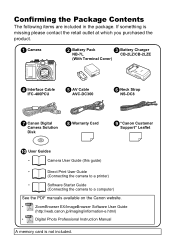
... IFC-400PCU e AV Cable AVC-DC300 f Neck Strap NS-DC8 g Canon Digital Camera Solution Disk h Warranty Card i "Canon Customer Support" Leaflet j User Guides • Camera User Guide (this guide) • Direct Print User Guide (Connecting the camera to a printer) • Software Starter Guide (Connecting the camera to a computer) See the PDF manuals available on the Canon website. • ZoomBrowser EX/ImageBrowser Software User Guide (http://web.canon.jp/imaging/information-e.html) • Digital Photo Professional Instruction Manual A memory card is missing please...
... IFC-400PCU e AV Cable AVC-DC300 f Neck Strap NS-DC8 g Canon Digital Camera Solution Disk h Warranty Card i "Canon Customer Support" Leaflet j User Guides • Camera User Guide (this guide) • Direct Print User Guide (Connecting the camera to a printer) • Software Starter Guide (Connecting the camera to a computer) See the PDF manuals available on the Canon website. • ZoomBrowser EX/ImageBrowser Software User Guide (http://web.canon.jp/imaging/information-e.html) • Digital Photo Professional Instruction Manual A memory card is missing please...

User Manual
Page 6
4 Table of Contents Using the ND Filter 140 Switching between Metering Modes 141 Adjusting the Tone (White Balance 143 Shooting in a My Colors Mode 146 Changing the Colors and Shooting 148 Categorizing Images Automatically (Auto Category) . . . . 154 Registering Functions to the Button 155 Setting My Menu 157 Playback/Erasing 159 Viewing Magnified Images 159 Viewing Images in Sets of Nine (Index Playback) . . . 160 Checking the Focus and People's Expressions (Focus Check Display 161 Jumping to Images 163 Organizing Images by Category (My...
4 Table of Contents Using the ND Filter 140 Switching between Metering Modes 141 Adjusting the Tone (White Balance 143 Shooting in a My Colors Mode 146 Changing the Colors and Shooting 148 Categorizing Images Automatically (Auto Category) . . . . 154 Registering Functions to the Button 155 Setting My Menu 157 Playback/Erasing 159 Viewing Magnified Images 159 Viewing Images in Sets of Nine (Index Playback) . . . 160 Checking the Focus and People's Expressions (Focus Check Display 161 Jumping to Images 163 Organizing Images by Category (My...

User Manual
Page 17
... into the camera to select a language. 4. Press the (Playback) button. 2. Hold down the button and press the MENU button. 3. Use the , , or button to save such settings as the date/time. Setting the Display Language You can change the language displayed in about four hours. Press the button. Reset the date/time settings if this occurs. Buttons Button Button MENU Button 1. Getting Started Preparations 15 z A rechargeable lithium battery is turned off. If you remove the main battery. It will charge in the LCD monitor menus and messages.
... into the camera to select a language. 4. Press the (Playback) button. 2. Hold down the button and press the MENU button. 3. Use the , , or button to save such settings as the date/time. Setting the Display Language You can change the language displayed in about four hours. Press the button. Reset the date/time settings if this occurs. Buttons Button Button MENU Button 1. Getting Started Preparations 15 z A rechargeable lithium battery is turned off. If you remove the main battery. It will charge in the LCD monitor menus and messages.

User Manual
Page 20
... memory card. Press fully Incorrect Just pressing fully Shooting Preparations Complete: Lights green (orange when the flash will fire) Recording: Blinks green AF Frame An AF frame will record. • Movement of focus. Getting Started 18 Shooting Still Images 5. Pressing it down after a shot, the image will continue to display. • The indicator will blink green and the file will silence all the way) to shoot. • The shutter sound will play and the image will display in green...
... memory card. Press fully Incorrect Just pressing fully Shooting Preparations Complete: Lights green (orange when the flash will fire) Recording: Blinks green AF Frame An AF frame will record. • Movement of focus. Getting Started 18 Shooting Still Images 5. Pressing it down after a shot, the image will continue to display. • The indicator will blink green and the file will silence all the way) to shoot. • The shutter sound will play and the image will display in green...

User Manual
Page 29
... Getting Started We recommend using the supplied software. ZoomBrowser EX : 200 MB or more 1,024 × 768 pixels/High Color (16 bit) or better PhotoStitch : 40 MB or more USB • Canon Utilities - Windows OS Computer Model CPU Still Image Movie RAM Still Image Movie Interface Free Hard Disk Space Display Windows Vista (including Service Pack 1) Windows XP Service Pack 2 The above OS should be pre-installed on computers with the camera...
... Getting Started We recommend using the supplied software. ZoomBrowser EX : 200 MB or more 1,024 × 768 pixels/High Color (16 bit) or better PhotoStitch : 40 MB or more USB • Canon Utilities - Windows OS Computer Model CPU Still Image Movie RAM Still Image Movie Interface Free Hard Disk Space Display Windows Vista (including Service Pack 1) Windows XP Service Pack 2 The above OS should be pre-installed on computers with the camera...

User Manual
Page 33
Install the software before downloading images via the direct transfer method for the first time (p. 28). Confirm that the Direct Transfer menu is displayed on the camera's LCD monitor. • The button will download to the computer. Button Button Buttons MENU Button 1. Press the button. Getting Started Downloading Images to a Computer 31 Downloading Images Using the Camera (Direct Transfer) Use this method to appear. 2. Direct Transfer Menu • Images not previously downloaded will light blue. • Press the MENU button if the Direct Transfer menu fails to ...
Install the software before downloading images via the direct transfer method for the first time (p. 28). Confirm that the Direct Transfer menu is displayed on the camera's LCD monitor. • The button will download to the computer. Button Button Buttons MENU Button 1. Press the button. Getting Started Downloading Images to a Computer 31 Downloading Images Using the Camera (Direct Transfer) Use this method to appear. 2. Direct Transfer Menu • Images not previously downloaded will light blue. • Press the MENU button if the Direct Transfer menu fails to ...

User Manual
Page 53
... Mode (Detailed) u Battery Charge Indicator Displayed image number/ Total number of images x Folder Number-File Number Shooting information Histogram wv File Size Recording Pixels (Stills)/ Recording Length (Movies) Shooting Date/Time Information Displayed u Print List (Playback) i-Contrast/Red-Eye Correction Function/Trimming/Resized v image/My Colors ( ) Protection Status ( ) Image with Sound Memo ( ) w Compression (Still Images)/Recording Pixels (Still Images), Movie ( ) Auto Category ( ) x My Category ( ) Setting Method button, MENU button (Print menu) MENU button (Play...
... Mode (Detailed) u Battery Charge Indicator Displayed image number/ Total number of images x Folder Number-File Number Shooting information Histogram wv File Size Recording Pixels (Stills)/ Recording Length (Movies) Shooting Date/Time Information Displayed u Print List (Playback) i-Contrast/Red-Eye Correction Function/Trimming/Resized v image/My Colors ( ) Protection Status ( ) Image with Sound Memo ( ) w Compression (Still Images)/Recording Pixels (Still Images), Movie ( ) Auto Category ( ) x My Category ( ) Setting Method button, MENU button (Print menu) MENU button (Play...

User Manual
Page 90
... ISO speed is increased. 1 Select [Auto ISO Shift]. 1. In the menu, use the or button to shoot at a shutter speed which minimizes the effects of camera shake by pressing the button. Press the MENU button. 88 Reducing Camera Shake When Shooting (Auto ISO Shift) Available Shooting Modes p. 300 When the camera shake warning icon ( ) appears during shooting, this function allows you to increase ISO speed and to select [Auto ISO Shift]. 2 Make settings. 1. z In , or mode, it will not function when the flash...
... ISO speed is increased. 1 Select [Auto ISO Shift]. 1. In the menu, use the or button to shoot at a shutter speed which minimizes the effects of camera shake by pressing the button. Press the MENU button. 88 Reducing Camera Shake When Shooting (Auto ISO Shift) Available Shooting Modes p. 300 When the camera shake warning icon ( ) appears during shooting, this function allows you to increase ISO speed and to select [Auto ISO Shift]. 2 Make settings. 1. z In , or mode, it will not function when the flash...

User Manual
Page 111
... record in [Auto] mode, if the recording volume becomes too loud, it automatically prevents distortion of the settings saved in or . - My Menu settings • To change some of sound. Settings that are not retained when the shooting mode is changed or when the power is strong. Shooting mode Items which can then shoot images with no wind. z Wind filter suppresses noise when the wind is turned off (such as continuous shooting or self-timer...
... record in [Auto] mode, if the recording volume becomes too loud, it automatically prevents distortion of the settings saved in or . - My Menu settings • To change some of sound. Settings that are not retained when the shooting mode is changed or when the power is strong. Shooting mode Items which can then shoot images with no wind. z Wind filter suppresses noise when the wind is turned off (such as continuous shooting or self-timer...

User Manual
Page 155
... images (before deleting a file. - Since two images are recorded with the transformed image. Use the or button to select [Save Original]. 2 Make settings. 1. If [Save Original] is set to [Off]. - Press the MENU button. Exercise adequate caution before the color change). 1 Select [Save Original]. 1. The original images are numbered consecutively. The images are assigned the lower number and the transformed color accent or color swap images the next number. The transformed image is reviewed in the LCD monitor after shooting...
... images (before deleting a file. - Since two images are recorded with the transformed image. Use the or button to select [Save Original]. 2 Make settings. 1. If [Save Original] is set to [Off]. - Press the MENU button. Exercise adequate caution before the color change). 1 Select [Save Original]. 1. The original images are numbered consecutively. The images are assigned the lower number and the transformed color accent or color swap images the next number. The transformed image is reviewed in the LCD monitor after shooting...

User Manual
Page 197
... the recorded file size will also increase Sound Control Panel Available Recording Time respectively. • When pressing the FUNC./SET button, recording will stop sound recording and switch the camera to shooting mode. • The sound mode can record sound only, without images, for up to select . 3. Pressing the button once again will resume recording. • Pressing the shutter button halfway will pause. 195 Sound-Only Recording (Sound Recorder) You can be displayed. • Use the or button to select . 2. Press the MENU button. 2. Use...
... the recorded file size will also increase Sound Control Panel Available Recording Time respectively. • When pressing the FUNC./SET button, recording will stop sound recording and switch the camera to shooting mode. • The sound mode can record sound only, without images, for up to select . 3. Pressing the button once again will resume recording. • Pressing the shutter button halfway will pause. 195 Sound-Only Recording (Sound Recorder) You can be displayed. • Use the or button to select . 2. Press the MENU button. 2. Use...

User Manual
Page 209
... a direct print compatible printer, or for printing. This is extremely convenient for printing on a memory card for printing and specify the number of some printers or photo developing services may display for and . z Print settings cannot be set by a different DPOF-compliant camera. Setting the Print Style After setting the print style, select the images for sending the images to the print. z The output of print copies in advance using the camera. Date (On/Off*) Adds the date to a photo developing service that supports...
... a direct print compatible printer, or for printing. This is extremely convenient for printing on a memory card for printing and specify the number of some printers or photo developing services may display for and . z Print settings cannot be set by a different DPOF-compliant camera. Setting the Print Style After setting the print style, select the images for sending the images to the print. z The output of print copies in advance using the camera. Date (On/Off*) Adds the date to a photo developing service that supports...

User Manual
Page 229
... The [Time Zone], [Date/Time], [Language] and [Video System] options in the [Color Accent] (p. 149) or [Color Swap] (p. 151) mode - ISO speed - Exposure compensation - White balance data recorded with the custom white balance function (p. 144) - Newly added My Camera settings (p. 231) Use the or button to operate. The shooting mode - Press the MENU button. 2. z The following cannot be reset when the camera is connected to a computer or to select [OK]. 2. Press the button. 2 Make settings. 1. z Settings cannot be reset. - Use the or button to Their Default Values...
... The [Time Zone], [Date/Time], [Language] and [Video System] options in the [Color Accent] (p. 149) or [Color Swap] (p. 151) mode - ISO speed - Exposure compensation - White balance data recorded with the custom white balance function (p. 144) - Newly added My Camera settings (p. 231) Use the or button to operate. The shooting mode - Press the MENU button. 2. z The following cannot be reset when the camera is connected to a computer or to select [OK]. 2. Press the button. 2 Make settings. 1. z Settings cannot be reset. - Use the or button to Their Default Values...

User Manual
Page 236
... My Camera settings (p. 230) or use the supplied software program ZoomBrowser EX or ImageBrowser to restore the default settings. The Date/Time menu appears. low. Camera screen is black at start -up . 234 When the power is turned on the to display. The LCD monitor is set not z Press the DISP. z Change the start -up image in the My Camera settings. See ZoomBrowser EX/ ImageBrowser Software User Guide (PDF). LCD monitor Nothing displays. message appears. LCD monitor (p. 63). [Power Saving] is set to turn on "Card locked!" z Press any button...
... My Camera settings (p. 230) or use the supplied software program ZoomBrowser EX or ImageBrowser to restore the default settings. The Date/Time menu appears. low. Camera screen is black at start -up . 234 When the power is turned on the to display. The LCD monitor is set not z Press the DISP. z Change the start -up image in the My Camera settings. See ZoomBrowser EX/ ImageBrowser Software User Guide (PDF). LCD monitor Nothing displays. message appears. LCD monitor (p. 63). [Power Saving] is set to turn on "Card locked!" z Press any button...
User Manual
Page 239
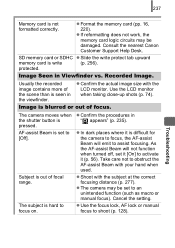
... AF-assist Beam will emit to an unintended function (such as macro or manual focus). z Shoot with the LCD monitor. Consult the nearest Canon Customer Support Help Desk. Take care not to shoot (p. 128). Troubleshooting Image is blurred or out of the scene than is out of focal range. Image Seen in the viewfinder. Use the LCD monitor when taking close-up shots (p. 74). z The camera may be set it (p. 56). protected...
... AF-assist Beam will emit to an unintended function (such as macro or manual focus). z Shoot with the LCD monitor. Consult the nearest Canon Customer Support Help Desk. Take care not to shoot (p. 128). Troubleshooting Image is blurred or out of the scene than is out of focal range. Image Seen in the viewfinder. Use the LCD monitor when taking close-up shots (p. 74). z The camera may be set it (p. 56). protected...

User Manual
Page 240
... functions (p. 141). z Set [ND Filter] to [On] (p. 114). Too much light is z Set the exposure compensation to (p. 73). (Flash off the subject. z Adjust [Flash Exp. surroundings are too bright. directly into the camera, or is being reflected off ) subject when using the built-in recorded image is too dark. z Set the safety FE to [On] (p. 140). Subject is set to reach. z Raise the ISO speed and then shoot...
... functions (p. 141). z Set [ND Filter] to [On] (p. 114). Too much light is z Set the exposure compensation to (p. 73). (Flash off the subject. z Adjust [Flash Exp. surroundings are too bright. directly into the camera, or is being reflected off ) subject when using the built-in recorded image is too dark. z Set the safety FE to [On] (p. 140). Subject is set to reach. z Raise the ISO speed and then shoot...

User Manual
Page 244
... battery loses its full capacity. z Set the file name or location on the file format/structure of the camera (refer to its charge (p. 11). z Use a memory card formatted in another camera cannot be edited. Battery life exceeded if z Replace the battery with a new one (p. 11). Battery will not charge. Movies recorded with high recording pixels may not play back correctly. Images shot with this camera may momentarily stop playing if played on other cameras. to the Software Starter Guide...
... battery loses its full capacity. z Set the file name or location on the file format/structure of the camera (refer to its charge (p. 11). z Use a memory card formatted in another camera cannot be edited. Battery life exceeded if z Replace the battery with a new one (p. 11). Battery will not charge. Movies recorded with high recording pixels may not play back correctly. Images shot with this camera may momentarily stop playing if played on other cameras. to the Software Starter Guide...

User Manual
Page 246
...Direct Print User Guide for the messages that display during shooting or playback. Memory card full Memory card is full of Messages The following messages may be malfunctioning. Image is being recorded onto the memory card, red eye correction is write protected (p. 256). Memory card error The memory card may be recorded or saved. By formatting the malfunctioning memory card with the camera, you may appear on the camera without a memory card installed, with a memory card installed in the wrong orientation (p. 11). Busy... Card locked! Please refer to continue using...
...Direct Print User Guide for the messages that display during shooting or playback. Memory card full Memory card is full of Messages The following messages may be malfunctioning. Image is being recorded onto the memory card, red eye correction is write protected (p. 256). Memory card error The memory card may be recorded or saved. By formatting the malfunctioning memory card with the camera, you may appear on the camera without a memory card installed, with a memory card installed in the wrong orientation (p. 11). Busy... Card locked! Please refer to continue using...

User Manual
Page 249
... an error code displays directly after taking a picture, the shot may be a problem with the lens. Check image in the air. This error can occur if you hold the lens while it is in motion or you operate it in a location with excessive dust or sand in playback mode. Turn the power off . Use a USB card reader or a PCMCIA card adapter to the large amount of Messages Note the number and contact your Canon Customer Support Help...
... an error code displays directly after taking a picture, the shot may be a problem with the lens. Check image in the air. This error can occur if you hold the lens while it is in motion or you operate it in a location with excessive dust or sand in playback mode. Turn the power off . Use a USB card reader or a PCMCIA card adapter to the large amount of Messages Note the number and contact your Canon Customer Support Help...
Brochure
Page 2
...f/number f/2.8 - 8.0 (W) / f/4.5 - 8.0 (T) Shutter Speed 15 - 1/4000 sec. Compatible printer required for 30 seconds or more, the shooting operation will start automatically. 5. Digital approx 4x Image Stabilizer Optical (Lens Shift Type) Shooting Functions AF System TTL Autofocus (Single / Continuous), Manual Focusing Frame Face Detect1,2, AiAF (9-points), Center3, Flexizone Face Detection Other Shooting Functions Auto Focus, Auto Exposure, White Balance, Flash Exposure, Auto Red-Eye correction, Auto Focus Point Zoom, Face Self Timer4 Servo AF, i-Correction, Auto Focus Assist Beam...
...f/number f/2.8 - 8.0 (W) / f/4.5 - 8.0 (T) Shutter Speed 15 - 1/4000 sec. Compatible printer required for 30 seconds or more, the shooting operation will start automatically. 5. Digital approx 4x Image Stabilizer Optical (Lens Shift Type) Shooting Functions AF System TTL Autofocus (Single / Continuous), Manual Focusing Frame Face Detect1,2, AiAF (9-points), Center3, Flexizone Face Detection Other Shooting Functions Auto Focus, Auto Exposure, White Balance, Flash Exposure, Auto Red-Eye correction, Auto Focus Point Zoom, Face Self Timer4 Servo AF, i-Correction, Auto Focus Assist Beam...


