
User Manual
Page 1
ENGLISH The Components Guide Preparations Shooting Playback/Erasing Menus and Settings Printing Downloading Images to a Computer Basic Camera User Guide Please Read This First This guide explains how to prepare the camera and use its basic features. PRINTED IN JAPAN CDI-E286-010 XX07XXX © 2007 CANON INC.
ENGLISH The Components Guide Preparations Shooting Playback/Erasing Menus and Settings Printing Downloading Images to a Computer Basic Camera User Guide Please Read This First This guide explains how to prepare the camera and use its basic features. PRINTED IN JAPAN CDI-E286-010 XX07XXX © 2007 CANON INC.

User Manual
Page 2
...the battery and memory card • Setting the date, time and language Shooting Playback/Erasing Menus and Settings Basic Camera User Guide (This Guide) • Read this guide, the Basic Camera User Guide is called the Basic Guide, and the Advanced Camera User Guide is called the Advanced Guide. Handling precautions, references to the various shooting and playback functions Advanced Camera User Guide Printing • Installing the software • Downloading images to a computer • Using the software Direct Print User Guide Basic Camera User Guide (This Guide) Software Starter...
...the battery and memory card • Setting the date, time and language Shooting Playback/Erasing Menus and Settings Basic Camera User Guide (This Guide) • Read this guide, the Basic Camera User Guide is called the Basic Guide, and the Advanced Camera User Guide is called the Advanced Guide. Handling precautions, references to the various shooting and playback functions Advanced Camera User Guide Printing • Installing the software • Downloading images to a computer • Using the software Direct Print User Guide Basic Camera User Guide (This Guide) Software Starter...
User Manual
Page 4
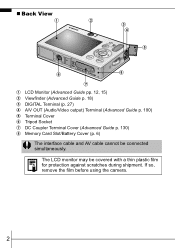
„ Back View a b c d e f h g a LCD Monitor (Advanced Guide pp. 12, 15) b Viewfinder (Advanced Guide p. 18) c DIGITAL Terminal (p. 27) d A/V OUT (Audio/Video output) Terminal (Advanced Guide p. 100) e Terminal Cover f Tripod Socket g DC Coupler Terminal Cover (Advanced Guide p. 130) h Memory Card Slot/Battery Cover (p. 6) The interface cable and AV cable cannot be covered with a thin plastic film for protection against scratches during shipment. If so, remove the film before using the camera. 2 The LCD monitor may be connected simultaneously.
„ Back View a b c d e f h g a LCD Monitor (Advanced Guide pp. 12, 15) b Viewfinder (Advanced Guide p. 18) c DIGITAL Terminal (p. 27) d A/V OUT (Audio/Video output) Terminal (Advanced Guide p. 100) e Terminal Cover f Tripod Socket g DC Coupler Terminal Cover (Advanced Guide p. 130) h Memory Card Slot/Battery Cover (p. 6) The interface cable and AV cable cannot be covered with a thin plastic film for protection against scratches during shipment. If so, remove the film before using the camera. 2 The LCD monitor may be connected simultaneously.

User Manual
Page 5
... 9) c Indicators (p. 4) d Zoom Lever (p. 14, Advanced Guide p. 76) Shooting: (Wide Angle)/ (Telephoto) Playback: (Index)/ (Magnify) e Shutter Button (p. 10) f Speaker g Mode Switch (pp. 9, 11) h (Print/Share) Button (pp. 22, 30, Advanced Guide pp. 66, 67) i FUNC./SET (Function/Set) Button (p. 20, Advanced Guide p. 22) j DISP. (Display) Button (Advanced Guide p. 12) k MENU Button (p. 21, Advanced Guide p. 23) l (Macro)/ (Infinity)/ Button (p. 15) m (ISO Speed)/ (Jump)/ Button (Advanced Guide pp. 65, 79) n (Flash)/ Button (p. 14) o (Continuous)/ (Self-timer)/ (Single Image Erase...
... 9) c Indicators (p. 4) d Zoom Lever (p. 14, Advanced Guide p. 76) Shooting: (Wide Angle)/ (Telephoto) Playback: (Index)/ (Magnify) e Shutter Button (p. 10) f Speaker g Mode Switch (pp. 9, 11) h (Print/Share) Button (pp. 22, 30, Advanced Guide pp. 66, 67) i FUNC./SET (Function/Set) Button (p. 20, Advanced Guide p. 22) j DISP. (Display) Button (Advanced Guide p. 12) k MENU Button (p. 21, Advanced Guide p. 23) l (Macro)/ (Infinity)/ Button (p. 15) m (ISO Speed)/ (Jump)/ Button (Advanced Guide pp. 65, 79) n (Flash)/ Button (p. 14) o (Continuous)/ (Self-timer)/ (Single Image Erase...

User Manual
Page 6
...while an indicator is blinking green. These actions may corrupt image data. • Shake or jolt the camera • Shut off the power, or open the memory card slot/battery cover „ Upper Indicator Green: Ready to shoot (camera beeps twice) Blinking Green: Time Lapse (movie) recording/Image recording/ reading/erasing/transferring (when connected to a computer/printer) Orange: Ready to shoot (flash on) Blinking Orange: Ready to shoot (camera shake warning) „ Lower Indicator Yellow: Macro mode/infinity mode/AF lock mode Blinking Yellow: Focusing difficulty (camera beeps...
...while an indicator is blinking green. These actions may corrupt image data. • Shake or jolt the camera • Shut off the power, or open the memory card slot/battery cover „ Upper Indicator Green: Ready to shoot (camera beeps twice) Blinking Green: Time Lapse (movie) recording/Image recording/ reading/erasing/transferring (when connected to a computer/printer) Orange: Ready to shoot (flash on) Blinking Orange: Ready to shoot (camera shake warning) „ Lower Indicator Yellow: Macro mode/infinity mode/AF lock mode Blinking Yellow: Focusing difficulty (camera beeps...
User Manual
Page 10
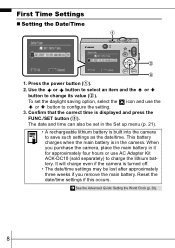
... the icon and use AC Adapter Kit ACK-DC10 (sold separately) to save such settings as the date/time. Use the or button to select an item and the or button to configure the setting. 3. Reset the date/time settings if this occurs. Î See the Advanced Guide: Setting the World Clock (p. 20). 8 This battery charges when the main battery is in the Set up menu (p. 21). • A rechargeable lithium battery is displayed and...
... the icon and use AC Adapter Kit ACK-DC10 (sold separately) to save such settings as the date/time. Use the or button to select an item and the or button to configure the setting. 3. Reset the date/time settings if this occurs. Î See the Advanced Guide: Setting the World Clock (p. 20). 8 This battery charges when the main battery is in the Set up menu (p. 21). • A rechargeable lithium battery is displayed and...

User Manual
Page 11
... FUNC./SET button (d). 3. Shooting 1. button while pressing the power button. Î See the Advanced Guide: Using the LCD Monitor (p. 12). Î See the Advanced Guide: Power Saving Function (p. 19). Î See the Advanced Guide: Set up menu (p. 21). Slide the mode switch to the setting that mutes all sounds (except for the warning sound), press and hold the DISP. Aim the camera at the subject. Power button The start-up sound will play and the start-up image will display...
... FUNC./SET button (d). 3. Shooting 1. button while pressing the power button. Î See the Advanced Guide: Using the LCD Monitor (p. 12). Î See the Advanced Guide: Power Saving Function (p. 19). Î See the Advanced Guide: Set up menu (p. 21). Slide the mode switch to the setting that mutes all sounds (except for the warning sound), press and hold the DISP. Aim the camera at the subject. Power button The start-up sound will play and the start-up image will display...

User Manual
Page 12
... the shutter button halfway to shoot. The shutter sound will play and the image will blink green while the image is dis- The indicator will record. You can continue to display images regardless of the image used to the memory card. Î See Indicators (p. 4). Î See the Advanced available. When the camera focuses, it beeps twice and the indicator lights green (orange when the flash fires). To stop displaying the image, press the shutter button halfway. Î See the Advanced Guide: Review...
... the shutter button halfway to shoot. The shutter sound will play and the image will blink green while the image is dis- The indicator will record. You can continue to display images regardless of the image used to the memory card. Î See Indicators (p. 4). Î See the Advanced available. When the camera focuses, it beeps twice and the indicator lights green (orange when the flash fires). To stop displaying the image, press the shutter button halfway. Î See the Advanced Guide: Review...
User Manual
Page 14
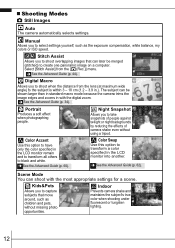
... using a tripod. „ Shooting Modes Still Images Auto The camera automatically selects settings. Night Snapshot Allows you to shoot overlapping images that move around, such as the exposure compensation, white balance, my colors or ISO speed. Stitch Assist Allows you to create one panoramic image on a computer. Color Accent Use this option to capture subjects that can later be shown larger than in standard macro mode because the camera trims the image edges and zooms...
... using a tripod. „ Shooting Modes Still Images Auto The camera automatically selects settings. Night Snapshot Allows you to shoot overlapping images that move around, such as the exposure compensation, white balance, my colors or ISO speed. Stitch Assist Allows you to create one panoramic image on a computer. Color Accent Use this option to capture subjects that can later be shown larger than in standard macro mode because the camera trims the image edges and zooms...

User Manual
Page 15
... shooting images with a natural hue. Snow Shoots without a blue tinge and without making people appear dark against a snowy background. Aquarium Selects the optimal ISO speed, white balance and color balance to reduce bluish tones and record images with Waterproof Case WP-DC13 (sold separately). • We recommend you press the shutter button. Shooting Underwater Appropriate for shooting one frame at a time at optimal exposure. This mode uses an optimal white balance setting to...
... shooting images with a natural hue. Snow Shoots without a blue tinge and without making people appear dark against a snowy background. Aquarium Selects the optimal ISO speed, white balance and color balance to reduce bluish tones and record images with Waterproof Case WP-DC13 (sold separately). • We recommend you press the shutter button. Shooting Underwater Appropriate for shooting one frame at a time at optimal exposure. This mode uses an optimal white balance setting to...

User Manual
Page 18
... the self-timer lamp will blink (when using red-eye reduction, it will stay lit for the last 2 seconds). • You can change the delay time and number of shots (1-3*2-10). • When [Delay] is set to more sec., the self-timer sound beeps quickly 2 sec. a b 10 sec. after you press the shutter button. • The self-timer sound beeps quickly*1 when you press the shutter button and the shutter releases 2 sec. later. Self-Timer: shoots 10...
... the self-timer lamp will blink (when using red-eye reduction, it will stay lit for the last 2 seconds). • You can change the delay time and number of shots (1-3*2-10). • When [Delay] is set to more sec., the self-timer sound beeps quickly 2 sec. a b 10 sec. after you press the shutter button. • The self-timer sound beeps quickly*1 when you press the shutter button and the shutter releases 2 sec. later. Self-Timer: shoots 10...

User Manual
Page 19
... flash must charge. • The interval between shots lengthens when the built-in memory of Shots ( ) 1. Press the MENU button. Shooting „ Changing the Delay Time and Number of the camera fills. • Shooting will automatically cease if the memory card becomes full. 17 Use the or button to select [Delay] or [Shots] and the or button to 2 or more shots, the following occurs. • The exposure and white balance are locked at the set...
... flash must charge. • The interval between shots lengthens when the built-in memory of Shots ( ) 1. Press the MENU button. Shooting „ Changing the Delay Time and Number of the camera fills. • Shooting will automatically cease if the memory card becomes full. 17 Use the or button to select [Delay] or [Shots] and the or button to 2 or more shots, the following occurs. • The exposure and white balance are locked at the set...
User Manual
Page 25
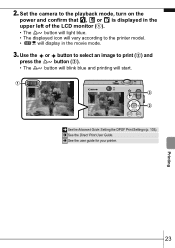
... Guide: Setting the DPOF Print Settings (p. 103). Î See the Direct Print User Guide. Î See the user guide for your printer. 2. Printing 23 Set the camera to the playback mode, turn on the power and confirm that , or is displayed in the upper left of the LCD monitor (a). • The button will light blue. • The displayed icon will vary according to print (b) and press the button (c). • The button will blink blue and printing will display in the movie mode...
... Guide: Setting the DPOF Print Settings (p. 103). Î See the Direct Print User Guide. Î See the user guide for your printer. 2. Printing 23 Set the camera to the playback mode, turn on the power and confirm that , or is displayed in the upper left of the LCD monitor (a). • The button will light blue. • The displayed icon will vary according to print (b) and press the button (c). • The button will blink blue and printing will display in the movie mode...
User Manual
Page 28
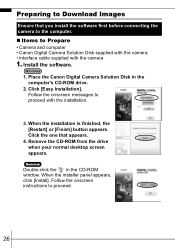
...; Canon Digital Camera Solution Disk supplied with the camera • Interface cable supplied with the installation. 3. Remove the CD-ROM from the drive when your normal desktop screen appears. Place the Canon Digital Camera Solution Disk in the CD-ROM window. When the installer panel appears, click [Install]. Follow the onscreen messages to proceed with the camera 1. When the installation is finished, the [Restart] or [Finish] button appears. Click [Easy Installation]. Follow the onscreen instructions to...
...; Canon Digital Camera Solution Disk supplied with the camera • Interface cable supplied with the installation. 3. Remove the CD-ROM from the drive when your normal desktop screen appears. Place the Canon Digital Camera Solution Disk in the CD-ROM window. When the installer panel appears, click [Install]. Follow the onscreen messages to proceed with the camera 1. When the installation is finished, the [Restart] or [Finish] button appears. Click [Easy Installation]. Follow the onscreen instructions to...

User Manual
Page 29
... window appears, click [Yes]. Use the toggle on the power. The camera and computer will automatically finish installing onto the computer when you attach the camera and open a connection. 27 Interface Cable Always grasp the sides of the camera's DIGITAL terminal cover, lift up and plug the interface cable in all the way. Connecting the camera to the camera's DIGITAL terminal. Downloading Images to communicate. USB Port DIGITAL Terminal Interface Cable...
... window appears, click [Yes]. Use the toggle on the power. The camera and computer will automatically finish installing onto the computer when you attach the camera and open a connection. 27 Interface Cable Always grasp the sides of the camera's DIGITAL terminal cover, lift up and plug the interface cable in all the way. Connecting the camera to the camera's DIGITAL terminal. Downloading Images to communicate. USB Port DIGITAL Terminal Interface Cable...

User Manual
Page 30
..., click the [Start] menu and select [All Programs] or [Programs], followed by [Canon Utilities], [CameraWindow], [PowerShot - You can set the preferences will display in the ZoomBrowser EX Main Window. IXY - Download the images. • Download the images using the camera or the computer. • By default, the downloaded images are saved into the [Pictures] or [My Pictures] folder. By default, the downloaded images are saved into subfolders according to their shooting dates. 28 Downloading Images Using a Computer. Select [Canon CameraWindow] and...
..., click the [Start] menu and select [All Programs] or [Programs], followed by [Canon Utilities], [CameraWindow], [PowerShot - You can set the preferences will display in the ZoomBrowser EX Main Window. IXY - Download the images. • Download the images using the camera or the computer. • By default, the downloaded images are saved into the [Pictures] or [My Pictures] folder. By default, the downloaded images are saved into subfolders according to their shooting dates. 28 Downloading Images Using a Computer. Select [Canon CameraWindow] and...
User Manual
Page 31
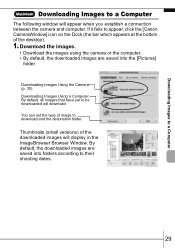
Downloading Images to a Computer Downloading Images to their shooting dates. 29 Downloading Images Using the Camera (p. 30). By default, the downloaded images are saved into folders according to a Computer The following window will appear when you establish a connection between the camera and computer. If it fails to appear, click the [Canon CameraWindow] icon on the Dock (the bar which appears at the bottom of the downloaded images will download. Download the images. • Download the images using the camera or...
Downloading Images to a Computer Downloading Images to their shooting dates. 29 Downloading Images Using the Camera (p. 30). By default, the downloaded images are saved into folders according to a Computer The following window will appear when you establish a connection between the camera and computer. If it fails to appear, click the [Canon CameraWindow] icon on the Dock (the bar which appears at the bottom of the downloaded images will download. Download the images. • Download the images using the camera or...

User Manual
Page 32
Install the supplied software and adjust the computer settings before using camera operations. New Images Transfers and saves to the computer only the images with DPOF Transfer Order settings (Advanced Guide, p. 107). Images Transfers and saves to the computer only the images that the Direct Transfer menu is displayed on the computer desktop. 1. Confirm that have not been previously transferred. Direct Transfer Menu „ All Images/New Images/DPOF Trans. Images 2. The button will light blue. • Press the MENU button if the Direct Transfer menu fails...
Install the supplied software and adjust the computer settings before using camera operations. New Images Transfers and saves to the computer only the images with DPOF Transfer Order settings (Advanced Guide, p. 107). Images Transfers and saves to the computer only the images that the Direct Transfer menu is displayed on the computer desktop. 1. Confirm that have not been previously transferred. Direct Transfer Menu „ All Images/New Images/DPOF Trans. Images 2. The button will light blue. • Press the MENU button if the Direct Transfer menu fails...

User Manual
Page 35
... camera in the Advanced Camera User Guide. Warnings • Do not trigger the flash in order to prevent injury, burns or electrical shock to yourself and others. ious fumes. • Do not handle the power cord if your hands are wet. • Use only recommended batteries and accessories. • The battery charger and compact power adapter are designed for exclusive use it with your camera...
... camera in the Advanced Camera User Guide. Warnings • Do not trigger the flash in order to prevent injury, burns or electrical shock to yourself and others. ious fumes. • Do not handle the power cord if your hands are wet. • Use only recommended batteries and accessories. • The battery charger and compact power adapter are designed for exclusive use it with your camera...
Brochure
Page 5
... is moving. As white balance is detected, lower ISOs are slimmer and smaller with great color and low digital noise. When little subject or camera movement is automatically optimized across the entire picture plane ensure razor sharp images every time you press the shutter. Camera's large LCD screens also allow convenient wide-angle viewing as it automatically sets a higher ISO number and faster shutter speed to reduce blur. Upon...
... is moving. As white balance is detected, lower ISOs are slimmer and smaller with great color and low digital noise. When little subject or camera movement is automatically optimized across the entire picture plane ensure razor sharp images every time you press the shutter. Camera's large LCD screens also allow convenient wide-angle viewing as it automatically sets a higher ISO number and faster shutter speed to reduce blur. Upon...


