User Manual
Page 1
CDI-E293-010 XX06XXX © 2006 CANON INC. ENGLISH The Components Guide Preparations Shooting Playback/Erasing Menus and Settings Printing Basic Downloading Images to a Computer Camera User Guide Please Read This First This guide explains how to prepare the camera and use its basic features. PRINTED IN JAPAN
CDI-E293-010 XX06XXX © 2006 CANON INC. ENGLISH The Components Guide Preparations Shooting Playback/Erasing Menus and Settings Printing Basic Downloading Images to a Computer Camera User Guide Please Read This First This guide explains how to prepare the camera and use its basic features. PRINTED IN JAPAN
User Manual
Page 2
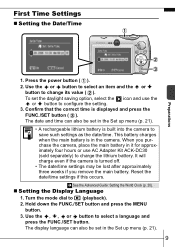
...Map The Components Guide Preparations • Charging the battery • Installing the battery and memory card • Setting the date, time and language Shooting Playback/Erasing Menus and Settings Basic Camera User Guide (This Guide) • Read this guide, the Basic Camera User Guide is called the Basic Guide, and the Advanced Camera User Guide is called the Advanced Guide. Handling precautions, references to the various shooting and playback functions Advanced Camera User Guide Printing Direct Print User Guide • Installing the software • Downloading images to the...
...Map The Components Guide Preparations • Charging the battery • Installing the battery and memory card • Setting the date, time and language Shooting Playback/Erasing Menus and Settings Basic Camera User Guide (This Guide) • Read this guide, the Basic Camera User Guide is called the Basic Guide, and the Advanced Camera User Guide is called the Advanced Guide. Handling precautions, references to the various shooting and playback functions Advanced Camera User Guide Printing Direct Print User Guide • Installing the software • Downloading images to the...

User Manual
Page 4
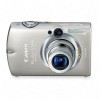
„ Back View LCD Monitor (Advanced Guide pp. 12, 15) Viewfinder (Advanced Guide p. 18) DIGITAL Terminal (p. 27) A/V OUT (Audio/Video output) Terminal (Advanced Guide p. 103) Terminal Cover Tripod Socket Memory Card Slot/Battery Cover Lock Release Switch (p. 7) DC Coupler Terminal Cover (Advanced Guide p. 125) Memory Card Slot/Battery Cover (p. 7) The interface cable and AV cable cannot be connected simultaneously. 2
„ Back View LCD Monitor (Advanced Guide pp. 12, 15) Viewfinder (Advanced Guide p. 18) DIGITAL Terminal (p. 27) A/V OUT (Audio/Video output) Terminal (Advanced Guide p. 103) Terminal Cover Tripod Socket Memory Card Slot/Battery Cover Lock Release Switch (p. 7) DC Coupler Terminal Cover (Advanced Guide p. 125) Memory Card Slot/Battery Cover (p. 7) The interface cable and AV cable cannot be connected simultaneously. 2

User Manual
Page 5
...; Controls Speaker Indicators (p. 5) Power Lamp Power Button (p. 10) Zoom Lever (p. 14, Advanced Guide p. 73) Shooting: (Wide Angle)/ (Telephoto) Playback: (Index)/ (Magnify) Shutter Button (p. 10) Mode Dial (pp. 10, 11) (Print/Share) Button (pp. 22, 30) DISP. (Display) Button (Advanced Guide p. 12) FUNC./SET (Function/Set) Button (p. 20, Advanced Guide p. 22) Touch Control Dial (pp. 4, 18) MENU Button (p. 21, Advanced Guide p. 23) (Macro)/ (Infinity)/ Button (p. 15) (ISO Speed)/ (Jump)/ Button (Advanced Guide pp. 65, 76) (Flash)/ Button (p. 14) (Single Image Erase)/ (Continuous)/ (Self-timer...
...; Controls Speaker Indicators (p. 5) Power Lamp Power Button (p. 10) Zoom Lever (p. 14, Advanced Guide p. 73) Shooting: (Wide Angle)/ (Telephoto) Playback: (Index)/ (Magnify) Shutter Button (p. 10) Mode Dial (pp. 10, 11) (Print/Share) Button (pp. 22, 30) DISP. (Display) Button (Advanced Guide p. 12) FUNC./SET (Function/Set) Button (p. 20, Advanced Guide p. 22) Touch Control Dial (pp. 4, 18) MENU Button (p. 21, Advanced Guide p. 23) (Macro)/ (Infinity)/ Button (p. 15) (ISO Speed)/ (Jump)/ Button (Advanced Guide pp. 65, 76) (Flash)/ Button (p. 14) (Single Image Erase)/ (Continuous)/ (Self-timer...

User Manual
Page 6
... on the touch control dial displays the playback mode and shooting mode touch icons on the LCD monitor. • You can easily select images using the touch control dial (Advanced Guide p. 20). • You can confirm the functions assigned to On/Off in the (Set up) menu (Advanced Guide p. 26). 4 You can set , and the icon will enlarge on the LCD monitor. Touch Icons Sample of shooting mode • Unavailable buttons are grayed...
... on the touch control dial displays the playback mode and shooting mode touch icons on the LCD monitor. • You can easily select images using the touch control dial (Advanced Guide p. 20). • You can confirm the functions assigned to On/Off in the (Set up) menu (Advanced Guide p. 26). 4 You can set , and the icon will enlarge on the LCD monitor. Touch Icons Sample of shooting mode • Unavailable buttons are grayed...
User Manual
Page 11
... use AC Adapter Kit ACK-DC30 (sold separately) to configure the setting. 3. Use the , , or button to save such settings as the date/time. Press the power button ( ). 2. When you remove the main battery. Hold down the FUNC./SET button and press the MENU button. 3. It will charge even if the camera is displayed and press the FUNC./SET button ( ). The date and time can also be set in the camera. Preparations First Time Settings „ Setting the Date/Time 1. The display language...
... use AC Adapter Kit ACK-DC30 (sold separately) to configure the setting. 3. Use the , , or button to save such settings as the date/time. Press the power button ( ). 2. When you remove the main battery. Hold down the FUNC./SET button and press the MENU button. 3. It will charge even if the camera is displayed and press the FUNC./SET button ( ). The date and time can also be set in the camera. Preparations First Time Settings „ Setting the Date/Time 1. The display language...
User Manual
Page 12
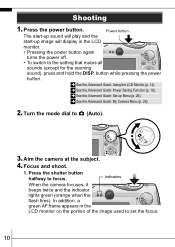
... Guide: Using the LCD Monitor (p. 12). Î See the Advanced Guide: Power Saving Function (p. 19). Î See the Advanced Guide: Set up image will play and the start -up sound will display in the LCD monitor on the portion of the image used to the setting that mutes all sounds (except for the warning sound), press and hold the DISP. Focus and shoot. 1. Press the shutter button halfway to (Auto). 3. Aim the camera at the subject. 4. Power button...
... Guide: Using the LCD Monitor (p. 12). Î See the Advanced Guide: Power Saving Function (p. 19). Î See the Advanced Guide: Set up image will play and the start -up sound will display in the LCD monitor on the portion of the image used to the setting that mutes all sounds (except for the warning sound), press and hold the DISP. Focus and shoot. 1. Press the shutter button halfway to (Auto). 3. Aim the camera at the subject. 4. Power button...

User Manual
Page 13
... Advanced Shooting (p. 67). The indicator will record. Guide: Checking for approximately 2 seconds. Turn the mode dial to display images regardless of the review duration setting with the following procedures. • Keeping the shutter button pressed after a shot. • Pressing the FUNC./SET or DISP. Shooting 11 played in the LCD monitor for Focus Right After Î See Erasing (p. 19). You can continue to the desired mode ( ). 2. button while the image is recorded to the memory card...
... Advanced Shooting (p. 67). The indicator will record. Guide: Checking for approximately 2 seconds. Turn the mode dial to display images regardless of the review duration setting with the following procedures. • Keeping the shutter button pressed after a shot. • Pressing the FUNC./SET or DISP. Shooting 11 played in the LCD monitor for Focus Right After Î See Erasing (p. 19). You can continue to the desired mode ( ). 2. button while the image is recorded to the memory card...
User Manual
Page 14
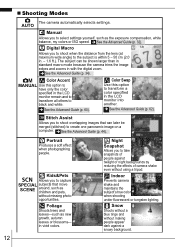
... Advanced Guide (p. 62). Digital Macro Allows you to shoot when the distance from the lens (at maximum wide angle) to transform a color specified in . - 1.6 ft.). Stitch Assist Allows you to capture SPECIAL subjects that can be merged (stitched) to take snapshots of camera shake even without missing photo opportunities. Foliage Shoots trees and leaves-such as the exposure compensation, white balance, my colors or ISO speed. Î...
... Advanced Guide (p. 62). Digital Macro Allows you to shoot when the distance from the lens (at maximum wide angle) to transform a color specified in . - 1.6 ft.). Stitch Assist Allows you to capture SPECIAL subjects that can be merged (stitched) to take snapshots of camera shake even without missing photo opportunities. Foliage Shoots trees and leaves-such as the exposure compensation, white balance, my colors or ISO speed. Î...
User Manual
Page 15
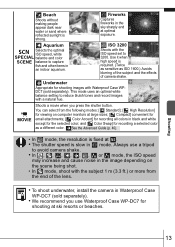
... of camera shake. Beach Shoots without making people appear dark near water or sand where reflected sunlight is slow in mode. MOVIE Shoots a movie when you use Waterproof Case WP-DC7 for shooting images with Waterproof Case WPDC7 (sold separately). • We recommend you press the shutter button. Shooting 13 This mode uses an optimal white balance setting to reduce bluish tones and record images with the ISO speed set to 3200. ISO 3200 Shoots...
... of camera shake. Beach Shoots without making people appear dark near water or sand where reflected sunlight is slow in mode. MOVIE Shoots a movie when you use Waterproof Case WP-DC7 for shooting images with Waterproof Case WPDC7 (sold separately). • We recommend you press the shutter button. Shooting 13 This mode uses an optimal white balance setting to reduce bluish tones and record images with the ISO speed set to 3200. ISO 3200 Shoots...

User Manual
Page 18
... the shutter releases, the self-timer lamp and sound speed up*1. 2 sec. Self-Timer: shoots 10 sec. before the shutter releases. Custom Timer: you can change the delay time (0-10*2, 15, 20, 30 sec.) and number of shots with the option (p. 17). Press the button ( ) and use the or button to display , or ( ). • When the shutter button is pressed fully, the self-timer will activate and the self-timer lamp will blink (when using red-eye reduction...
... the shutter releases, the self-timer lamp and sound speed up*1. 2 sec. Self-Timer: shoots 10 sec. before the shutter releases. Custom Timer: you can change the delay time (0-10*2, 15, 20, 30 sec.) and number of shots with the option (p. 17). Press the button ( ) and use the or button to display , or ( ). • When the shutter button is pressed fully, the self-timer will activate and the self-timer lamp will blink (when using red-eye reduction...
User Manual
Page 19
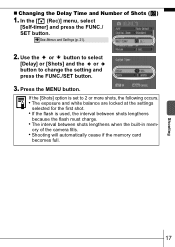
... MENU button. Use the or button to select [Delay] or [Shots] and the or button to 2 or more shots, the following occurs. • The exposure and white balance are locked at the settings selected for the first shot. • If the flash is set to change the setting and press the FUNC./SET button. 3. ory of Shots ( ) 1. Shooting „ Changing the Delay Time and Number of the camera fills. • Shooting will automatically cease if the memory card...
... MENU button. Use the or button to select [Delay] or [Shots] and the or button to 2 or more shots, the following occurs. • The exposure and white balance are locked at the settings selected for the first shot. • If the flash is set to change the setting and press the FUNC./SET button. 3. ory of Shots ( ) 1. Shooting „ Changing the Delay Time and Number of the camera fills. • Shooting will automatically cease if the memory card...
User Manual
Page 22
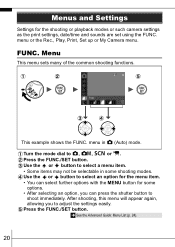
... playback modes or such camera settings as the print settings, date/time and sounds are set using the FUNC. Press the FUNC./SET button. Î See the Advanced Guide: Menu List (p. 24). 20 FUNC. This example shows the FUNC. menu in some options. • After selecting an option, you to , , or . Use the or button to shoot immediately. menu or the Rec., Play, Print, Set up or My Camera menu. Menu This menu sets many of the common shooting functions...
... playback modes or such camera settings as the print settings, date/time and sounds are set using the FUNC. Press the FUNC./SET button. Î See the Advanced Guide: Menu List (p. 24). 20 FUNC. This example shows the FUNC. menu in some options. • After selecting an option, you to , , or . Use the or button to shoot immediately. menu or the Rec., Play, Print, Set up or My Camera menu. Menu This menu sets many of the common shooting functions...
User Manual
Page 25
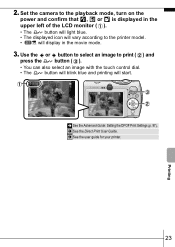
Set the camera to the playback mode, turn on the power and confirm that , or is displayed in the upper left of the LCD monitor ( ). • The button will light blue. • The displayed icon will vary according to print ( ) and press the button ( ). • You can also select an image with the touch control dial. • The button will blink blue and printing will display in the movie mode. 3. Printing 23 2. Use the or...
Set the camera to the playback mode, turn on the power and confirm that , or is displayed in the upper left of the LCD monitor ( ). • The button will light blue. • The displayed icon will vary according to print ( ) and press the button ( ). • You can also select an image with the touch control dial. • The button will blink blue and printing will display in the movie mode. 3. Printing 23 2. Use the or...

User Manual
Page 26
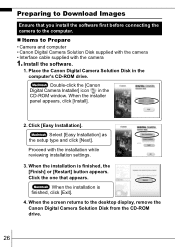
...;Software Starter Guide •Windows® XP and Mac OS X Users leaflet „ Using a Memory Card Reader A memory card reader can be used , may not be used with all the operating systems listed above. Some methods, depending on the OS used to download images recorded by the camera to a computer. Downloading Images to a Computer The following methods can be available. z z Computer System Requirements •Basic Guide (p. 25) •Software Starter Guide Connecting the Camera to...
...;Software Starter Guide •Windows® XP and Mac OS X Users leaflet „ Using a Memory Card Reader A memory card reader can be used , may not be used with all the operating systems listed above. Some methods, depending on the OS used to download images recorded by the camera to a computer. Downloading Images to a Computer The following methods can be available. z z Computer System Requirements •Basic Guide (p. 25) •Software Starter Guide Connecting the Camera to...
User Manual
Page 28
... [Install]. 2. Place the Canon Digital Camera Solution Disk in the CD-ROM window. Select [Easy Installation] as the setup type and click [Next]. Proceed with the camera 1. Click the one that you install the software first before connecting the camera to the computer. „ Items to the desktop display, remove the Canon Digital Camera Solution Disk from the CD-ROM drive. 26 When the installation is finished, the [Finish] or [Restart] button appears. When the screen...
... [Install]. 2. Place the Canon Digital Camera Solution Disk in the CD-ROM window. Select [Easy Installation] as the setup type and click [Next]. Proceed with the camera 1. Click the one that you install the software first before connecting the camera to the computer. „ Items to the desktop display, remove the Canon Digital Camera Solution Disk from the CD-ROM drive. 26 When the installation is finished, the [Finish] or [Restart] button appears. When the screen...

User Manual
Page 29
... the interface cable in all the way. If the Digital Signature Not Found window appears, click [Yes]. Downloading Images to the camera's DIGITAL terminal. Connect the supplied interface cable to the computer's USB port and to a Computer 2. Slip a fingernail under the bottom edge of the connector when disconnecting the interface cable from the camera's DIGITAL terminal. Connecting the camera to (playback) and turn on the power. Turn the camera's mode dial...
... the interface cable in all the way. If the Digital Signature Not Found window appears, click [Yes]. Downloading Images to the camera's DIGITAL terminal. Connect the supplied interface cable to the computer's USB port and to a Computer 2. Slip a fingernail under the bottom edge of the connector when disconnecting the interface cable from the camera's DIGITAL terminal. Connecting the camera to (playback) and turn on the power. Turn the camera's mode dial...
User Manual
Page 30
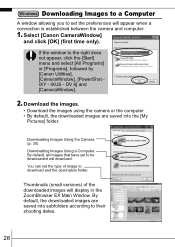
... the window to their shooting dates. 28 By default, all images that have yet to be downloaded will display in the ZoomBrowser EX Main Window. Downloading Images Using a Computer. Download the images. • Download the images using the camera or the computer. • By default, the downloaded images are saved into the [My Pictures] folder. Downloading Images Using the Camera (p. 30). Downloading Images to a Computer A window allowing you to set the type of the downloaded images will download. Select [Canon CameraWindow] and click [OK] (first time only...
... the window to their shooting dates. 28 By default, all images that have yet to be downloaded will display in the ZoomBrowser EX Main Window. Downloading Images Using a Computer. Download the images. • Download the images using the camera or the computer. • By default, the downloaded images are saved into the [My Pictures] folder. Downloading Images Using the Camera (p. 30). Downloading Images to a Computer A window allowing you to set the type of the downloaded images will download. Select [Canon CameraWindow] and click [OK] (first time only...
User Manual
Page 31
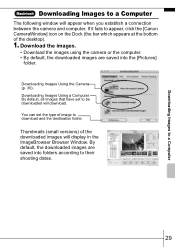
... downloaded images are saved into folders according to their shooting dates. 29 Downloading Images to a Computer Downloading Images to a Computer The following window will download. By default, all images that have yet to be downloaded will appear when you establish a connection between the camera and computer. Download the images. • Download the images using the camera or the computer. • By default, the downloaded images are saved into the [Pictures] folder. Thumbnails (small versions) of image to appear, click the [Canon...
... downloaded images are saved into folders according to their shooting dates. 29 Downloading Images to a Computer Downloading Images to a Computer The following window will download. By default, all images that have yet to be downloaded will appear when you establish a connection between the camera and computer. Download the images. • Download the images using the camera or the computer. • By default, the downloaded images are saved into the [Pictures] folder. Thumbnails (small versions) of image to appear, click the [Canon...

User Manual
Page 32
.... Install the supplied software and adjust the computer settings before using this method to the computer as you view and select them . All Images Transfers and saves all images to the computer only the images with DPOF Transfer Order settings (Advanced Guide, p. 101). Confirm that have not been previously transferred. Select & Transfer Transfers and saves single images to download images using camera operations. The transferred images display on the camera's LCD monitor. • The button will return to appear. Downloading Images Using the Camera (Direct Transfer) Use...
.... Install the supplied software and adjust the computer settings before using this method to the computer as you view and select them . All Images Transfers and saves all images to the computer only the images with DPOF Transfer Order settings (Advanced Guide, p. 101). Confirm that have not been previously transferred. Select & Transfer Transfers and saves single images to download images using camera operations. The transferred images display on the camera's LCD monitor. • The button will return to appear. Downloading Images Using the Camera (Direct Transfer) Use...


