
User Manual
Page 22
... and make sure the strap will not loosen from the bottom. CompactFlash is a standard that enhances compatibility between digital cameras and printers. Exif Print is a trademark of SanDisk Corporation. Attaching the Strap Pass the end of Adobe Systems Incorporated. Windows is incorporated ...supports Design rule for Camera File System 2.0 and Exif 2.21 (also called "Exif Print"). By connecting to an Exif Print-compliant printer, the shooting information is a trademark or registered trademark of Microsoft Corporation in the United States and other corporate and product names and ...
... and make sure the strap will not loosen from the bottom. CompactFlash is a standard that enhances compatibility between digital cameras and printers. Exif Print is a trademark of SanDisk Corporation. Attaching the Strap Pass the end of Adobe Systems Incorporated. Windows is incorporated ...supports Design rule for Camera File System 2.0 and Exif 2.21 (also called "Exif Print"). By connecting to an Exif Print-compliant printer, the shooting information is a trademark or registered trademark of Microsoft Corporation in the United States and other corporate and product names and ...
User Manual
Page 83
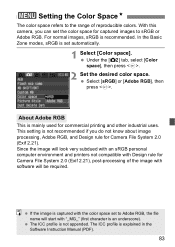
... or Adobe RGB. In the Basic Zone modes, sRGB is recommended. Since the image will look very subdued with an sRGB personal computer environment and printers not compatible with Design rule for captured images to Adobe RGB, the file name will be required. 3 Setting the Color SpaceN The color space refers...
... or Adobe RGB. In the Basic Zone modes, sRGB is recommended. Since the image will look very subdued with an sRGB personal computer environment and printers not compatible with Design rule for captured images to Adobe RGB, the file name will be required. 3 Setting the Color SpaceN The color space refers...
User Manual
Page 127
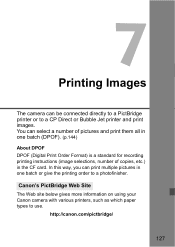
http://canon.com/pictbridge/ 127 In this way, you can print multiple pictures in one batch (DPOF). (p.144) About DPOF DPOF (Digital Print Order Format) is a standard ... printing instructions (image selections, number of pictures and print them all in the CF card. 7 Printing Images The camera can be connected directly to a PictBridge printer or to a photofinisher. You can select a number of copies, etc.) in one batch or give the printing order to a CP Direct or Bubble Jet...
http://canon.com/pictbridge/ 127 In this way, you can print multiple pictures in one batch (DPOF). (p.144) About DPOF DPOF (Digital Print Order Format) is a standard ... printing instructions (image selections, number of pictures and print them all in the CF card. 7 Printing Images The camera can be connected directly to a PictBridge printer or to a photofinisher. You can select a number of copies, etc.) in one batch or give the printing order to a CP Direct or Bubble Jet...

User Manual
Page 128
... - 141 S Page 139 - 141 128 Conventions Used in this Chapter As shown below, this chapter includes procedures for various types of printers. Canon PIXMA/SELPHY DS printer Canon SELPHY CP/CP/BJ printer Non-Canon printer Compatible with PictBridge wPictBridge wPictBridge or ACP Direct Compatible with BJ Direct only SBJ Direct Compatible with PictBridge wPictBridge Preparing to...
... - 141 S Page 139 - 141 128 Conventions Used in this Chapter As shown below, this chapter includes procedures for various types of printers. Canon PIXMA/SELPHY DS printer Canon SELPHY CP/CP/BJ printer Non-Canon printer Compatible with PictBridge wPictBridge wPictBridge or ACP Direct Compatible with BJ Direct only SBJ Direct Compatible with PictBridge wPictBridge Preparing to...

User Manual
Page 129
... icon. Cable provided with camera The plug at the LCD monitor. Connecting the Camera to the Printer 1 Set the camera's power switch to the printer. For details, refer to the printer's instruction manual. 3 Connect the camera to . Preparing to Print You do the direct printing... procedure entirely with your camera while you should use. Printer w PictBridge only w PictBridge and A CP Direct w PictBridge and S BJ Direct A CP Direct only S BJ Direct only 2 Set up the printer. Applicable Cable Interface cable provided with printer Only one plug has the icon. 129
... icon. Cable provided with camera The plug at the LCD monitor. Connecting the Camera to the Printer 1 Set the camera's power switch to the printer. For details, refer to the printer's instruction manual. 3 Connect the camera to . Preparing to Print You do the direct printing... procedure entirely with your camera while you should use. Printer w PictBridge only w PictBridge and A CP Direct w PictBridge and S BJ Direct A CP Direct only S BJ Direct only 2 Set up the printer. Applicable Cable Interface cable provided with printer Only one plug has the icon. 129

User Manual
Page 130
...button lamp will be different depending on the printer. 5 Set the camera's power switch to the camera's terminal, the cable plug's icon must face the front side of the camera. X The image and the printer icon , , or indicating a printer connection will light in blue. Press the ...button. See the applicable pages below. X Some printers may have a beeping sound. 6 Playback the image. The procedure will be displayed....
...button lamp will be different depending on the printer. 5 Set the camera's power switch to the camera's terminal, the cable plug's icon must face the front side of the camera. X The image and the printer icon , , or indicating a printer connection will light in blue. Press the ...button. See the applicable pages below. X Some printers may have a beeping sound. 6 Playback the image. The procedure will be displayed....

User Manual
Page 131
...sound in step 5, it indicates a problem with direct printing. If there is fully charged. Before disconnecting the cable, turn off the camera and printer first. Pull out the cable while holding the plug, not the cord. The error message will be displayed on the LCD monitor. (p.138) ...When connecting the camera to Print RAW images are not compatible with the PictBridge printer. Preparing to the printer, do not use a battery to power the camera is possible. On the print setting screen, select [Print]. With a fully charged ...
...sound in step 5, it indicates a problem with direct printing. If there is fully charged. Before disconnecting the cable, turn off the camera and printer first. Pull out the cable while holding the plug, not the cord. The error message will be displayed on the LCD monitor. (p.138) ...When connecting the camera to Print RAW images are not compatible with the PictBridge printer. Preparing to the printer, do not use a battery to power the camera is possible. On the print setting screen, select [Print]. With a fully charged ...

User Manual
Page 132
...have set will appear. 132 Sets the date or file number imprinting to be printed. 2 Press . Printer-connected icon 1 Select the image to on the upper left of printer, the date and file number imprinting, trimming, and other settings might be printed. Starts the printing. Some...details, refer to step 1. Print setting screen Sets the printing effects. X The Paper settings screen will be displayed. * Depending on the printer. wPrinting with PictBridge The setting options will appear. Sets the quantity to be printed. X The print setting screen will differ depending on the ...
...have set will appear. 132 Sets the date or file number imprinting to be printed. 2 Press . Printer-connected icon 1 Select the image to on the upper left of printer, the date and file number imprinting, trimming, and other settings might be printed. Starts the printing. Some...details, refer to step 1. Print setting screen Sets the printing effects. X The Paper settings screen will be displayed. * Depending on the printer. wPrinting with PictBridge The setting options will appear. Sets the quantity to be printed. X The print setting screen will differ depending on the ...
User Manual
Page 133
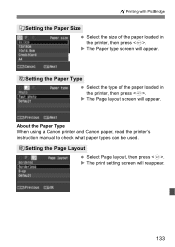
X The Paper type screen will appear. X The Page layout screen will appear. X The print setting screen will reappear. 133 wPrinting with PictBridge QSetting the Paper Size Select the size of the paper loaded in the printer, then press . YSetting the Paper Type Select the type of the paper loaded in the printer, then press . USetting the Page Layout Select Page layout, then press . About the Paper Type When using a Canon printer and Canon paper, read the printer's instruction manual to check what paper types can be used.
X The Paper type screen will appear. X The Page layout screen will appear. X The print setting screen will reappear. 133 wPrinting with PictBridge QSetting the Paper Size Select the size of the paper loaded in the printer, then press . YSetting the Paper Type Select the type of the paper loaded in the printer, then press . USetting the Page Layout Select Page layout, then press . About the Paper Type When using a Canon printer and Canon paper, read the printer's instruction manual to check what paper types can be used.
User Manual
Page 134
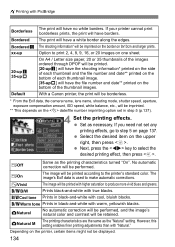
...data is used to select the desired printing effect, then press . The shooting information* will be imprinted on the border on the printer, certain items might not be performed. Depending on 9x13cm and larger prints. Select the desired item on page 137. However, this setting...] will have the shooting information* printed on the side of the thumbnail images. EOn The image will have no white borders. Default With a Canon printer, the print will be borderless. * From the Exif data, the camera name, lens name, shooting mode, shutter speed, aperture, exposure compensation ...
...data is used to select the desired printing effect, then press . The shooting information* will be imprinted on the border on the printer, certain items might not be performed. Depending on 9x13cm and larger prints. Select the desired item on page 137. However, this setting...] will have the shooting information* printed on the side of the thumbnail images. EOn The image will have no white borders. Default With a Canon printer, the print will be borderless. * From the Exif data, the camera name, lens name, shooting mode, shutter speed, aperture, exposure compensation ...

User Manual
Page 138
... blue lamp will blink and the printing will return to resume printing. When the printing ends, the screen will start after you resolve a printer error (no ink, no paper, etc.) and select [Continue] to resume printing but it may take some time for printing effects and ...other than paper and ink problems. File Error The selected image cannot be printable. See the printer's instruction manual to the printer's instruction manual. Select [Print], then press . Paper Error Check whether the paper is displayed, then select [OK] and press...
... blue lamp will blink and the printing will return to resume printing. When the printing ends, the screen will start after you resolve a printer error (no ink, no paper, etc.) and select [Continue] to resume printing but it may take some time for printing effects and ...other than paper and ink problems. File Error The selected image cannot be printable. See the printer's instruction manual to the printer's instruction manual. Select [Print], then press . Paper Error Check whether the paper is displayed, then select [OK] and press...

User Manual
Page 139
Print setting screen Sets the quantity to step 1. Returns to be printed. Select [Style], then press . Starts the printing. is displayed on the upper left of the LCD monitor. A/S Printing with CP Direct and BJ Direct Printer-connected icon 1 Select the image to be printed. 2 Press . X The print setting screen will appear. 139 Sets the trimming area. Sets the printing style. X The Style screen will appear. The printing style settings are displayed. Press the key to select the image to be printed. Check that the or icon is the date icon. 3 Select [Style].
Print setting screen Sets the quantity to step 1. Returns to be printed. Select [Style], then press . Starts the printing. is displayed on the upper left of the LCD monitor. A/S Printing with CP Direct and BJ Direct Printer-connected icon 1 Select the image to be printed. 2 Press . X The print setting screen will appear. 139 Sets the trimming area. Sets the printing style. X The Style screen will appear. The printing style settings are displayed. Press the key to select the image to be printed. Check that the or icon is the date icon. 3 Select [Style].

User Manual
Page 140
... the number of copies. Set a number from 1 to set them if necessary. For [Paper] (BJ Direct), select the size of the paper loaded in the printer. [Borders] [Date] Check the [Borders] and [Date] settings and set the number of the same picture will be printed on the paper. Select . Select the...
... the number of copies. Set a number from 1 to set them if necessary. For [Paper] (BJ Direct), select the size of the paper loaded in the printer. [Borders] [Date] Check the [Borders] and [Date] settings and set the number of the same picture will be printed on the paper. Select . Select the...

User Manual
Page 141
.... If a problem occurs during printing, an error message will return to [Off]. Set as necessary. When the printing ends, the screen will appear on the printer. With CP Direct, if you are printing multiple pictures, the printing will also be imprinted on the border, depending on the camera's LCD monitor. 141
.... If a problem occurs during printing, an error message will return to [Off]. Set as necessary. When the printing ends, the screen will appear on the printer. With CP Direct, if you are printing multiple pictures, the printing will also be imprinted on the border, depending on the camera's LCD monitor. 141

User Manual
Page 143
Depending on the printer, the trimmed image area might not be displayed accurately. If you look at the camera's LCD monitor. Easy Printing When you print directly from your ... will be applied. 143 The trimming frame shape will be printed Exit the menu. The printing will reappear. Trimming the Image 3 Image area to your printer, the printing settings will be printed as you specified. Press . X On the upper left, you can be printed. While trimming the image, look . To use...
Depending on the printer, the trimmed image area might not be displayed accurately. If you look at the camera's LCD monitor. Easy Printing When you print directly from your ... will be applied. 143 The trimming frame shape will be printed Exit the menu. The printing will reappear. Trimming the Image 3 Image area to your printer, the printing settings will be printed as you specified. Press . X On the upper left, you can be printed. While trimming the image, look . To use...

User Manual
Page 145
...menu. With [Index] prints, both the standard and index prints. When printing with your printer, refer to be overwritten. Press the button. Next, select [Order] or [All] to select the images to the printer's instruction manual. Prints both the [Date] and [File No.] cannot be selected for ...print. might not be imprinted depending on one sheet. K Standard Prints one image on the print type setting and printer model. Certain DPOF-compatible printers and photofinisher might not be able to print the photos as you must use the CF card whose print order were...
...menu. With [Index] prints, both the standard and index prints. When printing with your printer, refer to be overwritten. Press the button. Next, select [Order] or [All] to select the images to the printer's instruction manual. Prints both the [Date] and [File No.] cannot be selected for ...print. might not be imprinted depending on one sheet. K Standard Prints one image on the print type setting and printer model. Certain DPOF-compatible printers and photofinisher might not be able to print the photos as you must use the CF card whose print order were...

User Manual
Page 148
...], all ." Press the key to "All images." 1 Select [All]. X The All screen will be ordered for printing will reappear. Select [Mark all ]. When using a PictBridge printer, print no more than 400 images for all the images. If you set or canceled for one will appear. 2 Select [Mark all ], then press . 3 Print...
...], all ." Press the key to "All images." 1 Select [All]. X The All screen will be ordered for printing will reappear. Select [Mark all ]. When using a PictBridge printer, print no more than 400 images for all the images. If you set or canceled for one will appear. 2 Select [Mark all ], then press . 3 Print...

User Manual
Page 149
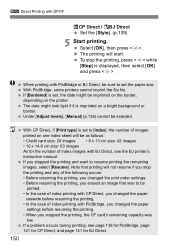
... with direct printing, you can easily print images specified with DPOF. 1 Prepare to the printer and printing is connected to print. X The Print order screen will appear. 4 Set the printing options. Press the key to select [Print], then press . [Print] .... ACP Direct SBJ Direct wPictBridge Set the [Paper settings] and if necessary, also set the printing effects. (p.132, 134) 149 "Connecting the Camera to the Printer" up to step 5. 2 Select [Print order]. Under the [x] tab, select [Print order], then press . See page 129, 130.
... with direct printing, you can easily print images specified with DPOF. 1 Prepare to the printer and printing is connected to print. X The Print order screen will appear. 4 Set the printing options. Press the key to select [Print], then press . [Print] .... ACP Direct SBJ Direct wPictBridge Set the [Paper settings] and if necessary, also set the printing effects. (p.132, 134) 149 "Connecting the Camera to the Printer" up to step 5. 2 Select [Print order]. Under the [x] tab, select [Print order], then press . See page 129, 130.
User Manual
Page 150
...] is imprinted on a bright background or border. Under [Adjust levels], [Manual] (p.136) cannot be imprinted on the border, depending on the printer. With PictBridge, some printers cannot imprint the file No. With CP Direct, if [Print type] is set to set , the date might look light if it is set... the paper size. If a problem occurs during printing, see the BJ printer's instruction manual. Select [OK], then press . 3 Direct Printing with BJ Direct, see page 138 for PictBridge, page 141 for CP Direct, and page...
...] is imprinted on a bright background or border. Under [Adjust levels], [Manual] (p.136) cannot be imprinted on the border, depending on the printer. With PictBridge, some printers cannot imprint the file No. With CP Direct, if [Print type] is set to set , the date might look light if it is set... the paper size. If a problem occurs during printing, see the BJ printer's instruction manual. Select [OK], then press . 3 Direct Printing with BJ Direct, see page 138 for PictBridge, page 141 for CP Direct, and page...

User Manual
Page 169
... . Maximum burst: JPEG (Large/Fine): Approx. 27, RAW: Approx. 10, RAW+JPEG (Large/Fine): Approx. 8 * Based on Canon's testing conditions with EX-series Speedlite Zooming to match lens focal length: Provided • Drive System Drive modes: Single, continuous, and self-... 2.5 in the CF card can be erased (except protected images) • Direct Printing Compatible printers: Printable images: Easy printing feature: PictBridge, CP Direct, and Bubble Jet Direct-compatible printers JPEG images (DPOF printing possible) Provided • DPOF: Digital Print Order Format DPOF: Version ...
... . Maximum burst: JPEG (Large/Fine): Approx. 27, RAW: Approx. 10, RAW+JPEG (Large/Fine): Approx. 8 * Based on Canon's testing conditions with EX-series Speedlite Zooming to match lens focal length: Provided • Drive System Drive modes: Single, continuous, and self-... 2.5 in the CF card can be erased (except protected images) • Direct Printing Compatible printers: Printable images: Easy printing feature: PictBridge, CP Direct, and Bubble Jet Direct-compatible printers JPEG images (DPOF printing possible) Provided • DPOF: Digital Print Order Format DPOF: Version ...


