
DC100 Instruction Manual
Page 3
... No. 70-1984, provides information with care. IMPORTANT SAFETY INSTRUCTIONS In these safety instructions the word "product" 10. company. This is connected to the Canon DVD Camcorder DC100 Power Adapter should be moved with respect to instructions in this manual. 12. Do not use electrician to plugs and the point from which...
... No. 70-1984, provides information with care. IMPORTANT SAFETY INSTRUCTIONS In these safety instructions the word "product" 10. company. This is connected to the Canon DVD Camcorder DC100 Power Adapter should be moved with respect to instructions in this manual. 12. Do not use electrician to plugs and the point from which...
DC100 Instruction Manual
Page 5
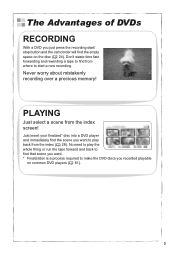
...). 5 PLAYING Just select a scene from the index ( 28). The Advantages of DVDs RECORDING With a DVD you just press the recording start/ stop button and the camcorder will find from where to start a new recording. Never worry about mistakenly recording over a precious memory! No need to play back from the index screen...
...). 5 PLAYING Just select a scene from the index ( 28). The Advantages of DVDs RECORDING With a DVD you just press the recording start/ stop button and the camcorder will find from where to start a new recording. Never worry about mistakenly recording over a precious memory! No need to play back from the index screen...
DC100 Instruction Manual
Page 6
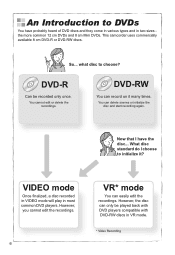
... Mini DVDs. What disc standard do I have probably heard of DVD discs and they come in various types and in most common DVD players. This camcorder uses commercially available 8 cm DVD-R or DVD-RW discs.
... Mini DVDs. What disc standard do I have probably heard of DVD discs and they come in various types and in most common DVD players. This camcorder uses commercially available 8 cm DVD-R or DVD-RW discs.
DC100 Instruction Manual
Page 7
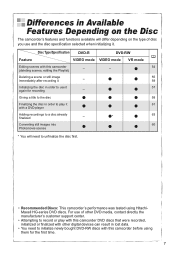
...selected when initializing it - 55 59 Initializing the disc in lost data. • You need to unfinalize the disc first. • Recommended Discs: This camcorder's performance was tested using them for the first time. 7 For use of disc you use it again for recording - 57 Giving a title to the ...disc 58 Finalizing the disc in order to play with this camcorder DVD discs that were recorded, initialized or finalized with other digital devices can result in order to initialize newly bought DVD-RW discs with this...
...selected when initializing it - 55 59 Initializing the disc in lost data. • You need to unfinalize the disc first. • Recommended Discs: This camcorder's performance was tested using them for the first time. 7 For use of disc you use it again for recording - 57 Giving a title to the ...disc 58 Finalizing the disc in order to play with this camcorder DVD discs that were recorded, initialized or finalized with other digital devices can result in order to initialize newly bought DVD-RW discs with this...
DC100 Instruction Manual
Page 8
... 10 Checking the Supplied Accessories 12 Components Guide 13 Screen Displays 15 Preparations Getting Started 17 Step 1: Preparing the Power Supply 17 Step 2: Preparing the Camcorder 19 Step 3: Adjusting the LCD Screen 19 Step 4: Changing the Display Language 20 Step 5: Setting the Time Zone / Daylight Saving Time 20 Step 6: Setting the...
... 10 Checking the Supplied Accessories 12 Components Guide 13 Screen Displays 15 Preparations Getting Started 17 Step 1: Preparing the Power Supply 17 Step 2: Preparing the Camcorder 19 Step 3: Adjusting the LCD Screen 19 Step 4: Changing the Display Language 20 Step 5: Setting the Time Zone / Daylight Saving Time 20 Step 6: Setting the...
DC100 Instruction Manual
Page 10
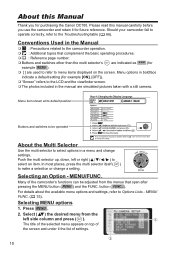
...for future reference. About this manual carefully before you for purchasing the Canon DC100. Menu item shown at its default position Buttons and switches to be adjusted from the left or right ( / / / ) to the camcorder operation. : Additional topics that open after pressing the MENU...MENU ) and the FUNC. Push the multi selector up, down, left side column and press ( ). MENU/FUNC. button ( FUNC. ). Should your camcorder fail to operate correctly, refer to Options Lists - Selecting MENU options 1. Menu options in a menu and change a setting. MENU/ FUNC. ( 33...
...for future reference. About this manual carefully before you for purchasing the Canon DC100. Menu item shown at its default position Buttons and switches to be adjusted from the left or right ( / / / ) to the camcorder operation. : Additional topics that open after pressing the MENU...MENU ) and the FUNC. Push the multi selector up, down, left side column and press ( ). MENU/FUNC. button ( FUNC. ). Should your camcorder fail to operate correctly, refer to Options Lists - Selecting MENU options 1. Menu options in a menu and change a setting. MENU/ FUNC. ( 33...
DC100 Instruction Manual
Page 11
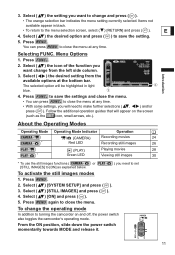
...use the still images functions ( or [STILL IMAGES] to [ON] as explained below. ) you want change the operating mode In addition to turning the camcorder on the screen (such as the icon, small arrows, etc.). Select ( ) [ON] and press ( ). 5. Press MENU again to save the ...towards MODE and release it. 11 Press FUNC. Follow the additional operation guides that will appear on and off, the power switch also toggles the camcorder's operating mode. Introduction Selecting FUNC. 3. Select ( ) the setting you need to change and press ( ). • The orange selection ...
...use the still images functions ( or [STILL IMAGES] to [ON] as explained below. ) you want change the operating mode In addition to turning the camcorder on the screen (such as the icon, small arrows, etc.). Select ( ) [ON] and press ( ). 5. Press MENU again to save the ...towards MODE and release it. 11 Press FUNC. Follow the additional operation guides that will appear on and off, the power switch also toggles the camcorder's operating mode. Introduction Selecting FUNC. 3. Select ( ) the setting you need to change and press ( ). • The orange selection ...
DC100 Instruction Manual
Page 12
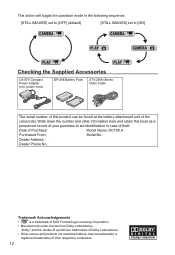
... will toggle the operation mode in the following sequence: [STILL IMAGES] set to [OFF] (default) [STILL IMAGES] set to aid identification in case of the camcorder. Date of Purchase: Model Name: DC100 A Purchased From: Serial No.: Dealer Address: Dealer Phone No.: Trademark Acknowledgements • is a trademark of their respective companies. 12...
... will toggle the operation mode in the following sequence: [STILL IMAGES] set to [OFF] (default) [STILL IMAGES] set to aid identification in case of the camcorder. Date of Purchase: Model Name: DC100 A Purchased From: Serial No.: Dealer Address: Dealer Phone No.: Trademark Acknowledgements • is a trademark of their respective companies. 12...
DC100 Instruction Manual
Page 15
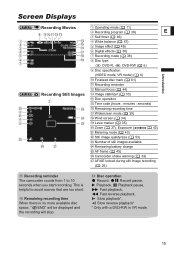
... marker ( 35) Zoom ( 27), Exposure ( 43) Metering mode ( 43) Still image quality/size ( 53) Number of still images available Remaining battery charge AF frame ( 45) Camcorder shake warning ( 33) AF/AE locked during still image recording ( 26) Recording reminder The...
... marker ( 35) Zoom ( 27), Exposure ( 43) Metering mode ( 43) Still image quality/size ( 53) Number of still images available Remaining battery charge AF frame ( 45) Camcorder shake warning ( 33) AF/AE locked during still image recording ( 26) Recording reminder The...

DC100 Instruction Manual
Page 16
Remaining battery charge • When " " starts flashing in green. • Depending on the conditions under which the camcorder and the battery pack are used, the actual battery charge may decrease by 2 still images at once. Number of still images available flashing in red: ...
Remaining battery charge • When " " starts flashing in green. • Depending on the conditions under which the camcorder and the battery pack are used, the actual battery charge may decrease by 2 still images at once. Number of still images available flashing in red: ...
DC100 Instruction Manual
Page 17
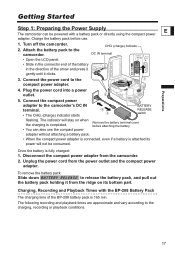
...from the power outlet and the compact power adapter. Unplug the power cord from the camcorder. 2. The following recording and playback times are approximate and vary according to the camcorder's DC IN terminal. • The CHG. (charge) indicator starts BATTERY RELEASE switch flashing. ...Turn off the camcorder. 2. Preparations 4. Connect the compact power adapter to the charging, recording or playback ...
...from the power outlet and the compact power adapter. Unplug the power cord from the camcorder. 2. The following recording and playback times are approximate and vary according to the camcorder's DC IN terminal. • The CHG. (charge) indicator starts BATTERY RELEASE switch flashing. ...Turn off the camcorder. 2. Preparations 4. Connect the compact power adapter to the charging, recording or playback ...

DC100 Instruction Manual
Page 18
...90 min. 90 min. 105 min. 100 min. 95 min. Outside the temperature range of the battery charge status. Continuously on /off. Turn off the camcorder before connecting or disconnecting the power adapter. Do not connect to the camcorder's DC IN terminal or to the compact power ...adapter any electrical equipment that you prepare battery packs 2 to voltage converters for recording with this camcorder. You may hear some noise from the compact power adapter...
...90 min. 90 min. 105 min. 100 min. 95 min. Outside the temperature range of the battery charge status. Continuously on /off. Turn off the camcorder before connecting or disconnecting the power adapter. Do not connect to the camcorder's DC IN terminal or to the compact power ...adapter any electrical equipment that you prepare battery packs 2 to voltage converters for recording with this camcorder. You may hear some noise from the compact power adapter...

DC100 Instruction Manual
Page 19
... viewfinder E and adjust the dioptric adjustment lever as necessary. 3. Press MENU to include yourself when recording with your thumb. Adjust the viewfinder. Turn on the camcorder. 2. Step 2: Preparing the...
... viewfinder E and adjust the dioptric adjustment lever as necessary. 3. Press MENU to include yourself when recording with your thumb. Adjust the viewfinder. Turn on the camcorder. 2. Step 2: Preparing the...

DC100 Instruction Manual
Page 21
... the date and time setting may be lost. In such case, recharge the built-in the same way. • If you do not use the camcorder for about 3 months, the built-in orange. 4. Select ( ) the month and move ( ) to change. 5. E Time Zones and Difference from GMT/UTC London Paris Cairo Moscow...
... the date and time setting may be lost. In such case, recharge the built-in the same way. • If you do not use the camcorder for about 3 months, the built-in orange. 4. Select ( ) the month and move ( ) to change. 5. E Time Zones and Difference from GMT/UTC London Paris Cairo Moscow...

DC100 Instruction Manual
Page 22
... cloth to confirm the disc specification you selected. Do not force the cover closed if the disc is not correctly inserted and firmly set the camcorder in mode. 2. You will not get in the way of the disc or the pick up lens. 4. Before inserting the disc be asked to... operating mode, refer to initialize new discs before you can start recording movies once the record pause indication appears. Retract the grip belt under the camcorder so it will be sure to check that case, you can start recording once the record pause indication appears. Step 7: Loading and Removing a Disc ...
... cloth to confirm the disc specification you selected. Do not force the cover closed if the disc is not correctly inserted and firmly set the camcorder in mode. 2. You will not get in the way of the disc or the pick up lens. 4. Before inserting the disc be asked to... operating mode, refer to initialize new discs before you can start recording movies once the record pause indication appears. Retract the grip belt under the camcorder so it will be sure to check that case, you can start recording once the record pause indication appears. Step 7: Loading and Removing a Disc ...

DC100 Instruction Manual
Page 23
... that case, initialize the disc using the menu option ( 57). The process of the arrow and gently open the disc cover completely until the camcorder finishes recognizing the disc before the disc cover opens. Select ( ) [YES] and press ( ) to open. 2. E • You can start recording ...appears. The disc initialization screen may take a moment after making a recording, additional important data is being read. Avoid moving the camcorder while the operation is on the screen. Slide OPEN fully in the way of the disc and gently pull it will appear on or ...
... that case, initialize the disc using the menu option ( 57). The process of the arrow and gently open the disc cover completely until the camcorder finishes recognizing the disc before the disc cover opens. Select ( ) [YES] and press ( ) to open. 2. E • You can start recording ...appears. The disc initialization screen may take a moment after making a recording, additional important data is being read. Avoid moving the camcorder while the operation is on the screen. Slide OPEN fully in the way of the disc and gently pull it will appear on or ...

DC100 Instruction Manual
Page 24
...(move the lens cover switch to vibrations or strong impacts. - When you can change the operating mode, refer to check if the camcorder operates correctly. Turn off the camcorder. - Do not open the disc cover and do so may result in permanent data loss. - This is powered by a battery pack... access indicator is being recorded on or flashing. To restore the power, slide the 24 Do not disconnect the power source or turn off the camcorder. 3. Do not change the operating mode. About the recording time: By changing the recording mode you have finished recording: 1. Press Start/...
...(move the lens cover switch to vibrations or strong impacts. - When you can change the operating mode, refer to check if the camcorder operates correctly. Turn off the camcorder. - Do not open the disc cover and do so may result in permanent data loss. - This is powered by a battery pack... access indicator is being recorded on or flashing. To restore the power, slide the 24 Do not disconnect the power source or turn off the camcorder. 3. Do not change the operating mode. About the recording time: By changing the recording mode you have finished recording: 1. Press Start/...

DC100 Instruction Manual
Page 25
...(16:9 Widescreen or 4:3) You can also delete the scene by the lens). Reviewing the Last Scene Recorded Press and release (record review). • The camcorder plays back the last scene and returns to record pause mode. • While reviewing the scene, select ( recording mode. ) the icon and press (... ) to return to the • While reviewing a scene immediately after recording it may damage the camcorder. To play back on a disc initialized in Widescreen mode, with [IMG STAB] set to [LP] on a TV with the Video ID-1 system will ...
...(16:9 Widescreen or 4:3) You can also delete the scene by the lens). Reviewing the Last Scene Recorded Press and release (record review). • The camcorder plays back the last scene and returns to record pause mode. • While reviewing the scene, select ( recording mode. ) the icon and press (... ) to return to the • While reviewing a scene immediately after recording it may damage the camcorder. To play back on a disc initialized in Widescreen mode, with [IMG STAB] set to [LP] on a TV with the Video ID-1 system will ...
DC100 Instruction Manual
Page 26
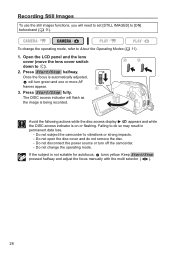
... still images functions, you will need to set [STILL IMAGES] to vibrations or strong impacts. - The DISC access indicator will turn off the camcorder. - Do not subject the camcorder to [ON] beforehand ( 11). If the subject is on or flashing. Failing to ). 2. Press Start/Stop halfway. Once the focus is automatically adjusted...
... still images functions, you will need to set [STILL IMAGES] to vibrations or strong impacts. - The DISC access indicator will turn off the camcorder. - Do not subject the camcorder to [ON] beforehand ( 11). If the subject is on or flashing. Failing to ). 2. Press Start/Stop halfway. Once the focus is automatically adjusted...

DC100 Instruction Manual
Page 28
Press / to stop and the camcorder will be displayed at the upper right corner of the scenes recorded on the first scene. 1. Press to begin the playback. • Playback of the ... display instead the date and time when the scene was recorded and additional recording data ( 32). As long as you don't turn off the camcorder you want to the scene index screen.
Press / to stop and the camcorder will be displayed at the upper right corner of the scenes recorded on the first scene. 1. Press to begin the playback. • Playback of the ... display instead the date and time when the scene was recorded and additional recording data ( 32). As long as you don't turn off the camcorder you want to the scene index screen.


