
Instruction Manual - English and Spanish
Page 3
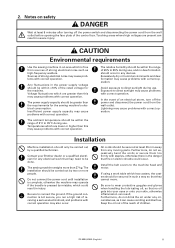
... not excessively bend the cords or secure them too firmly with correct operation. The sewing machine weighs more people. If using a work that no dew formation should be within the range of children. ZE-855A,856A (English) ii Touching areas where high voltages are lower or higher than this may cause problems with correct operation may cause problems with correct operation. Temperatures which are...
... not excessively bend the cords or secure them too firmly with correct operation. The sewing machine weighs more people. If using a work that no dew formation should be within the range of children. ZE-855A,856A (English) ii Touching areas where high voltages are lower or higher than this may cause problems with correct operation may cause problems with correct operation. Temperatures which are...
Instruction Manual - English and Spanish
Page 4
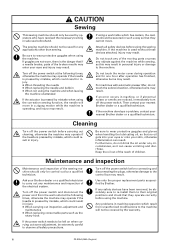
... machine. Cleaning Turn off the power switch and disconnect the power cord from unauthorized modifications to the machine will move . G When carrying out inspection, adjustment and maintenance G When replacing consumable parts such as it can result. iii ZE-855A,856A (English) Attach all safety precautions. Do not touch any of the moving parts or press any objects against the machine while sewing, as specified by Brother. For machines with automatic presser...
... machine. Cleaning Turn off the power switch and disconnect the power cord from unauthorized modifications to the machine will move . G When carrying out inspection, adjustment and maintenance G When replacing consumable parts such as it can result. iii ZE-855A,856A (English) Attach all safety precautions. Do not touch any of the moving parts or press any objects against the machine while sewing, as specified by Brother. For machines with automatic presser...
Instruction Manual - English and Spanish
Page 16
.... Connecting the connecting rod 33 5-14. Installing the bobbin case 50 6-5. USING THE OPERATION PANEL 57 7-1. Setting the sewing speed 84 7-4. Adjusting the presser foot pressure 132 11. Needle and rotary hook timing 153 13-9. Adjusting the rotary hook lubrication amount 159 13-12. Reflection pattern switch 191 14-2. List of the lower thread presser spring (856A only 169 13-15. Removing the bobbin case 47 6-3. Adjusting the thread tension 130 10-2. Fixed knife and movable knife (856A only 138...
.... Connecting the connecting rod 33 5-14. Installing the bobbin case 50 6-5. USING THE OPERATION PANEL 57 7-1. Setting the sewing speed 84 7-4. Adjusting the presser foot pressure 132 11. Needle and rotary hook timing 153 13-9. Adjusting the rotary hook lubrication amount 159 13-12. Reflection pattern switch 191 14-2. List of the lower thread presser spring (856A only 169 13-15. Removing the bobbin case 47 6-3. Adjusting the thread tension 130 10-2. Fixed knife and movable knife (856A only 138...
Instruction Manual - English and Spanish
Page 57
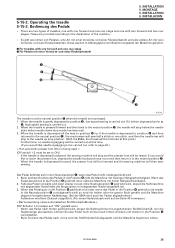
... stitch, and then the needle bar will stop at the needle up stop mode has been set to lower the presser foot, depress the treadle backward once more and then return it is then depressed as far as e, high-speed sewing is depressed forward, the presser foot will be lowered and the sewing machine will stop below the needle plate (when needle down stop position. (With the 856A, the thread...
... stitch, and then the needle bar will stop at the needle up stop mode has been set to lower the presser foot, depress the treadle backward once more and then return it is then depressed as far as e, high-speed sewing is depressed forward, the presser foot will be lowered and the sewing machine will stop below the needle plate (when needle down stop position. (With the 856A, the thread...
Instruction Manual - English and Spanish
Page 90
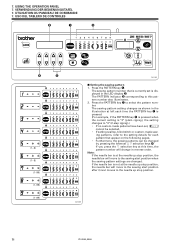
... position, the needle bar will move to the sewing start position after it next moves to the needle up stop position. 1434M 71 ZE-855A,856A Press the PATTERN key q. The sewing pattern setting changes as shown in reverse order. Note: If the needle bar is not at left each pattern that is currently set is "2" (plain zigzag), the setting changes to select the pattern number. USO DEL TABLERO DE CONTROLES w q e r t (1~8) (1~8) (1~99) (1~99) (1~99) 1433M I Setting the sewing pattern...
... position, the needle bar will move to the sewing start position after it next moves to the needle up stop position. 1434M 71 ZE-855A,856A Press the PATTERN key q. The sewing pattern setting changes as shown in reverse order. Note: If the needle bar is not at left each pattern that is currently set is "2" (plain zigzag), the setting changes to select the pattern number. USO DEL TABLERO DE CONTROLES w q e r t (1~8) (1~8) (1~99) (1~99) (1~99) 1433M I Setting the sewing pattern...
Instruction Manual - English and Spanish
Page 102
... position. (Stop) Plain zigzag 3-step zigzag OFF OFF q No position specified ON OFF Left stopping Scallop 1342M I Setting method Press the zigzag stop position key q to set the needle stop position. • The indicator illumination changes as shown in the illustration below.) * When the straight stitch, blind stitch or custom-made sewing patterns have been selected, the zigzag stop position setting is set , the sewing machine will be changed.) The next sewing operation starts from the same position. USING...
... position. (Stop) Plain zigzag 3-step zigzag OFF OFF q No position specified ON OFF Left stopping Scallop 1342M I Setting method Press the zigzag stop position key q to set the needle stop position. • The indicator illumination changes as shown in the illustration below.) * When the straight stitch, blind stitch or custom-made sewing patterns have been selected, the zigzag stop position setting is set , the sewing machine will be changed.) The next sewing operation starts from the same position. USING...
Instruction Manual - English and Spanish
Page 103
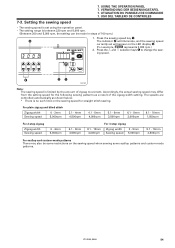
... the setting speed for straight stitch sewing. The speeds are controlled automatically as a result of the zigzag width setting. r wq 1441M Note: The sewing speed is no such limit on the LED display e. (For example, AA AA represents 3,000 rpm.) 2. ZE-855A,856A 84 Press the sewing speed key q. USO DEL TABLERO DE CONTROLES 7-3. UTILISATION DU PANNEAU DE COMMANDE 7. e The indicator w will illuminate, and the sewing speed currently set using the operation...
... the setting speed for straight stitch sewing. The speeds are controlled automatically as a result of the zigzag width setting. r wq 1441M Note: The sewing speed is no such limit on the LED display e. (For example, AA AA represents 3,000 rpm.) 2. ZE-855A,856A 84 Press the sewing speed key q. USO DEL TABLERO DE CONTROLES 7-3. UTILISATION DU PANNEAU DE COMMANDE 7. e The indicator w will illuminate, and the sewing speed currently set using the operation...

Instruction Manual - English and Spanish
Page 114
... OPERATION PANEL 7. USO DEL TABLERO DE CONTROLES I Setting the zigzag width for the start backtack stitches (3.0mm) When DIP switch 2-5 inside the control box is turned on and off the power before changing any of start backtack stitches 1449M Zigzag width for section B w q 1453M wq 1454M 3. To change the number of 3.0 mm for section A and 1.5 mm for section B start backtack stitches 1455M Zigzag width display 1450M 95 ZE-855A...
... OPERATION PANEL 7. USO DEL TABLERO DE CONTROLES I Setting the zigzag width for the start backtack stitches (3.0mm) When DIP switch 2-5 inside the control box is turned on and off the power before changing any of start backtack stitches 1449M Zigzag width for section B w q 1453M wq 1454M 3. To change the number of 3.0 mm for section A and 1.5 mm for section B start backtack stitches 1455M Zigzag width display 1450M 95 ZE-855A...

Instruction Manual - English and Spanish
Page 124
..., the thread will then be trimmed.) Note: • The sewing machine will continue operating until the set number of end backtack stitches has been sewn, even if the treadle is adjusted by means of the condense dial q, and the stitch length for section D re 1459M 1. I Changing the setting The DIP switch settings can sew a set number of stitches to change the zigzag width for end backtack stitches. (Refer to the neutral position...
..., the thread will then be trimmed.) Note: • The sewing machine will continue operating until the set number of end backtack stitches has been sewn, even if the treadle is adjusted by means of the condense dial q, and the stitch length for section D re 1459M 1. I Changing the setting The DIP switch settings can sew a set number of stitches to change the zigzag width for end backtack stitches. (Refer to the neutral position...

Instruction Manual - English and Spanish
Page 125
.... 1492M Number of end backtack stitches, use the ĦĤ selection keys t to make this time too. VERWENDUNG DER BEDIENUNGSTAFEL 7. Be sure to change the setting value. 7. To change the zigzag widths. 5. USO DEL TABLERO DE CONTROLES I Setting the zigzag width for section D and that end backtacking will be set separately from the normal zigzag width. (You must set the start backtack zigzag width at this setting if...
.... 1492M Number of end backtack stitches, use the ĦĤ selection keys t to make this time too. VERWENDUNG DER BEDIENUNGSTAFEL 7. Be sure to change the setting value. 7. To change the zigzag widths. 5. USO DEL TABLERO DE CONTROLES I Setting the zigzag width for section D and that end backtacking will be set separately from the normal zigzag width. (You must set the start backtack zigzag width at this setting if...

Instruction Manual - English and Spanish
Page 134
... the thread has been trimmed (or after the treadle has been depressed backward for the 855A-A0 [ ]). • The condition changes as the current setting for the 855A-A0 [ ]). 1. 7. After turning the material, depress the treadle. (For -90 [ ] specifications, the presser foot rises at the sewing end. USING THE OPERATION PANEL 7. Setting fixed stitches/name label sewing (856A, 855A-A0 [ ] only) 1362M Start point/end point F E = Number of fixed stitches...
... the thread has been trimmed (or after the treadle has been depressed backward for the 855A-A0 [ ]). • The condition changes as the current setting for the 855A-A0 [ ]). 1. 7. After turning the material, depress the treadle. (For -90 [ ] specifications, the presser foot rises at the sewing end. USING THE OPERATION PANEL 7. Setting fixed stitches/name label sewing (856A, 855A-A0 [ ] only) 1362M Start point/end point F E = Number of fixed stitches...

Instruction Manual - English and Spanish
Page 135
... the treadle once. • When the fixed stitch/name label function is canceled, the AUTO function is also canceled, and the AUTO indicator u switches off . VERWENDUNG DER BEDIENUNGSTAFEL 7. Note: The set number of stitch combinations using backtacking. USING THE OPERATION PANEL 7. uy tr Start point/end point (Automatic thread trimming) E F 1472M 7. E= Number of fixed E= stitches Number of end backtack stitches End backtack zigzag width 1369M ZE-855A,856A 116
... the treadle once. • When the fixed stitch/name label function is canceled, the AUTO function is also canceled, and the AUTO indicator u switches off . VERWENDUNG DER BEDIENUNGSTAFEL 7. Note: The set number of stitch combinations using backtacking. USING THE OPERATION PANEL 7. uy tr Start point/end point (Automatic thread trimming) E F 1472M 7. E= Number of fixed E= stitches Number of end backtack stitches End backtack zigzag width 1369M ZE-855A,856A 116

Instruction Manual - English and Spanish
Page 192
... (Table 3) Sewing start position L Table 3 below Needle zigzagging when treadle is turned on and after setting memory switches Zigzag stop position DIPSW2-3 L OFF ţON Left stopping Left Right No position specified Left Right Right stopping Right Left 173 ZE-855A,856A Function Operation when OFF Operation when ON 1 Treadle specifications Domestic Japan L Export 2 (Spare) L Do not set to ON Do not set to ON 3 Automatic presser lifter L Not used Used...
... (Table 3) Sewing start position L Table 3 below Needle zigzagging when treadle is turned on and after setting memory switches Zigzag stop position DIPSW2-3 L OFF ţON Left stopping Left Right No position specified Left Right Right stopping Right Left 173 ZE-855A,856A Function Operation when OFF Operation when ON 1 Treadle specifications Domestic Japan L Export 2 (Spare) L Do not set to ON Do not set to ON 3 Automatic presser lifter L Not used Used...

Instruction Manual - English and Spanish
Page 197
... Operation selection possible using thread trimming / needle raising key OFF Thread trimming and thread wiping operate 12 Presser foot status after thread trimming ON Presser foot rises at neutral position OFF Presser foot lowered at neutral position 13 Presser foot status when treadle stopped ON Raised at neutral position OFF Lowered 14 Actuator function ON Operates as thread trimming switch OFF Normal functioning 15 Decelerated stop control ON No decelerated stop control OFF Control prevents extra stitch...
... Operation selection possible using thread trimming / needle raising key OFF Thread trimming and thread wiping operate 12 Presser foot status after thread trimming ON Presser foot rises at neutral position OFF Presser foot lowered at neutral position 13 Presser foot status when treadle stopped ON Raised at neutral position OFF Lowered 14 Actuator function ON Operates as thread trimming switch OFF Normal functioning 15 Decelerated stop control ON No decelerated stop control OFF Control prevents extra stitch...

Instruction Manual - English and Spanish
Page 224
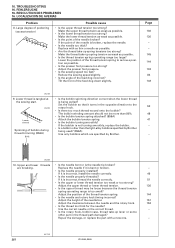
... opening the face plate of the needle bar. CAUTION Turn off the power switch and disconnect the power cord before carrying out troubleshooting, otherwise the machine will operate if the treadle is not tight. 0573M 2. If it is a bit heavier. Adjust the clearance between the needle and the rotary hook. • Is the thread tension spring too weak? Adjust the tension of the presser foot. • Is the needle and rotary hook timing...
... opening the face plate of the needle bar. CAUTION Turn off the power switch and disconnect the power cord before carrying out troubleshooting, otherwise the machine will operate if the treadle is not tight. 0573M 2. If it is a bit heavier. Adjust the clearance between the needle and the rotary hook. • Is the thread tension spring too weak? Adjust the tension of the presser foot. • Is the needle and rotary hook timing...

Instruction Manual - English and Spanish
Page 225
... thread tightening not balanced Upper thread Lower thread • Is the presser foot pressure too weak? Adjust the height of the thread take -up stop position at the sewing start ? Adjust the feed dog height. • Is the bobbin scratched? TROUBLESHOOTING 16. If the bobbin is one . 0626M ZE-855A,856A 132 147 - 130 131 145 144 150 151 153 - - 206 Adjust the needle and rotary hook timing. • Is the needle and rotary hook timing correct? Try using a needle...
... thread tightening not balanced Upper thread Lower thread • Is the presser foot pressure too weak? Adjust the height of the thread take -up stop position at the sewing start ? Adjust the feed dog height. • Is the bobbin scratched? TROUBLESHOOTING 16. If the bobbin is one . 0626M ZE-855A,856A 132 147 - 130 131 145 144 150 151 153 - - 206 Adjust the needle and rotary hook timing. • Is the needle and rotary hook timing correct? Try using a needle...
Instruction Manual - English and Spanish
Page 226
Replace with a new one. - 207 0471M ZE-855A,856A are specified by Brother being pulled? 0628M Set the bobbin so that it is being used? (856A) thread trimming (856A) Use only bobbins which are breaking. Adjust the height of the feed dog incorrect? Use the correct needle or the correct thread. - • Is the rotary hook, bobbin case, thread take-up lever or some other than 80%. 48 • Is the bobbin tension spring attached? (856A) Lower Attach the bobbin tension spring. 47...
Replace with a new one. - 207 0471M ZE-855A,856A are specified by Brother being pulled? 0628M Set the bobbin so that it is being used? (856A) thread trimming (856A) Use only bobbins which are breaking. Adjust the height of the feed dog incorrect? Use the correct needle or the correct thread. - • Is the rotary hook, bobbin case, thread take-up lever or some other than 80%. 48 • Is the bobbin tension spring attached? (856A) Lower Attach the bobbin tension spring. 47...

Instruction Manual - English and Spanish
Page 227
...) Adjust the rotating direction of thread trailing from the needle hole too long wipe the thread. trimmed). (856A) Replace the fixed knife or the movable knife. 138 • Do skipped stitches occur during sewing". 205 14. after thread trimming? (856A-40 [ ] , 90 [ ] ) Adjust the upper thread feeding device. 161 15-2. Operation panel Problem 1. If the indicator is illuminated, the key operation has been locked by the LOCK key, so key operation...
...) Adjust the rotating direction of thread trailing from the needle hole too long wipe the thread. trimmed). (856A) Replace the fixed knife or the movable knife. 138 • Do skipped stitches occur during sewing". 205 14. after thread trimming? (856A-40 [ ] , 90 [ ] ) Adjust the upper thread feeding device. 161 15-2. Operation panel Problem 1. If the indicator is illuminated, the key operation has been locked by the LOCK key, so key operation...

Hand Book - English
Page 1
... this, change the setting of the presser foot (such as when sewing light-weight materials), replace the compression spring with thread trimmer Thread trimmer Upper thread feeding device Back tack/condense device *1 Thread wiper Automatic presser foot lifter 855A 0 A - - - - - - - - - 856A 3 4 9 Solenoid Solenoid Solenoid - Furthermore, the maximum sewing speed may be limited by the type of sewing pattern and the zigzag width. *4......The maximum number of custom-made patterns can be added *4) Max. ZE-855A ZE-856A Electronic single needle zigzag lock stitcher...
... this, change the setting of the presser foot (such as when sewing light-weight materials), replace the compression spring with thread trimmer Thread trimmer Upper thread feeding device Back tack/condense device *1 Thread wiper Automatic presser foot lifter 855A 0 A - - - - - - - - - 856A 3 4 9 Solenoid Solenoid Solenoid - Furthermore, the maximum sewing speed may be limited by the type of sewing pattern and the zigzag width. *4......The maximum number of custom-made patterns can be added *4) Max. ZE-855A ZE-856A Electronic single needle zigzag lock stitcher...
Hand Book - English
Page 10
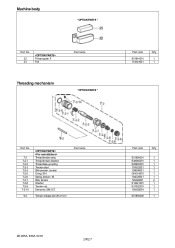
No. 22 23 Thread guide, F Felt Part name Threading mechanism "OPTION PARTS " Part code Q'ty S51814001 1 114941001 1 Ref. No. 7-2 7-2-1 7-2-2 7-2-3 7-2-4 7-2-5 7-2-6 7-2-7 7-2-8 7-2-9 7-2-10 9-2 Thread tension assy Thread tension bracket Thread take-up spring Tension stud Disk presser, :tension O ring, S14 Spring, tension : M Disk, tension Washer Tension nut Set screw, SM 3.57 Tension release pin (26.2 mm) Part name ZE-855A, 856A 10/16 2002.7 Part code Q'ty S51808001 1 S48084001 1 S02620001 1 116922001 1 159805001 1 081014870 1 104525001 1 145446001 2 ...
No. 22 23 Thread guide, F Felt Part name Threading mechanism "OPTION PARTS " Part code Q'ty S51814001 1 114941001 1 Ref. No. 7-2 7-2-1 7-2-2 7-2-3 7-2-4 7-2-5 7-2-6 7-2-7 7-2-8 7-2-9 7-2-10 9-2 Thread tension assy Thread tension bracket Thread take-up spring Tension stud Disk presser, :tension O ring, S14 Spring, tension : M Disk, tension Washer Tension nut Set screw, SM 3.57 Tension release pin (26.2 mm) Part name ZE-855A, 856A 10/16 2002.7 Part code Q'ty S51808001 1 S48084001 1 S02620001 1 116922001 1 159805001 1 081014870 1 104525001 1 145446001 2 ...


