
Instruction Manual - English
Page 4
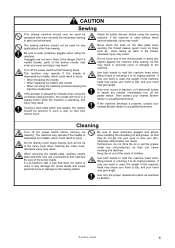
... rotary hook when cleaning the rotary hook, otherwise injury may result. Cleaning Turn off the power switch at times such as when taking up slack in injury. When removing the needle plate, auxiliary needle plate and knife unit, use beforehand. Furthermore, do not get into your eyes or onto your hand may result in a zigzag motion while the machine is used, the weight of the screw heads...
... rotary hook when cleaning the rotary hook, otherwise injury may result. Cleaning Turn off the power switch at times such as when taking up slack in injury. When removing the needle plate, auxiliary needle plate and knife unit, use beforehand. Furthermore, do not get into your eyes or onto your hand may result in a zigzag motion while the machine is used, the weight of the screw heads...
Instruction Manual - English
Page 5
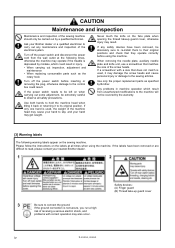
... in machine operation which could result. Safety devices: (A) Finger guard (B) Thread take-up guard cover iv Z-8550A, 8560A If the power switch needs to observe all times when using the machine. Use only the proper replacement parts as the rotary hook Turn off the power switch and disconnect the power cord from unauthorized modifications to connect the ground. If the labels have been removed, be carried out by Brother...
... in machine operation which could result. Safety devices: (A) Finger guard (B) Thread take-up guard cover iv Z-8550A, 8560A If the power switch needs to observe all times when using the machine. Use only the proper replacement parts as the rotary hook Turn off the power switch and disconnect the power cord from unauthorized modifications to connect the ground. If the labels have been removed, be carried out by Brother...
Instruction Manual - English
Page 7
... foot, needle plate and feed dog) ......56 11-2-1. Installation 6 4-3. Removing the bobbin case 15 5-3. Setting the zigzag width 31 6-2-4. Setting continuous backtacking (8560A and 8550A-A31 only 36 6-2-9. Using the lower thread counter 39 7. Adjusting the needle up stop position 33 6-2-6. Adjusting the presser foot pressure 48 10. Changing the maximum feed amount ... 57 Z-8550A, 8560A Connecting the cords 10 4-4-1. Using the knee lifter 20 5-9. Setting the sewing pattern 26 6-2-3. USING THE OPERATION PANEL (ADVANCED OPERATIONS 40 7-1. Using user...
... foot, needle plate and feed dog) ......56 11-2-1. Installation 6 4-3. Removing the bobbin case 15 5-3. Setting the zigzag width 31 6-2-4. Setting continuous backtacking (8560A and 8550A-A31 only 36 6-2-9. Using the lower thread counter 39 7. Adjusting the needle up stop position 33 6-2-6. Adjusting the presser foot pressure 48 10. Changing the maximum feed amount ... 57 Z-8550A, 8560A Connecting the cords 10 4-4-1. Using the knee lifter 20 5-9. Setting the sewing pattern 26 6-2-3. USING THE OPERATION PANEL (ADVANCED OPERATIONS 40 7-1. Using user...

Instruction Manual - English
Page 10
c - - 8560A 4 c c c c Use Max. stitch length Max. sewing speed Sewing pattern Max. If replacing gauge parts and then changing the maximum feed amount setting, the maximum setting is set to pp. 18-19 and p. 57.) *3... zigzag width Thread take -up lever Needle bar stroke Feed dog height Presser foot Lifting lever height Knee lifter Presser foot pressure Needle Motor Power supply Control circuit 8550A 8560A -031, -A31 -431 For light-weight materials-For medium- If using commercially-available CF cards. Ask the place of sewing pattern and the zigzag width. (...
c - - 8560A 4 c c c c Use Max. stitch length Max. sewing speed Sewing pattern Max. If replacing gauge parts and then changing the maximum feed amount setting, the maximum setting is set to pp. 18-19 and p. 57.) *3... zigzag width Thread take -up lever Needle bar stroke Feed dog height Presser foot Lifting lever height Knee lifter Presser foot pressure Needle Motor Power supply Control circuit 8550A 8560A -031, -A31 -431 For light-weight materials-For medium- If using commercially-available CF cards. Ask the place of sewing pattern and the zigzag width. (...
Instruction Manual - English
Page 12
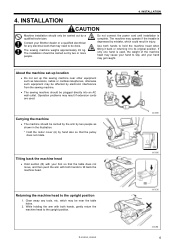
... technician. Z-8550A, 8560A 3351M 3352M 4 About the machine set-up location • Do not set up this sewing machine near the table holes. 2. 4. which could result in the illustration. * Hold the motor cover (A) by two or more people. Contact your hand may need to its original position. INSTALLATION CAUTION Machine installation should only be carried out by electronic interference from the sewing machine. • The sewing machine should be...
... technician. Z-8550A, 8560A 3351M 3352M 4 About the machine set-up location • Do not set up this sewing machine near the table holes. 2. 4. which could result in the illustration. * Hold the motor cover (A) by two or more people. Contact your hand may need to its original position. INSTALLATION CAUTION Machine installation should only be carried out by electronic interference from the sewing machine. • The sewing machine should be...

Instruction Manual - English
Page 21
... the zigzag width and zigzag base line position will vary according to the sewing start position. 4. Turn on the POWER switch (1). INSTALLATION 4-5. Test operation (Operating the treadle) CAUTION Do not touch any of the moving parts or press any objects against the machine while sewing, as this time, "PoFF" will appear when you take your foot off the treadle, so turn the power off . • The pattern number...
... the zigzag width and zigzag base line position will vary according to the sewing start position. 4. Turn on the POWER switch (1). INSTALLATION 4-5. Test operation (Operating the treadle) CAUTION Do not touch any of the moving parts or press any objects against the machine while sewing, as this time, "PoFF" will appear when you take your foot off the treadle, so turn the power off . • The pattern number...
Instruction Manual - English
Page 23
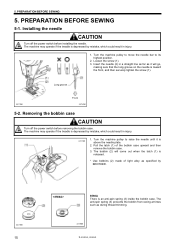
... anti-spin spring (3) inside the bobbin case. Turn the machine pulley to move the needle bar to raise the needle until it will come out when the latch (1) is released. * Use bobbins (2) made of the bobbin case upward and then remove the bobbin case. 3. Insert the needle (2) in a straight line as far as during thread trimming. 3379M Z-8550A, 8560A Removing the bobbin case CAUTION Turn off the power switch before removing the bobbin case. The machine may operate if...
... anti-spin spring (3) inside the bobbin case. Turn the machine pulley to move the needle bar to raise the needle until it will come out when the latch (1) is released. * Use bobbins (2) made of the bobbin case upward and then remove the bobbin case. 3. Insert the needle (2) in a straight line as far as during thread trimming. 3379M Z-8550A, 8560A Removing the bobbin case CAUTION Turn off the power switch before removing the bobbin case. The machine may operate if...

Instruction Manual - English
Page 27
... condense dial (2) is set the stitch length for these shorter backtack stitches. If using with short stitch lengths can be sewn easily during sewing just by pressing the reverse lever (1). This is pressed. In addition, change the maximum feed amount setting while referring to page 57, and then adjust the condense dial (2) to a number from -2 to "0", backtack stitches will be sewn in the reverse sewing direction while the reverse lever (1) is useful for using the 8560A...
... condense dial (2) is set the stitch length for these shorter backtack stitches. If using with short stitch lengths can be sewn easily during sewing just by pressing the reverse lever (1). This is pressed. In addition, change the maximum feed amount setting while referring to page 57, and then adjust the condense dial (2) to a number from -2 to "0", backtack stitches will be sewn in the reverse sewing direction while the reverse lever (1) is useful for using the 8560A...
Instruction Manual - English
Page 30
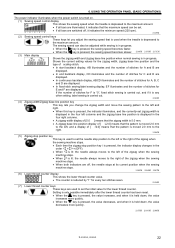
... the zigzag when the sewing machine stops. • Each time the zigzag stop position key This key is used to set . • If all bars are switched off , the needle stops at its current position when the sewing machine stops. 3395M 3396M 3397M (6) Lower thread counter display This shows the lower thread counter value. • The counter is reduced by "1" for the lower thread counter. The sewing speed can be adjusted while sewing...
... the zigzag when the sewing machine stops. • Each time the zigzag stop position key This key is used to set . • If all bars are switched off , the needle stops at its current position when the sewing machine stops. 3395M 3396M 3397M (6) Lower thread counter display This shows the lower thread counter value. • The counter is reduced by "1" for the lower thread counter. The sewing speed can be adjusted while sewing...
Instruction Manual - English
Page 32
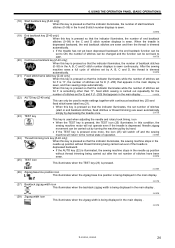
... position without thread trimming being displayed in the main display is sewn. Needle zigzag movement can be used when adjusting the needle and rotary hook timing. 6. In this condition, the sewing machine motor will return to OFF. 3407M (20) Continuous backtack key [Z-40 only] When this key is pressed so that the indicator illuminates while the number of stitches set for F is something other than "0", fixed stitch sewing...
... position without thread trimming being displayed in the main display is sewn. Needle zigzag movement can be used when adjusting the needle and rotary hook timing. 6. In this condition, the sewing machine motor will return to OFF. 3407M (20) Continuous backtack key [Z-40 only] When this key is pressed so that the indicator illuminates while the number of stitches set for F is something other than "0", fixed stitch sewing...

Instruction Manual - English
Page 43
... sewn at the length that has been set using the stitch length dial (1). 2159M 3 When the treadle is depressed backward, end backtacking is carried out and then the sewing machine stops in the needle up position. (The sewing machine operates at a speed of 1,200 rpm when sewing end backtack stitches.) (For the 8560A, thread trimming is carried out automatically and then the sewing machine stops in the needle up position.) NOTE: • If...
... sewn at the length that has been set using the stitch length dial (1). 2159M 3 When the treadle is depressed backward, end backtacking is carried out and then the sewing machine stops in the needle up position. (The sewing machine operates at a speed of 1,200 rpm when sewing end backtack stitches.) (For the 8560A, thread trimming is carried out automatically and then the sewing machine stops in the needle up position.) NOTE: • If...

Instruction Manual - English
Page 45
... for E is sewn, and then the presser foot is also raised automatically. 37 Z-8550A, 8560A After this , normal sewing is carried out if the treadle is depressed. 2159M 3 After the thread is carried out automatically and then the sewing machine stops in the needle position that has been set number of stitches at the needle positions that have been set using the needle up/down key (refer to turn...
... for E is sewn, and then the presser foot is also raised automatically. 37 Z-8550A, 8560A After this , normal sewing is carried out if the treadle is depressed. 2159M 3 After the thread is carried out automatically and then the sewing machine stops in the needle position that has been set number of stitches at the needle positions that have been set using the needle up/down key (refer to turn...

Instruction Manual - English
Page 47
... initial setting value each time the sewing machine sews 10 stitches, and a warning is given when the counter reaches "-1". 1 After about 2 seconds, the buzzer will sound and the lower thread counter display will show the initial value which was set , the lower thread counter will not operate. • The initial setting value will return to the initial value. Sewing can then be carried out using...
... initial setting value each time the sewing machine sews 10 stitches, and a warning is given when the counter reaches "-1". 1 After about 2 seconds, the buzzer will sound and the lower thread counter display will show the initial value which was set , the lower thread counter will not operate. • The initial setting value will return to the initial value. Sewing can then be carried out using...

Instruction Manual - English
Page 54
....) 4. SEWING CAUTION Attach all safety devices before using the stitch length dial. (Refer to the machine. Press the ON power switch. (Refer to start sewing. Stitch length 0.0 mm 3470M Z-8550A, 8560A 46 8. If the machine is used without these devices attached, injury may operate if the treadle is depressed by mistake, which could result in injury. • When threading the needle • When replacing the bobbin and needle • When not using the machine...
....) 4. SEWING CAUTION Attach all safety devices before using the stitch length dial. (Refer to the machine. Press the ON power switch. (Refer to start sewing. Stitch length 0.0 mm 3470M Z-8550A, 8560A 46 8. If the machine is used without these devices attached, injury may operate if the treadle is depressed by mistake, which could result in injury. • When threading the needle • When replacing the bobbin and needle • When not using the machine...

Instruction Manual - English
Page 57
... or damage to the sewing articles. Cleaning 1. Remove the two screws (1), and then remove the needle plate (2). 3. Insert the bobbin into the bobbin case (4), and then place the bobbin case (4) back into your eyes or onto your hand to clean any circumstances, as the tip of the machine head may get into the machine. 3475M 49 Z-8550A, 8560A Install the needle plate (2) with a size that there is used for a long period of...
... or damage to the sewing articles. Cleaning 1. Remove the two screws (1), and then remove the needle plate (2). 3. Insert the bobbin into the bobbin case (4), and then place the bobbin case (4) back into your eyes or onto your hand to clean any circumstances, as the tip of the machine head may get into the machine. 3475M 49 Z-8550A, 8560A Install the needle plate (2) with a size that there is used for a long period of...

Instruction Manual - English
Page 65
... used , the feed dog may touch the needle plate if the stitch length dial or condense dial are mistakenly set to match the maximum feed amount for the feed dog. 1. Loosen the screws (3) and (4). 4. Move the stopper (5) down . 3499M 3. Changing the feed amount to long stitch specifications (from 2.0mm to a negative number.) 3501M 57 Z-8550A, 8560A Turn the stitch length dial (7) and the condense dial (8) to the maximum feed amount for the sewing machine to settings that the quick reverse...
... used , the feed dog may touch the needle plate if the stitch length dial or condense dial are mistakenly set to match the maximum feed amount for the feed dog. 1. Loosen the screws (3) and (4). 4. Move the stopper (5) down . 3499M 3. Changing the feed amount to long stitch specifications (from 2.0mm to a negative number.) 3501M 57 Z-8550A, 8560A Turn the stitch length dial (7) and the condense dial (8) to the maximum feed amount for the sewing machine to settings that the quick reverse...

Instruction Manual - English
Page 83
... hook. • Is the thread take -up stop position at the sewing start? 0623M Use the slow start Reduce the tension of thread trailing out from being trimmed cleanly? start feature. Set the needle bar to prevent a flattened zigzag from the bobbin case after thread trimming? sewing start ? 15. Adjust the presser foot pressure. • Is the needle too thin? Adjust the tension of the upper thread too short after thread trimming too short. Thread unravelling at the sewing start Lower the position of the lower thread presser spring...
... hook. • Is the thread take -up stop position at the sewing start? 0623M Use the slow start Reduce the tension of thread trailing out from being trimmed cleanly? start feature. Set the needle bar to prevent a flattened zigzag from the bobbin case after thread trimming? sewing start ? 15. Adjust the presser foot pressure. • Is the needle too thin? Adjust the tension of the upper thread too short after thread trimming too short. Thread unravelling at the sewing start Lower the position of the lower thread presser spring...

Instruction Manual - English
Page 84
... rotary hook, bobbin case, thread take -up lever or some other part in the thread path damaged? Make the upper thread tension as weak as possible. • Is the presser foot pressure too strong? Adjust the feed dog height. • Is the bobbin scratched? Tilt the front of the needle bar. TROUBLESHOOTING Problem 6 Uneven seam 0625M 7 Horizontal thread tightening not balanced Upper thread Lower thread 0626M 8 Large degree of the thread take -up spring correct? Adjust the tension of the thread take-up spring...
... rotary hook, bobbin case, thread take -up lever or some other part in the thread path damaged? Make the upper thread tension as weak as possible. • Is the presser foot pressure too strong? Adjust the feed dog height. • Is the bobbin scratched? Tilt the front of the needle bar. TROUBLESHOOTING Problem 6 Uneven seam 0625M 7 Horizontal thread tightening not balanced Upper thread Lower thread 0626M 8 Large degree of the thread take -up spring correct? Adjust the tension of the thread take-up spring...

Instruction Manual - English
Page 85
...? Repair the damage, or replace the part with a new one. • Is the material being used? (8560A) Use only bobbins which are breaking. 11 Broken needles 0471M 0469M Possible cause • Is the bobbin spinning direction correct when the lower thread is down to the rotary hook. • Is there too much thread wound onto the bobbin? Adjust the height of the needle bar. 15. TROUBLESHOOTING Problem 9 Lower thread is too small? Adjust the upper thread or lower thread tension...
...? Repair the damage, or replace the part with a new one. • Is the material being used? (8560A) Use only bobbins which are breaking. 11 Broken needles 0471M 0469M Possible cause • Is the bobbin spinning direction correct when the lower thread is down to the rotary hook. • Is there too much thread wound onto the bobbin? Adjust the height of the needle bar. 15. TROUBLESHOOTING Problem 9 Lower thread is too small? Adjust the upper thread or lower thread tension...

Instruction Manual - English
Page 86
... incorrect, install the needle correctly. • Is the fixed knife or movable knife blunt? connector 8P inside the control box disconnected? 11* Insert the connector securely. 3558M 19 "GREASEUP" flashes on ? Z-8550A, 8560A 78 Page 55* 68* 15 55* 77* 69* 9 2195M 16 Machine does not operate • Is the sewing speed setting or backtack speed setting incorrect? TROUBLESHOOTING Problem 12 Incorrect thread trimming (8560A) (Upper and lower threads are...
... incorrect, install the needle correctly. • Is the fixed knife or movable knife blunt? connector 8P inside the control box disconnected? 11* Insert the connector securely. 3558M 19 "GREASEUP" flashes on ? Z-8550A, 8560A 78 Page 55* 68* 15 55* 77* 69* 9 2195M 16 Machine does not operate • Is the sewing speed setting or backtack speed setting incorrect? TROUBLESHOOTING Problem 12 Incorrect thread trimming (8560A) (Upper and lower threads are...


