Users Manual - English
Page 3
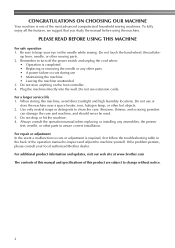
... wall. For a longer service life 1. Do not drop or hit the machine. 4. If the problem persists, please consult your eye on the foot controller. 4. Do not store anything on the needle while sewing. To fully enjoy all the features, we suggest that you study the manual before using ...can damage the case and machine, and should never be used. 3. For additional product information and updates, visit our web site at www.brother.com The contents of this manual and specifications of this machine, avoid direct sunlight and high humidity locations. CONGRATULATIONS ON CHOOSING OUR MACHINE Your...
... wall. For a longer service life 1. Do not drop or hit the machine. 4. If the problem persists, please consult your eye on the foot controller. 4. Do not store anything on the needle while sewing. To fully enjoy all the features, we suggest that you study the manual before using ...can damage the case and machine, and should never be used. 3. For additional product information and updates, visit our web site at www.brother.com The contents of this manual and specifications of this machine, avoid direct sunlight and high humidity locations. CONGRATULATIONS ON CHOOSING OUR MACHINE Your...
Users Manual - English
Page 4
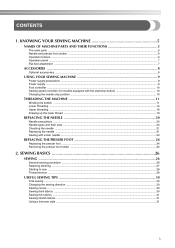
...Operation buttons ...6 Operation panel ...7 Flat bed attachment ...7 ACCESSORIES ...8 Optional accessories ...8 USING YOUR SEWING MACHINE 9 Power supply precautions ...9 Power supply ...9 Foot controller ...10 Sewing speed controller (for models equipped with the start/stop button 10 Changing the needle stop position ...10 THREADING THE MACHINE 11 Winding the bobbin ...11 Lower threading...20 Needle types and their uses ...20 Checking the needle ...21 Replacing the needle ...21 Sewing with a twin needle ...23 REPLACING THE PRESSER FOOT 24 Replacing the presser foot ...24 Removing the presser...
...Operation buttons ...6 Operation panel ...7 Flat bed attachment ...7 ACCESSORIES ...8 Optional accessories ...8 USING YOUR SEWING MACHINE 9 Power supply precautions ...9 Power supply ...9 Foot controller ...10 Sewing speed controller (for models equipped with the start/stop button 10 Changing the needle stop position ...10 THREADING THE MACHINE 11 Winding the bobbin ...11 Lower threading...20 Needle types and their uses ...20 Checking the needle ...21 Replacing the needle ...21 Sewing with a twin needle ...23 REPLACING THE PRESSER FOOT 24 Replacing the presser foot ...24 Removing the presser...
Users Manual - English
Page 6
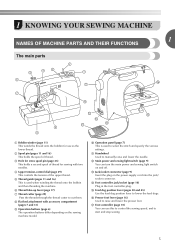
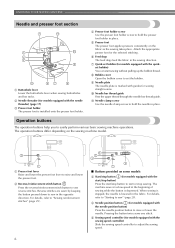
... is used to select the stitch and specify the various settings. l Main power and sewing light switch (page 9) You can use as the lower thread. n Foot controller jack/socket (page 10) Plug in the foot controller plug. b Spool pin (pages 11 and 16) This holds the spool of the upper thread. d Upper tension... sewing with accessory compartment (pages 7 and 31) i Operation buttons (page 6) The operation buttons differ depending on the power supply cord into the jack/ socket connector. q Foot controller (page 10) You can turn the main power and sewing light switch on and off.
... is used to select the stitch and specify the various settings. l Main power and sewing light switch (page 9) You can use as the lower thread. n Foot controller jack/socket (page 10) Plug in the foot controller plug. b Spool pin (pages 11 and 16) This holds the spool of the upper thread. d Upper tension... sewing with accessory compartment (pages 7 and 31) i Operation buttons (page 6) The operation buttons differ depending on the power supply cord into the jack/ socket connector. q Foot controller (page 10) You can turn the main power and sewing light switch on and off.
Users Manual - English
Page 7
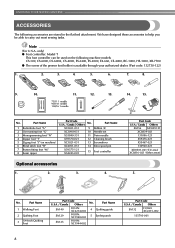
... button (for models equipped with the needle threader) (page 17) c Presser foot holder The presser foot is depressed. For details, refer to "Starting to adjust the sewing speed. 6 e Sewing speed controller (for models equipped with the needle position button) Press the needle position button ... set bobbin (for models equipped with the sewing speed controller) Slide the sewing speed controller to sew" (page 28). g Quick-set the bobbin. b Needle threader (for the selected stitching. Attach the appropriate presser foot for models equipped with the quickset bobbin) You can ...
... button (for models equipped with the needle threader) (page 17) c Presser foot holder The presser foot is depressed. For details, refer to "Starting to adjust the sewing speed. 6 e Sewing speed controller (for models equipped with the needle position button) Press the needle position button ... set bobbin (for models equipped with the sewing speed controller) Slide the sewing speed controller to sew" (page 28). g Quick-set the bobbin. b Needle threader (for the selected stitching. Attach the appropriate presser foot for models equipped with the quickset bobbin) You can ...
Users Manual - English
Page 9
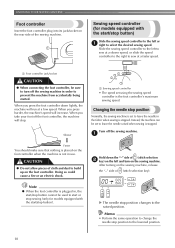
...-660, CE-4000, BC-1000, HS-1000, XR-7700 G The screw of the presser foot holder is available through your authorized dealer. (Part code: 132730-122) 1. 2. 3. 4. 5. 6. 7. 8. 9. 10. 11. 12. 13. 14. 15. 75/11 1 needle 90/14 1 needle 100/16 1 needle No. only) G Foot controller: Model T This foot controller can be able to carry out most sewing...
...-660, CE-4000, BC-1000, HS-1000, XR-7700 G The screw of the presser foot holder is available through your authorized dealer. (Part code: 132730-122) 1. 2. 3. 4. 5. 6. 7. 8. 9. 10. 11. 12. 13. 14. 15. 75/11 1 needle 90/14 1 needle 100/16 1 needle No. only) G Foot controller: Model T This foot controller can be able to carry out most sewing...
Users Manual - English
Page 11
.... When you press harder, the machine's speed will stop position changes to sew at a low speed. a Foot controller jack/socket CAUTION ● When connecting the foot controller, be used to start or stop sewing (only for models equipped with the start /stop position Normally, the... set using the sewing speed controller is the foot controller's maximum sewing speed. Doing so could cause a fire or an electric shock. X The needle stop . KNOWING YOUR SEWING MACHINE Foot controller Insert the foot controller plug into its jack/socket on the foot controller when the machine is not ...
.... When you press harder, the machine's speed will stop position changes to sew at a low speed. a Foot controller jack/socket CAUTION ● When connecting the foot controller, be used to start or stop sewing (only for models equipped with the start /stop position Normally, the... set using the sewing speed controller is the foot controller's maximum sewing speed. Doing so could cause a fire or an electric shock. X The needle stop . KNOWING YOUR SEWING MACHINE Foot controller Insert the foot controller plug into its jack/socket on the foot controller when the machine is not ...
Users Manual - English
Page 13
...9679; Make sure you slide the bobbin winding shaft to the right. When the bobbin seems full and begins j spinning slowly, take your foot off the foot controller or press (start/stop button) (for models equipped with the start/stop the machine. Note ● If the sewing machine is to ...be operated using the foot controller, connect the foot controller before turning on the machine. ● When the foot controller is wound, when the thread runs low it may cause the thread tension to fast). (For models ...
...9679; Make sure you slide the bobbin winding shaft to the right. When the bobbin seems full and begins j spinning slowly, take your foot off the foot controller or press (start/stop button) (for models equipped with the start/stop the machine. Note ● If the sewing machine is to ...be operated using the foot controller, connect the foot controller before turning on the machine. ● When the foot controller is wound, when the thread runs low it may cause the thread tension to fast). (For models ...
Users Manual - English
Page 14
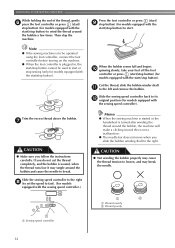
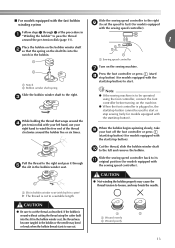
...the bobbin is plugged in a "Winding the bobbin" to pass the thread around the bobbin five or six times. a Sewing speed controller a Notch b Bobbin winder shaft spring Slide the bobbin winder shaft to cut to a suitable length. When the bobbin begins spinning ...k original position (for models equipped with the sewing speed controller). Turn on the machine. ● When the foot controller is wound without cutting the thread using the foot controller, connect the foot controller before turning on the sewing machine. g Press the foot controller or press (start/ h stop button) (for models...
...the bobbin is plugged in a "Winding the bobbin" to pass the thread around the bobbin five or six times. a Sewing speed controller a Notch b Bobbin winder shaft spring Slide the bobbin winder shaft to cut to a suitable length. When the bobbin begins spinning ...k original position (for models equipped with the sewing speed controller). Turn on the machine. ● When the foot controller is wound without cutting the thread using the foot controller, connect the foot controller before turning on the sewing machine. g Press the foot controller or press (start/ h stop button) (for models...

Users Manual - English
Page 15
.... 14 1 a Tension-adjusting spring Replace the bobbin cover. CAUTION ● Make sure you set bobbin, see arrow a), and then press lightly on the foot controller and the machine starts to be injured. CAUTION ● Make sure you accidentally step on b 1 2 a Cover b Slide button Put the bobbin in so the thread ...
.... 14 1 a Tension-adjusting spring Replace the bobbin cover. CAUTION ● Make sure you set bobbin, see arrow a), and then press lightly on the foot controller and the machine starts to be injured. CAUTION ● Make sure you accidentally step on b 1 2 a Cover b Slide button Put the bobbin in so the thread ...
Users Manual - English
Page 22
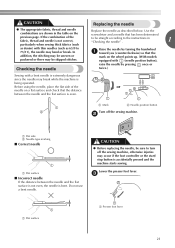
...flat side of the fabric, thread and needle is not correct, particularly when sewing thick fabrics (such as described below. c 1 a Flat surface a Presser foot lever 21 b a Flat side b Needle type marking ■ Correct needle 1 a Flat surface ■ Incorrect needle If the distance between the needle and ...In addition, the stitching may be uneven or puckered or there may be sure to 75/11), the needle may occur if the foot controller or the start/ stop button is accidentally pressed and the machine starts sewing. CAUTION ● The appropriate fabric, thread and needle ...
...flat side of the fabric, thread and needle is not correct, particularly when sewing thick fabrics (such as described below. c 1 a Flat surface a Presser foot lever 21 b a Flat side b Needle type marking ■ Correct needle 1 a Flat surface ■ Incorrect needle If the distance between the needle and ...In addition, the stitching may be uneven or puckered or there may be sure to 75/11), the needle may occur if the foot controller or the start/ stop button is accidentally pressed and the machine starts sewing. CAUTION ● The appropriate fabric, thread and needle ...

Users Manual - English
Page 25
...be used with each stitch appears in the holder. Using other any presser feet may occur if the foot controller or the start and you may cause injury. ● Only use the correct presser foot for the stitch pattern you (counterclockwise) so that the mark on the wheel points up. (With...sewing machine has been turned on the controller, the machine will start /stop button is positioned to be read. Raise the needle by turning the handwheel a toward you have been designed to be injured. ● Always use presser feet that the presser foot pin is aligned with this machine. ...
...be used with each stitch appears in the holder. Using other any presser feet may occur if the foot controller or the start and you may cause injury. ● Only use the correct presser foot for the stitch pattern you (counterclockwise) so that the mark on the wheel points up. (With...sewing machine has been turned on the controller, the machine will start /stop button is positioned to be read. Raise the needle by turning the handwheel a toward you have been designed to be injured. ● Always use presser feet that the presser foot pin is aligned with this machine. ...
Users Manual - English
Page 29
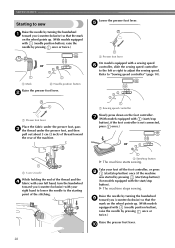
...stop button) once (if the machine was started by pressing (start/stop button)) (for models equipped with the start /stop button), if the foot controller is not connected, press once.) or a 5 cm (2 inch) While holding the end of the thread and the d fabric with (start ...), raise the needle by pressing once or twice.) a Presser foot lever On models equipped with a sewing speed or f controller, slide the sewing speed controller to adjust the sewing speed. a Sewing speed controller Slowly press down on the foot controller. a Start/stop button). j 28 a Mark b Needle position...
...stop button) once (if the machine was started by pressing (start/stop button)) (for models equipped with the start /stop button), if the foot controller is not connected, press once.) or a 5 cm (2 inch) While holding the end of the thread and the d fabric with (start ...), raise the needle by pressing once or twice.) a Presser foot lever On models equipped with a sewing speed or f controller, slide the sewing speed controller to adjust the sewing speed. a Sewing speed controller Slowly press down on the foot controller. a Start/stop button). j 28 a Mark b Needle position...

Users Manual - English
Page 30
...stitches that you do a test sample on scrap of a fabric before you change fabric or thread. a Thread cutter Memo ● When the foot controller is selected. You may need to 5 stitches on top of each other. 1 2 a Reverse stitching b Reinforcement stitching Memo ● Whether ...1 2 3 5 4 a Wrong side b Surface c Upper thread d Lower thread e Loops appear on surface of fabric Solution Reduce the tension by turning the upper tension-control dial to a lower number. 54 3 ■ Upper tension is too loose Loops appear on the wrong side of the fabric. 1 5 2 3 4 a Wrong side...
...stitches that you do a test sample on scrap of a fabric before you change fabric or thread. a Thread cutter Memo ● When the foot controller is selected. You may need to 5 stitches on top of each other. 1 2 a Reverse stitching b Reinforcement stitching Memo ● Whether ...1 2 3 5 4 a Wrong side b Surface c Upper thread d Lower thread e Loops appear on surface of fabric Solution Reduce the tension by turning the upper tension-control dial to a lower number. 54 3 ■ Upper tension is too loose Loops appear on the wrong side of the fabric. 1 5 2 3 4 a Wrong side...
Users Manual - English
Page 60
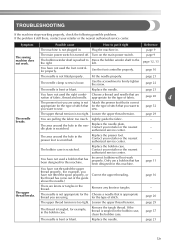
... page 9 The sewing machine does not work properly. Replace the needle. Choose a thread and needle that are using is not Attach the presser foot that is correct appropriate for the type of stitch that for this machine. Lightly guide the fabric. - The area around the hole in the ...The upper thread tension is loose. You have not used the foot controller properly. Plug the machine in the thread. Turn on the main power switch. Use the foot controller properly. page 22 The needle is too tight. page 20 4 The presser foot you are nation of stitch. - page 29 The needle ...
... page 9 The sewing machine does not work properly. Replace the needle. Choose a thread and needle that are using is not Attach the presser foot that is correct appropriate for the type of stitch that for this machine. Lightly guide the fabric. - The area around the hole in the ...The upper thread tension is loose. You have not used the foot controller properly. Plug the machine in the thread. Turn on the main power switch. Use the foot controller properly. page 22 The needle is too tight. page 20 4 The presser foot you are nation of stitch. - page 29 The needle ...
Users Manual - English
Page 63
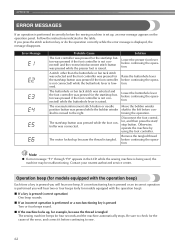
...is displayed, the message disappears. The start /stop button was pressed while the foot controller was pressed while the presser foot is set up, an error message appears on the operation panel. Disconnect the foot controller, and then press the start /stop button. Be sure to check for ...of the error, and correct it before continuing to the right. The reverse/reinforcement stitch button or needle position button was pressed if the foot controller is not connected) while the buttonhole lever is lowered. Note ● If error message "F1" through "F8" appears in the table...
...is displayed, the message disappears. The start /stop button was pressed while the foot controller was pressed while the presser foot is set up, an error message appears on the operation panel. Disconnect the foot controller, and then press the start /stop button. Be sure to check for ...of the error, and correct it before continuing to the right. The reverse/reinforcement stitch button or needle position button was pressed if the foot controller is not connected) while the buttonhole lever is lowered. Note ● If error message "F1" through "F8" appears in the table...
Users Manual - English
Page 64
... winding 12 feed dog position lever 45 , feed dogs 6 45 , flat bed attachment 7 31 , foot controller 8 28 free-arm style 31 free-motion quilting 45 P patchwork stitching 43 piecing 43 pocket corners 46 , presser foot 6 24 , presser foot holder 6 25 , presser foot lever 6 16 pre-tension disk 11 Q , quick-set bobbin 6 15 quilting 44 quilting...
... winding 12 feed dog position lever 45 , feed dogs 6 45 , flat bed attachment 7 31 , foot controller 8 28 free-arm style 31 free-motion quilting 45 P patchwork stitching 43 piecing 43 pocket corners 46 , presser foot 6 24 , presser foot holder 6 25 , presser foot lever 6 16 pre-tension disk 11 Q , quick-set bobbin 6 15 quilting 44 quilting...

Users Manual - English
Page 65
T thick fabrics 30 thin fabrics 31 thread cutter 29 thread guide 16 thread tension 29 trial sewing 30 triple stretch stitch 33 troubleshooting 59 twin needle 22 U upper tension-control dial 29 upper threading 16 W walking foot 44 wing needle 51 Z zigzag , stitch 30 32, 42 zipper foot 40 zipper Insertion 40 64
T thick fabrics 30 thin fabrics 31 thread cutter 29 thread guide 16 thread tension 29 trial sewing 30 triple stretch stitch 33 troubleshooting 59 twin needle 22 U upper tension-control dial 29 upper threading 16 W walking foot 44 wing needle 51 Z zigzag , stitch 30 32, 42 zipper foot 40 zipper Insertion 40 64


