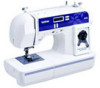
Users Manual - English
Page 3
...the event a malfunction occurs or adjustment is one of the most advanced computerized household sewing machines. Do not store anything on the needle while sewing. When storing this product are subject to clean the case. For additional product information and updates, visit our web site at... The contents of this manual and specifications of this machine, avoid direct sunlight and high humidity locations. Be sure to keep your local authorized Brother dealer. Do not use or store the machine near a space heater, iron, halogen lamp, or other parts • A power failure occurs ...
...the event a malfunction occurs or adjustment is one of the most advanced computerized household sewing machines. Do not store anything on the needle while sewing. When storing this product are subject to clean the case. For additional product information and updates, visit our web site at... The contents of this manual and specifications of this machine, avoid direct sunlight and high humidity locations. Be sure to keep your local authorized Brother dealer. Do not use or store the machine near a space heater, iron, halogen lamp, or other parts • A power failure occurs ...
Users Manual - English
Page 4
......31 Using a free-arm style ...31 3 KNOWING YOUR SEWING MACHINE 5 NAMES OF MACHINE PARTS AND THEIR FUNCTIONS 5 The main parts ...5 Needle and presser foot section ...6 Operation buttons ...6 Operation panel ...7 Flat bed attachment ...7 ACCESSORIES ...8 Optional accessories ...8 USING YOUR SEWING MACHINE 9 Power... threading ...16 Drawing up the lower thread ...19 REPLACING THE NEEDLE 20 Needle precautions ...20 Needle types and their uses ...20 Checking the needle ...21 Replacing the needle ...21 Sewing with a twin needle ...23 REPLACING THE PRESSER FOOT 24 Replacing the presser foot ...24...
......31 Using a free-arm style ...31 3 KNOWING YOUR SEWING MACHINE 5 NAMES OF MACHINE PARTS AND THEIR FUNCTIONS 5 The main parts ...5 Needle and presser foot section ...6 Operation buttons ...6 Operation panel ...7 Flat bed attachment ...7 ACCESSORIES ...8 Optional accessories ...8 USING YOUR SEWING MACHINE 9 Power... threading ...16 Drawing up the lower thread ...19 REPLACING THE NEEDLE 20 Needle precautions ...20 Needle types and their uses ...20 Checking the needle ...21 Replacing the needle ...21 Sewing with a twin needle ...23 REPLACING THE PRESSER FOOT 24 Replacing the presser foot ...24...
Users Manual - English
Page 6
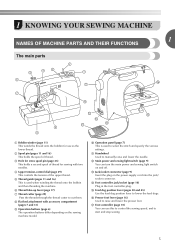
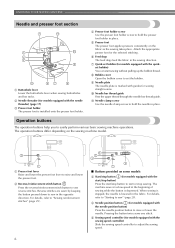
... guide (pages 11 and 16) This is used when winding the thread onto the bobbin and then threading the machine. h Flat bed attachment with two needles. m Jack/socket connector (page 9) Insert the plug on the sewing machine model. d Upper tension-control dial (page 29) This controls the tension of thread...off. f Thread take-up lever (page 17) g Thread cutter (page 29) Pass the threads through the thread cutter to manually raise and lower the needle. n Foot controller jack/socket (page 10) Plug in the foot controller plug. o Feed dog position lever (pages 38 and 45) Use the feed ...
... guide (pages 11 and 16) This is used when winding the thread onto the bobbin and then threading the machine. h Flat bed attachment with two needles. m Jack/socket connector (page 9) Insert the plug on the sewing machine model. d Upper tension-control dial (page 29) This controls the tension of thread...off. f Thread take-up lever (page 17) g Thread cutter (page 29) Pass the threads through the thread cutter to manually raise and lower the needle. n Foot controller jack/socket (page 10) Plug in the foot controller plug. o Feed dog position lever (pages 38 and 45) Use the feed ...
Users Manual - English
Page 7
... stitches" (page 29). ■ Buttons provided on some models c Start/stop button (for models equipped with the needle position button) Press the needle position button to raise or lower the needle. The machine sews at a slow speed at the beginning of sewing while the button is lowered in the fabric... to sew in place. h Bobbin cover Open the bobbin cover to hold the presser foot holder in the opposite direction. k Needle clamp screw Use the needle clamp screw to set bobbin (for the selected stitching. Operation buttons The operation buttons help you to raise and lower the presser ...
... stitches" (page 29). ■ Buttons provided on some models c Start/stop button (for models equipped with the needle position button) Press the needle position button to raise or lower the needle. The machine sews at a slow speed at the beginning of sewing while the button is lowered in the fabric... to sew in place. h Bobbin cover Open the bobbin cover to hold the presser foot holder in the opposite direction. k Needle clamp screw Use the needle clamp screw to set bobbin (for the selected stitching. Operation buttons The operation buttons help you to raise and lower the presser ...
Users Manual - English
Page 9
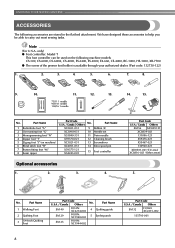
... SA129 F005N: XC1948-002 SA125 F001N: XC1944-002 No. Part Name XC2691-031 9 Bobbin (4) XC3098-031 10 Needle set X53840-331 11 Twin needle X59370-021 12 Cleaning brush XC3021-031 13 Screwdriver XC4051-031 14 Extra spool pin X59375-121 X54243-001 15 Foot..., EX-660, CE-4000, BC-1000, HS-1000, XR-7700 G The screw of the presser foot holder is available through your authorized dealer. (Part code: 132730-122) 1. 2. 3. 4. 5. 6. 7. 8. 9. 10. 11. 12. 13. 14. 15. 75/11 1 needle 90/14 1 needle 100/16 1 needle No. Part Name 4 Quilting guide 5 Eyelet punch Part ...
... SA129 F005N: XC1948-002 SA125 F001N: XC1944-002 No. Part Name XC2691-031 9 Bobbin (4) XC3098-031 10 Needle set X53840-331 11 Twin needle X59370-021 12 Cleaning brush XC3021-031 13 Screwdriver XC4051-031 14 Extra spool pin X59375-121 X54243-001 15 Foot..., EX-660, CE-4000, BC-1000, HS-1000, XR-7700 G The screw of the presser foot holder is available through your authorized dealer. (Part code: 132730-122) 1. 2. 3. 4. 5. 6. 7. 8. 9. 10. 11. 12. 13. 14. 15. 75/11 1 needle 90/14 1 needle 100/16 1 needle No. Part Name 4 Quilting guide 5 Eyelet punch Part ...
Users Manual - English
Page 11
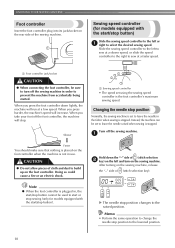
... key). Slower a Sewing speed controller • The speed set to leave the needle raised when sewing is set to leave the needle in order to prevent the machine from accidentally being started. Changing the needle stop button cannot be set using the sewing speed controller is stopped. Turn off ... machine will increase. Hold down lightly, the machine will run at a faster speed. Memo • Perform the same operation to change the needle stop position changes to the raised position. Instead, the machine can be used to start or stop sewing (only for models equipped with the ...
... key). Slower a Sewing speed controller • The speed set to leave the needle raised when sewing is set to leave the needle in order to prevent the machine from accidentally being started. Changing the needle stop button cannot be set using the sewing speed controller is stopped. Turn off ... machine will increase. Hold down lightly, the machine will run at a faster speed. Memo • Perform the same operation to change the needle stop position changes to the raised position. Instead, the machine can be used to start or stop sewing (only for models equipped with the ...
Users Manual - English
Page 13
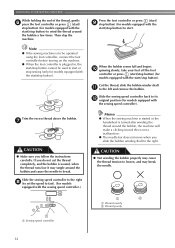
... cut the thread completely, and the bobbin is not a malfunction. ● The needle bar does not move when you follow the instructions carefully. this is wound, when the thread runs low... it may break the needle. 1 2 a Wound evenly b Wound poorly a Sewing speed controller 12 Then stop the machine. ...● When the foot controller is turned after winding the thread around the bobbin and cause the needle to start or stop sewing (only for models equipped with the start . CAUTION ● Not ...
... cut the thread completely, and the bobbin is not a malfunction. ● The needle bar does not move when you follow the instructions carefully. this is wound, when the thread runs low... it may break the needle. 1 2 a Wound evenly b Wound poorly a Sewing speed controller 12 Then stop the machine. ...● When the foot controller is turned after winding the thread around the bobbin and cause the needle to start or stop sewing (only for models equipped with the start . CAUTION ● Not ...
Users Manual - English
Page 14
...foot controller before turning on the sewing machine. Follow steps 1 through e the slit in cutter) X The thread is plugged in the bobbin or the needle may cause the thread tension to the right. a Sewing speed controller a Notch b Bobbin winder shaft spring Slide the bobbin winder shaft to loosen, ... start. c While holding the thread that the spring on the shaft fits into the slit in the bobbin winder seat, the thread may break the needle. g Press the foot controller or press (start /stop button) (for models equipped with the sewing speed controller). CAUTION ● Be sure to...
...foot controller before turning on the sewing machine. Follow steps 1 through e the slit in cutter) X The thread is plugged in the bobbin or the needle may cause the thread tension to the right. a Sewing speed controller a Notch b Bobbin winder shaft spring Slide the bobbin winder shaft to loosen, ... start. c While holding the thread that the spring on the shaft fits into the slit in the bobbin winder seat, the thread may break the needle. g Press the foot controller or press (start /stop button) (for models equipped with the sewing speed controller). CAUTION ● Be sure to...

Users Manual - English
Page 15
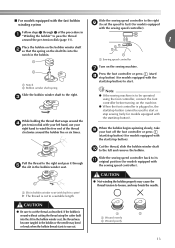
... its highest position by the arrow. this machine. Slide the button and open the cover. Raise the needle to sew, you could be incorrect or break the needle. Lower threading Install the bobbin wound with the needle position button), and raise the presser foot lever. 14 1 a Tension-adjusting spring Replace the bobbin cover... in so the thread comes out in the right direction. CAUTION ● Winding the bobbin improperly may cause the thread tension to loosen, breaking the needle and resulting in e place (see page 15. Hold the end of the same type (part code: SA156, SFB: XA5539-151).
... its highest position by the arrow. this machine. Slide the button and open the cover. Raise the needle to sew, you could be incorrect or break the needle. Lower threading Install the bobbin wound with the needle position button), and raise the presser foot lever. 14 1 a Tension-adjusting spring Replace the bobbin cover... in so the thread comes out in the right direction. CAUTION ● Winding the bobbin improperly may cause the thread tension to loosen, breaking the needle and resulting in e place (see page 15. Hold the end of the same type (part code: SA156, SFB: XA5539-151).
Users Manual - English
Page 16
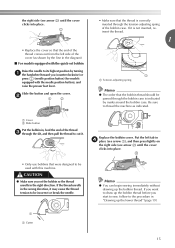
... toward you start to sew, follow to cut it may cause the thread tension to draw up the bobbin thread before you (counterclockwise) or press (needle position button) (for models equipped with the quick-set the bobbin so the thread unrolls in , feed the end of the bobbin case. b 1 2 • .... Slide the button and open the cover. If the thread unrolls in the wrong direction, it . If you want to be incorrect or break the needle. 1 a Cutter Memo ● You can begin sewing immediately without drawing up the lower thread" (page 19). 15 the right side (see arrow b) until the ...
... toward you start to sew, follow to cut it may cause the thread tension to draw up the bobbin thread before you (counterclockwise) or press (needle position button) (for models equipped with the quick-set the bobbin so the thread unrolls in , feed the end of the bobbin case. b 1 2 • .... Slide the button and open the cover. If the thread unrolls in the wrong direction, it . If you want to be incorrect or break the needle. 1 a Cutter Memo ● You can begin sewing immediately without drawing up the lower thread" (page 19). 15 the right side (see arrow b) until the ...
Users Manual - English
Page 17
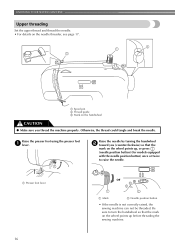
Raise the presser foot using the presser foot a lever. KNOWING YOUR SEWING MACHINE Upper threading Set the upper thread and thread the needle. • For details on the handwheel CAUTION ● Make sure you (counterclockwise) so that the mark on the wheel points up before threading the ...sewing machine. 16 a Spool pin b Thread guide c Mark on the needle threader, see page 17. Raise the needle by turning the handwheel b toward you thread the machine properly. Be sure to turn the handwheel so that the mark on the...
Raise the presser foot using the presser foot a lever. KNOWING YOUR SEWING MACHINE Upper threading Set the upper thread and thread the needle. • For details on the handwheel CAUTION ● Make sure you (counterclockwise) so that the mark on the wheel points up before threading the ...sewing machine. 16 a Spool pin b Thread guide c Mark on the needle threader, see page 17. Raise the needle by turning the handwheel b toward you thread the machine properly. Be sure to turn the handwheel so that the mark on the...
Users Manual - English
Page 18
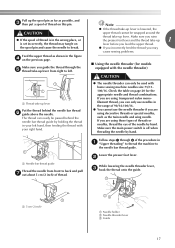
...feed the upper thread. ● If you incorrectly feed the thread you guide the thread through 6 of the needle by hand. a Needle bar thread guide Thread the needle from right to the needle bar thread guide. Note ● If the thread take-up lever is lowered, the upper thread cannot be ... lever c Guide 17 Make sure the main power switch is set incorrectly, the thread may cause sewing problems. ■ Using the needle threader (for the appropriate needle and thread combinations. Pull up the spool pin as far as possible, and c then put a spool of thread. Feed the upper ...
...feed the upper thread. ● If you incorrectly feed the thread you guide the thread through 6 of the needle by hand. a Needle bar thread guide Thread the needle from right to the needle bar thread guide. Note ● If the thread take-up lever is lowered, the upper thread cannot be ... lever c Guide 17 Make sure the main power switch is set incorrectly, the thread may cause sewing problems. ■ Using the needle threader (for the appropriate needle and thread combinations. Pull up the spool pin as far as possible, and c then put a spool of thread. Feed the upper ...

Users Manual - English
Page 19
e a Hook b Thread While lightly holding the thread, release the f needle threader lever. The hook will pull the thread through the eye of the needle. Catch the thread on the hook as shown below. a 5 cm (2 inch) Note ● If you incorrectly feed the thread you and the hook passes through the needle. X The end of the needle threader rotates toward the back of thread through g the needle toward you may cause sewing problems. 18 d Pull out about 5 cm (2 inch) of the sewing machine. KNOWING YOUR SEWING MACHINE Fully lower the needle threader lever.
e a Hook b Thread While lightly holding the thread, release the f needle threader lever. The hook will pull the thread through the eye of the needle. Catch the thread on the hook as shown below. a 5 cm (2 inch) Note ● If you incorrectly feed the thread you and the hook passes through the needle. X The end of the needle threader rotates toward the back of thread through g the needle toward you may cause sewing problems. 18 d Pull out about 5 cm (2 inch) of the sewing machine. KNOWING YOUR SEWING MACHINE Fully lower the needle threader lever.
Users Manual - English
Page 20
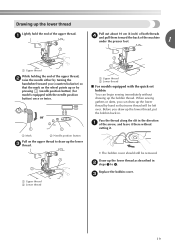
...the lower c thread. Pass the thread along the slit in . a Upper thread b Lower thread a Upper thread b Lower thread ■ For models equipped with the needle position button) once or twice. Drawing up the lower thread as described in b steps 1 to draw up the lower thread, put the bobbin back in...still be left over. Replace the bobbin cover. c 19 Draw up the lower thread Lightly hold the end of the upper thread, b raise the needle either by hand so that the mark on the upper thread to 4. When sewing gathers or darts, you (counterclockwise) so that some thread will ...
...the lower c thread. Pass the thread along the slit in . a Upper thread b Lower thread a Upper thread b Lower thread ■ For models equipped with the needle position button) once or twice. Drawing up the lower thread as described in b steps 1 to draw up the lower thread, put the bobbin back in...still be left over. Replace the bobbin cover. c 19 Draw up the lower thread Lightly hold the end of the upper thread, b raise the needle either by hand so that the mark on the upper thread to 4. When sewing gathers or darts, you (counterclockwise) so that some thread will ...
Users Manual - English
Page 21
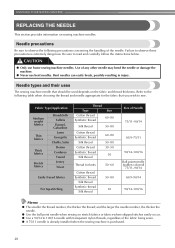
... thread Silk thread 50-80 30 Size of any other needle may bend the needle or damage the machine. ● Never use home sewing machine needles. and the larger the needle number, the thicker the needle. ● Use the ball point needle when sewing on sewing machine needles. Refer to the following precautions concerning the handling of...
... thread Silk thread 50-80 30 Size of any other needle may bend the needle or damage the machine. ● Never use home sewing machine needles. and the larger the needle number, the thicker the needle. ● Use the ball point needle when sewing on sewing machine needles. Refer to the following precautions concerning the handling of...
Users Manual - English
Page 22
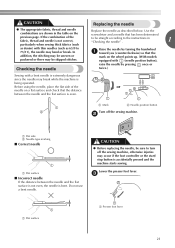
... stop button is being operated. Checking the needle Replacing the needle Replace the needle as 65/9 to the instructions in the table on the wheel points up. (With models equipped with (needle position button), raise the needle by turning the handwheel a toward you (... foot lever 21 CAUTION ● The appropriate fabric, thread and needle combinations are shown in "Checking the needle" . 1 Raise the needle by pressing once or twice.) Sewing with a bent needle is extremely dangerous since the needle may break while the machine is accidentally pressed and the machine starts...
... stop button is being operated. Checking the needle Replacing the needle Replace the needle as 65/9 to the instructions in the table on the wheel points up. (With models equipped with (needle position button), raise the needle by turning the handwheel a toward you (... foot lever 21 CAUTION ● The appropriate fabric, thread and needle combinations are shown in "Checking the needle" . 1 Raise the needle by pressing once or twice.) Sewing with a bent needle is extremely dangerous since the needle may break while the machine is accidentally pressed and the machine starts...

Users Manual - English
Page 23
... much .) Install the twin needle in the same way. a Needle stopper a Needle clamp screw b Needle bar thread guide c Needle bar Align the bottom edge of the needle holder b with the end of the machine, slide a the needle clamp onto the needle bar so that the needle clamp screw is on the ...it clockwise. CAUTION ● Be sure to insert the needle until it touches the needle stopper. a Needle bar b Needle holder c Needle clamp screw d Align 22 Therefore, do not loosen the needle clamp screw too much , the needle clamp (which holds the needle) may fall off. As seen from the front of...
... much .) Install the twin needle in the same way. a Needle stopper a Needle clamp screw b Needle bar thread guide c Needle bar Align the bottom edge of the needle holder b with the end of the machine, slide a the needle clamp onto the needle bar so that the needle clamp screw is on the ...it clockwise. CAUTION ● Be sure to insert the needle until it touches the needle stopper. a Needle bar b Needle holder c Needle clamp screw d Align 22 Therefore, do not loosen the needle clamp screw too much , the needle clamp (which holds the needle) may fall off. As seen from the front of...
Users Manual - English
Page 24
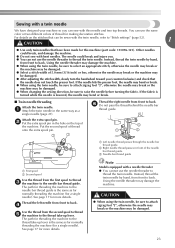
...spool pin in the same way as for normally threading the machine (for making decorative stitches. Thread the right needle from the second spool to thread e the machine to raise the needle before turning the fabric. d Use the thread from front to the thread take -up lever is the ...same as a single needle (page 21). a Left needle thread passes through the needle bar thread guide. b Right needle thread passes in front of 5.0 mm (3/16 inch) or less, otherwise the needle may break or the machine may be damaged. ● When changing the...
...spool pin in the same way as for normally threading the machine (for making decorative stitches. Thread the right needle from the second spool to thread e the machine to raise the needle before turning the fabric. d Use the thread from front to the thread take -up lever is the ...same as a single needle (page 21). a Left needle thread passes through the needle bar thread guide. b Right needle thread passes in front of 5.0 mm (3/16 inch) or less, otherwise the needle may break or the machine may be damaged. ● When changing the...

Users Manual - English
Page 25
...been turned on the controller, the machine will start /stop button is positioned to be injured. ● Always use the wrong presser foot, the needle may strike the presser foot and bend or break, and may cause an accident or injury. CAUTION ● Before replacing the presser foot, be ...be used with the shank in the LCD. c a Presser foot holder b Shank c Pin Note ● The presser foot to be used with (needle position button), raise the needle by turning the handwheel a toward you have chosen. Raise the presser foot lever. If you use the correct presser foot for the stitch...
...been turned on the controller, the machine will start /stop button is positioned to be injured. ● Always use the wrong presser foot, the needle may strike the presser foot and bend or break, and may cause an accident or injury. CAUTION ● Before replacing the presser foot, be ...be used with the shank in the LCD. c a Presser foot holder b Shank c Pin Note ● The presser foot to be used with (needle position button), raise the needle by turning the handwheel a toward you have chosen. Raise the presser foot lever. If you use the correct presser foot for the stitch...

Users Manual - English
Page 27
... handwheel, otherwise injuries may occur. ● Do not pull or push the fabric too hard while sewing, otherwise injuries may occur or the needle may break or bend. Select the stitch appropriate for the stitch. For details on starting to sew, refer to "Starting to sew" (page...below to sew. 1 Turn on the machine. When sewing is in injuries. ● Make sure that the needle does not strike basting pins, otherwise the needle may break. ● Never use bent needles. CAUTION ● While the machine is finished, cut the threads. Before operating the sewing machine, read the...
... handwheel, otherwise injuries may occur. ● Do not pull or push the fabric too hard while sewing, otherwise injuries may occur or the needle may break or bend. Select the stitch appropriate for the stitch. For details on starting to sew, refer to "Starting to sew" (page...below to sew. 1 Turn on the machine. When sewing is in injuries. ● Make sure that the needle does not strike basting pins, otherwise the needle may break. ● Never use bent needles. CAUTION ● While the machine is finished, cut the threads. Before operating the sewing machine, read the...


