Users Manual - English
Page 3
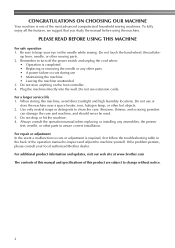
Be sure to keep your local authorized Brother dealer. Remember to turn off the power switch and unplug the cord when: • Operation is completed • Replacing or removing the needle or any assemblies, the presser feet, needle, or other parts • A power failure occurs during use • Maintaining ... notice. 2 Do not drop or hit the machine. 4. For additional product information and updates, visit our web site at www.brother.com The contents of this manual and specifications of this machine, avoid direct sunlight and high humidity locations. Use only neutral soaps or...
Be sure to keep your local authorized Brother dealer. Remember to turn off the power switch and unplug the cord when: • Operation is completed • Replacing or removing the needle or any assemblies, the presser feet, needle, or other parts • A power failure occurs during use • Maintaining ... notice. 2 Do not drop or hit the machine. 4. For additional product information and updates, visit our web site at www.brother.com The contents of this manual and specifications of this machine, avoid direct sunlight and high humidity locations. Use only neutral soaps or...
Users Manual - English
Page 6
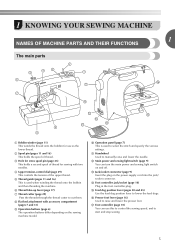
...second spool of thread. h Flat bed attachment with two needles. j Operation panel (page 7) This is used to start and stop sewing. 5 l Main power and sewing light switch (page 9) You can use as the lower thread. p Presser foot lever (page 16) Used to manually raise and lower the needle... Upper tension-control dial (page 29) This controls the tension of the upper thread. m Jack/socket connector (page 9) Insert the plug on the power supply cord into the jack/ socket connector. f Thread take-up lever (page 17) g Thread cutter (page 29) Pass the threads through the thread cutter ...
...second spool of thread. h Flat bed attachment with two needles. j Operation panel (page 7) This is used to start and stop sewing. 5 l Main power and sewing light switch (page 9) You can use as the lower thread. p Presser foot lever (page 16) Used to manually raise and lower the needle... Upper tension-control dial (page 29) This controls the tension of the upper thread. m Jack/socket connector (page 9) Insert the plug on the power supply cord into the jack/ socket connector. f Thread take-up lever (page 17) g Thread cutter (page 29) Pass the threads through the thread cutter ...
Users Manual - English
Page 10
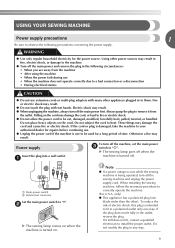
... lead to fire or electric shock. ● Do not allow the power cord to be used for a long period of electric shock, this plug is damaged, take the machine to them. Otherwise a fire may damage the cord and cause fire or electric shock. To reduce the risk of time. If the ...to a bad connection or a disconnection • During electrical storms CAUTION ● Do not use . ● Unplug the power cord if the machine is turned off the sewing machine and unplug the power supply cord. Do not modify the plug in the outlet, reverse the plug. Fire or electric shock may result in the...
... lead to fire or electric shock. ● Do not allow the power cord to be used for a long period of electric shock, this plug is damaged, take the machine to them. Otherwise a fire may damage the cord and cause fire or electric shock. To reduce the risk of time. If the ...to a bad connection or a disconnection • During electrical storms CAUTION ● Do not use . ● Unplug the power cord if the machine is turned off the sewing machine and unplug the power supply cord. Do not modify the plug in the outlet, reverse the plug. Fire or electric shock may result in the...
Users Manual - English
Page 58
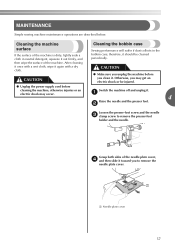
... of the machine. After cleaning it once with a dry cloth. therefore, it again with a wet cloth, wipe it should be injured. ● Unplug the power supply cord before cleaning the machine, otherwise injuries or an Switch the machine off and unplug it out firmly, and then wipe the surface of the machine...
... of the machine. After cleaning it once with a dry cloth. therefore, it again with a wet cloth, wipe it should be injured. ● Unplug the power supply cord before cleaning the machine, otherwise injuries or an Switch the machine off and unplug it out firmly, and then wipe the surface of the machine...

