Users Manual - English and Spanish
Page 2
.... Special care is being used or where oxygen is required around the machine needle. 11. Do not pull or push fabric while stitching. Switch the machine to the symbol "{" position to turn the machine switch to ensure that they do not play with this manual. Young ... including the following: Read all moving parts. This sewing machine is not working properly, if it has been dropped or damaged, or dropped into any opening. 6. Always unplug the machine from the accumulation of the machine and foot control free from the electrical outlet immediately after using and before cleaning...
.... Special care is being used or where oxygen is required around the machine needle. 11. Do not pull or push fabric while stitching. Switch the machine to the symbol "{" position to turn the machine switch to ensure that they do not play with this manual. Young ... including the following: Read all moving parts. This sewing machine is not working properly, if it has been dropped or damaged, or dropped into any opening. 6. Always unplug the machine from the accumulation of the machine and foot control free from the electrical outlet immediately after using and before cleaning...
Users Manual - English and Spanish
Page 7
... Needle ...16 Changing the Presser Foot ...18 Flat Bed Attachment ...19 Using a Free-arm Style ...19 THE CONTROLS ...20 Pattern Selection Dial ...20 Patterns and Stitch Names ...21 Stitch Length Dial ...24 Stretch Stitching ...24 Stitch Width Dial ...25 Reverse Sewing Lever ...25 THREADING THE MACHINE 26 Winding the Bobbin ...26 Lower Threading ...28 Lower Threading (for models...
... Needle ...16 Changing the Presser Foot ...18 Flat Bed Attachment ...19 Using a Free-arm Style ...19 THE CONTROLS ...20 Pattern Selection Dial ...20 Patterns and Stitch Names ...21 Stitch Length Dial ...24 Stretch Stitching ...24 Stitch Width Dial ...25 Reverse Sewing Lever ...25 THREADING THE MACHINE 26 Winding the Bobbin ...26 Lower Threading ...28 Lower Threading (for models...

Users Manual - English and Spanish
Page 8
USING ATTACHMENTS AND APPLICATIONS 56 Zipper Insertion ...56 Gathering ...57 Darning ...58 Appliqués ...58 Monogramming and Embroidering ...59 OPTIONAL ACCESSORIES 62 Using the Walking Foot ...62 Using the Quilting Foot ...63 Using the 1/4-inch Quilting Foot ...65 Using the Narrow Hemmer Foot ...65 Using the Blind Stitch Foot ...67 6. 5. APPENDIX ...69 MAINTENANCE ...69 Changing the Light Bulb ...69 Cleaning ...70 Troubleshooting ...72 INDEX ...79 7
USING ATTACHMENTS AND APPLICATIONS 56 Zipper Insertion ...56 Gathering ...57 Darning ...58 Appliqués ...58 Monogramming and Embroidering ...59 OPTIONAL ACCESSORIES 62 Using the Walking Foot ...62 Using the Quilting Foot ...63 Using the 1/4-inch Quilting Foot ...65 Using the Narrow Hemmer Foot ...65 Using the Blind Stitch Foot ...67 6. 5. APPENDIX ...69 MAINTENANCE ...69 Changing the Light Bulb ...69 Cleaning ...70 Troubleshooting ...72 INDEX ...79 7
Users Manual - English and Spanish
Page 11
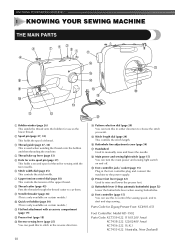
... YOUR SEWING MACHINE 1 KNOWING YOUR SEWING MACHINE THE MAIN PARTS 1 Bobbin winder (page 26) This winds the thread onto the bobbin for use this in either direction to choose the stitch you want. H Main power and sewing light switch (page 15) You can turn the main power and sewing light ...page 52) Lower the buttonhole lever when sewing buttonholes. Parts Code for sewing with accessory compartment (page 19) B Presser foot (page 18) C Reverse sewing lever (page 25) You can push this to stitch in the foot controller plug and connect the machine to manually raise and lower the needle. ...
... YOUR SEWING MACHINE 1 KNOWING YOUR SEWING MACHINE THE MAIN PARTS 1 Bobbin winder (page 26) This winds the thread onto the bobbin for use this in either direction to choose the stitch you want. H Main power and sewing light switch (page 15) You can turn the main power and sewing light ...page 52) Lower the buttonhole lever when sewing buttonholes. Parts Code for sewing with accessory compartment (page 19) B Presser foot (page 18) C Reverse sewing lever (page 25) You can push this to stitch in the foot controller plug and connect the machine to manually raise and lower the needle. ...

Users Manual - English and Spanish
Page 19
... cambiar el pie prensatela, apague la máquina. Baje la palanca del pie prensatela y ajuste el pie en la lengüeta. KNOWING YOUR SEWING MACHINE / CONOZCA SU MÁQUINA DE COSER Changing the Presser Foot Cambio del pie prensatela CAUTION/PRECAUCIÓN ● Always turn off the power before ... the needle may strike the presser foot and bend or break, and may cause injury. ● Only use the correct presser foot for the stitch pattern you have been designed to its highest position by 1 turning the handwheel toward you change the presser foot depending on Type / Tipo de ...
... cambiar el pie prensatela, apague la máquina. Baje la palanca del pie prensatela y ajuste el pie en la lengüeta. KNOWING YOUR SEWING MACHINE / CONOZCA SU MÁQUINA DE COSER Changing the Presser Foot Cambio del pie prensatela CAUTION/PRECAUCIÓN ● Always turn off the power before ... the needle may strike the presser foot and bend or break, and may cause injury. ● Only use the correct presser foot for the stitch pattern you have been designed to its highest position by 1 turning the handwheel toward you change the presser foot depending on Type / Tipo de ...
Users Manual - English and Spanish
Page 37
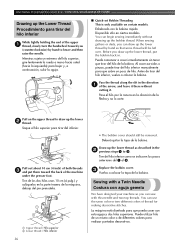
..., vuelva a colocar la bobina. Saque el hilo superior para tirar del inferior. Draw up the lower 2 thread. Sewing with a Twin Needle Costura con aguja gemela We have designed your machine so you can use the same color or two different colors of the arrow, and leave it . La má...This is only available on the upper thread to draw up the lower thread as described in the direction 1 of thread for making decorative stitches. KNOWING YOUR SEWING MACHINE / CONOZCA SU MÁQUINA DE COSER Drawing up the lower thread, put them toward you (counterclockwise) by hand so that some ...
..., vuelva a colocar la bobina. Saque el hilo superior para tirar del inferior. Draw up the lower 2 thread. Sewing with a Twin Needle Costura con aguja gemela We have designed your machine so you can use the same color or two different colors of the arrow, and leave it . La má...This is only available on the upper thread to draw up the lower thread as described in the direction 1 of thread for making decorative stitches. KNOWING YOUR SEWING MACHINE / CONOZCA SU MÁQUINA DE COSER Drawing up the lower thread, put them toward you (counterclockwise) by hand so that some ...
Users Manual - English and Spanish
Page 44
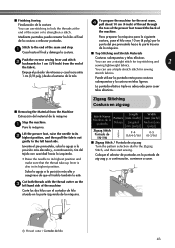
... parte trasera de la máquina. ■ Top Stitching and Stretch Materials Push the reverse sewing lever and stitch 2 backwards for 1 cm (3/8 inch) from the Machine Extracción del material de la máquina Stop the machine. 1 Pare la máquina. To prepare the machine for top stitching and 2 sewing lightweight fabrics. Costuras sobrepuestas y telas elásticas...
... parte trasera de la máquina. ■ Top Stitching and Stretch Materials Push the reverse sewing lever and stitch 2 backwards for 1 cm (3/8 inch) from the Machine Extracción del material de la máquina Stop the machine. 1 Pare la máquina. To prepare the machine for top stitching and 2 sewing lightweight fabrics. Costuras sobrepuestas y telas elásticas...
Users Manual - English and Spanish
Page 67
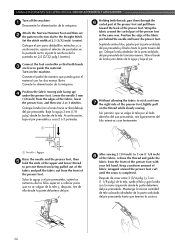
...to stick out from the front of the fabric, lower the presser foot, and then sew 2 or 3 stitches. Keep a uniform amount of the fabric just behind the needle and lower the presser foot... baje el pie prensatela y cosa 2 ó 3 puntadas. 1 Holding both hands 3 are free to the Straight Stitch. Suba la aguja y el pie prensatela, sujete los extremos de los hilos superior e inferior para ...the seam is completed. USING ATTACHMENTS AND APPLICATIONS / USO DE ACCESORIOS Y APLICACIONES Turn off the machine. 1 Desconecte la alimentación de la máquina. Attach the Narrow Hemmer Foot and...
...to stick out from the front of the fabric, lower the presser foot, and then sew 2 or 3 stitches. Keep a uniform amount of the fabric just behind the needle and lower the presser foot... baje el pie prensatela y cosa 2 ó 3 puntadas. 1 Holding both hands 3 are free to the Straight Stitch. Suba la aguja y el pie prensatela, sujete los extremos de los hilos superior e inferior para ...the seam is completed. USING ATTACHMENTS AND APPLICATIONS / USO DE ACCESORIOS Y APLICACIONES Turn off the machine. 1 Desconecte la alimentación de la máquina. Attach the Narrow Hemmer Foot and...
Users Manual - English and Spanish
Page 68
... 3-5 (1/64-1/16) (1/8-3/16) This foot comes in handy not only for blind hem stitching, but also for sewing fabric edges and seams. Este pie resulta útil no se podrá coser una costura triple Using the Blind Stitch Foot Utilización del pie para puntada invisible Pull the fabric held in your... right hand to the right in order to be from the edge of fabric wrapped in the presser foot curl. Attach the Blind Stitch Foot. 2 Turn on the machine. Al mismo tiempo, guíe con cuidado la tela que sobra hacia la izquierda con la mano izquierda. Coloque la aguja a...
... 3-5 (1/64-1/16) (1/8-3/16) This foot comes in handy not only for blind hem stitching, but also for sewing fabric edges and seams. Este pie resulta útil no se podrá coser una costura triple Using the Blind Stitch Foot Utilización del pie para puntada invisible Pull the fabric held in your... right hand to the right in order to be from the edge of fabric wrapped in the presser foot curl. Attach the Blind Stitch Foot. 2 Turn on the machine. Al mismo tiempo, guíe con cuidado la tela que sobra hacia la izquierda con la mano izquierda. Coloque la aguja a...

Users Manual - English and Spanish
Page 69
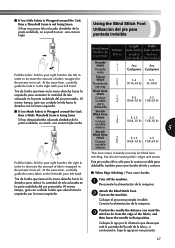
.... 2 Turn on Blind Hem Stitching, see page 45. Conecte la alimentación de la máquina. Set the pattern selection dial to the Straight 3 Stitch, and then set the stitch width at 2.5 (3/32 inch) (center). Lower the presser foot and begin sewing. 6 Baje el pie prensatela y comience a coser.... 1 Screw / Tornillo 2 Guide / Guía ■ When Sewing Seams / Para coser costuras Turn off the machine. 1 Desconecte la ...
.... 2 Turn on Blind Hem Stitching, see page 45. Conecte la alimentación de la máquina. Set the pattern selection dial to the Straight 3 Stitch, and then set the stitch width at 2.5 (3/32 inch) (center). Lower the presser foot and begin sewing. 6 Baje el pie prensatela y comience a coser.... 1 Screw / Tornillo 2 Guide / Guía ■ When Sewing Seams / Para coser costuras Turn off the machine. 1 Desconecte la ...
Users Manual - English and Spanish
Page 73
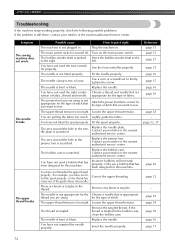
... machine in . The bobbin-winder shaft is pushed Move the bobbin-winder shaft to the to firmly tighten the screw. The needle clamp screw is tangled. Replace the needle. The presser foot you want to sew. Attach the presser foot that is correct for the type of stitch...fitted the spool properly, or the thread has Correct the upper threading. Incorrect bobbins will not work . Replace the needle. Symptom The sewing machine does not work properly. The main power switch is too tight. The upper thread tension is turned off. Lightly guide the fabric. Replace...
... machine in . The bobbin-winder shaft is pushed Move the bobbin-winder shaft to the to firmly tighten the screw. The needle clamp screw is tangled. Replace the needle. The presser foot you want to sew. Attach the presser foot that is correct for the type of stitch...fitted the spool properly, or the thread has Correct the upper threading. Incorrect bobbins will not work . Replace the needle. Symptom The sewing machine does not work properly. The main power switch is too tight. The upper thread tension is turned off. Lightly guide the fabric. Replace...
Users Manual - English and Spanish
Page 74
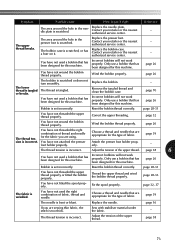
... retailer or the nearest authorized service center. - The bobbin case is tangled. Only use a bobbin that has been designed for this machine. page 26 You have not attached the presser foot holder properly. The thread is scratched, or has a burr on it right Reference.... Only use a bobbin that has been designed for this machine. Choose a thread and needle that has been designed for the fabric you are using. page 16 If you are sewing thin fabric, the stitch is incorrect. Sew with stabiliser material under the fabric. - Replace the presser ...
... retailer or the nearest authorized service center. - The bobbin case is tangled. Only use a bobbin that has been designed for this machine. page 26 You have not attached the presser foot holder properly. The thread is scratched, or has a burr on it right Reference.... Only use a bobbin that has been designed for this machine. Choose a thread and needle that has been designed for the fabric you are using. page 16 If you are sewing thin fabric, the stitch is incorrect. Sew with stabiliser material under the fabric. - Replace the presser ...
Users Manual - English and Spanish
Page 75
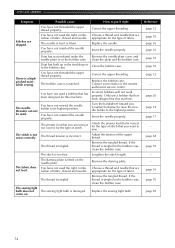
... has been designed for the type of fabric, thread and needle. Insert the needle properly. The stitch is a highpitched noise while sewing. Replace the sewing light bulb. Stitches are using is scratched. You have not threaded the upper thread properly. Insert the needle properly. ...There is not sewn correctly. The bobbin case is not correct for this machine. Remove the tangled thread....
... has been designed for the type of fabric, thread and needle. Insert the needle properly. The stitch is a highpitched noise while sewing. Replace the sewing light bulb. Stitches are using is scratched. You have not threaded the upper thread properly. Insert the needle properly. ...There is not sewn correctly. The bobbin case is not correct for this machine. Remove the tangled thread....
Users Manual - English and Spanish
Page 80
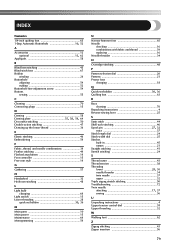
... screw 54 Buttons sewing 55 C Cleaning 70 Connecting plugs 15 D Darning 58 Darning plate 55, 58, 59, 64 Decorative stitching 50 Double action stitching 47 Drawing up the lower thread 36 E Elastic stitching 46 Embroidering 59 F Fabric, thread, and needle combinations 39 Feather stitching 49 Flat bed attachment 19 Foot controller 15 Free-arm style 19 G Gathering...
... screw 54 Buttons sewing 55 C Cleaning 70 Connecting plugs 15 D Darning 58 Darning plate 55, 58, 59, 64 Decorative stitching 50 Double action stitching 47 Drawing up the lower thread 36 E Elastic stitching 46 Embroidering 59 F Fabric, thread, and needle combinations 39 Feather stitching 49 Flat bed attachment 19 Foot controller 15 Free-arm style 19 G Gathering...


