Users Manual - English and Spanish
Page 2
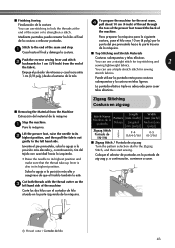
... machine only for use as contained in the needle area, such as a toy. Replace the bulb with any other user servicing adjustments mentioned in the instruction manual. 16. Always unplug the machine before cleaning. 2. Do not operate where aerosol (spray) products are being administered. 8. Use this machine. Special care is being used as threading needle, changing needle, threading bobbin, or changing presser foot, and the like. 15. It may deflect the needle, causing it off , then remove...
... machine only for use as contained in the needle area, such as a toy. Replace the bulb with any other user servicing adjustments mentioned in the instruction manual. 16. Always unplug the machine before cleaning. 2. Do not operate where aerosol (spray) products are being administered. 8. Use this machine. Special care is being used as threading needle, changing needle, threading bobbin, or changing presser foot, and the like. 15. It may deflect the needle, causing it off , then remove...

Users Manual - English and Spanish
Page 4
...pin plug fitted. Always replace the fuse cover. IMPORTANT If the available socket outlet is marked with this equipment, it should be connected to BS 1362, i.e. Never use...must be destroyed as a plug with bared flexible cords is marked with the coloured markings identifying the ...replacing the plug fuse, use plugs with a three-pin non-rewireable BS plug then please read the following code: Blue Neutral Brown Live As the colours of this appliance may not correspond with the letter 'N' or coloured black or blue. FOR USERS IN THE UK, EIRE, MALTA AND CYPRUS ONLY If this machine...
...pin plug fitted. Always replace the fuse cover. IMPORTANT If the available socket outlet is marked with this equipment, it should be connected to BS 1362, i.e. Never use...must be destroyed as a plug with bared flexible cords is marked with the coloured markings identifying the ...replacing the plug fuse, use plugs with a three-pin non-rewireable BS plug then please read the following code: Blue Neutral Brown Live As the colours of this appliance may not correspond with the letter 'N' or coloured black or blue. FOR USERS IN THE UK, EIRE, MALTA AND CYPRUS ONLY If this machine...
Users Manual - English and Spanish
Page 5
... conditions. You may have stopped using the machine •If you are replacing or removing the needle or any other part •If there is designed to be repaired. ● Este material de embalaje está diseñado para evitar daños. If you are sewing. To use extension cords. Do not store anything on the foot controller. 4. Para desembalar y reembalar la máquina...
... conditions. You may have stopped using the machine •If you are replacing or removing the needle or any other part •If there is designed to be repaired. ● Este material de embalaje está diseñado para evitar daños. If you are sewing. To use extension cords. Do not store anything on the foot controller. 4. Para desembalar y reembalar la máquina...
Users Manual - English and Spanish
Page 7
... the Presser Foot ...18 Flat Bed Attachment ...19 Using a Free-arm Style ...19 THE CONTROLS ...20 Pattern Selection Dial ...20 Patterns and Stitch Names ...21 Stitch Length Dial ...24 Stretch Stitching ...24 Stitch Width Dial ...25 Reverse Sewing Lever ...25 THREADING THE MACHINE 26 Winding the Bobbin ...26 Lower Threading ...28 Lower Threading (for models equipped with a quick-set bobbin 30 Upper Threading ...32 Using the Needle Threader (for models equipped with a needle threader 34 Drawing up the Lower Thread ...36 Sewing with a Twin Needle ...36 Thread Tension ...38 FABRIC, THREAD, AND...
... the Presser Foot ...18 Flat Bed Attachment ...19 Using a Free-arm Style ...19 THE CONTROLS ...20 Pattern Selection Dial ...20 Patterns and Stitch Names ...21 Stitch Length Dial ...24 Stretch Stitching ...24 Stitch Width Dial ...25 Reverse Sewing Lever ...25 THREADING THE MACHINE 26 Winding the Bobbin ...26 Lower Threading ...28 Lower Threading (for models equipped with a quick-set bobbin 30 Upper Threading ...32 Using the Needle Threader (for models equipped with a needle threader 34 Drawing up the Lower Thread ...36 Sewing with a Twin Needle ...36 Thread Tension ...38 FABRIC, THREAD, AND...

Users Manual - English and Spanish
Page 8
5. APPENDIX ...69 MAINTENANCE ...69 Changing the Light Bulb ...69 Cleaning ...70 Troubleshooting ...72 INDEX ...79 7 USING ATTACHMENTS AND APPLICATIONS 56 Zipper Insertion ...56 Gathering ...57 Darning ...58 Appliqués ...58 Monogramming and Embroidering ...59 OPTIONAL ACCESSORIES 62 Using the Walking Foot ...62 Using the Quilting Foot ...63 Using the 1/4-inch Quilting Foot ...65 Using the Narrow Hemmer Foot ...65 Using the Blind Stitch Foot ...67 6.
5. APPENDIX ...69 MAINTENANCE ...69 Changing the Light Bulb ...69 Cleaning ...70 Troubleshooting ...72 INDEX ...79 7 USING ATTACHMENTS AND APPLICATIONS 56 Zipper Insertion ...56 Gathering ...57 Darning ...58 Appliqués ...58 Monogramming and Embroidering ...59 OPTIONAL ACCESSORIES 62 Using the Walking Foot ...62 Using the Quilting Foot ...63 Using the 1/4-inch Quilting Foot ...65 Using the Narrow Hemmer Foot ...65 Using the Blind Stitch Foot ...67 6.
Users Manual - English and Spanish
Page 11
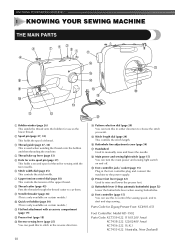
... off. E Stitch length dial (page 24) This controls the stitch length. H Main power and sewing light switch (page 15) You can turn this to control the sewing speed, and to start and stop sewing. J Presser foot lever (page 32) Used to raise and lower the presser foot. KNOWING YOUR SEWING MACHINE 1 KNOWING YOUR SEWING MACHINE THE MAIN PARTS 1 Bobbin winder (page 26) This winds the thread onto the bobbin for use this in the foot controller plug and connect the machine to manually raise and lower the needle.
... off. E Stitch length dial (page 24) This controls the stitch length. H Main power and sewing light switch (page 15) You can turn this to control the sewing speed, and to start and stop sewing. J Presser foot lever (page 32) Used to raise and lower the presser foot. KNOWING YOUR SEWING MACHINE 1 KNOWING YOUR SEWING MACHINE THE MAIN PARTS 1 Bobbin winder (page 26) This winds the thread onto the bobbin for use this in the foot controller plug and connect the machine to manually raise and lower the needle.
Users Manual - English and Spanish
Page 13
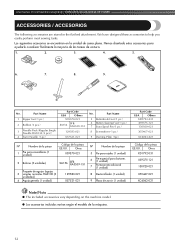
...Part Name 1 Zipper foot (1 pc.) 2 Bobbin (3 pcs.) 3 Needle Pack (Regular Single Needle HAX130 (3 pcs.)) 4 Twin Needle (1 pc.) Part Code USA Others X59370-021 SA156 SFB: XA5539-151 129583-021 X57521-021 No. We have designed these accessories to help you easily perform most sewing tasks. Hemos diseñado estos accesorios para... se encuentran en la unidad de cama plana. Part Name 5 Buttonhole Foot (1 pc.) 6 Button Sewing Foot (1 pc.) 7 Extra Spool Pin (1 pc.) 8 Screwdriver (1 pc.) 9 Darning Plate (1pc.) Part Code USA Others XD1792-031 X59375-121 130920-021 X55467...
...Part Name 1 Zipper foot (1 pc.) 2 Bobbin (3 pcs.) 3 Needle Pack (Regular Single Needle HAX130 (3 pcs.)) 4 Twin Needle (1 pc.) Part Code USA Others X59370-021 SA156 SFB: XA5539-151 129583-021 X57521-021 No. We have designed these accessories to help you easily perform most sewing tasks. Hemos diseñado estos accesorios para... se encuentran en la unidad de cama plana. Part Name 5 Buttonhole Foot (1 pc.) 6 Button Sewing Foot (1 pc.) 7 Extra Spool Pin (1 pc.) 8 Screwdriver (1 pc.) 9 Darning Plate (1pc.) Part Code USA Others XD1792-031 X59375-121 130920-021 X55467...

Users Manual - English and Spanish
Page 19
... a different presser foot on the controller, the machine will have chosen. KNOWING YOUR SEWING MACHINE / CONOZCA SU MÁQUINA DE COSER Changing the Presser Foot Cambio del pie prensatela CAUTION/PRECAUCIÓN ● Always turn off the power before you (counterclockwise), and then raise the presser foot lever. Press the black button at the back of the 2 presser foot holder to change the presser foot. If you use the wrong presser foot, the needle may...
... a different presser foot on the controller, the machine will have chosen. KNOWING YOUR SEWING MACHINE / CONOZCA SU MÁQUINA DE COSER Changing the Presser Foot Cambio del pie prensatela CAUTION/PRECAUCIÓN ● Always turn off the power before you (counterclockwise), and then raise the presser foot lever. Press the black button at the back of the 2 presser foot holder to change the presser foot. If you use the wrong presser foot, the needle may...
Users Manual - English and Spanish
Page 27
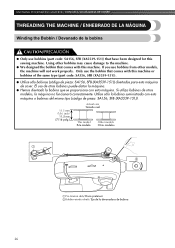
... otros modelos, la máquina no funcionará correctamente. Using other models, the machine will not work properly. KNOWING YOUR SEWING MACHINE / CONOZCA SU MÁQUINA DE COSER THREADING THE MACHINE / ENHEBRADO DE LA MÁQUINA Winding the Bobbin / Devanado de la bobina CAUTION/PRECAUCIÓN ● Only use bobbins from other bobbins may cause damage to the machine. ● We designed the bobbin that comes with this sewing machine.
... otros modelos, la máquina no funcionará correctamente. Using other models, the machine will not work properly. KNOWING YOUR SEWING MACHINE / CONOZCA SU MÁQUINA DE COSER THREADING THE MACHINE / ENHEBRADO DE LA MÁQUINA Winding the Bobbin / Devanado de la bobina CAUTION/PRECAUCIÓN ● Only use bobbins from other bobbins may cause damage to the machine. ● We designed the bobbin that comes with this sewing machine.
Users Manual - English and Spanish
Page 37
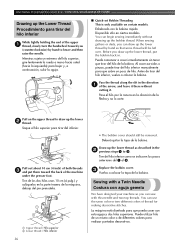
... 2 Lower thread / Hilo inferior 36 • The bobbin cover should still be left over. Replace the bobbin cover. 3 Vuelva a colocar la tapa de la bobina. Draw up the lower 2 thread. La máquina está diseñada para que pueda coser con esta aguja y dos hilos superiores. KNOWING YOUR SEWING MACHINE / CONOZCA SU MÁQUINA DE COSER Drawing up the Lower Thread Procedimiento para tirar del hilo inferior While lightly...
... 2 Lower thread / Hilo inferior 36 • The bobbin cover should still be left over. Replace the bobbin cover. 3 Vuelva a colocar la tapa de la bobina. Draw up the lower 2 thread. La máquina está diseñada para que pueda coser con esta aguja y dos hilos superiores. KNOWING YOUR SEWING MACHINE / CONOZCA SU MÁQUINA DE COSER Drawing up the Lower Thread Procedimiento para tirar del hilo inferior While lightly...
Users Manual - English and Spanish
Page 44
... en la puntada de zig-zag y, a continuación, comience a coser. 1 Thread cutter / Cortador de hilo 43 Puede utilizar la puntada recta para costuras sobrepuestas y la costura en telas ligeras. Mediante puntadas puede rematar los hilos al final de la costura o reforzar puntadas. You can use a straight stitch for sewing stretch fabrics. Zigzag Stitching Costura en zig-zag Stitch Name Nombre de la puntada Zigzag Stitch Puntada de zig-zag Pattern Dibujo Length [mm (inch)] Longitud...
... en la puntada de zig-zag y, a continuación, comience a coser. 1 Thread cutter / Cortador de hilo 43 Puede utilizar la puntada recta para costuras sobrepuestas y la costura en telas ligeras. Mediante puntadas puede rematar los hilos al final de la costura o reforzar puntadas. You can use a straight stitch for sewing stretch fabrics. Zigzag Stitching Costura en zig-zag Stitch Name Nombre de la puntada Zigzag Stitch Puntada de zig-zag Pattern Dibujo Length [mm (inch)] Longitud...
Users Manual - English and Spanish
Page 67
.... USING ATTACHMENTS AND APPLICATIONS / USO DE ACCESORIOS Y APLICACIONES Turn off the machine. 1 Desconecte la alimentación de la máquina. Connect the foot controller so that both threads, pass them through the 6 curled part of the presser foot and pull them from being pulled out of the fabric and pull the fabric out from the front of the upper and lower thread to the Straight Stitch...
.... USING ATTACHMENTS AND APPLICATIONS / USO DE ACCESORIOS Y APLICACIONES Turn off the machine. 1 Desconecte la alimentación de la máquina. Connect the foot controller so that both threads, pass them through the 6 curled part of the presser foot and pull them from being pulled out of the fabric and pull the fabric out from the front of the upper and lower thread to the Straight Stitch...
Users Manual - English and Spanish
Page 68
... same time, carefully guide the extra fabric to be from the edge of the fabric, and then lower the needle in that position. Stitch Name Nombre de la puntada Pattern Dibujo Length Width [mm (inch)] [mm (inch)] Longitud Anchura [mm (pulg.)] [mm (pulg.)] Straight Stitch Puntada recta Any Any Cualquiera Cualquiera Zigzag Stitch Puntada de zig-zag 1-4 0-5 (1/16-3/16) (0-3/16) Blind Hem Stitch Costura invisible para dobladillo F-2 3-5 (1/64-1/16) (1/8-3/16) Stretch Blind Hem Stitch...
... same time, carefully guide the extra fabric to be from the edge of the fabric, and then lower the needle in that position. Stitch Name Nombre de la puntada Pattern Dibujo Length Width [mm (inch)] [mm (inch)] Longitud Anchura [mm (pulg.)] [mm (pulg.)] Straight Stitch Puntada recta Any Any Cualquiera Cualquiera Zigzag Stitch Puntada de zig-zag 1-4 0-5 (1/16-3/16) (0-3/16) Blind Hem Stitch Costura invisible para dobladillo F-2 3-5 (1/64-1/16) (1/8-3/16) Stretch Blind Hem Stitch...

Users Manual - English and Spanish
Page 69
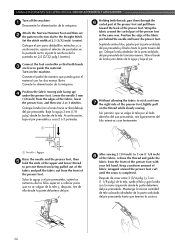
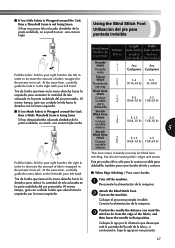
... Blind Hem Stitching Para coser costuras invisibles para dobladillo 3 3 4 4 1 2 1 With medium weight fabrics / Con telas medianas 2 With heavyweight fabrics / Con telas pesadas 3 Right side of fabric / Tela del derecho 4 Wrong side of the fabric. Lower the presser foot and begin sewing. 6 Baje el pie prensatela y comience a coser. 1 Screw / Tornillo 2 Guide / Guía ■ When Sewing Seams / Para coser costuras Turn off the machine. 1 Desconecte la alimentación de la máquina. Attach the Blind Stitch Foot...
... Blind Hem Stitching Para coser costuras invisibles para dobladillo 3 3 4 4 1 2 1 With medium weight fabrics / Con telas medianas 2 With heavyweight fabrics / Con telas pesadas 3 Right side of fabric / Tela del derecho 4 Wrong side of the fabric. Lower the presser foot and begin sewing. 6 Baje el pie prensatela y comience a coser. 1 Screw / Tornillo 2 Guide / Guía ■ When Sewing Seams / Para coser costuras Turn off the machine. 1 Desconecte la alimentación de la máquina. Attach the Blind Stitch Foot...
Users Manual - English and Spanish
Page 73
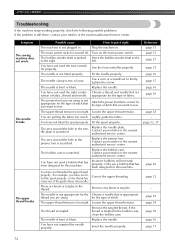
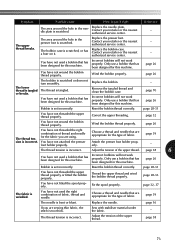
.... Replace the needle plate. You have not fitted the spool properly, or the thread has Correct the upper threading. The needle is scratched. You have not fitted the spool properly. Turn on the main power switch. Use the foot controller properly. The bobbin case is bent or blunt. Lightly guide the fabric. Replace the bobbin case. If the thread is tangled in . The needle is tangled. The upper thread breaks. Incorrect bobbins will not work . page 38 - Attach the presser foot...
.... Replace the needle plate. You have not fitted the spool properly, or the thread has Correct the upper threading. The needle is scratched. You have not fitted the spool properly. Turn on the main power switch. Use the foot controller properly. The bobbin case is bent or blunt. Lightly guide the fabric. Replace the bobbin case. If the thread is tangled in . The needle is tangled. The upper thread breaks. Incorrect bobbins will not work . page 38 - Attach the presser foot...
Users Manual - English and Spanish
Page 74
... the hole in the needle plate is tangled. The thread tension is tangled or breaks. page 38 73 Contact your retailer or the nearest authorized service center. - page 26 The lower thread is incorrect. page 70 page 26 Bobbin is bent or blunt. Reset the bobbin thread correctly. Wind the bobbin thread properly. Only use a bobbin that are sewing thin fabric, the stitch is wrinkled. page 39 The needle is set incorrectly. Adjust the tension...
... the hole in the needle plate is tangled. The thread tension is tangled or breaks. page 38 73 Contact your retailer or the nearest authorized service center. - page 26 The lower thread is incorrect. page 70 page 26 Bobbin is bent or blunt. Reset the bobbin thread correctly. Wind the bobbin thread properly. Only use a bobbin that are sewing thin fabric, the stitch is wrinkled. page 39 The needle is set incorrectly. Adjust the tension...
Users Manual - English and Spanish
Page 75
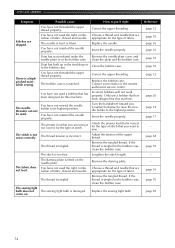
... position. The needle threader can not be used. Insert the needle properly. Remove the darning plate. Stitches are appropriate for the type of the upper thread. Choose a thread and needle that you (counterclockwise) to raise the needle holder to the highest position. The thread is damaged. The sewing light bulb does not The sewing light bulb is tangled. Insert the needle properly. Dust has accumulated under the Remove the needle plate cover and needle plate or in the bobbin case. You have not threaded the upper thread properly. come...
... position. The needle threader can not be used. Insert the needle properly. Remove the darning plate. Stitches are appropriate for the type of the upper thread. Choose a thread and needle that you (counterclockwise) to raise the needle holder to the highest position. The thread is damaged. The sewing light bulb does not The sewing light bulb is tangled. Insert the needle properly. Dust has accumulated under the Remove the needle plate cover and needle plate or in the bobbin case. You have not threaded the upper thread properly. come...
Users Manual - English and Spanish
Page 80
... quick-set bobbin 30 36 M Main parts 10 Main power 15 Maintenance 69 Monogramming 59 N Narrow hemmer foot 65 Needle checking 16 combinations with fabric and thread 39 replacing 16 Needle threader 34 O Overedge stitching 48 P Pattern selection dial 20 Patterns 21 Presser foot changing 18 Q , Quick-set bobbin 30 36 Quilting foot 63 R Race cleaning 70 Repacking instructions 4 Reverse sewing lever 25 S Satin stitch 44 Shell tuck stitching 46 , Spool pin 27 32 extra 37 Stitch length dial 24 Stitch width dial 25 Stitches built-in 45 names 21 Straight stitching 41 Stretch...
... quick-set bobbin 30 36 M Main parts 10 Main power 15 Maintenance 69 Monogramming 59 N Narrow hemmer foot 65 Needle checking 16 combinations with fabric and thread 39 replacing 16 Needle threader 34 O Overedge stitching 48 P Pattern selection dial 20 Patterns 21 Presser foot changing 18 Q , Quick-set bobbin 30 36 Quilting foot 63 R Race cleaning 70 Repacking instructions 4 Reverse sewing lever 25 S Satin stitch 44 Shell tuck stitching 46 , Spool pin 27 32 extra 37 Stitch length dial 24 Stitch width dial 25 Stitches built-in 45 names 21 Straight stitching 41 Stretch...

Users Manual - English and Spanish
Page 82
ENGLISH/SPANISH 885 -S28 /S29 XD1794-1211 Printed in China
ENGLISH/SPANISH 885 -S28 /S29 XD1794-1211 Printed in China


