Users Manual - English and Spanish
Page 2
... machine to the symbol "{" position to ensure that they do not play with this machine. This sewing machine is not intended for examination, repair, electrical or mechanical adjustment. 4. Always unplug the machine ... the light bulb. The machine should never be supervised to turn the machine switch to be taken, including the following: Read all moving parts. Never drop or insert any... SAFETY INSTRUCTIONS When using this machine, basic safety precautions should always be used as a toy. To reduce the risk of the machine and foot control free from the electrical outlet immediately ...
... machine to the symbol "{" position to ensure that they do not play with this machine. This sewing machine is not intended for examination, repair, electrical or mechanical adjustment. 4. Always unplug the machine ... the light bulb. The machine should never be supervised to turn the machine switch to be taken, including the following: Read all moving parts. Never drop or insert any... SAFETY INSTRUCTIONS When using this machine, basic safety precautions should always be used as a toy. To reduce the risk of the machine and foot control free from the electrical outlet immediately ...
Users Manual - English and Spanish
Page 5
...and unplug the cord in high humidity conditions. Do not use the machine safely 1. Do not store this packing material if you are using the machine •When you are sewing. Do not drop or hit the machine. 4 Plug the machine directly into the wall. Do not touch the handwheel, thread take...while you do not pack it properly, or do not use or store the machine near a heater, iron, halogen lamp or other moving parts. 2. If you are replacing or removing the needle or any other part •If there is designed to clean the case. PLEASE READ THESE INSTRUCTIONS ...
...and unplug the cord in high humidity conditions. Do not use the machine safely 1. Do not store this packing material if you are using the machine •When you are sewing. Do not drop or hit the machine. 4 Plug the machine directly into the wall. Do not touch the handwheel, thread take...while you do not pack it properly, or do not use or store the machine near a heater, iron, halogen lamp or other moving parts. 2. If you are replacing or removing the needle or any other part •If there is designed to clean the case. PLEASE READ THESE INSTRUCTIONS ...
Users Manual - English and Spanish
Page 7
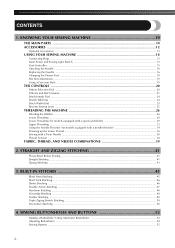
... Buttonholes ...54 Sewing Buttons ...55 6 KNOWING YOUR SEWING MACHINE 10 THE MAIN PARTS ...10 ACCESSORIES ...12 Optional Accessories ...13 USING YOUR SEWING MACHINE 14 Connecting Plugs ...15 Main Power and Sewing Light Switch ...15 Foot Controller ...15 Checking the Needle ...16 Replacing the Needle ...16 Changing the Presser Foot ...18 Flat Bed Attachment ...19 Using a Free-arm Style ...19...
... Buttonholes ...54 Sewing Buttons ...55 6 KNOWING YOUR SEWING MACHINE 10 THE MAIN PARTS ...10 ACCESSORIES ...12 Optional Accessories ...13 USING YOUR SEWING MACHINE 14 Connecting Plugs ...15 Main Power and Sewing Light Switch ...15 Foot Controller ...15 Checking the Needle ...16 Replacing the Needle ...16 Changing the Presser Foot ...18 Flat Bed Attachment ...19 Using a Free-arm Style ...19...
Users Manual - English and Spanish
Page 11
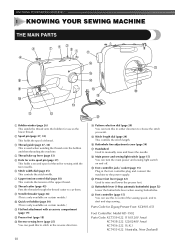
... in the reverse direction. 10 D Pattern selection dial (page 20) You can turn this to control the sewing speed, and to manually raise and lower the needle. KNOWING YOUR SEWING MACHINE 1 KNOWING YOUR SEWING MACHINE THE MAIN PARTS 1 Bobbin winder (page 26) This winds the thread onto the bobbin for use this in either direction to...
... in the reverse direction. 10 D Pattern selection dial (page 20) You can turn this to control the sewing speed, and to manually raise and lower the needle. KNOWING YOUR SEWING MACHINE 1 KNOWING YOUR SEWING MACHINE THE MAIN PARTS 1 Bobbin winder (page 26) This winds the thread onto the bobbin for use this in either direction to...
Users Manual - English and Spanish
Page 13
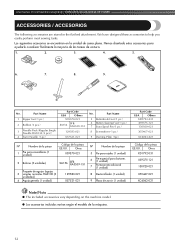
... (1 unidad) 9 Placa de zurcir (1 unidad) Código de la pieza EE.UU. Part Name 5 Buttonhole Foot (1 pc.) 6 Button Sewing Foot (1 pc.) 7 Extra Spool Pin (1 pc.) 8 Screwdriver (1 pc.) 9 Darning Plate (1pc.) Part Code USA Others XD1792-031 X59375-121 130920-021 X55467-021 XC6063-021 Nº Nombre de ...250;n el modelo de la máquina. 12 Los siguientes accesorios se encuentran en la unidad de cama plana. KNOWING YOUR SEWING MACHINE / CONOZCA SU MÁQUINA DE COSER ACCESSORIES / ACCESORIOS The following accessories are stored in the flat bed attachment. We ...
... (1 unidad) 9 Placa de zurcir (1 unidad) Código de la pieza EE.UU. Part Name 5 Buttonhole Foot (1 pc.) 6 Button Sewing Foot (1 pc.) 7 Extra Spool Pin (1 pc.) 8 Screwdriver (1 pc.) 9 Darning Plate (1pc.) Part Code USA Others XD1792-031 X59375-121 130920-021 X55467-021 XC6063-021 Nº Nombre de ...250;n el modelo de la máquina. 12 Los siguientes accesorios se encuentran en la unidad de cama plana. KNOWING YOUR SEWING MACHINE / CONOZCA SU MÁQUINA DE COSER ACCESSORIES / ACCESORIOS The following accessories are stored in the flat bed attachment. We ...

Users Manual - English and Spanish
Page 19
...the handwheel toward you want to be injured. ● Always use presser feet that the bar on the controller, the machine will have been designed to sew and how. Coloque otro pie prensatela en la placa de la aguja para que la varilla del pie quede alineada con ... la parte trasera del soporte del pie prensatela para soltar el pie prensatela. 1 Black button / Botón negro 2 Presser foot holder / Soporte del pie prensatela 3 Presser Foot / Pie prensatela Put a different presser foot on what you (counterclockwise), and then raise the presser foot lever. KNOWING YOUR SEWING MACHINE / ...
...the handwheel toward you want to be injured. ● Always use presser feet that the bar on the controller, the machine will have been designed to sew and how. Coloque otro pie prensatela en la placa de la aguja para que la varilla del pie quede alineada con ... la parte trasera del soporte del pie prensatela para soltar el pie prensatela. 1 Black button / Botón negro 2 Presser foot holder / Soporte del pie prensatela 3 Presser Foot / Pie prensatela Put a different presser foot on what you (counterclockwise), and then raise the presser foot lever. KNOWING YOUR SEWING MACHINE / ...
Users Manual - English and Spanish
Page 27
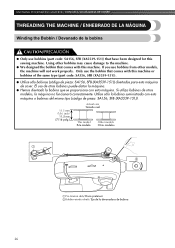
...)) diseñadas para esta máquina de coser. Using other models, the machine will not work properly. If you use bobbins (part code: SA156, SFB (XA5539-151)) that have been designed for this sewing machine. El uso de otras bobinas puede dañar la máquina. ●...con esta máquina. Si utiliza bobinas de otros modelos, la máquina no funcionará correctamente. KNOWING YOUR SEWING MACHINE / CONOZCA SU MÁQUINA DE COSER THREADING THE MACHINE / ENHEBRADO DE LA MÁQUINA Winding the Bobbin / Devanado de la bobina CAUTION/PRECAUCIÓN ● Only ...
...)) diseñadas para esta máquina de coser. Using other models, the machine will not work properly. If you use bobbins (part code: SA156, SFB (XA5539-151)) that have been designed for this sewing machine. El uso de otras bobinas puede dañar la máquina. ●...con esta máquina. Si utiliza bobinas de otros modelos, la máquina no funcionará correctamente. KNOWING YOUR SEWING MACHINE / CONOZCA SU MÁQUINA DE COSER THREADING THE MACHINE / ENHEBRADO DE LA MÁQUINA Winding the Bobbin / Devanado de la bobina CAUTION/PRECAUCIÓN ● Only ...
Users Manual - English and Spanish
Page 37
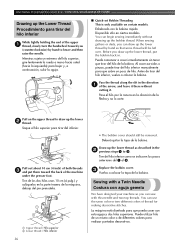
...zurcidos o pinzas, puede tirar del hilo inferior manualmente para que sobre un poco de hilo. You can sew with a Twin Needle Costura con aguja gemela We have designed your machine so you (counterclockwise) by hand so that some thread will be removed. Puede comenzar a coser inmediatamente sin... cm (4 pulg.) y colóquelos en la parte trasera de la máquina, debajo del pie prensatela. 1 Upper thread / Hilo superior 2 Lower thread / Hilo inferior 36 • The bobbin cover should still be left over. KNOWING YOUR SEWING MACHINE / CONOZCA SU MÁQUINA DE COSER Drawing up ...
...zurcidos o pinzas, puede tirar del hilo inferior manualmente para que sobre un poco de hilo. You can sew with a Twin Needle Costura con aguja gemela We have designed your machine so you (counterclockwise) by hand so that some thread will be removed. Puede comenzar a coser inmediatamente sin... cm (4 pulg.) y colóquelos en la parte trasera de la máquina, debajo del pie prensatela. 1 Upper thread / Hilo superior 2 Lower thread / Hilo inferior 36 • The bobbin cover should still be left over. KNOWING YOUR SEWING MACHINE / CONOZCA SU MÁQUINA DE COSER Drawing up ...
Users Manual - English and Spanish
Page 44
...Stitch / Puntada de zig-zag Turn the pattern selection dial to the left hand side of the machine. Lift the presser foot, raise the needle to its highest position. ■ Finishing Sewing Finalización de la costura You can use stitching to lock the threads at the end of ... pase el hilo unos 10 cm (4 pulg.) por la punta del pie prensatela hacia la parte trasera de la máquina. ■ Top Stitching and Stretch Materials Push the reverse sewing lever and stitch 2 backwards for sewing stretch fabrics. Empuje el pulsador de retroceso y cosa hacia atrás 1 cm (3/8 pulg...
...Stitch / Puntada de zig-zag Turn the pattern selection dial to the left hand side of the machine. Lift the presser foot, raise the needle to its highest position. ■ Finishing Sewing Finalización de la costura You can use stitching to lock the threads at the end of ... pase el hilo unos 10 cm (4 pulg.) por la punta del pie prensatela hacia la parte trasera de la máquina. ■ Top Stitching and Stretch Materials Push the reverse sewing lever and stitch 2 backwards for sewing stretch fabrics. Empuje el pulsador de retroceso y cosa hacia atrás 1 cm (3/8 pulg...
Users Manual - English and Spanish
Page 67
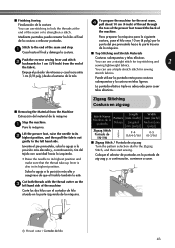
... baje el pie prensatela y cosa 2 ó 3 puntadas. 1 Holding both hands 3 are free to stick out from the front of the fabric just behind the needle and lower the presser foot...;e la tela con la mano izquierda desde la parte delantera del pie prensatela. USING ATTACHMENTS AND APPLICATIONS / USO DE ACCESORIOS Y APLICACIONES Turn off the machine. 1 Desconecte la alimentación de la m&#...225;quina. Conecte la alimentación de la máquina. Turn on the thread while slowly sewing. Position the fabric...
... baje el pie prensatela y cosa 2 ó 3 puntadas. 1 Holding both hands 3 are free to stick out from the front of the fabric just behind the needle and lower the presser foot...;e la tela con la mano izquierda desde la parte delantera del pie prensatela. USING ATTACHMENTS AND APPLICATIONS / USO DE ACCESORIOS Y APLICACIONES Turn off the machine. 1 Desconecte la alimentación de la m&#...225;quina. Conecte la alimentación de la máquina. Turn on the thread while slowly sewing. Position the fabric...
Users Manual - English and Spanish
Page 68
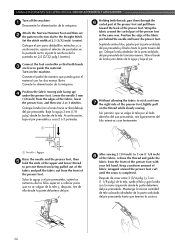
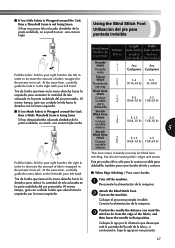
...para coser bordes de tela y costuras. ■ When Edge Stitching / Para coser bordes Turn off the machine. 1 Desconecte la alimentación de la máquina. Conecte la alimentación de la máquina. .... 2 Turn on the machine. ■ If too Little Fabric is Wrapped around the Curl, then a Wide Threefold Seam is not being Sewn Si hay demasiada tela colocada alrededor de la parte ondulada, se coserá..., and then lower the needle in handy not only for blind hem stitching, but also for sewing fabric edges and seams. Este pie resulta útil no se podrá coser una costura...
...para coser bordes de tela y costuras. ■ When Edge Stitching / Para coser bordes Turn off the machine. 1 Desconecte la alimentación de la máquina. Conecte la alimentación de la máquina. .... 2 Turn on the machine. ■ If too Little Fabric is Wrapped around the Curl, then a Wide Threefold Seam is not being Sewn Si hay demasiada tela colocada alrededor de la parte ondulada, se coserá..., and then lower the needle in handy not only for blind hem stitching, but also for sewing fabric edges and seams. Este pie resulta útil no se podrá coser una costura...


