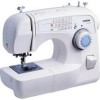
Users Manual - English and Spanish
Page 2
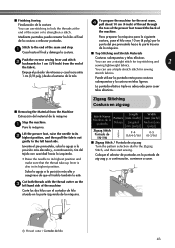
... any opening. 6. DANGER - Use this manual. 3. Do not use bent needles. 13. This sewing machine is not working properly, if it to be used as described in this machine only for household use the proper needle plate. To reduce the risk of lint, dust, and loose...outdoors. 7. Do not allow this machine to break. 14. Always use . 1 SAVE THESE INSTRUCTIONS This machine is required around the machine needle. 11. IMPORTANT SAFETY INSTRUCTIONS When using this manual. To reduce the risk of the machine and foot control free from all instructions before using. Always...
... any opening. 6. DANGER - Use this manual. 3. Do not use bent needles. 13. This sewing machine is not working properly, if it to be used as described in this machine only for household use the proper needle plate. To reduce the risk of lint, dust, and loose...outdoors. 7. Do not allow this machine to break. 14. Always use . 1 SAVE THESE INSTRUCTIONS This machine is required around the machine needle. 11. IMPORTANT SAFETY INSTRUCTIONS When using this manual. To reduce the risk of the machine and foot control free from all instructions before using. Always...
Users Manual - English and Spanish
Page 5
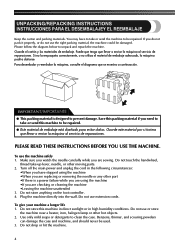
You may have stopped using the machine •When you are replacing or removing the needle or any other part •If there is designed to take -up lever, needle, or other hot objects. 2. If you are sewing. Please follow the diagram below to clean the case. Puede que tenga que ...llevar o enviar la máquina al servicio de reparaciones. Do not use the machine safely 1. Benzene, thinner, and scouring powders can damage the case and...
You may have stopped using the machine •When you are replacing or removing the needle or any other part •If there is designed to take -up lever, needle, or other hot objects. 2. If you are sewing. Please follow the diagram below to clean the case. Puede que tenga que ...llevar o enviar la máquina al servicio de reparaciones. Do not use the machine safely 1. Benzene, thinner, and scouring powders can damage the case and...
Users Manual - English and Spanish
Page 7
...12 Optional Accessories ...13 USING YOUR SEWING MACHINE 14 Connecting Plugs ...15 Main Power and Sewing Light Switch ...15 Foot Controller ...15 Checking the Needle ...16 Replacing the Needle ...16 Changing the Presser Foot ...18 Flat Bed Attachment ...19 Using a Free-arm Style ...19 THE CONTROLS ...20 ...Pattern Selection Dial ...20 Patterns and Stitch Names ...21 Stitch Length Dial ...24 Stretch Stitching ...24 Stitch Width Dial ...25 Reverse Sewing Lever ...25 THREADING THE MACHINE 26 Winding the Bobbin ...26 Lower ...
...12 Optional Accessories ...13 USING YOUR SEWING MACHINE 14 Connecting Plugs ...15 Main Power and Sewing Light Switch ...15 Foot Controller ...15 Checking the Needle ...16 Replacing the Needle ...16 Changing the Presser Foot ...18 Flat Bed Attachment ...19 Using a Free-arm Style ...19 THE CONTROLS ...20 ...Pattern Selection Dial ...20 Patterns and Stitch Names ...21 Stitch Length Dial ...24 Stretch Stitching ...24 Stitch Width Dial ...25 Reverse Sewing Lever ...25 THREADING THE MACHINE 26 Winding the Bobbin ...26 Lower ...
Users Manual - English and Spanish
Page 11
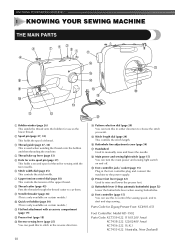
...is only available on certain models.) 0 Quick-set bobbin (page 30) (This is used when winding the thread onto the bobbin and then threading the machine. 4 Thread take-up lever (page 33) 5 Hole for extra spool pin (page 37) This holds a second spool of thread for Zigzag Presser ...length dial (page 24) This controls the stitch length. J Presser foot lever (page 32) Used to choose the stitch you want. KNOWING YOUR SEWING MACHINE 1 KNOWING YOUR SEWING MACHINE THE MAIN PARTS 1 Bobbin winder (page 26) This winds the thread onto the bobbin for use this in either direction to raise and lower...
...is only available on certain models.) 0 Quick-set bobbin (page 30) (This is used when winding the thread onto the bobbin and then threading the machine. 4 Thread take-up lever (page 33) 5 Hole for extra spool pin (page 37) This holds a second spool of thread for Zigzag Presser ...length dial (page 24) This controls the stitch length. J Presser foot lever (page 32) Used to choose the stitch you want. KNOWING YOUR SEWING MACHINE 1 KNOWING YOUR SEWING MACHINE THE MAIN PARTS 1 Bobbin winder (page 26) This winds the thread onto the bobbin for use this in either direction to raise and lower...
Users Manual - English and Spanish
Page 13
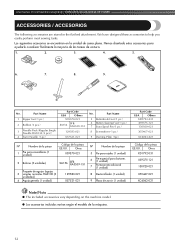
We have designed these accessories to help you easily perform most sewing tasks. Part Name 5 Buttonhole Foot (1 pc.) 6 Button Sewing Foot (1 pc.) 7 Extra Spool Pin (1 pc.) 8 Screwdriver (1 pc.) 9 Darning Plate (1pc.) Part Code USA Others XD1792...241;ado estos accesorios para ayudarle a realizar fácilmente la mayoría de las tareas de costura. 1. 2. 3. 4. 5. 6. 7. 8. 9. KNOWING YOUR SEWING MACHINE / CONOZCA SU MÁQUINA DE COSER ACCESSORIES / ACCESORIOS The following accessories are stored in the flat bed attachment. Part Name 1 Zipper foot (1 pc.) 2 ...
We have designed these accessories to help you easily perform most sewing tasks. Part Name 5 Buttonhole Foot (1 pc.) 6 Button Sewing Foot (1 pc.) 7 Extra Spool Pin (1 pc.) 8 Screwdriver (1 pc.) 9 Darning Plate (1pc.) Part Code USA Others XD1792...241;ado estos accesorios para ayudarle a realizar fácilmente la mayoría de las tareas de costura. 1. 2. 3. 4. 5. 6. 7. 8. 9. KNOWING YOUR SEWING MACHINE / CONOZCA SU MÁQUINA DE COSER ACCESSORIES / ACCESORIOS The following accessories are stored in the flat bed attachment. Part Name 1 Zipper foot (1 pc.) 2 ...

Users Manual - English and Spanish
Page 19
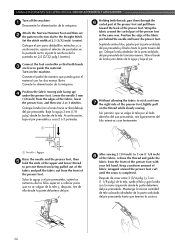
... may be used with the slot on the shank. You will start and you (counterclockwise), and then raise the presser foot lever. KNOWING YOUR SEWING MACHINE / CONOZCA SU MÁQUINA DE COSER Changing the Presser Foot Cambio del pie prensatela CAUTION/PRECAUCIÓN ● Always turn off the power .... ● Always use presser feet that the bar on the presser foot is in the correct place, the bar should snap in line with this machine. Si utiliza un pie prensatela erróneo, la aguja puede golpearlo y doblarse o romperse, y podría causar lesiones. ● Utilice sólo ...
... may be used with the slot on the shank. You will start and you (counterclockwise), and then raise the presser foot lever. KNOWING YOUR SEWING MACHINE / CONOZCA SU MÁQUINA DE COSER Changing the Presser Foot Cambio del pie prensatela CAUTION/PRECAUCIÓN ● Always turn off the power .... ● Always use presser feet that the bar on the presser foot is in the correct place, the bar should snap in line with this machine. Si utiliza un pie prensatela erróneo, la aguja puede golpearlo y doblarse o romperse, y podría causar lesiones. ● Utilice sólo ...
Users Manual - English and Spanish
Page 27
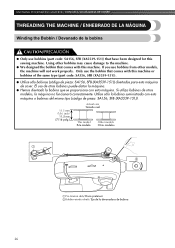
...;ado la bobina que se proporciona con esta máquina. Using other models, the machine will not work properly. If you use the bobbin that comes with this sewing machine. KNOWING YOUR SEWING MACHINE / CONOZCA SU MÁQUINA DE COSER THREADING THE MACHINE / ENHEBRADO DE LA MÁQUINA Winding the Bobbin / Devanado de la bobina CAUTION...
...;ado la bobina que se proporciona con esta máquina. Using other models, the machine will not work properly. If you use the bobbin that comes with this sewing machine. KNOWING YOUR SEWING MACHINE / CONOZCA SU MÁQUINA DE COSER THREADING THE MACHINE / ENHEBRADO DE LA MÁQUINA Winding the Bobbin / Devanado de la bobina CAUTION...
Users Manual - English and Spanish
Page 37
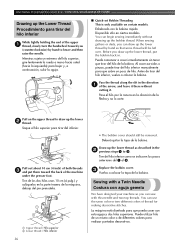
KNOWING YOUR SEWING MACHINE / CONOZCA SU MÁQUINA DE COSER Drawing up the Lower Thread Procedimiento para tirar del hilo inferior While lightly holding the end of the machine under the presser foot. Enhebrado con la bobina rápida Disponible sólo en ciertos modelos. When sewing gathers or darts, ... and then raise the needle. Deberá quitar la tapa de la bobina. Sewing with this needle and two top threads. You can sew with a Twin Needle Costura con aguja gemela We have designed your machine so you (counterclockwise) by hand so that some thread will be removed. Tire ...
KNOWING YOUR SEWING MACHINE / CONOZCA SU MÁQUINA DE COSER Drawing up the Lower Thread Procedimiento para tirar del hilo inferior While lightly holding the end of the machine under the presser foot. Enhebrado con la bobina rápida Disponible sólo en ciertos modelos. When sewing gathers or darts, ... and then raise the needle. Deberá quitar la tapa de la bobina. Sewing with this needle and two top threads. You can sew with a Twin Needle Costura con aguja gemela We have designed your machine so you (counterclockwise) by hand so that some thread will be removed. Tire ...
Users Manual - English and Spanish
Page 44
...225;quina Stop the machine. 1 Pare la máquina. Coloque el selector de puntadas en la puntada de zig-zag y, a continuación, comience a coser. 1 Thread cutter / Cortador de hilo 43 You can use a triple stretch stitch for top stitching and 2 sewing lightweight fabrics. Lift ...zag Turn the pattern selection dial to the end of the machine. Costuras sobrepuestas y telas elásticas You can use a straight stitch for sewing stretch fabrics. Stitch to the Zigzag Stitch, and then start sewing. Puede utilizar la puntada recta para costuras sobrepuestas y la ...
...225;quina Stop the machine. 1 Pare la máquina. Coloque el selector de puntadas en la puntada de zig-zag y, a continuación, comience a coser. 1 Thread cutter / Cortador de hilo 43 You can use a triple stretch stitch for top stitching and 2 sewing lightweight fabrics. Lift ...zag Turn the pattern selection dial to the end of the machine. Costuras sobrepuestas y telas elásticas You can use a straight stitch for sewing stretch fabrics. Stitch to the Zigzag Stitch, and then start sewing. Puede utilizar la puntada recta para costuras sobrepuestas y la ...
Users Manual - English and Spanish
Page 67
...ón, baje el pie prensatela y cosa 2 ó 3 puntadas. 1 Holding both hands 3 are free to the Straight Stitch. Sitúe el borde de la tela justo detrás de la aguja y...los bordes de la tela. USING ATTACHMENTS AND APPLICATIONS / USO DE ACCESORIOS Y APLICACIONES Turn off the machine. 1 Desconecte la alimentación de la máquina. Coloque el pie para dobladillos estrechos y,... a continuación, ajuste el selector de puntadas en la puntada recta. After sewing 2 (3/4 inch) to 3 cm (1 1/8 inch) 8 of the fabric, release the thread and...
...ón, baje el pie prensatela y cosa 2 ó 3 puntadas. 1 Holding both hands 3 are free to the Straight Stitch. Sitúe el borde de la tela justo detrás de la aguja y...los bordes de la tela. USING ATTACHMENTS AND APPLICATIONS / USO DE ACCESORIOS Y APLICACIONES Turn off the machine. 1 Desconecte la alimentación de la máquina. Coloque el pie para dobladillos estrechos y,... a continuación, ajuste el selector de puntadas en la puntada recta. After sewing 2 (3/4 inch) to 3 cm (1 1/8 inch) 8 of the fabric, release the thread and...
Users Manual - English and Spanish
Page 68
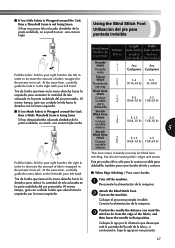
...lo para la costura invisible para dobladillo, también para coser bordes de tela y costuras. ■ When Edge Stitching / Para coser bordes Turn off the machine. 1 Desconecte la alimentación de la máquina. Stitch Name Nombre de la puntada Pattern Dibujo Length Width [mm (inch)] [mm (inch)] Longitud ... fabric to increase the amount of the fabric, and then lower the needle in handy not only for blind hem stitching, but also for sewing fabric edges and seams. Este pie resulta útil no se podrá coser una costura triple Using the Blind Stitch Foot Utilizació...
...lo para la costura invisible para dobladillo, también para coser bordes de tela y costuras. ■ When Edge Stitching / Para coser bordes Turn off the machine. 1 Desconecte la alimentación de la máquina. Stitch Name Nombre de la puntada Pattern Dibujo Length Width [mm (inch)] [mm (inch)] Longitud ... fabric to increase the amount of the fabric, and then lower the needle in handy not only for blind hem stitching, but also for sewing fabric edges and seams. Este pie resulta útil no se podrá coser una costura triple Using the Blind Stitch Foot Utilizació...

Users Manual - English and Spanish
Page 69
...pie y ajuste con cuidado para guiar la tela. Lower the presser foot and begin sewing. 6 Baje el pie prensatela y comience a coser. 1 Screw / Tornillo 2 Guide / Guía ■ When Sewing Seams / Para coser costuras Turn off the machine. 1 Desconecte la alimentación de la máquina. Coloque el pie para puntada... dobladillo utilizando el pie para puntada invisible, gire el tornillo para ajustar la guía al dobladillo. • For more details on the machine. Alinee la guía del pie con la posición de la aguja. Attach the Blind Stitch Foot. 2 Turn on Blind Hem ...
...pie y ajuste con cuidado para guiar la tela. Lower the presser foot and begin sewing. 6 Baje el pie prensatela y comience a coser. 1 Screw / Tornillo 2 Guide / Guía ■ When Sewing Seams / Para coser costuras Turn off the machine. 1 Desconecte la alimentación de la máquina. Coloque el pie para puntada... dobladillo utilizando el pie para puntada invisible, gire el tornillo para ajustar la guía al dobladillo. • For more details on the machine. Alinee la guía del pie con la posición de la aguja. Attach the Blind Stitch Foot. 2 Turn on Blind Hem ...
Users Manual - English and Spanish
Page 73
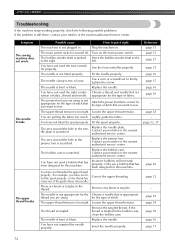
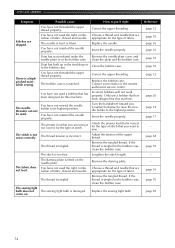
Symptom The sewing machine does not work properly. The main power switch is too tight. You ...used the right combi- come out of stitch. Remove the tangled thread. page 32, 37 - - - Plug the machine in the bobbin case, clean the bobbin case. The needle is bent or blunt. Fit the needle properly. You have ... been designed for the Choose a needle that has been designed for this machine. Contact your retailer or the nearest authorized service center. Use a coin or screwdriver to sew. The upper-thread tension is tangled. Turn on the main power switch....
Symptom The sewing machine does not work properly. The main power switch is too tight. You ...used the right combi- come out of stitch. Remove the tangled thread. page 32, 37 - - - Plug the machine in the bobbin case, clean the bobbin case. The needle is bent or blunt. Fit the needle properly. You have ... been designed for the Choose a needle that has been designed for this machine. Contact your retailer or the nearest authorized service center. Use a coin or screwdriver to sew. The upper-thread tension is tangled. Turn on the main power switch....
Users Manual - English and Spanish
Page 74
... properly. The thread is incorrect. Only use a bobbin that has been designed for this machine. Correct the upper threading. You have not threaded the upper thread properly. Thread the upper thread and wind the bobbin thread properly. Sew with stabiliser material under the fabric. - Replace the presser foot. Replace the bobbin case...
... properly. The thread is incorrect. Only use a bobbin that has been designed for this machine. Correct the upper threading. You have not threaded the upper thread properly. Thread the upper thread and wind the bobbin thread properly. Sew with stabiliser material under the fabric. - Replace the presser foot. Replace the bobbin case...
Users Manual - English and Spanish
Page 75
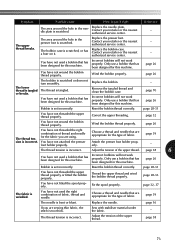
...Attach the presser foot that is fitted on . The stitch is damaged. Remove the darning plate. Replace the sewing light bulb. Reference page 32 page 39 page 16 page 16 page 70 page 70 page 32 - page .... Adjust the tension of stitch that are appropriate for this machine. Remove the tangled thread. The fabric does not feed. The sewing light bulb does not The sewing light bulb is not sewn correctly. The needle is incorrect...are using is tangled. APPENDIX / ANEXO Symptom Possible cause How to sew. The thread is not correct for this machine.
...Attach the presser foot that is fitted on . The stitch is damaged. Remove the darning plate. Replace the sewing light bulb. Reference page 32 page 39 page 16 page 16 page 70 page 70 page 32 - page .... Adjust the tension of stitch that are appropriate for this machine. Remove the tangled thread. The fabric does not feed. The sewing light bulb does not The sewing light bulb is not sewn correctly. The needle is incorrect...are using is tangled. APPENDIX / ANEXO Symptom Possible cause How to sew. The thread is not correct for this machine.


